Can You Bleach Veneer Wood? Yes, But Test First (Safety Guide)
Yes, you can bleach real wood veneer, but the margin for error is about 0.024 inch, the standard thickness of raw face veneer. Strong two-part bleach can lift color, yet oversanding or repeated coats can reach the glue line and the core underneath. This guide covers which bleach suits veneer, what the safety data sheets say about sodium hydroxide and peroxide, and how to test, apply, rinse, and finish without burning through.
Which Bleach Actually Works on Veneer?
BEST TWO-PART BLEACH KIT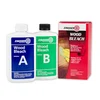 |
Zinsser Wood Bleach Kit, 2-Step Brightening System ($26.30)
|
Not every bleach does the same job. Two-part A/B wood bleach is the only common option that lightens the wood color itself. The others fix specific stains, which is often all a veneer repair needs. Match the product to the problem before you open a bottle.
| Bleach type | What it does | Fit for veneer |
|---|---|---|
| Two-part A/B (sodium hydroxide + hydrogen peroxide) | Lightens and evens the color of bare wood | Works, but it is the harshest choice and is water-based, so keep coats few |
| Oxalic acid | Removes black iron stains from tannin-rich woods and grayed, weathered color (Popular Woodworking) | Good first try for dark water or iron spots |
| Household chlorine bleach | Removes dye-based stains only, does not lighten raw wood white (Popular Woodworking) | Poor fit, and a gas hazard if mixed with other cleaners |
For a black ring or rusty spot, try oxalic acid first. For a whole-surface color change, such as taking a dark stained veneer table to a pale tone, the two-part kit is the realistic route. For a wider look at the two-part method on solid wood, see our guide to using wood bleach.
Why Veneer Is Riskier Than Solid Wood
Solid wood can be sanded back a millimeter or more if a bleach job goes patchy. Veneer cannot. The US industry standard for raw face veneer is 1/42 inch (0.024 inch, about 0.6 mm), and factory sanding can already remove roughly 0.006 to 0.008 inch of that, according to WoodWeb discussions of veneer thickness. Subtracting those figures leaves about 0.016 to 0.018 inch of real wood on some sheets.
| Veneer type | Thickness (from supplier data) | What it means for bleaching |
|---|---|---|
| Raw face veneer | 1/42 in. (0.024 in.) | The real wood layer on nearly every veneered piece |
| 10-mil paper-backed | About 1/30 in. total, 0.022-0.025 in. after sanding | Total includes the paper backer, not extra wood |
| 22-mil paper-backed | About 1/22 in. total, 0.026-0.029 in. after sanding | Sturdier to handle, but the wood layer is still thin |
| Phenolic-backed | About 0.038 in. after sanding | Backer adds stiffness, not extra wood to sand |
| Wood-backed 3-ply | About 1/8 in. total, 0.038 in. after sanding | More material, but the face layer is still veneer |
The figures above come from Oakwood Veneer’s sheet-thickness guide. The backer adds strength, not bleachable, sandable wood, so the working depth is still the face layer. WoodWeb contributors also note that some budget plywood arrives from the store already sanded through the veneer, so inspect the edges and any thin patches before you commit to a wet, chemical process.
Moisture is the second risk. Two-part bleach is an aqueous solution, and WoodWeb posters describe water reaching a veneer’s glue line and weakening it, particularly through the short grain of figured veneers. PVA glue also softens when warm. Use as little liquid as the job needs, and never flood a surface or edge.
Safety First: What the Safety Data Sheets Say
Wood bleach is not a mild household product. The details below come from the manufacturer safety data sheets (SDS) that I read for this guide. Your bottle may be formulated differently, so always read the label and SDS for the exact product you buy.
| Product | What the SDS lists | Keep it away from |
|---|---|---|
| Part A (Klean-Strip, 2010 SDS) | Sodium hydroxide, 3-7%. Corrosive, causes severe eye damage with potential blindness, causes chemical burns to the skin | Acids, halogenated compounds, and aluminum, brass, bronze, copper, lead, tin and zinc (contact with certain metals may produce hydrogen gas) |
| Part B (Klean-Strip, 2010 SDS) | Hydrogen peroxide, 25-30%. Strong oxidizer, causes chemical burns and severe eye damage, and drying on cloth or other combustibles may cause fire | Acids, bases, metals, metal salts, reducing agents, organic materials, flammables |
| Oxalic acid (Fisher lab-grade SDS, over 95%) | Skin corrosion category 1, serious eye damage category 1, harmful if swallowed or in contact with skin. Exposure limit 1 mg/m3 TWA | Strong oxidizers, strong bases, metals. Never combine with A/B bleach |
| Household chlorine bleach (CDC) | Can release chlorine gas if mixed with certain other cleaning products | Every other cleaner: do not mix household cleaners |
Note that the oxalic acid sheet is for a laboratory-grade powder, so a hardware-store wood bleach sold as oxalic acid will differ in strength. The pattern still holds. Oxalic acid and A/B bleach do not belong in the same container, and a rinse between different products is the safe order.
Turn those sheets into working rules:
- Eyes: the Part A sheet recommends chemical splash goggles or a face shield. Safety glasses with open sides are not enough.
- Hands and skin: the sheet lists nitrile rubber, neoprene, natural rubber, butyl rubber and PVC gloves as possibly protective. Choose one for the chemical you are using and discard gloves that are contaminated.
- Air: the sheet says not to use it in basements, bathrooms or other small enclosed areas, to work outdoors when possible, and to stop and leave if you notice dizziness, headache, nausea or eye-watering. It also says a dust mask does not protect against vapors.
- Containers and rags: Part A is incompatible with several metals, so use plastic or glass. Part B drying on cloth may cause fire, so keep used rags wet and dispose of them according to local rules. Never pour unused product back into its original bottle.
- If it goes wrong: both sheets say to flush eyes with water for at least 15 minutes and get medical attention, and not to induce vomiting if swallowed. Keep a bucket of clean water within reach.
Check What You Actually Have Before You Start
Three quick checks save the most grief.
- Is it real wood? Melamine, vinyl and foil wood-look surfaces have no wood fibers to lighten. Look at the edge: a thin real-wood layer over a different core is veneer, while a printed pattern that repeats exactly is not.
- Is it fully bare? Bleach only works on wood with no finish. If the piece is varnished or lacquered, the finish has to be removed first, and stripping is its own risk on thin veneer. Our Citristrip on veneer article covers that step.
- Is the veneer sound? Press along edges and corners. Loose or bubbled veneer and lifted edges will get worse when wet, so repair the bond before bleaching, or skip bleaching.
How to Bleach Veneer Step by Step
Two-part products differ in their order of application, so treat the label as the final word. Popular Woodworking notes that some brands have you apply Part A and then Part B before A dries, while others have you mix both parts just before applying. What follows is the veneer-cautious version of that process.
- Gear up and set up: put on splash goggles, gloves and long sleeves, open windows or work outside, and lay down plastic sheeting under the piece.
- Test first: pick a hidden spot such as the underside of a top or inside a door. Apply the bleach, let it dry, rinse, and check the color and whether the veneer lifts or blisters.
- Apply lightly: use a synthetic-bristle brush or a clean rag, and stay with the grain. Do not let it pool or run over an edge, because raw edges soak up liquid fastest.
- Expect the reaction: Popular Woodworking notes that Part A alone darkens the wood at first, and Part B tends to foam as it reacts. Do not panic when the wood looks darker before it lightens.
- Let it dry completely: Popular Woodworking says this is usually overnight. Do not use heat to speed it up, since heat also softens many veneer glues.
- Rinse the residue: sponge with plenty of clean water and wring the sponge out often so you add as little water as possible. Let the piece dry again fully.
- Judge the color dry: bleached wood looks different wet. If it is still too dark, repeat only after the piece has dried, and stop the moment the veneer feels rough or shows blisters.
- Sand by hand, gently: raised grain may need a light pass with fine paper. Use hand pressure and stop early. On a 0.024 inch layer, a few careless strokes with a power sander can go through.
Common Problems and How to Avoid Them
| Problem | Likely cause | Prevention |
|---|---|---|
| Blisters or lifting veneer | Water reached the glue line, especially at edges | Light coats, no pooling, keep edges dry, dry fully between coats |
| Patchy, uneven color | Old stain or finish left in places, or uneven application | Strip completely, apply in one continuous pass with the grain |
| Sand-through to the core | Heavy sanding on a layer of about 0.024 in. or less | Hand-sand only, fine grit, stop at the first sign of color change |
| White or crusty residue | Bleach or oxalic acid not fully rinsed | Sponge with clean water repeatedly and let the wood dry before finishing |
| Bleach did not lighten | Wrong bleach, finish still present, or pigment stain | Match the bleach to the stain type and re-check that the wood is bare |
Oxalic acid residue is also an inhalation hazard once it dries. Popular Woodworking warns that it makes irritating dust when sanded, so wear a dust mask for that step.
Finishing Bleached Veneer
Bleached veneer is bare, absorbent and often pale, so it needs a finish soon. Test any stain first, because bleached wood can take color unevenly. If you are also dealing with raw edges on a veneered panel, the edge treatment is a separate job, covered in our edge banding staining guide. Choose a thin finish, apply it in light coats, and avoid heat and standing water on the piece afterward, since both attack veneer glues.
Should You Bleach It or Replace It?
If the veneer is already thin, chipped or bubbled, bleaching may cost more than it saves. A bleach job that chews through 0.024 inch of wood cannot be undone. In that case, a stain, a tinted finish, or new veneer is often the safer route. Bleach makes sense when the veneer is sound, the color problem is on the surface, and you have tested a hidden spot.
Frequently Asked Questions
Can you bleach veneer wood safely?
Yes, if it is real wood veneer with the finish fully stripped, you wear splash goggles and chemical-resistant gloves, and you work with strong ventilation. The bigger risk is to the veneer itself: raw face veneer is about 0.024 inch thick, so heavy sanding or repeated coats can reach the glue line. Test on a hidden spot first.
Which bleach is best for veneer wood?
A two-part A/B wood bleach is the option that actually lightens the wood color, while oxalic acid is the gentler choice for iron and tannin stains and gray weathering. Household chlorine bleach removes only dye-based stains and does not lighten raw wood white, so it is a poor fit for veneer.
How long should bleach stay on veneer?
Follow the label on your specific product, because two-part bleaches differ. Popular Woodworking notes the wood is usually left to dry completely, often overnight, before the residue is sponged off with plenty of clean water. Check the hidden test patch first so you know how your veneer responds.
Can you bleach veneer that still has a finish?
No. Bleach needs bare wood, so varnish, lacquer, and wax have to come off first. A Daly’s two-part kit listing states the bleach is intended for bare wood with old finish and stain removed. Stripping a veneer carefully is its own risk, so see the Citristrip on veneer guide.
Can you stain veneer wood after bleaching it?
Yes. Rinse off the residue with clean water, let the veneer dry completely, and test the stain on a hidden spot. Bleached wood can take stain unevenly, so a small test patch matters more than usual on thin veneer.
Conclusion
Veneer can be bleached, but the process has to respect a wood layer of about 0.024 inch and chemicals that the safety data sheets classify as corrosive or oxidizing. Pick the right bleach for the stain, strip the finish, test a hidden patch, keep water to a minimum, and hand-sand lightly. If the test patch blisters or lifts, stop.
Sources read for this article: Klean-Strip Wood Bleach Part A and B SDS, Oakwood Veneer thickness guide, and the CDC chlorine fact sheet.
Sponsored / affiliate links. As an Amazon Associate I earn from qualifying purchases. I may earn additional commission from eligible campaigns.