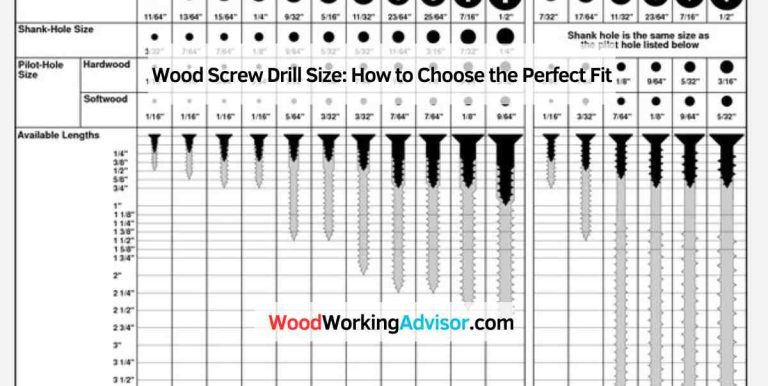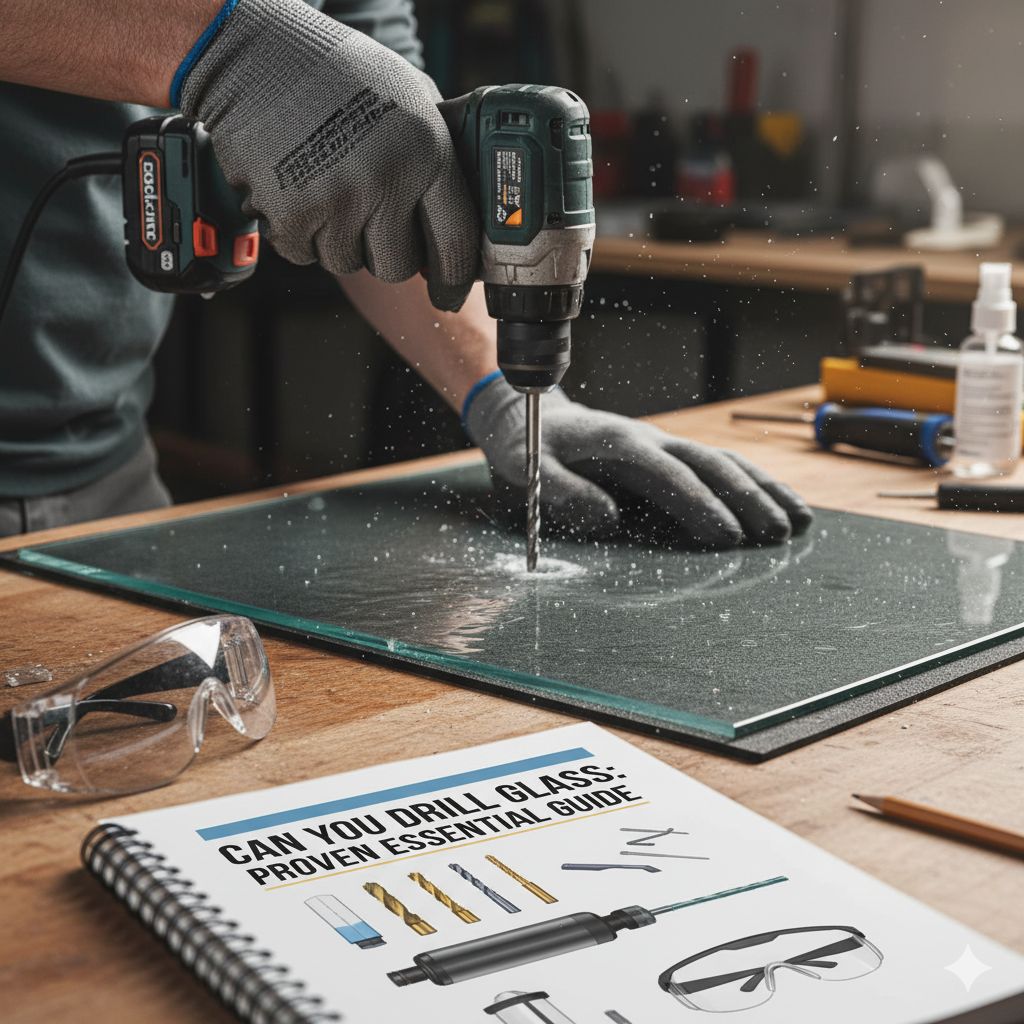
Can You Drill Glass: Proven Essential Guide
Yes, you absolutely can drill glass! With the right tools, technique, and a little patience, drilling clean holes in glass is a very achievable DIY project. This guide will walk you through everything you need to know to do it safely and successfully for your home projects.
Ever looked at a beautiful glass tabletop, a decorative mirror, or even a simple jar and thought, “I wish I could put a hole in that”? Maybe you’re planning a unique lighting fixture, a custom terrarium, or just need to hang something on a glass surface. Many folks hesitate, thinking glass is too fragile or difficult to work with. It’s a common worry, and honestly, it can be a bit intimidating! But don’t let that stop your creativity. With the right approach, you can confidently drill holes in glass, turning ordinary items into something truly special. This guide is designed to make the process clear, safe, and incredibly rewarding. Let’s get those projects started!
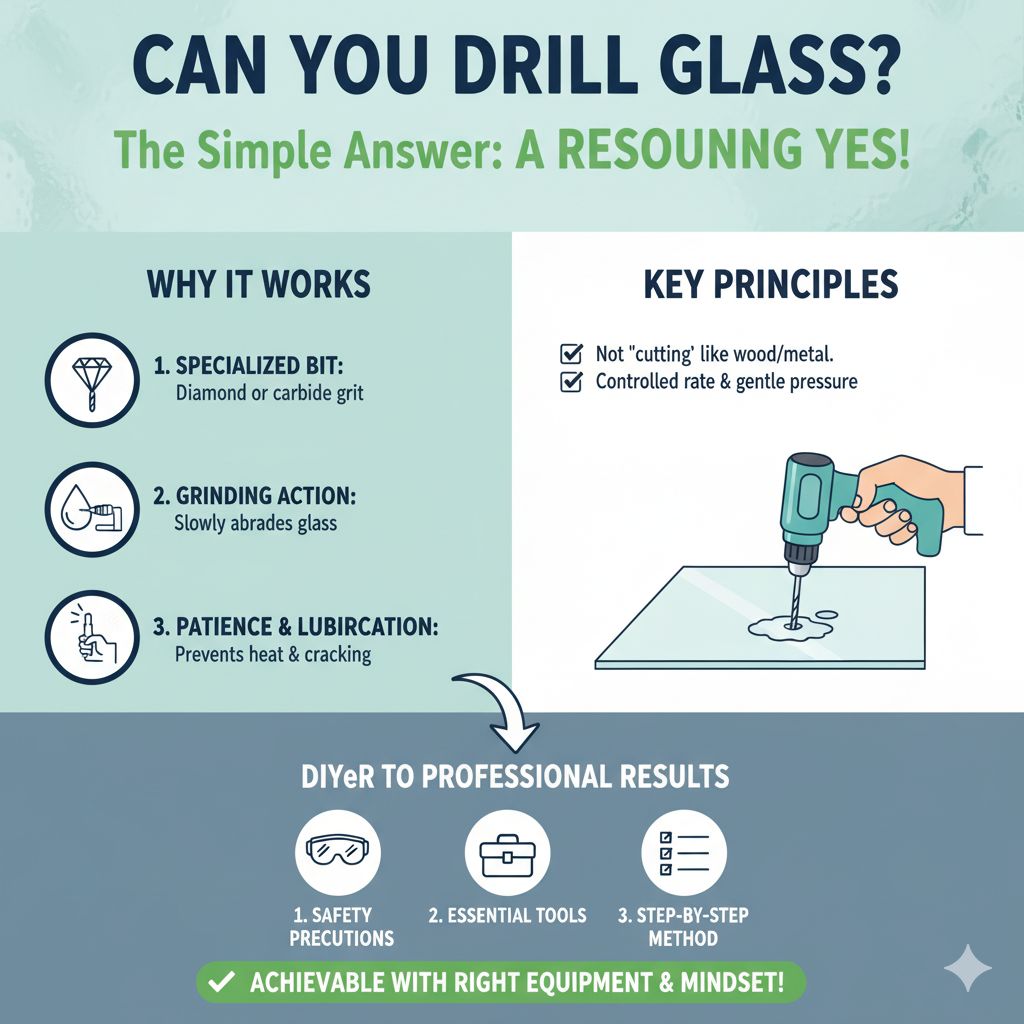
Can You Drill Glass? The Simple Answer & Why It Works
The short answer is a resounding yes! Many people believe glass is impossible to drill, but that’s not the case. The key is understanding that you don’t “cut” glass like you would wood or metal. Instead, you use a specialized bit that grinds or cuts away the glass material at a much slower, controlled rate. This grinding action is what allows you to create holes without shattering the material. It requires a different mindset than traditional drilling, focusing on patience, lubrication, and gentle pressure.
This process is fundamental to how many glass items are manufactured, from windows to intricate art pieces. By understanding the principles behind grinding and using the correct equipment, any DIYer can achieve professional-looking results. We’ll cover the essential tools, safety precautions, and a step-by-step method that makes drilling glass straightforward and successful.
Essential Tools and Materials for Drilling Glass
Before you even think about picking up a drill, gather your supplies. Using the right tools is crucial for safety and for getting that clean hole you’re after. Think of it like preparing your workbench for any project – being well-equipped makes all the difference.
1. The Right Drill
You don’t necessarily need a heavy-duty industrial drill. A standard corded or cordless drill will work just fine. The most important factor here is the ability to control the speed. Look for a drill with a variable speed trigger. Slow speeds are your friend when drilling glass.
- Variable Speed Drill: Essential for controlling the grinding process and preventing overheating.
- Cordless vs. Corded: Either works, but a corded drill might offer more consistent power for longer sessions.
2. Specialized Drill Bits
This is where the magic happens. Standard metal or wood drill bits won’t work and will likely break the glass instantly. You need bits designed specifically for drilling glass and tile.
- Diamond-Tipped Drill Bits: These are the most common and effective. The diamond grit on the tip grinds through the glass. They come in various sizes, measured in inches or millimeters.
- Carbide-Tipped Drill Bits: Also work for glass, especially for thinner pieces, but diamond is generally preferred for consistency and durability.
- Hole Saws (Diamond Cup or Core Bits): For larger diameter holes, a diamond-tipped hole saw is the best option.
For beginners, I recommend starting with a set of diamond-tipped bits in a few common sizes. You can find these at most hardware stores or online.
3. Lubrication is Key!
Drilling glass creates friction and heat, which can crack the glass or dull your bit quickly. Lubrication helps keep things cool and washes away glass dust.
- Water: The simplest and most effective lubricant. You can use a spray bottle or create a dam around your drill site.
- Cutting Fluid/Oil: Specialized cutting fluid can also be used. It’s a bit messier but can provide excellent cooling and lubrication for tougher jobs.
I always keep a spray bottle of water handy. It’s incredibly effective and readily available.
4. Safety Gear – Non-Negotiable!
Working with glass, even when drilling, means dealing with sharp edges and small, flying particles. Safety is paramount. Never skip this step.
- Safety Glasses: Absolutely essential to protect your eyes from flying glass chips.
- Gloves: Thick work gloves will protect your hands from sharp edges, both before and after drilling.
- Long Sleeves and Pants: To protect your skin from any rogue shards.
5. Other Helpful Items
These aren’t strictly mandatory, but they make the process smoother and safer.
- Masking Tape or Painter’s Tape: Helps prevent the drill bit from wandering when you start drilling and provides a slight buffer.
- Template or Jig (Optional): For precise hole placement, especially if drilling multiple holes.
- Container for Water: If you plan to create a water dam.
- Clean Rags: For cleanup.
- Work Surface Protection: A towel or drop cloth to protect your table or floor.
Preparing Your Glass for Drilling
This step is all about making sure your glass is ready and stable. A little preparation goes a long way to ensuring a clean, successful drill.
1. Cleaning the Glass
Start by thoroughly cleaning the area where you’ll be drilling. Any dirt, grease, or debris can interfere with the drilling process or even cause the bit to slip. Use a standard glass cleaner and a clean cloth. Ensure the glass is completely dry before proceeding.
2. Marking the Drill Spot
Use a marker or a fine-tipped pen to mark the exact center of where you want your hole. For added accuracy, you can place a small piece of masking tape over the spot. Then, mark the center of the tape. This trick helps prevent the drill bit from “walking” or skidding across the glass surface when you begin.
3. Securing the Glass
This is critical. The glass must be stable and should not move at all during the drilling process. If it’s a small item, like a jar or a piece of craft glass, secure it firmly to your work surface using clamps or strong tape. If you’re working with a larger piece, like a tabletop, ensure it’s well-supported and won’t flex or shift. A wobbly piece of glass is a recipe for disaster. For larger panes, consider placing them flat on a stable, level surface like a workbench and clamping them down.
4. Creating a Water Dam (for Larger Surfaces)
If you’re drilling into flat glass (like a pane or a tabletop), you’ll want to keep the drilling area cool and lubricated. One effective way is to create a small dam around the drill spot. You can do this by:
- Using plumber’s putty or modeling clay to build a circular wall around your mark.
- Filling this dam gently with water. This water will stay around the drill bit, providing constant cooling and lubrication.
For smaller items, frequently spraying water from a spray bottle directly onto the bit and glass is usually sufficient.
Step-by-Step Guide: Drilling Your Glass
Now that everything is prepped, it’s time to make that hole! Remember, this isn’t about speed; it’s about control and patience.
Step 1: Set Up Your Drill
Insert your chosen diamond-tipped drill bit into your drill’s chuck and tighten it securely. If your drill has an adjustable chuck, make sure it’s snug. Attach a depth stop if you need to control how deep you drill, though for most glass projects, you’re drilling all the way through.
Step 2: Control the Speed
This is perhaps the most important technical step. Set your drill to its lowest speed setting. Many people try to drill glass too fast, thinking it will speed up the process. This is the exact opposite of what you want. Slow, steady speed allows the diamond grit to do its work effectively without generating excessive heat or pressure that can cause cracks. If your drill has a variable speed trigger, feather it gently to maintain a slow RPM. You can find more on drill speed recommendations from resources like Popular Mechanics, which often feature expert tips on DIY tasks.
Step 3: Start Drilling Gently
Begin drilling at a very slow speed. Position the tip of the drill bit directly on your marked spot. Apply just a small amount of downward pressure. Let the bit do the grinding. You’ll start to see dust and slurry forming – this is normal. If you’re using the water dam method, ensure the water level is maintained. If you’re using a spray bottle, periodically spray water onto the bit and the glass.
Important Tip: Initial Angle
Some experts recommend starting the drill bit at a slight angle (around 45 degrees) for the first few seconds. This allows the sides of the diamond bit to establish a small groove before you bring the bit to a perpendicular (90-degree) angle. Once you’ve created a small circular groove, you can then gently bring the drill to a full 90-degree angle relative to the glass surface and continue drilling straight through.
Step 4: Maintain Lubrication and Pressure
Keep the area cool and lubricated throughout the process. If the glass starts to feel hot to the touch, stop immediately and add more water or lubricant. Continue applying light, consistent pressure. Don’t force the drill. If it feels like it’s struggling, ease up on the pressure rather than pushing harder. Patience is crucial here.
Step 5: Drilling Through
As you get close to breaking through to the other side, reduce your pressure even further. This final stage is when cracks are most likely to occur. Slow down significantly and ease the drill through the last bit of glass. Once the hole is complete, carefully withdraw the drill bit while it’s still spinning slowly.
Step 6: Finishing and Cleanup
Once the hole is drilled, carefully remove the tape, if used. You’ll likely have some sharp edges around the hole. You can use a fine-grit sandpaper (wet/dry paper works well here, used wet) or a small grinding stone to gently smooth these edges. Be very careful as the glass is still sharp. Clean the glass thoroughly to remove all glass dust and any residue from your lubricant. Inspect your work – you should have a clean, smooth hole!
Troubleshooting Common Issues
Even with the best preparation, things can sometimes go wrong when drilling glass. Here are a few common problems and how to address them.
Problem: The Drill Bit is Wandering.
- Cause: Not starting on a stable surface or the bit isn’t gripping properly.
- Solution: Ensure the glass is perfectly stable. Use masking tape over the mark to give the bit a better starting point. Start the drill at a slight angle before moving to 90 degrees.
Problem: The Glass Cracks or Shatters.
- Cause: Too much pressure, drilling too fast, insufficient lubrication, or the glass was unevenly heated.
- Solution: This is usually irreversible. In the future, use lighter pressure, slower speeds, and plenty of lubrication. Ensure the glass isn’t stressed or unevenly supported.
Problem: The Drill Bit Isn’t Cutting.
- Cause: The bit is dull, or you’re not applying enough (gentle) pressure. It could also be that your drill speed is too high.
- Solution: Ensure you are using a diamond-tipped bit designed for glass. If it’s an older bit, it might be worn out. Increase speed slightly (but still slow!) and apply a bit more firm, consistent pressure.
Problem: The Hole Isn’t Smooth.
- Cause: Inconsistent drilling speed, heat buildup, or not clearing away glass dust effectively.
- Solution: Slow down and maintain consistent lubrication. Go back with fine-grit wet/dry sandpaper or a Dremel grinding stone to smooth the edges.
Types of Glass and Considerations
Not all glass is created equal. Some types are easier to drill than others. Knowing your glass can help you adjust your technique.
Tempered Glass: This is glass that has been heat-treated for increased strength. Once tempered, it cannot be cut or drilled. Any attempt to drill tempered glass will cause it to shatter into thousands of small, relatively dull pieces. So, if your glass is tempered (often found in shower doors, car windows, or oven doors), you cannot drill it. You would need to replace the pane with a non-tempered piece if drilling is required.
Annealed Glass: This is standard, non-tempered glass used in most windows, picture frames, and craft projects. This is the type you’ll be drilling. It’s more forgiving but can still crack if treated improperly.
Laminated Glass: This is two layers of glass with a plastic layer in between (like most car windshields). Drilling through laminated glass is possible but requires more effort as you’re essentially drilling through glass, plastic, and then more glass. Ensure you have a robust diamond bit.
Cast Acrylic (Not Glass, but Often Confused): If you’re working with acrylic “glass,” its requirements are different. Standard drill bits can often work on acrylic, but it melts easily. Always drill acrylic at a low speed with minimal pressure. This article specifically addresses drilling actual glass, not acrylic plastics.
Safety First: A Recap
I can’t stress this enough: safety is paramount when working with glass. Here’s a quick recap of the crucial safety points:
- Eye Protection: Always wear safety glasses.
- Hand Protection: Wear sturdy gloves to protect against sharp edges.
- Body Protection: Cover up with long sleeves and pants.
- Stable Surface: Ensure the glass and your work area are secure.
- Proper Tools: Use diamond-tipped bits and a variable speed drill.
- Lubrication: Keep the drilling area cool and clean with water or cutting fluid.
Following these guidelines will ensure a safe and successful drilling experience. Resources like the CDC’s home safety guidelines emphasize using the right tools and taking precautions for DIY projects.
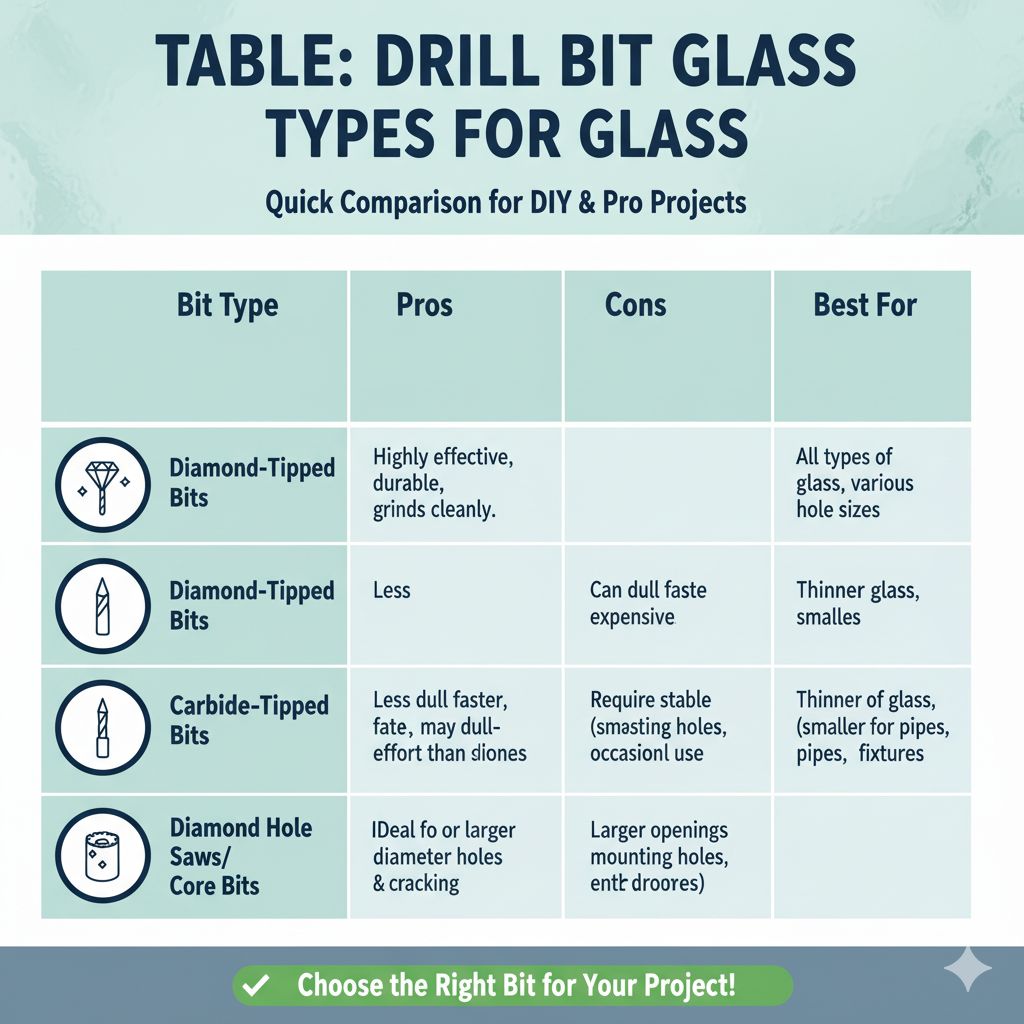
Table: Drill Bit Types for Glass
Here’s a quick comparison of drill bits you might encounter when considering drilling glass.
| Bit Type | Pros | Cons | Best For |
|---|---|---|---|
| Diamond-Tipped Bits | Highly effective, durable, grinds cleanly | Can be more expensive | All types of glass, various hole sizes |
| Carbide-Tipped Bits | Less expensive | Can dull faster, may require more effort than diamond | Thinner glass, smaller holes, occasional use |
| Diamond Hole Saws/Core Bits | Ideal for larger diameter holes | Require stable mounting, can be slower | Larger openings (e.g., for pipes, fixtures) |
FAQ: Can You Drill Glass?
Q1: Is it dangerous to drill glass at home?
A1: It can be if you don’t take proper safety precautions. Always wear safety glasses, gloves, and protective clothing. Ensure the glass is stable and use the right tools and techniques to minimize the risk of breakage or injury.
Q2: What is the best drill bit to use for glass?
A2: Diamond-tipped drill bits are the most recommended and effective for drilling glass. They are designed to grind through the material without shattering it. Carbide-tipped bits can work for thinner glass but are less durable.
Q3: How do I stop glass from breaking when drilling?
A3: The key is slow speed, gentle pressure, and consistent lubrication (usually water). Avoid forcing the drill. Start at a slight angle and keep the glass stable. For additional support, you can try placing a piece of wood underneath the glass for it to sit on.
Q4: Can I use my regular drill for drilling glass?
A4: Yes, as long as it has a variable speed setting. You’ll want to use the lowest speed possible. A powerful drill isn’t necessary; control over speed is far more important.