Custom Wood Burning Stamps: How To Make Your Own
Making your own wood burning stamps can seem like a big project. You might see beautiful custom stamps online. They look so professional.
If you enjoy working with natural wood for outdoor and survival projects, our guide on how to make a spear out of wood walks through shaft selection, tip carving, and hardening — all with hand tools.
You wonder if you can make something similar at home. Maybe you want to add a special touch to your crafts. Or perhaps you need a unique logo for your small business.
It’s easy to feel a bit lost at the start. This guide will break it down for you. We will walk through it step by step.
You can create amazing wood burning stamps with a little know-how. Let’s get started on this creative journey.
Creating custom wood burning stamps involves choosing the right materials, understanding the burning process, and focusing on safety. It allows for unique artistic and branding applications by transferring designs onto wood surfaces using heat. This guide details the steps and considerations for making your own.
What Are Custom Wood Burning Stamps?
Custom wood burning stamps are tools you make yourself. They have a design carved into their surface. You heat up this design.
Then, you press it onto wood. This leaves a burnt image. It’s like a wood brand.
But it’s for smaller crafts. You can use them for art projects. They are great for personalizing gifts.
Small businesses use them for branding. Think of a baker stamping their logo on cookies. Or an artist signing their work on wood pieces.
They are a way to make things look special. They add a unique, handmade feel.
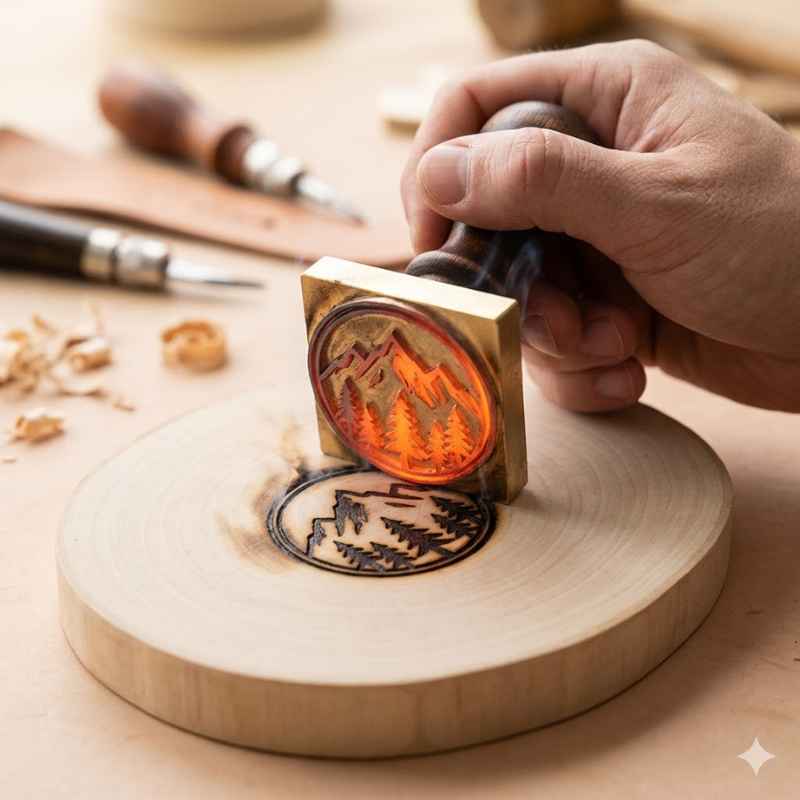
The magic is in the heat. A special tool heats up the stamp’s design. This heat transfers the design onto the wood.
It creates a permanent mark. The depth of the burn depends on heat and time. Different woods react differently too.
Some are soft and burn easily. Others are harder and need more heat.
Making your own gives you total control. You can choose any design you like. Simple shapes work best.
Intricate details can be hard to burn clearly. Letters, simple logos, or geometric patterns are good starting points. It’s a fun way to express your creativity.
You can make a whole set of custom stamps. Each one can have a different image.
My First Attempt at a Custom Stamp
I remember my first time trying to make a wood burning stamp. It was for my sister’s wedding favors. I wanted to put a simple heart shape on small wooden coasters.
I found a piece of scrap wood. It was a nice, smooth hardwood. I thought, “How hard can this be?” I grabbed a wood carving knife.
I started trying to carve out the heart. Well, my knife wasn’t sharp enough. The wood kept splintering.
It looked jagged and rough. I felt a wave of frustration. This wasn’t looking like the elegant heart I imagined.
Then I remembered I had a small wood burning tool. It came with a few tips. One tip was like a tiny chisel.
I decided to try that. I heated it up. Carefully, I started tracing the heart shape I’d drawn.
The smell of burning wood filled my small workshop. It was a comforting, familiar scent. But I was still nervous.
I didn’t want to mess this up. I held my breath. Slowly, I moved the hot tip.
The wood darkened. It started to form the shape. It wasn’t perfect, not like a machine made it.
But it was mine. It had a rustic charm. I felt a surge of relief and pride.
The final coasters looked so special. My sister loved them. That experience taught me a lot.
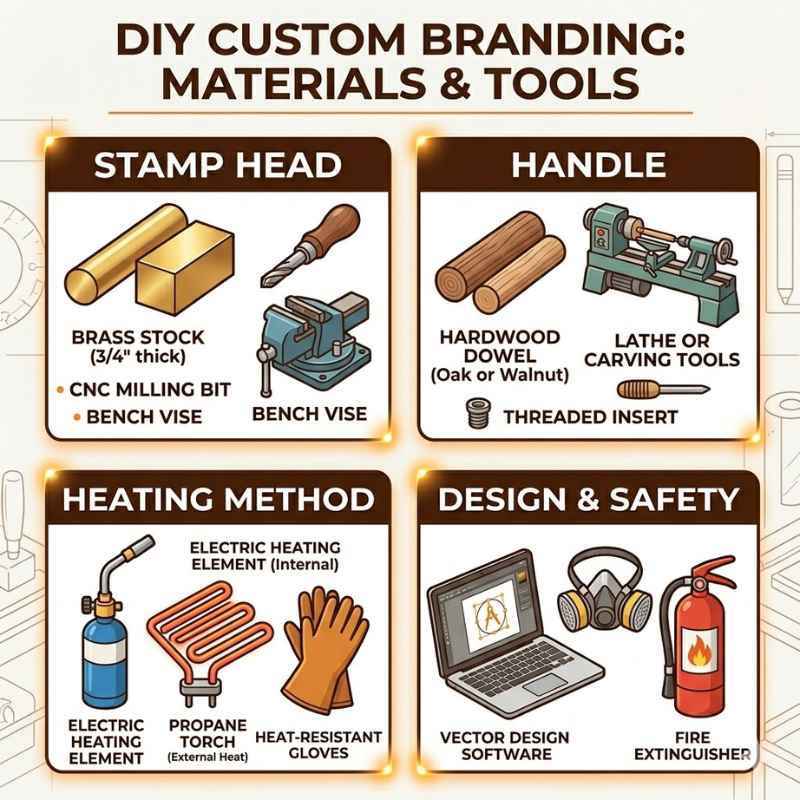
Choosing Your Stamp Material
The material for your stamp is very important. It needs to handle heat well. It should also be easy to shape.
Wood is the most common choice. But not just any wood will do. Hardwoods are best.
They hold detail well. They also don’t burn up too quickly. Think of maple, cherry, or walnut.
These woods are dense. They resist warping from heat. Softwoods like pine can burn too fast.
They might char unevenly. You might also get smoke. Avoid plywood.
The layers can separate with heat.
You can also use metal. Brass or copper are good options. They conduct heat very well.
This means they heat up fast. They also hold heat for a good amount of time. Metal can be harder to shape at home.
You might need special tools. Some people use metal plumbing caps or fittings. You can engrave these.
Or you can attach a metal plate with your design to a wooden handle.
Another option is dense rubber. Some crafting rubbers can withstand moderate heat. You would need to carve your design into this.
It’s softer than wood or metal. This might make carving easier. But it might not give as crisp a burn.
It could also melt if it gets too hot.
For beginners, a nice hardwood block is a great start. Look for a piece that is about 1-2 inches thick. This gives you enough material.
It also makes a comfortable handle. The size depends on your design. A 2×2 inch block is a good general size.
You can always cut it down later.
Stamp Material Pros and Cons
Hardwood (Maple, Cherry)
Pros: Holds detail well, good heat resistance, easy to carve.
Metal (Brass, Copper)
Pros: Excellent heat conductivity, durable, very crisp burns.
Dense Rubber
Pros: Easier to carve than metal, can be good for softer burns.
Softwood (Pine)
Pros: Easy to find. Cons: Burns unevenly, chars easily, not recommended for detail.
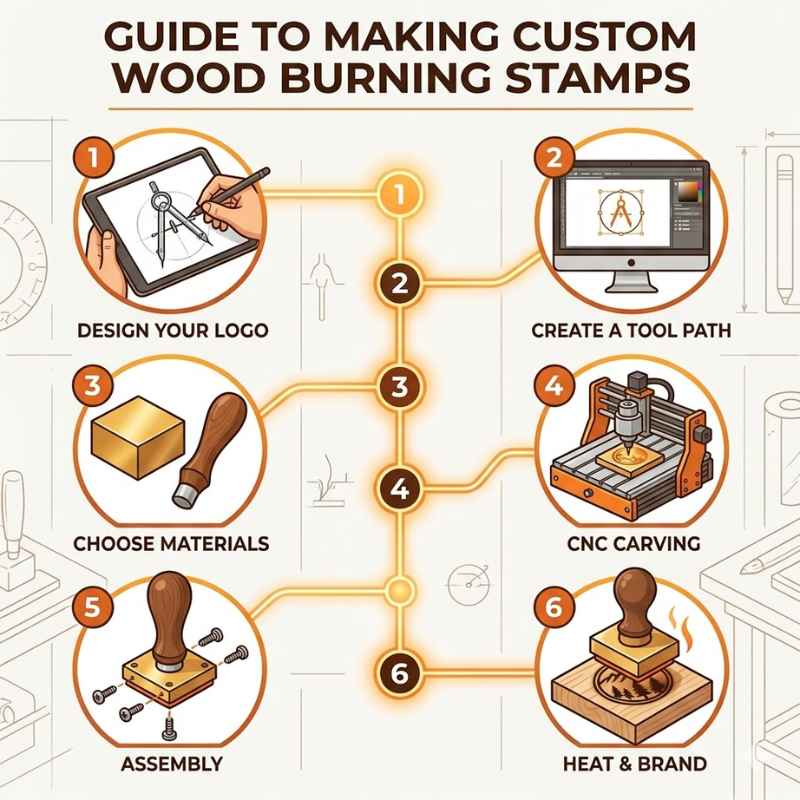
Designing Your Stamp
The design is the heart of your stamp. Keep it simple to start. Think about what will look good burned.
Lines that are too thin might disappear. Large solid areas can burn too dark. Small, intricate details are hard to carve.
They can also burn unevenly.
Good designs include:
- Simple letters or numbers.
- Basic shapes like stars, hearts, or circles.
- Line art with clean, bold lines.
- Small, simple logos.
Before you carve, draw your design. You can draw it directly on the wood. Or you can print it out.
Then trace it. A pencil works well. Make sure your lines are clear.
You want to see your design easily.
Consider the size. Your design needs to fit on your stamp material. It also needs to be readable on the wood you will be stamping.
Test your design on scrap wood. See how it burns. This is very important.
You might need to adjust the lines. You might need to simplify it further.
Think about mirror imaging. If you are stamping text, you will need to carve it backward. This is called mirror writing.
Most word processing programs have a mirror text function. Or you can draw it backward by hand. It takes practice.
Imagine looking at your design through a mirror. That’s how you need to draw it onto the stamp.
Design Tips for Beginners
- Start Simple: Choose basic shapes or bold letters.
- Bold Lines: Use clear, thick lines that will show up well.
- Avoid Tiny Details: Small dots or thin lines can burn away or be unclear.
- Mirror Text: If using words, draw or print them backward.
- Test First: Always test your design on scrap wood before making the final stamp.
- Consider Negative Space: The areas you remove are as important as the design itself.
Tools You Will Need
You don’t need a huge workshop. A few basic tools will get you started.
- Stamp Material: A block of hardwood is ideal.
- Wood Carving Tools: A set with different blades is useful. A small V-tool or gouge works well for lines. A small knife for detail.
- Pencil: For drawing your design.
- Sandpaper: Fine grit (150-220) to smooth the wood.
- Wood Burning Tool (Pyrography Pen): This is essential. Get one with various tips. A fine point tip and a small chisel tip are very helpful for stamps.
- Heat-Resistant Surface: A tile or metal plate to rest the hot tool on.
- Safety Glasses: Always protect your eyes.
- Gloves: Heat-resistant gloves can prevent burns.
- Optional: Clamps to hold your wood steady while carving. A small vise can also help.
Make sure your wood burning tool is good quality. Cheap ones can overheat. They might not get hot enough.
They can also have inconsistent heat. This makes burning your design difficult. The tips should be easy to change.
You want to be able to switch them out safely.
For carving, start with a sharp knife. A dull knife is dangerous. It can slip easily.
It will also make your work much harder. You can sharpen them yourself. Or buy a simple sharpening stone.
A small set of carving gouges or V-tools is a good investment. They allow you to remove wood cleanly.
The Carving Process
This is where your design comes to life. Start by preparing your wood. Sand it very smooth.
This helps the carving tool glide. It also makes the final burn cleaner. Your wood should feel silky.
No rough spots at all.
Transfer your design. You can draw it freehand. Or use carbon paper to trace it.
Make sure the lines are dark. You need to see them clearly while carving.
Now, the carving. Use your wood carving tools. If you are using a V-tool, make shallow cuts first.
Follow your lines precisely. Remove small pieces of wood at a time. It’s better to take too little wood away.
You can always go back and remove more. It’s hard to put wood back.
If you are using a knife, use a slicing motion. Keep the blade angled. Don’t try to force the knife.
Let the sharp edge do the work. Work with the grain of the wood when you can. This makes carving smoother.
You are carving away the wood that you don’t want to burn. So the design you see carved out is what will be left to burn. Think of it like a relief carving.
The raised part is your design. The carved-out parts are the background.
After carving, sand the carved areas lightly. Use a fine grit sandpaper. Be careful not to sand away your design.
This smooths out any rough edges. It prepares the surface for burning. You want a clean surface for the heat.
This part takes patience. Don’t rush it. Enjoy the process of shaping the wood.
It’s like sculpting. You are bringing your idea into a physical form.
Carving Safety First
- Sharp Tools: Always use sharp carving tools.
- Cut Away: Always cut away from your body.
- Stable Workpiece: Secure your wood with clamps or a vise.
- Good Lighting: Make sure you can see your work clearly.
- Take Breaks: Don’t carve for too long without a rest.
The Wood Burning Step
This is the most exciting part. Get your wood burning tool ready. Make sure you have the right tip attached.
A fine point or a small chisel tip works well. Heat it up according to the tool’s instructions. This usually takes a few minutes.
Place your stamp on a heat-resistant surface. Never leave a hot tool unattended. Have your scrap wood nearby for testing.
This is crucial. You need to figure out the right temperature and time.
Touch the hot tip to the design on your stamp. Apply gentle, even pressure. Move the tool slowly.
You want to burn the raised design. The areas you carved away should remain unburnt. This creates the contrast.
Test, test, test! Press the hot stamp onto your scrap wood. How dark is the mark? Is it too light?
Too dark? Does it look clear? If it’s too light, you need more heat or more time.
If it’s too dark, reduce the heat or time. You might need to adjust the pressure too.
Each wood type will react differently. Each burning tool has its own heat output. Finding the sweet spot takes experimentation.
Once you find the right setting, you can burn your stamp. You might need to reheat the stamp between impressions. Some tools can do this easily.
Others require a short break.
Be careful not to burn too deep. This can damage the stamp. It can also make the design fuzzy.
You want clean, sharp lines. The heat should be just enough to char the wood surface of the design. The carved areas will be the color of the original wood.
If you get smoke, your tool might be too hot. Or the wood might be scorching. Try a lower temperature.
Ensure good ventilation. You don’t want to breathe in too much smoke.
Burning Tips for Crisp Results
- Preheat Properly: Ensure the tool is fully heated.
- Gentle Pressure: Don’t push too hard. Let the heat do the work.
- Steady Hand: Keep your hand very still during the burn.
- Even Heating: Try to heat the entire design evenly.
- Work in Sections: If your design is large, burn it in sections.
- Cool Down: Let the stamp cool completely before storing.
Safety First: Wood Burning and Carving
Safety is paramount with these tools. Both carving and burning involve sharp objects and heat. You must be careful.
Always work in a well-ventilated area. Wood smoke can be irritating. It’s best to have fresh air circulating.
Open a window or use a fan.
Wear safety glasses. Wood chips can fly when carving. The hot tool can also cause sparks.
Eye protection is non-negotiable. Consider wearing a dust mask when sanding or carving.
Use heat-resistant gloves. This is especially important when handling the hot wood burning tool. It protects you from accidental burns.
Keep a safe distance between yourself and the hot tip. Don’t touch it. Ever.
When carving, always cut away from yourself. Make sure your workpiece is secure. A slipping knife can cause serious injury.
Don’t let your fingers get in the path of the blade.
Your wood burning tool will get very hot. Have a designated spot for it. A ceramic tile or a metal tray works well.
Keep it there when you are not actively using it. Never lay it on a flammable surface like paper or fabric.
Unplug your wood burning tool when you are finished. Let it cool down completely before you store it. This can take 15-20 minutes.
Store tools safely. Keep them out of reach of children and pets.
Understand the materials you are using. Some woods produce more smoke than others. If you are using metal, it can get extremely hot.
Be aware of the properties of your chosen material.
If you are new to wood burning, read the manual for your tool. Follow all manufacturer guidelines. They are there to help you stay safe.
A little caution goes a long way. It ensures you can enjoy your crafting without injuries.
This process is generally safe for home use. But awareness is key. Treat the tools with respect.
Your well-being is more important than any project.
Testing Your Custom Stamp
You’ve carved your design. You’ve burned it. Now, the moment of truth.
You need to test your stamp. Find a piece of scrap wood. This should be similar to the wood you plan to stamp on.
If you’re stamping pine, test on pine. If it’s oak, test on oak.
Heat your wood burning tool. Adjust the temperature if needed. You want the design on your stamp to get hot.
Press the stamp onto the scrap wood. Hold it there for a few seconds. The time depends on the heat.
And the wood you are using.
Lift the stamp. Look at the imprint. Is it clear?
Is it the right shade of brown?
- Too Light? Increase the heat or time.
- Too Dark? Decrease the heat or time.
- Blurry? Your carving might not be deep enough. Or the heat is too high.
- Uneven? The heat might not be reaching all parts of the design evenly.
You will likely need to do several tests. Adjust your heat settings. Adjust your pressure.
Adjust how long you hold the stamp down. This is how you dial in the perfect burn.
Once you get a good impression, use that setting. You can then apply it to your actual project. Keep notes of your settings.
This helps for future stamps. You can remember what worked best for certain woods.
Consider the wood you are stamping on. Porous woods will absorb the burn differently. Harder woods might need more heat.
Always test on the same type of wood you’ll be using for your project. This ensures consistent results. It saves you from ruining your finished piece.
Applying Your Stamp to Projects
Now for the fun part. You have your finished custom stamp. You’ve tested it.
You know what settings work. It’s time to add that personal touch to your projects.
Make sure your project piece is clean and smooth. Any dust or debris can affect the imprint. Ensure your stamp is clean too.
Sometimes bits of wood can stick to it. Gently brush them off when cool.
Heat your wood burning tool to your tested setting. Hold the stamp handle firmly. Place the design onto your project surface.
Apply steady, even pressure. The amount of time needed will be similar to your test burns.
Lift the stamp carefully. You should see your custom design burned into the wood. For multiple impressions, you may need to reheat the stamp.
Or you might find that it holds heat long enough for a few stamps.
If you are stamping a logo or signature, practice placement. Measure carefully. Make sure it’s straight.
A crooked stamp can distract from the item. Sometimes a small jig or guide can help with placement. This is especially true for consistent branding.
For items that will be handled a lot, like wooden spoons, you might want to seal the burn. A food-safe oil or wax can protect the wood. It also helps the burned design last longer.
For decorative items, a clear varnish or sealer can be used.
What kind of projects can you use these stamps on?
- Wooden coasters
- Cutting boards (use food-safe sealants)
- Wooden toys
- Art pieces and sculptures
- Personalized gift tags
- Branding on handmade furniture
- Decorations for parties or weddings
- Leather goods (some stamps work on leather too!)
The possibilities are vast. Each stamped piece becomes unique. It carries a piece of your own creativity.
It shows that extra effort was put in. That’s what makes handmade special.
Project Ideas Using Custom Stamps
Personalized Gifts
Add initials or small icons to wooden gifts.
Branding
Stamp your business logo on crafts or packaging.
Artistic Signatures
Create a unique signature mark for your artwork.
Home Decor
Add patterns to wooden signs or picture frames.
Event Favors
Customize wedding or party favors with themed stamps.
Craft Kits
Include custom stamps as part of a craft kit.
Troubleshooting Common Issues
Even with practice, you might run into problems. Don’t get discouraged. Most issues are fixable.
Or they can be avoided next time.
Issue: The burn is too light.
- Reason: Not enough heat, or not enough time.
- Fix: Increase the temperature of your wood burning tool. Hold the stamp on the wood longer. Make sure the stamp itself is hot enough.
Issue: The burn is too dark or charred.
- Reason: Too much heat, or held on for too long.
- Fix: Lower the temperature of your tool. Reduce the time you hold the stamp down. You might need to sand off a light char. But be careful not to remove your design.
Issue: The design is blurry or smudged.
- Reason: Carving wasn’t deep enough. Or the heat is too high and spreading.
- Fix: Carve your design a bit deeper next time. Ensure your tool tip is clean. Try a slightly lower temperature. Make sure the stamp is pressed straight down and not wiggled.
Issue: The wood splinters or burns unevenly.
- Reason: Using the wrong type of wood. Or wood with a difficult grain.
- Fix: Switch to a hardwood like maple or cherry. Ensure your carving tools are sharp. Test your settings on scrap wood first.
Issue: The stamp itself is burning up.
- Reason: The heat is too high for the stamp material. Or it’s being held too long.
- Fix: Lower the temperature. Reduce the time. If using wood, try a denser hardwood. If using metal, this is less likely unless the heat is extreme.
Issue: The stamp leaves smoke.
- Reason: The material is scorching. This means it’s too hot.
- Fix: Lower the temperature. Ensure good ventilation. The smoke might be from the wood you are stamping on if it’s soft.
Remember, practice makes perfect. Every stamp you make will teach you something. Learn from mistakes.
Adjust your process. You’ll get better with each attempt. The goal is a clear, defined imprint that you love.
Maintaining Your Custom Stamps
Taking care of your custom stamps will make them last. It also keeps them working well. After you finish using a stamp, let it cool down.
This is important. Don’t try to clean or store a hot stamp. Wait until it’s cool to the touch.
Once cool, brush off any loose wood debris. A stiff brush works well. You can also use a small vacuum attachment.
Make sure it’s completely clean. Small particles can interfere with the next burn. They can also cause uneven heating.
Inspect the stamp for damage. Are there any deep gouges? Is the design still sharp?
Minor wear is normal. But major damage might mean it’s time to retire it. Or try to repair it if possible.
Store your stamps properly. Keep them in a dry place. A small box or a drawer works.
Avoid places with high humidity. Moisture can cause wood to warp. This will ruin your stamp.
If you used metal stamps, they won’t warp from moisture. But they can get dirty. You can clean metal stamps with a fine steel wool or metal polish.
This will keep the surface smooth for better heat transfer.
For wooden stamps, you can apply a light coat of mineral oil. This can help protect the wood. It can prevent drying out.
Use a very small amount. You don’t want to soak the wood. This is more for long-term storage.
If the carving gets dull or the design gets fuzzy over time, you might be able to refresh it. Lightly sand the surface of the design. Or carefully re-carve the edges.
This is a more advanced step. It depends on the stamp’s construction.
Proper care means your custom stamps will be reliable. They’ll be ready when you need them. This investment in care pays off.
It ensures many years of unique creations. It keeps your personal touch consistent.
What This Means for You
Creating your own custom wood burning stamps means unlocking new levels of personalization. You can move beyond generic designs. You can add your unique mark to everything you make.
It’s empowering. It allows for a deeper connection to your craft.
For artists and makers, this is a way to sign your work. It’s a signature that is part of the piece. It adds value and authenticity.
For small businesses, it’s a professional branding tool. It makes your products stand out. It creates a memorable impression.
This skill is also rewarding. The process of carving and burning is mindful. It can be very satisfying.
Seeing your design come to life is a joy. It doesn’t require expensive, specialized equipment. Most items can be found at craft stores or online.
It also means you can adapt. Need a stamp for a holiday? Make one.
Need a special symbol for a project? Create it. Your stamp collection can grow with your needs.
It’s a flexible solution for adding a custom touch.
You gain a better understanding of materials. You learn about heat transfer. You develop your carving skills.
It’s a learning experience that branches out. The final stamps are not just tools. They are expressions of your creativity and effort.
Quick Tips for Your Custom Stamp Journey
Here are some quick takeaways. Keep these in mind as you create.
- Start Simple: Don’t try complex designs first.
- Sharp Tools: Crucial for clean carving.
- Test Everything: Wood, heat, time. Test before your final project.
- Safety First: Always wear safety glasses and work in a ventilated space.
- Patience: Carving and burning take time. Enjoy the process.
- Clean Up: Keep your stamps clean for best results.
- Store Properly: Protect your stamps from moisture and damage.
- Have Fun: This is a creative outlet!
Frequently Asked Questions
What is the best type of wood for making a stamp?
Hardwoods like maple, cherry, or walnut are best. They are dense, hold detail well, and resist warping from heat. Softwoods like pine tend to burn unevenly and are not recommended.
Can I use a regular soldering iron instead of a wood burning tool?
You can try, but a dedicated wood burning tool is much better. It has interchangeable tips designed for different effects and offers more temperature control. A soldering iron might get too hot or not hot enough consistently.
How deep do I need to carve the design?
You only need to carve deep enough to create a clear separation between the design you want to burn and the background. Usually, 1/8 inch to 1/4 inch is sufficient, depending on your tools and wood.
How do I make sure my text stamp is readable?
You must carve the text in reverse (mirror image). Most word processing software has a mirror text function. Draw or print your text backward onto the wood before carving.
Can I use my custom stamp on materials other than wood?
Some custom stamps can be used on leather. The process is similar, often using lower heat and specific leather conditioning. For other materials like fabric, different stamping methods are usually required.
How do I clean my custom wood burning stamp after use?
Once the stamp is completely cool, brush off any loose wood debris with a stiff brush. Ensure the surface is clean and free of dust or char bits before storing or reusing.
What happens if my stamp gets too hot?
If the stamp gets too hot, the wood can char excessively, leading to smoke and a fuzzy imprint. It might also damage the stamp itself. Reduce the heat setting on your tool or let the stamp cool down for a short period.
Bringing Your Designs to Life
Making custom wood burning stamps is a journey. It’s one filled with creativity and a touch of magic. You learn to shape wood with your hands.
You learn to use heat to leave your mark. It’s a skill that opens up so many possibilities. From personal gifts to professional branding, your unique designs can now be permanently etched.
Remember the steps: choose your material wisely, design with clarity, carve with care, and burn with patience. Safety is always key. And never forget to test.
Each stamp you create will be a testament to your effort and artistry. Enjoy this wonderful craft!