How Do You Lacquer Wood: Essential Guide
Quick Summary: Lacquering wood involves applying a clear, protective finish for beauty and durability. Start with proper wood preparation, then apply thin, even coats of lacquer using a brush, spray, or cloth, allowing ample drying time between layers for a smooth, professional result.
Woodworking projects, big or small, deserve a finish that protects them and makes them shine. Lacquer is a fantastic choice for beginners! It dries fast and gives a tough, beautiful coating. But sometimes, the thought of applying a lacquer finish can seem a little daunting. Don’t worry! With the right steps and a little patience, you can achieve a stunning, professional-looking finish on your wooden creations. This guide will walk you through exactly how to lacquer wood, step-by-step, so you can confidently tackle your next project.
Why Choose Lacquer for Your Wood Project?
When you’re looking for a wood finish, you’ll find many options. Lacquer stands out for several good reasons, especially for those just starting out. Its quick drying time means you can apply multiple coats in a single day, moving your project along much faster than with oil-based finishes. This is a huge plus when you’re eager to see your work come to life!
Beyond speed, lacquer provides a really durable surface. It resists moisture and scratches, keeping your wood looking its best for years. Plus, when applied correctly, it dries to a hard, smooth film that can be buffed to a high sheen, giving your projects that professional, showroom quality. It’s a finish that’s both practical and beautiful.
Understanding Different Types of Lacquer
Just like with paint, there are a few types of lacquer you might encounter. Knowing the basics helps you pick the right one for your project and needs.
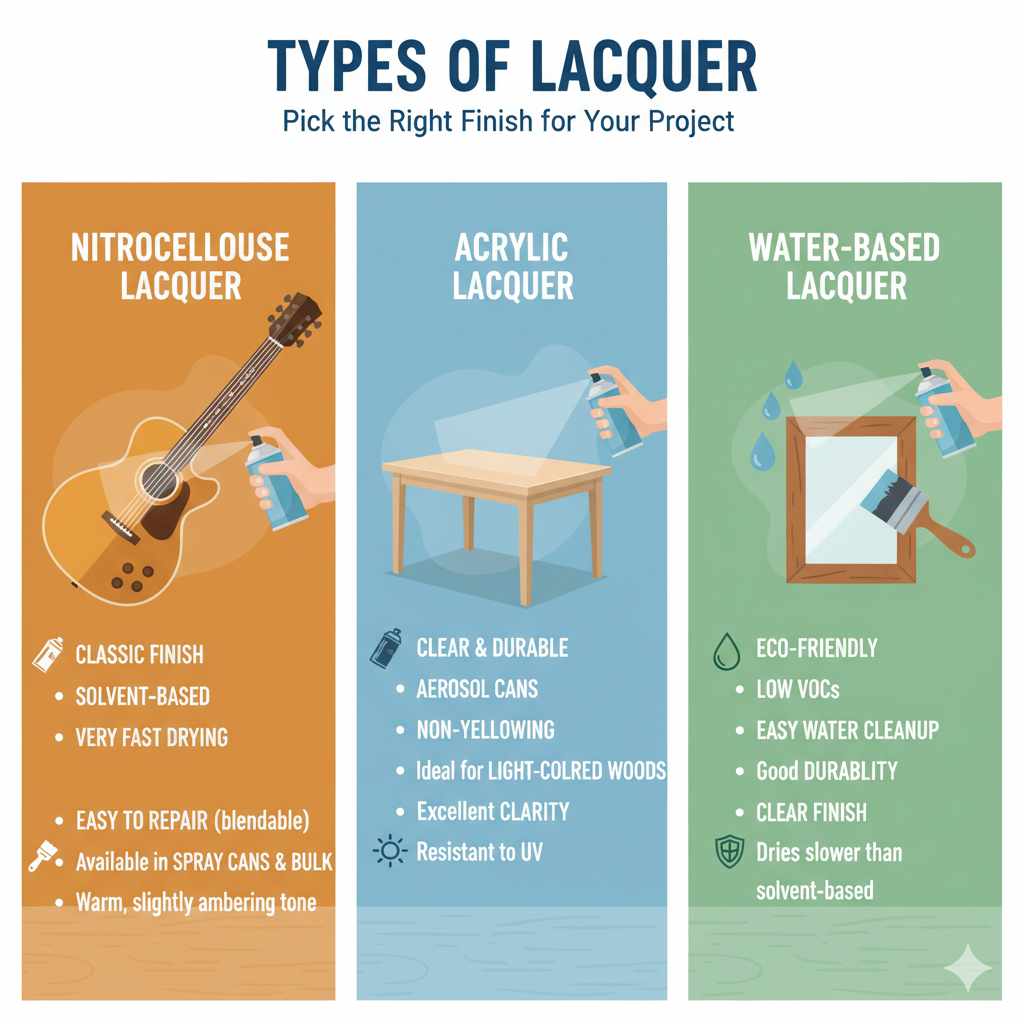
- Nitrocellulose Lacquer: This is the classic lacquer. It’s a solvent-based finish that dries very quickly and is easy to repair. If you scratch a spot, you can often dissolve the surrounding lacquer with lacquer thinner and blend in a new coat. It’s available in spray cans and bulk.
- Acrylic Lacquer: Often found in aerosol cans, acrylic lacquer is a good choice for spraying. It’s known for its clarity and durability. It doesn’t yellow over time like some other finishes, making it great for light-colored woods or projects where color stability is important.
- Water-Based Lacquer: This type is more environmentally friendly, with lower VOCs (Volatile Organic Compounds). It cleans up easily with water, which is a big advantage. While it doesn’t dry quite as fast as solvent-based lacquers, it still offers good durability and a clear finish.
Essential Tools and Materials for Lacquering Wood
Getting the right gear ready before you start is key to a smooth process. Here’s what you’ll need to have on hand to lacquer your wood effectively and safely.
Workspace Preparation
Your workspace makes a big difference. You want a place where you can work without dust and with good ventilation. Lacquer fumes can be strong, so safety is paramount.
- Ventilation: Always work in a well-ventilated area. Open windows and doors, or even better, use a fan to push air out of the space. Consider a respirator mask designed for organic vapors. You can find safety guidelines for working with finishes from the Occupational Safety and Health Administration (OSHA).
- Dust Control: Dust is the enemy of a smooth finish. If possible, work in a room where there isn’t a lot of activity kicking up dust. Wiping surfaces with a tack cloth before each coat is crucial.
- Protection: Protect your surroundings from drips and overspray. Lay down drop cloths or old newspapers on the floor and cover any furniture or items you don’t want to get finish on.
Applying Tools
How you apply the lacquer will influence the tools you need.
- Spray Gun: For large projects or achieving the smoothest finish, a spray gun (HVLP – High Volume Low Pressure is recommended for efficiency) is the best option. You’ll also need an air compressor.
- Aerosol Cans: For smaller projects or ease of use, spray cans of lacquer are excellent. They are readily available and require no extra equipment.
- Brushes: High-quality natural bristle brushes can be used for brushing lacquer, but be sure to use ones specifically designed for lacquers or varnishes, as some synthetic bristles can be affected by the solvents. Work quickly to avoid brush marks.
- Rags/Applicators: For some oil-based or wiping lacquers, clean, lint-free rags can be used.
Other Essential Supplies
- Lacquer: Choose the type that best suits your project and application method.
- Lacquer Thinner: This is used for thinning the lacquer if needed (follow product instructions) and for cleaning your spray equipment thoroughly.
- Sandpaper: Various grits (e.g., 120, 180, 220, 320) for preparing the wood and between coats.
- Tack Cloths: These sticky cloths pick up fine dust particles.
- Gloves: Nitrile gloves are good for protecting your hands from chemicals.
- Safety Glasses/Goggles: Essential eye protection.
- Respirator Mask: A mask rated for organic vapors is highly recommended.
- Wood Filler (if needed): To fill any imperfections.
- Painter’s Tape: To mask off areas you don’t want to lacquer.
The Step-by-Step Process: How to Lacquer Wood
Now that you have your supplies and workspace ready, let’s get to the exciting part: applying the lacquer!
Step 1: Prepare Your Wood
This is arguably the most critical step. A beautiful finish starts with a perfectly smooth surface.
- Sanding: Start with a medium grit sandpaper (around 120-150 grit) to remove any rough spots or old finish. Work your way up to finer grits (e.g., 180, 220). The goal is a smooth, uniform surface. Always sand in the direction of the wood grain.
- Clean Dust: After sanding, thoroughly remove all dust. Vacuum the piece, then wipe it down with a tack cloth. Repeat this process after each sanding step between coats of lacquer. For tricky areas, a brush or compressed air can help dislodge dust.
- Fill Imperfections: If there are any small holes or gouges, fill them with a wood filler that matches your wood color, or a stainable/paintable filler if you plan to paint or heavily stain later. Let the filler dry completely, then sand it smooth.
Step 2: Apply the First Coat of Lacquer
This first coat is about getting even coverage and starting to build the finish.
Applying with a Sprayer
- Thinning (if necessary): Check the lacquer can for thinning instructions. You might need to add a small amount of lacquer thinner to achieve the right consistency for spraying.
- Settings: Set your spray gun according to the manufacturer’s instructions and your compressor’s output.
- Spray Technique: Hold the spray gun about 8-10 inches from the wood surface. Move in smooth, consistent strokes, overlapping each pass by about 50%. Start spraying before the trigger and release it after you’ve passed the edge of the wood to avoid getting too much material at the start and end of your passes. Work in a consistent pattern (e.g., horizontal, then vertical, if needed for full coverage).
- Thin Coats: Apply thin, even coats. It’s better to apply multiple thin coats than one thick one, which can lead to runs and an uneven finish.
Applying with Aerosol Cans
- Shake Well: Shake the can vigorously for at least 2 minutes after you hear the mixing ball rattle.
- Test Spray: Spray a small test area or a piece of scrap cardboard to ensure an even spray pattern.
- Spray Technique: Hold the can about 10-12 inches away from the surface. Move your hand in a steady, sweeping motion, overlapping each pass by about 50%. Work in a grid pattern: spray one direction, then the other.
- Thin Coats: As with a spray gun, apply thin, even coats.
Applying with a Brush
- Loading the Brush: Dip the brush about one-third of the way into the lacquer. Tap, don’t wipe, the brush against the can’s edge to remove excess.
- Brushing Technique: Apply the lacquer in long, smooth strokes, following the direction of the wood grain. Brush lightly and overlap your strokes by about half. Work quickly to avoid the lacquer setting up too much before you can blend it.
- Avoid Overworking: Once a section is covered, try not to go back over it too many times to prevent brush marks.
Step 3: Drying and Sanding Between Coats
Patience here pays off big time!
- Drying Time: Allow the first coat to dry thoroughly. Drying times vary. Always check the product’s label, but typically, lacquer is dry to the touch in 15-30 minutes and ready for the next coat in 1-2 hours. Ensure good ventilation during drying.
- Light Sanding: Once dry, lightly sand the surface with very fine-grit sandpaper (around 320-400 grit). This is not to remove the lacquer, but to de-nib – that is, to knock down any tiny raised wood fibers or dust particles that may have settled into the finish.
- Clean Again: Thoroughly wipe the surface with a tack cloth to remove all sanding dust.
Step 4: Apply Subsequent Coats
Repeat Step 2 and Step 3 for each additional coat. Most projects will require at least 2-3 coats, but sometimes 4-5 coats are needed for a truly robust finish, especially if you plan on rubbing or polishing it later.
- Building the Finish: Each coat builds on the previous one, creating a thicker, more protective, and smoother surface.
- Maintain Consistency: Try to apply each coat with the same pressure and technique for the most uniform result.
Step 5: The Final Coat and Curing
The last coat is where you aim for perfection.
- Final Application: Apply your final coat with the same care and technique as previous coats. Aim for a smooth, even finish without any drips or runs.
- Curing Time: While lacquer dries quickly, it takes longer to fully “cure” and harden. This can take several days to a couple of weeks, depending on the product and environmental conditions (temperature, humidity). Avoid heavy use or placing heavy objects on the lacquered surface during this time.
Step 6: Optional Finishing (Rubbing Out the Finish)
If you want an ultra-smooth, “glass-like” finish, you can rub out the lacquer after it has fully cured.
- Materials: You’ll need very fine grit wet/dry sandpaper (e.g., 600, 800, 1000, 1500, 2000 grit), a sanding block, water or mineral spirits (as a lubricant), and polishing compounds.
- Wet Sanding: Lightly wet sand the surface in a random pattern using your chosen grit, starting with the coarsest, and progressively moving to finer grits. Always keep the surface wet and rinse the sandpaper frequently.
- Lubrication is Key: Using a lubricant like water or light mineral spirits helps carry away the sanding dust and prevents the sandpaper from clogging.
- Cleaning: After sanding with the finest grit, clean the surface thoroughly with a tack cloth.
- Polishing: Apply a polishing compound (automotive polishing compounds work well) with a soft cloth or buffer. Work the compound into the surface until it achieves a deep sheen.
Lacquer Finish Outcomes: Pros and Cons
Like any woodworking technique, lacquering has its advantages and disadvantages. Understanding these can help you decide if it’s the right choice for your project.
| Pros | Cons |
|---|---|
| Dries very quickly, allowing for multiple coats in a day. | Fumes can be strong, requiring good ventilation and personal protective equipment (PPE). |
| Creates a hard, durable, and protective finish. | Solvent-based lacquers are flammable and require careful handling. |
| Can be easily repaired or re-coated by dissolving the existing finish with lacquer thinner. | Can be more prone to chipping or cracking if applied too thickly or under very specific stress conditions compared to some other finishes. |
| Can be buffed to a very high gloss. | Water-based lacquers may not offer the same level of chemical resistance as their solvent-based counterparts. |
| Available in clear, tinted, or pigmented forms. | Requires a clean, dust-free environment for best results. |
Tips for Success: Avoid Common Pitfalls
Even with the best intentions, a few common issues can pop up. Here are some pro tips to help you get a flawless finish every time.
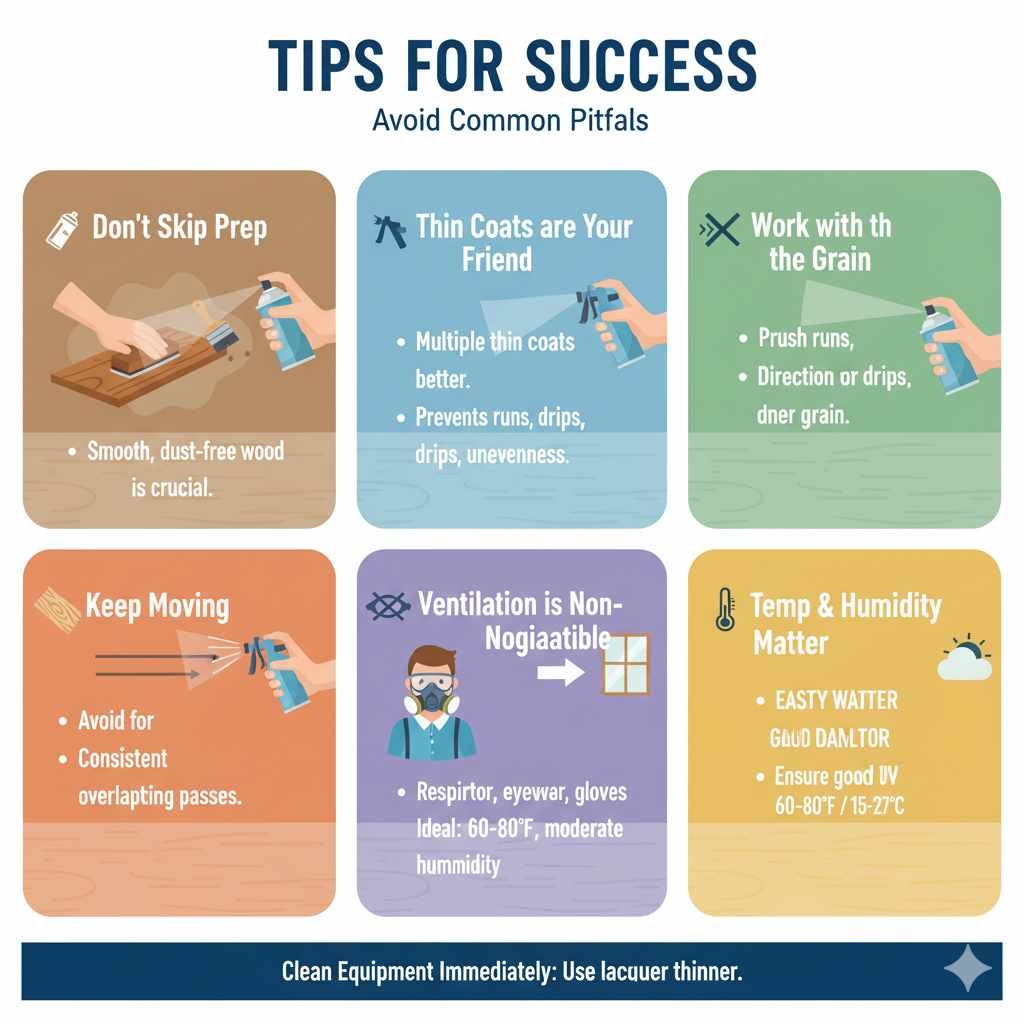
- Don’t Skip Prep: Seriously, this is the most important step. If your wood isn’t smooth and dust-free, your lacquer won’t look good, no matter how well you apply it.
- Thin Coats are Your Friend: Resist the urge to slather it on. Multiple thin coats are always better than one thick one. This prevents runs, drips, and unevenness.
- Work with the Grain: Whether brushing or spraying, always move your applicator in the direction of the wood grain.
- Keep Moving: Lacquer dries fast. Keep your applicator moving to avoid lap marks (where a wet edge meets a dry edge). For brushing, this means working in sections and maintaining a wet edge. For spraying, it means consistent, overlapping passes.
- Ventilation is Non-Negotiable: Always prioritize safety. Use a respirator, ensure good airflow, and wear protective eyewear and gloves. The Environmental Protection Agency (EPA) offers more information on maintaining good indoor air quality when working with finishes.
- Temperature and Humidity Matter: Avoid lacquering in extreme temperatures or very humid conditions. Ideal conditions are typically between 60°F and 80°F (15°C – 27°C) with moderate humidity.
- Clean Equipment Immediately: If you use a spray gun or brushes, clean them with lacquer thinner right away after you finish. Dried lacquer is very difficult to remove from equipment.
Frequently Asked Questions About Lacquering Wood
Q1: How many coats of lacquer should I apply?
For most furniture and general woodworking projects, 2-4 coats are usually sufficient. If you’re seeking a very high-gloss, extremely durable finish, or if you plan on rubbing it out, 5-6 coats can provide a better base.
Q2: Can I lacquer over an existing finish?
Yes, but with caution. The existing finish needs to be well-adhered and in good condition. You would typically need to lightly scuff sand the old finish to provide a better grip for the new lacquer. If the old finish is oil-based, you might need a barrier coat (like shellac) before applying lacquer. Always test in an inconspicuous area first.
Q3: What’s the difference between lacquer and varnish?
Lacquer dries very quickly by solvent evaporation, forming a hard film. Varnish dries more slowly through oxidation and polymerization, forming a more flexible, often more durable film, especially against abrasion and sunlight. Lacquer is easier to repair, while varnish is often more resistant to heat and chemicals.
Q4: Is lacquer safe for food surfaces?
Generally, no. While lacquer provides a durable finish, most common lacquers are not considered food-safe once cured. For kitchen cabinets, tabletops, or cutting boards that come into direct contact with food, you should opt for food-safe finishes like mineral oil, beeswax blends, or specific FDA-approved lacquers (which are rare and often very expensive).