How Do You Seal Painted Furniture: Essential Guide
To seal painted furniture effectively, you must first ensure the paint is fully cured, then apply a high-quality, thin layer of protective topcoat—like polyurethane or wax—using the correct tools and proper application technique. Curing time and proper sealing are key to achieving a durable, chip-resistant, and beautiful finish that lasts.
Welcome to the workshop! If you’ve just finished painting a beautiful piece of furniture—maybe a charming dresser or a rustic side table—you might be feeling a mix of pride and worry. That worry is usually about one thing: durability. How do you make sure that beautiful new paint job doesn’t chip or scratch the first time someone sets a glass down?
It is a very common concern for new painters! But I promise, sealing painted furniture is not complicated magic; it’s just following a few proven steps. Getting this final step right protects your hard work and gives your piece a professional, long-lasting finish. We are going to walk through the entire process, from knowing when to seal to picking the perfect sealant. Let’s turn that freshly painted item into a cherished heirloom!
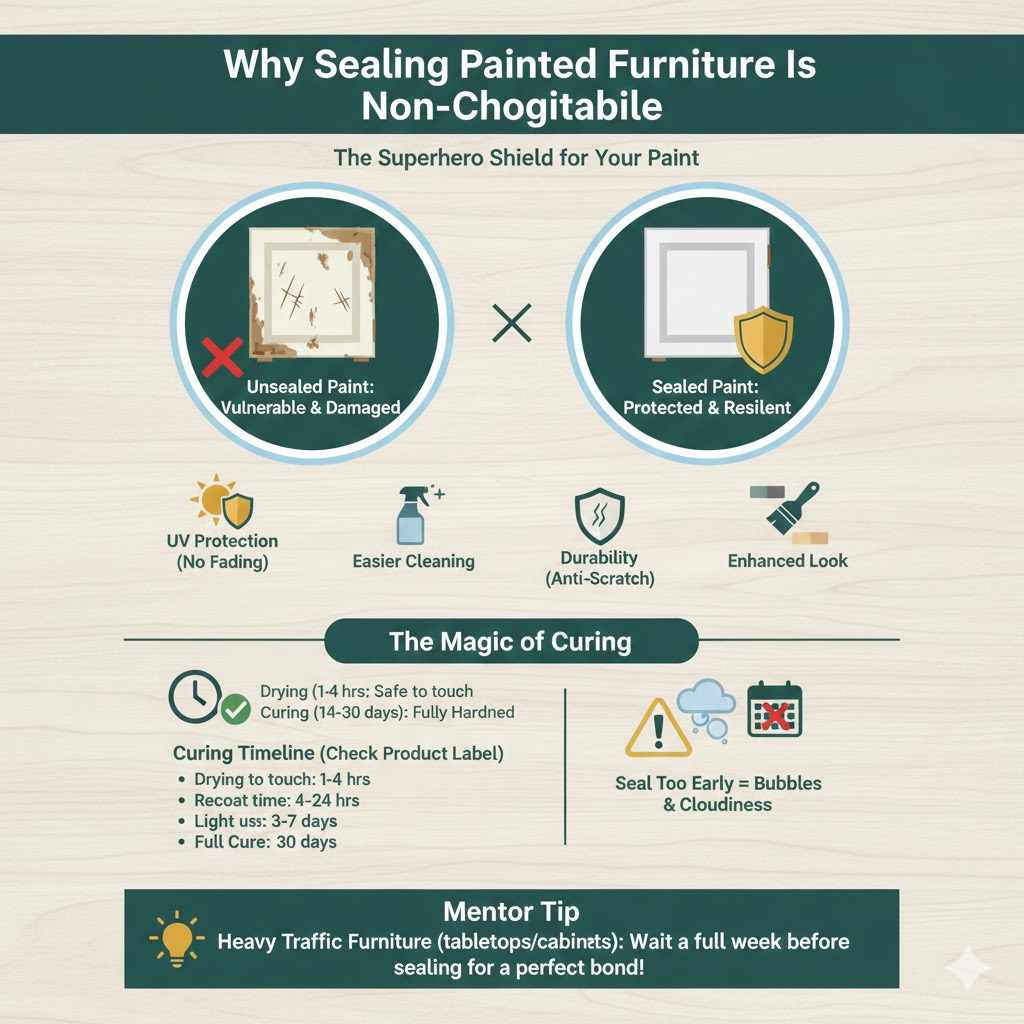
Why Sealing Painted Furniture Is Non-Negotiable
Think of sealant as a superhero shield for your paint. Even the toughest paint needs backup, especially on furniture that sees regular use. Furniture constantly faces spills, cleaning supplies, sunlight, and friction from daily life. Without a proper seal, your lovely paint job is left exposed and vulnerable.
A good topcoat does more than just stop scratches. It enhances the look, provides crucial UV protection to stop fading, and makes cleaning much easier. If you skipped the sealing step, even great chalk paint or cabinet enamel can look tired quickly.
The Magic of Curing: Before You Seal Anything
This is the most often overlooked step, and it causes most sealing failures! Paint needs time to “cure,” which is different from simply “drying.” Drying means the solvent (usually water or mineral spirits) has evaporated. Curing means the remaining binders and resins have fully hardened into a solid film. If you seal too early, the trapped solvents try to escape, causing bubbles, cloudiness, or a sticky feeling that never goes away.
General guidelines for curing, though you should always check your specific product label, often look like this:
- Drying to the touch: 1 to 4 hours
- Recoat time: 4 to 24 hours
- Curing time (Ready for light use): 3 to 7 days
- Full Cure (Ready for heavy sealing): 14 to 30 days
For furniture that will handle heavy traffic (like tabletops or kitchen cabinets), waiting a full week, if possible, before applying your first topcoat is the safest route. This preparation ensures your sealant bonds perfectly to a solid foundation.
Step 1: Choosing Your Perfect Topcoat Sealant
When you ask, “how do you seal painted furniture,” the answer depends entirely on the look and durability you want. There isn’t one perfect sealant; there’s the perfect sealant for your project. We are focusing primarily on clear topcoats compatible with most craft paints (like chalk paint, milk paint, and acrylic enamels).
Types of Sealants: Pros and Cons
Understanding your options lets you make the best choice for longevity and appearance. Here is a breakdown of the most popular choices for beginner-friendly furniture sealing:
| Sealant Type | Best For | Pros | Cons |
|---|---|---|---|
| Polyurethane (Water-Based) | General furniture, low to medium traffic | Dries fast, cleans up with water, low odor, stays clear (non-yellowing) | Needs multiple thin coats, not the strongest protection against harsh chemicals |
| Polyurethane (Oil-Based) | High-traffic surfaces (tabletops, floors) | Extremely durable, very scratch-resistant | Strong odor (requires ventilation), yellows slightly over time (amber tone) |
| Paste Wax | Matte or satin finishes, antique looks | Beautiful soft sheen, easy to buff, works well over chalk paint | Less durable than poly, requires regular re-waxing, can attract dust if over-applied |
| Furniture Lacquer (Spray) | Quick finishing, smooth professional look | Very fast application, achieves a factory-smooth finish quickly | Requires excellent ventilation, less forgiving if you drip, usually requires sanding between coats |
Water-Based Polyurethane: The Beginner’s Best Friend
For most homeowners painting chairs, dressers, and shelves, water-based polyurethane is the gold standard. It dries crystal clear, meaning it won’t change the true color of your paint, and cleanup is as simple as soap and water. When selecting, look for finishes like “Satin” for a low-gloss, contemporary look, or “Semi-Gloss” for slightly more shine and added water resistance.
For specific durability needs, many woodworkers refer to standards provided by the Forest Products Laboratory regarding coating performance. While furniture sealing is different from floor finishing, the principles of cross-linking and abrasion resistance are similar.
Step 2: Prepping the Painted Surface for Sealing
Just like prepping wood before painting, prepping paint before sealing is essential for adhesion. A smooth, dust-free, lightly scuffed surface grabs the topcoat much better than slick, glossy paint.
Light Sanding for Key Adhesion
Even though the paint feels hard, there might be microscopic imperfections or tiny dust nibs that need smoothing. This step is crucial, especially if you used a matte finish like chalk paint, which has a porous surface.
- Wait for the Cure: Ensure your paint has fully cured (ideally 48–72 hours minimum).
- Choose the Right Grit: Use very fine sandpaper, starting with 220-grit or moving up to 320-grit sandpaper. Remember, you are not trying to remove the paint; you are just scuffing the top microscopic layer for grip.
- Sand Lightly: Use very gentle pressure. You should feel minimal resistance. Sand until the surface feels smooth to your hand, not rough. Work in the direction of the grain if you are working on a previously stained or naturally wood-grain-heavy surface underneath the paint.
- Wipe Down Thoroughly: After sanding, use a high-quality tack cloth or a lint-free cloth lightly dampened with mineral spirits or water (depending on your paint type) to remove all sanding dust. Dust contamination is the #1 cause of rough sealer coats.
Step 3: Mastering the Application Technique
Whether you use a brush, foam applicator, or sprayer, thin coats are your secret weapon for a flawless, durable seal. Thick coats dry slowly, invite drips, show brush strokes, and often lead to poor adhesion or wrinkling.
Tools for Sealing Application
Your choice of tool depends on the sealer type and the desired finish:
- For Polyurethane (Brush-on): Use a high-quality synthetic bristle brush (nylon/polyester blend). Foam brushes are cheaper but often leave little bits of foam residue behind.
- For Wax: Use a clean, soft, lint-free cloth (old cotton T-shirt works great) or 0000 steel wool for heavy buffing after application.
- For Spray Products (Lacquer/Aerosol Poly): Hold the can about 10–12 inches away from the surface and use sweeping, steady motions, slightly overlapping each pass.
The Thin Coat Philosophy: Brush Application (Polyurethane Focus)
This method builds durability layer by layer, which is much better than applying one thick layer.
- Dip Lightly: Dip your brush about one-third into the sealer. Tap off the excess against the can edge—do not wipe it on the rim, as this pushes paint onto the outside of the can.
- Use Long, Even Strokes: Start brushing in long, parallel strokes across a manageable section of the furniture. Apply only enough sealer to lightly cover the area. You should be able to see through the coat almost immediately.
- “Tip Off” (Optional but Recommended): After applying a section, wait about 30 seconds (check the product’s dry time) and gently go over the section one last time with very light, overlapping, even strokes without reloading the brush. This technique is called “tipping off” and helps level the finish.
- Mind the Edges: Be careful around edges and carved details, as these areas soak up more sealant. You want an even layer everywhere, not a thick puddle in the crevices.
- Let It Dry Completely: Follow the manufacturer’s recoat window strictly. Water-based poly often requires 2 to 4 hours between coats.
- Repeat: Apply 2 to 3 thin coats for standard durability, or up to 4 or 5 coats for high-contact surfaces like tabletops or dresser tops. Lightly scuff (sand with 320-grit) between the final coat and the penultimate coat only if you feel any slight roughness after the first two coats dry.
Applying Furniture Wax: The Gentle Finish
Wax gives a wonderful, low-sheen, slightly soft feel that many DIYers adore, especially with vintage or distressed furniture styles. It requires patience but offers great payoff.
- Apply Sparingly: Dip a cloth or applicator pad into the paste wax. Apply a very thin layer across the surface using overlapping circular motions. It should look like you are barely touching the piece.
- Let It Haze: Allow the wax to sit and “haze over.” This usually takes 10 to 30 minutes, depending on humidity. The wax is ready when it looks dull rather than wet.
- Buff to a Shine: Using a clean, soft, dry cloth (a microfiber cloth works wonderfully here), buff the surface vigorously in circular motions. As you work, the wax will melt slightly from the friction and transform into a smooth, hard sheen.
- Maintain: Keep in mind that wax offers the least amount of protection compared to polyurethane. It needs occasional reapplication, usually every six months to a year, depending on use.
Caring for Different Paint Types Under Sealant
Not all paint cures the same way, and that affects how you approach sealing. Using the wrong topcoat on delicate paint can lift the color right off the piece!
Sealing Chalk Paint Projects
Chalk paint is famously porous. It drinks up sealant, which is why many beginners end up with blotchy finishes if they try to apply a thick coat. Chalk paint absolutely requires a sealer to protect against dirt transfer and moisture rings.
- Best Bet: High-quality paste wax or 2-3 very thin coats of water-based poly (satin finish).
- What to Avoid: Oil-based products over light-colored chalk paints can sometimes cause yellowing or slight discoloration, and strong solvents might lift the base coat if it wasn’t cured long enough.
Sealing Milk Paint Projects
Authentic milk paint is incredibly thirsty and powdery when raw. It almost always requires a stabilizer or sealant immediately after drying.
- Best Bet: Oil-based topcoats (like an oil-based varnish or poly) bond incredibly well to milk paint for a rock-hard finish. Pure Tung oil is also an excellent, traditional option for achieving a rich, warm seal.
- Note: If you used modern, pre-mixed “milk paint” which is often acrylic-based, follow the guidelines for standard acrylic enamel (water-based poly works great).
Sealing High-Gloss Enamel or Urethane Alkyd Paints
If you used a hard, enamel-style paint (often labeled for cabinets or trim), you are already working with a more durable base. Sealing these is often done for sheen consistency or chemical resistance, rather than raw protection.
- Best Bet: A durable, two-part clear coating or an automotive-grade clear coat can offer ultimate protection against yellowing and chips on heavy-use items. For standard furniture, one coat of high-quality water-based poly in a semi-gloss is usually plenty to boost the shine and provide that final barrier.
Essential Tool Kit Checklist for Sealing
Having the right tools makes the job easier, faster, and produces a higher-quality result. You don’t need complex machinery, just reliable supplies.
| Category | Essential Item | Why You Need It |
|---|---|---|
| Cleaning | Tack Cloths or Lint-Free Rags | To pick up all fine sanding dust before applying the sealant. Crucial step! |
| Sanding | 220-Grit and 320-Grit Sandpaper | For gently scuffing the cured paint surface to ensure good topcoat adhesion. |
| Application (Brush) | High-Quality Synthetic Brush (e.g., Purdy or Wooster) | Avoids bristles shedding and leaves a smoother, more even finish than foam brushes. |
| Application (Wax) | Soft, Clean Cotton Rags (non-linting) | Used for rubbing in the paste wax and then buffing to shine. |
| Safety | Nitrile Gloves and Proper Ventilation | Protects your skin, especially when using oil-based products or solvents. Good airflow is key. |
Troubleshooting Common Sealing Mistakes
Even with the best intentions, beginners sometimes run into snags when sealing. Don’t panic; these issues usually have easy fixes!
Sticky or Soft Finish (Never Hardens)
If your sealed piece remains tacky after 24 hours, this is almost always one of two problems:
- The Paint Didn’t Cure: The sealer trapped solvents underneath, or the paint underneath is too soft to support the topcoat.
- Over-Application: You applied the topcoat too thickly.
The Fix: Increase ventilation, use a small fan pointed across the piece (not directly onto it) to encourage solvent evaporation, and wait longer. For extreme stickiness, you might have to very gently rub down the surface with mineral spirits (test an inconspicuous spot first!) and try again with much thinner coats.
Hazy or Milky Appearance
This is often called “blushing” or “clouding” and is common when applying water-based products.
- Cause: Moisture or high humidity causes the water in the sealant to try and evaporate too quickly, creating tiny droplets within the film.
- The Fix: Ensure your working environment is not overly humid or cold. If it’s already applied, you might have to gently sand the hazy layer off with 400-grit paper and reapply the sealer in better conditions. Using a fan that moves air across the surface (not blowing air directly at it) can help prevent this in damp areas.
Bubbles or Fisheyes
Bubbles appear when air gets trapped or gasses escape the paint layer. Fisheyes are small circles where the sealant actively avoids sticking to the surface.
- Cause: Dust, oil/grease, or silicone contamination on the paint surface.
- The Fix: Fisheyes are tough to fix once the sealer is applied. Next time, scrub the painted surface very well with a degreaser (like TSP substitute) or mild soap and water before your final dust-off. If you have small bubbles, you can try popping them with the tip of a fine brush immediately after application, before the sealer sets up.
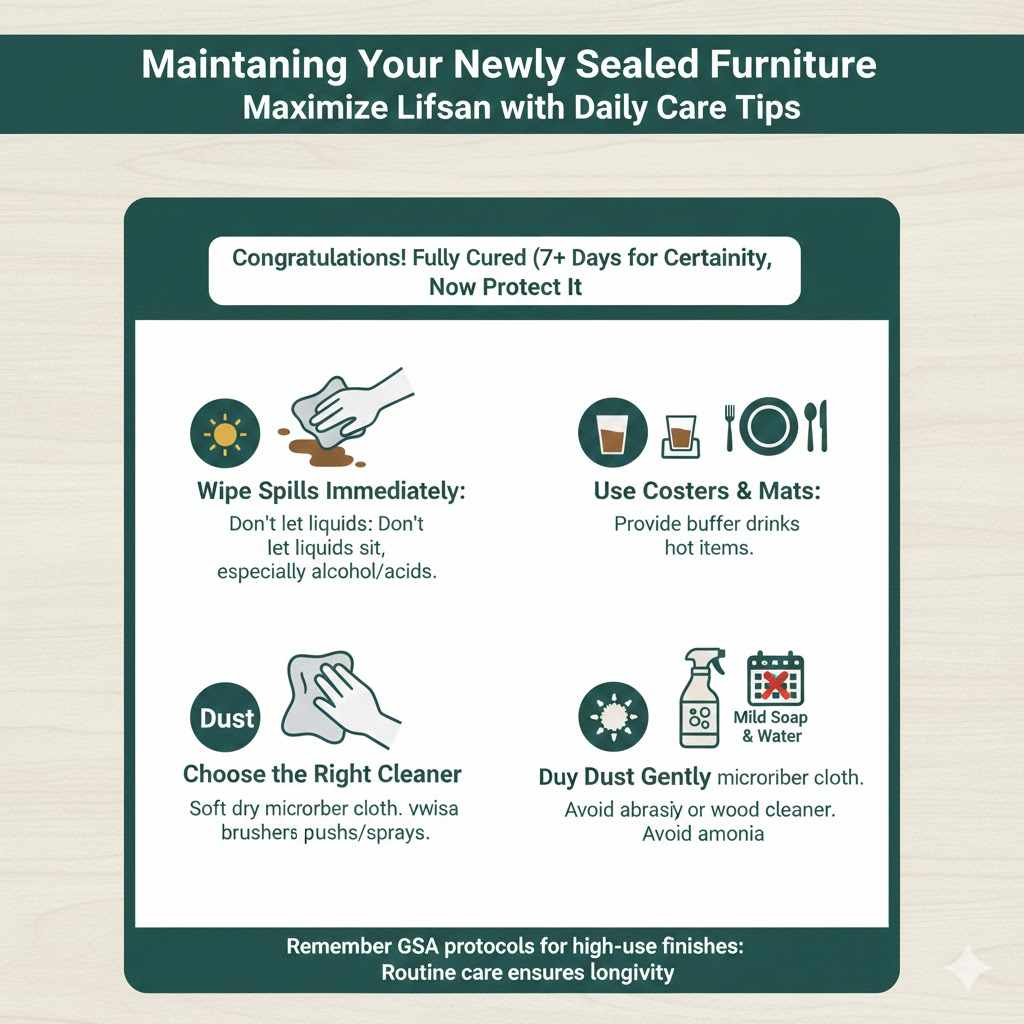
Maintaining Your Newly Sealed Furniture
Congratulations! Once your final coat has fully cured (check the can, but assume 7 full days for absolute certainty), your furniture is protected. But to maximize its lifespan, routine care matters.
Daily Care Tips
Even the toughest polyurethane will degrade if mistreated. Use these simple habits to keep your finish looking showroom-new:
- Wipe Spills Immediately: Do not let liquids, especially alcohol or acidic juices, sit on the surface for long periods. Even durable coatings have a breaking point.
- Use Coasters and Mats: This is especially important for coffee tables and dining tables. Always provide a buffer zone.
- Dust Gently: Use a soft, dry microfiber cloth for daily dusting. Avoid abrasive scrub brushes or harsh chemical sprays.
- Choose the Right Cleaner: For most sealed furniture, warm water with a few drops of mild dish soap is all you need. If you used oil-based products, a wood cleaner formulated for sealed wood is best. Avoid ammonia-based glass cleaners, as they can dull polyurethane finishes over time.
Remember the US General Services Administration (GSA) often recommends strict cleaning protocols for high-use furniture finishes to maintain their appearance and longevity. While your coffee table isn’t a government desk, the principle of gentle, routine care remains the same for any quality coating.
Frequently Asked Questions (FAQ) for Beginner Sealers
Q1: Can I use spray polyurethane on painted furniture instead of brushing it on?
A: Yes, spray polyurethane is an excellent option, especially for items with intricate carvings or if you want to avoid brush strokes entirely. Always use multiple light coats rather than one heavy coat, and ensure you have excellent cross-ventilation, as sprays can contain higher levels of solvents.
Q2: How long do I need to wait before I can put books or decorative items on the sealed shelf?
A: While the piece might feel dry within a day, wait at least 48 to 72 hours after the final sealant coat before placing moderate weight or decorative items on it. For full furniture use, like drawers being loaded or tabletops being set, wait a full week for complete hardness and durability.
Q3: What is the best way to seal painted raw wood legs without sanding off the paint?
A: Use a specialized brush with very soft bristles or a foam applicator designed for smooth coats. Apply the sealant in a very thin layer while the piece is upside down. Work quickly and carefully along the grain. Sealers like wax work very well on painted wood legs because they require less heavy wiping or buffing than a flat surface.
Q4: My topcoat looks uneven and streaky. Can I fix this?
A: Streaking usually means the coat was applied too thickly, or the sealer dried before you could properly “tip off” the wet edge. Allow it to dry completely, then very gently scuff the area with 320-grit sandpaper to smooth the ridges. Wipe clean and apply a very thin, fresh coat, moving more smoothly and quickly during application.
Q5: Do I have to sand if I am using wax over chalk paint?
A: Yes, very light sanding (like 320-grit) or scuffing is recommended over matte paints like chalk paint before waxing. This removes any small dust particles trapped in the porous surface, ensuring the wax bonds uniformly and polishes evenly, leading to a much better sheen.
Q6: Will sealing my furniture make the light-colored paint look yellow?
A: Water-based polyurethanes are typically marketed as “non-yellowing” and are the best choice for keeping whites and pastels true to color. Oil-based polyurethanes naturally amber slightly over time. If you are working with bright white paint, always choose a quality water-based sealer to maintain the crisp color.
Conclusion: Sealing Your Way to Lasting Beauty
Sealing painted furniture moves your project from a “fun weekend craft” to a truly lasting piece of home decor. By respecting the curing time, choosing a topcoat that matches your piece’s intended use, and committing to applying multiple thin layers instead of one thick one, you will achieve a finish that resists chips, cleans easily, and looks professionally done.
Remember, every coat of sealant builds strength. Take your time, pay close attention to that critical light scuffing between layers, and don’t rush the final cure. You’ve already mastered the hard part—the painting! Now, relax, follow these steps carefully, and enjoy displaying your beautiful, newly protected piece for years to come. You’ve got this!