How To Care For Waxed Wood Floors The Safe And Easy Way
Caring for waxed wood floors can sometimes feel like a delicate dance. You want to keep them looking their absolute best, but you also worry about doing the wrong thing. It’s easy to feel a bit lost, wondering what products are safe or how often you should re-wax.
Got cloudy marks too? See how to remove white spots from wood furniture with simple home fixes.
This guide is here to help you navigate it all with confidence. We’ll break down exactly how to clean, protect, and maintain your beautiful waxed floors so they shine for years to come, the easy way.
Caring for waxed wood floors means using gentle cleaning methods and regular upkeep. Focus on dry cleaning, minimal moisture, and appropriate waxing. This approach keeps them protected and looking great without damaging the finish.
Understanding Waxed Wood Floors
Waxed wood floors have a charm all their own. They offer a soft sheen and a warm feel that many people love. The finish is not a plastic-like coating.
Instead, it’s a layer of wax that soaks into the wood pores. This gives the floor a more natural, matte look compared to polyurethane finishes. It also means they need a different kind of care.
The wax layer acts as a protective barrier. It helps to guard the wood against everyday spills and wear. However, this barrier is not as tough as modern sealants.
It can scratch more easily. It also doesn’t hold up well to a lot of water. This is why water-based cleaners can be a problem for them.
Knowing how your floor is finished is the first step. Is it truly waxed? Sometimes, older floors might have oil finishes or even shellac.
These can look similar but require slightly different treatments. Most often, if you have a floor with a satiny, warm glow that feels soft to the touch, it’s likely waxed. You can often test this by placing a small drop of water in an inconspicuous corner.
If it beads up and stays there for a while, it’s probably waxed. If it soaks in quickly, it might be unsealed or have a different finish.
My Waxed Floor Oops Moment
I remember the first time I had a home with genuine waxed floors. It was an old farmhouse I’d fallen in love with. The floors were gorgeous, a deep, rich brown with a subtle glow.
I was so excited to move in. One evening, after a long day of unpacking, I accidentally knocked over a glass of red wine. My heart sank.
Panic set in. I grabbed a paper towel and started dabbing, but I was worried I had already stained it. Then, I remembered a cleaning spray I had bought, a multi-surface cleaner.
I sprayed it liberally, thinking I was being thorough. The spill seemed to disappear, but the area looked. dull.
Worse, it felt slightly sticky.
That’s when I learned my first big lesson. That “all-purpose” cleaner was too harsh. It stripped away some of the protective wax.
The sticky feeling meant it left a residue. It took me a while, and a lot of gentle buffing with a wax-infused cloth, to bring that spot back to life. It was a clear sign that my old cleaning habits wouldn’t work here.
I needed to learn the right way to care for these beautiful floors.
The Basics of Waxed Floor Care
Caring for waxed wood floors is all about being gentle and consistent. Think of it as maintaining a piece of fine furniture, not scrubbing a tile floor. The goal is to protect the wax layer, not to strip it away.
Dry Cleaning is Key: Most of the time, you’ll just need to sweep or vacuum. Use a soft-bristle broom or a vacuum cleaner with a hardwood floor attachment. This removes dust and grit that can scratch the finish over time.
Imagine tiny pieces of sand on the floor – they act like sandpaper when you walk on them.
Minimal Moisture: Water is the biggest enemy of waxed floors. It can penetrate the wax and seep into the wood. This causes swelling, staining, and can even lead to warping.
So, avoid wet mops entirely. If you absolutely must clean a spot, use a slightly damp cloth. Make sure the cloth is only barely wet, and dry the area immediately.
Gentle Cleaning Solutions: When sweeping or vacuuming isn’t enough, you need special cleaners. These are usually pH-neutral or specifically made for waxed wood. They don’t contain harsh chemicals or ammonia.
They also often have a bit of wax in them. This helps to refresh the finish as you clean.
Regular Buffing: Buffing helps to bring back the shine and remove light scuffs. You can do this with a soft cloth by hand. For larger areas, a floor buffer with a soft pad works wonders.
This action also helps to redistribute the wax and keep it looking fresh.
What NOT to Use on Waxed Floors
It’s just as important to know what to avoid. Using the wrong product can do more harm than good. Always check labels to ensure a cleaner is safe for waxed wood finishes.
- Abrasive Cleaners: Powders or scrubs can scratch the wax.
- Ammonia-Based Cleaners: These can dull and damage the wax.
- Vinegar: While sometimes recommended for other floors, it’s too acidic for wax.
- Steam Mops: The heat and steam can ruin the wax and wood.
- Excess Water: Never flood the floor or use a soaking wet mop.
Deep Cleaning and Re-Waxing
Over time, even with good care, your waxed floors might start to look a bit tired. They might lose some of their luster. This is when a deeper clean or re-waxing becomes necessary.
Deep Cleaning Steps: Before you re-wax, you need to make sure the floor is perfectly clean. You might need to use a specific wood floor cleaner designed to remove old wax buildup. Follow the product instructions carefully.
This usually involves applying the cleaner, letting it sit, and then wiping it up with clean cloths.
You’ll want to work in small sections. Make sure to rinse the area thoroughly if the cleaner requires it. The goal is to remove any dirt, grime, and old wax.
This creates a fresh surface for new wax. Don’t skip this step, as applying new wax over dirt will just seal in the mess.
Choosing the Right Wax: There are different types of wax for wood floors. You’ll want to use a paste wax or a liquid wax. Many are made from natural ingredients like carnauba or beeswax.
Some products are specifically formulated for hardwood floors and might even contain a bit of solvent to help them spread easily. Always choose a wax that is compatible with your floor’s current finish.
If you’re unsure, a good quality paste wax is often a safe bet. It provides a durable layer of protection and a beautiful sheen. Look for products that are easy to apply and buff.
Some even have added pigments to help cover minor scratches or bring out the wood’s natural color.
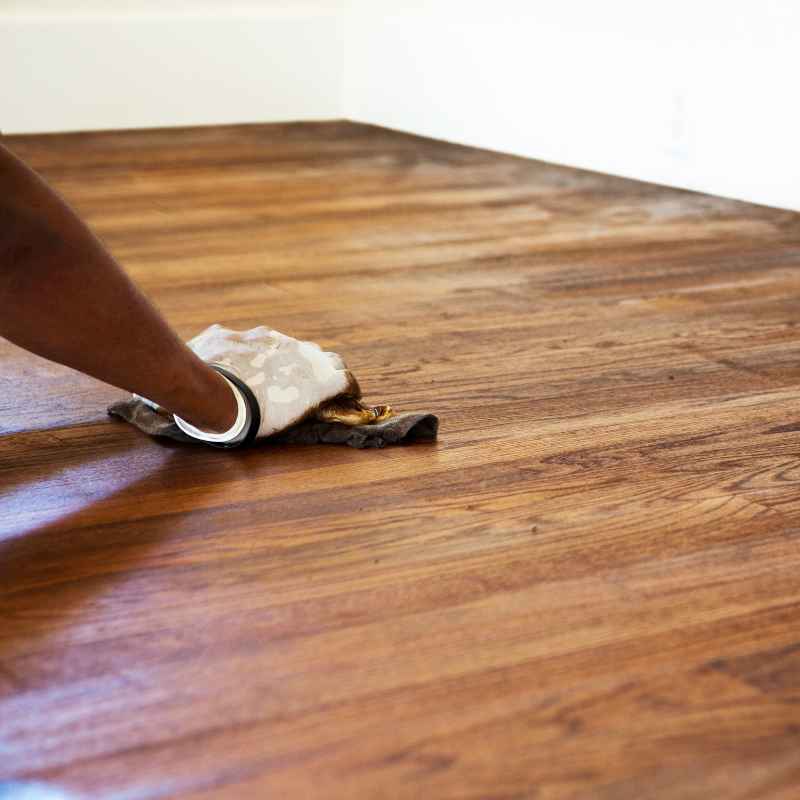
The Re-Waxing Process: Once the floor is clean and dry, it’s time to apply the new wax. Use a clean cloth or a wax applicator pad. Apply the wax in thin, even coats.
Work with the grain of the wood. Don’t try to put on too much wax at once. It’s better to apply several thin layers than one thick one.
Allow each coat to dry according to the product’s instructions. This can take anywhere from 10 minutes to an hour. Once dry, it’s time to buff.
Use a clean, soft cloth or a buffer. Buff until the floor has a smooth, even sheen. This step is crucial for bringing out the shine and creating a protective surface.
For really high traffic areas, you might need to re-wax once or twice a year. Less used areas might only need it every few years. The key is to watch how the floor is holding up and re-wax when it starts to look dull or feel dry.
Quick Guide to Re-Waxing
Re-waxing brings back the beauty and protection of your floors. Here’s a simple way to do it:
- Clean Thoroughly: Remove all dirt and old wax.
- Let it Dry: Ensure the floor is completely dry.
- Apply Thin Coat: Use a cloth, working with the wood grain.
- Let it Dry: Follow product instructions for drying time.
- Buff to Shine: Use a buffer or soft cloth.
Protecting Your Waxed Floors from Damage
Prevention is always better than repair. Taking a few simple steps can save your waxed floors from a lot of potential damage. It’s about creating a shield against common household hazards.
Mats and Rugs: Place doormats at all entrances. These catch dirt, sand, and moisture before they reach your floors. Inside the house, consider using rugs in high-traffic areas like hallways and living rooms.
This reduces wear and tear. Ensure the backing of your rugs is safe for wood floors. Some rubber backings can discolor the finish.
Furniture Protection: Furniture legs are notorious for scratching floors. Use felt pads on all furniture legs. Check these pads regularly and replace them when they get worn.
This is a cheap and easy way to prevent deep scratches. When moving furniture, lift it rather than dragging it. This is especially important for heavy items.
Pet Care: If you have pets, keep their nails trimmed. Long, sharp nails can scratch the wax finish. Clean up any accidents immediately.
Pet urine can be very damaging to wood, even with a wax finish. Have pet-specific cleaners ready, but make sure they are safe for waxed wood.
Spill Management: As I learned the hard way, spills happen. The key is to address them right away. Blot spills with a clean, dry cloth.
If a stain remains, use a cleaner specifically approved for waxed wood. Avoid letting liquids sit on the floor for any length of time.
Controlling Humidity: Extreme changes in humidity can affect wood floors. In very dry winter months, a humidifier can help. In very humid summers, a dehumidifier might be useful.
Stable humidity levels prevent wood from expanding and contracting too much, which can cause gaps or cupping.
Smart Habits for Floor Longevity
Small changes in your routine make a big difference. Adopt these habits to keep your floors looking their best.
- Entryway Defense:
- Place mats inside and outside all doors.
- Felt Pad Power:
- Attach felt to furniture legs.
- Lift, Don’t Drag:
- Move furniture carefully.
- Quick Spill Response:
- Wipe up spills immediately.
- Pet Nail Trim:
- Keep pet claws short.
When is it Time to Worry?
Most of the time, your waxed floors will be fine with regular care. But sometimes, you might notice issues that signal a bigger problem. It’s good to know what to look for.
Deep Scratches: Light scratches can often be buffed out or covered with a bit of wax. But deep gouges that go into the wood itself are more serious. These might require professional refinishing or repair.
If you can feel the scratch with your fingernail, it’s likely too deep for simple wax care.
Warping or Cupping: If parts of your floor start to bend or curl, this is a sign of moisture damage or extreme humidity changes. This is a significant issue that often needs professional assessment. It means the wood has absorbed too much moisture and is no longer flat.
Stains That Won’t Budge: Some stains are permanent. If you have a deep stain from wine, pet accidents, or ink that you can’t remove with gentle cleaners, it might be set into the wood. You might need to try a wood bleach or consider a more intensive refinishing process.
Dullness Despite Buffing: If you buff and buff, but the floor remains stubbornly dull, the wax might be too old or too heavily built up. It might be time for a full stripper and re-wax. Sometimes, the old wax itself can become cloudy and lose its protective qualities.
Persistent Stickiness: If an area remains sticky even after cleaning and drying, it could be a sign of a cleaner that didn’t fully come off or a damaged wax layer. You may need to strip and reapply wax in that specific spot. It could also be a reaction with something spilled earlier.
Signs of Wood Damage: Look out for any signs of rot, mold, or mildew. These indicate serious moisture problems that need immediate attention. Such issues usually stem from leaks or prolonged exposure to damp conditions.
Red Flags for Waxed Floors
Keep an eye out for these warning signs. Early detection can save your floors.
- Deep scratches you can feel
- Warped or uneven boards
- Stubborn, dark stains
- Persistent stickiness
- Dullness that won’t buff out
- Any signs of mold or rot
Choosing the Right Wax for Your Floors
The type of wax you choose can make a big difference. Not all waxes are created equal, and the best choice often depends on your floor’s condition and the look you want.
Paste Wax: This is a classic choice. It’s usually made of carnauba and beeswax. It provides a durable, protective layer.
Paste waxes offer a beautiful, satiny sheen that many people find appealing. They can be a bit more labor-intensive to apply and buff, but the results are worth it. They are excellent for adding a layer of protection and shine.
Liquid Wax: Liquid waxes are often easier and quicker to apply. They tend to have a solvent base, which helps them spread more evenly. They can dry to a good shine.
However, some liquid waxes might not offer the same depth of protection as a good paste wax. Always check the ingredients and reviews.
Wax for Specific Woods: Some waxes are formulated for specific wood types or colors. For example, you might find waxes with a slight tint to enhance the color of darker woods or cover minor imperfections. Always test these in an inconspicuous area first to ensure the color is what you expect.
Avoid Wax with Acrylics or Silicones: Be cautious of waxes that advertise “no-buffing” or contain acrylics or silicones. While these might seem convenient, they can sometimes create a buildup that is difficult to remove later. They may also alter the natural look and feel of a waxed floor, making it harder to re-wax properly in the future.
Read Reviews and Labels: Before buying, read product reviews from other users with waxed wood floors. Check the label carefully for instructions and compatibility. If your floor has been waxed before, try to find a wax that is compatible with the existing finish.
This helps avoid any strange reactions or uneven sheen.
Wax Product Types
Understanding wax types helps you pick the best one:
Paste Wax:
- Pros: Durable, rich sheen, good protection.
- Cons: Takes more effort to apply and buff.
Liquid Wax:
- Pros: Easier and faster to apply.
- Cons: May offer less protection than paste wax.
Maintaining Shine Between Waxings
Keeping your waxed floors looking their best between full re-waxing sessions is all about daily habits and quick touch-ups. It’s about preventing the dullness from setting in.
Daily Sweeping/Vacuuming: This is non-negotiable. Dust and debris are the silent saboteurs of a waxed finish. Regular sweeping with a soft broom or vacuuming with the correct attachment removes these abrasive particles.
This prevents them from being ground into the wax. Think of it as brushing your teeth – a daily essential.
Buffing: A quick buff every week or two can make a world of difference. Use a soft microfiber cloth or a floor buffer with a clean pad. This brings up the luster of the existing wax.
It also helps to blend any minor scuffs or marks. It’s like polishing your favorite shoes – it makes them look instantly better.
Spot Cleaning: If you notice a small scuff mark or a dried-up drip, address it promptly. Sometimes a gentle rub with a dry cloth is enough. If not, a slightly damp cloth with a touch of approved wood cleaner can work.
Always dry the spot immediately afterward. This prevents water spots.
Use a Wax-Infused Cloth: You can buy cloths that have wax already infused in them. These are great for quick touch-ups or for maintaining the sheen in high-traffic areas. You can also create your own by lightly buffing a small amount of paste wax onto a clean cloth.
These cloths help to refresh the protective layer without a full re-wax.
Avoid Letting Dirt Build Up: The more dirt and grime that accumulates, the harder it will be to clean later. Consistent, light cleaning is far more effective than infrequent deep cleans. It’s the same principle as keeping a kitchen clean – daily tidying prevents overwhelming messes.
Shine-Saving Quick Tips
These simple tips keep your floors looking great daily:
- Sweep Daily: Remove dust and grit.
- Buff Weekly: Restore shine and blend marks.
- Spot Treat Fast: Clean small issues immediately.
- Use Touch-Up Cloths: Refresh worn areas.
Understanding the U.S. Context for Wood Floors
When we talk about wood floors in the United States, it’s important to remember the diverse climates and common housing styles. Our homes see everything from the dry winters of the Midwest to the humid summers of the South.
Climate Impact: In colder parts of the U.S., indoor heating can lead to very dry air, especially in winter. This dry air causes wood to contract. For waxed floors, this can mean slight gaps opening between boards.
Conversely, humid regions can cause wood to expand. This can lead to floors feeling tight or even slightly buckling.
Maintaining a consistent indoor humidity level (ideally between 35-55%) is crucial everywhere. Humidifiers in winter and dehumidifiers in summer can be vital tools. This stability helps prevent the wood from undergoing extreme expansion and contraction, which stresses the wax finish and the wood itself.
Common Wood Types: American homes often feature floors made from hardwoods like oak, maple, and cherry. These woods have different natural hardness and grain patterns. Oak is very common, durable, and takes finishes well.
Maple is harder and lighter in color. Cherry is softer and darkens with age. The care for these woods with a wax finish is generally similar, but understanding your specific wood type can help.
Age of Homes: Many U.S. homes, especially older ones, have original hardwood floors that might have been waxed for decades. These floors have a history.
They may have layers of old finishes or minor imperfections that add character. Modern homes might have newly installed wood floors finished with wax for a classic look. The care principles remain the same, but the history of an older floor might mean it needs more attention.
Consumer Products: In the U.S., we have access to a wide range of cleaning products. It’s important to stick to products specifically labeled for waxed wood floors or those recommended by flooring manufacturers. Brands like Bona, Howard, and Old English offer products that are generally well-regarded for wood floor care, but always check their suitability for wax finishes.
U.S. Flooring Considerations
Factors unique to American homes:
Climate:
- Dry winters: Use humidifiers.
- Humid summers: Use dehumidifiers.
- Target: 35-55% humidity.
Wood Types:
- Oak, Maple, Cherry are common.
- All need gentle care for wax finishes.
What This Means for You
Understanding how to care for waxed wood floors can seem daunting at first. But once you grasp the core principles, it becomes much simpler. It means embracing a gentler approach to cleaning.
When it’s Normal: It’s normal for waxed floors to require regular sweeping and occasional buffing. It’s normal for them to lose a bit of shine over time. It’s also normal to need to re-wax every 6-18 months, depending on traffic.
A slight dulling is not a crisis; it’s a sign your floor needs a little love.
When to Worry: You should worry if you see significant damage like deep gouges, warping, or persistent staining. If a cleaning product leaves a strange residue or a cloudy film that won’t buff out, that’s a cause for concern. Also, any indication of mold or mildew needs immediate attention.
Simple Checks: Regularly check the felt pads on your furniture. Are they intact? Do they need replacing?
Run your hand over the floor. Does it feel smooth, or are there rough spots? Look at the sheen in different lighting.
Is it even, or are there dull patches? These simple checks help you catch small issues before they become big problems.
Essentially, caring for waxed floors means being a mindful homeowner. It’s about paying attention to the needs of your floor and acting with gentle, appropriate methods. The effort you put in will be rewarded with beautiful, long-lasting floors that add warmth and character to your home.
Quick Fixes and Tips
Sometimes, you just need a quick tip to solve a minor issue. Here are a few easy fixes for common waxed floor concerns.
For a Dull Spot: If a small area looks dull, try buffing it with a soft cloth. If that doesn’t work, apply a tiny bit of paste wax to a cloth and buff the spot. This should help restore the shine.
For Light Scuffs: Often, light scuffs can be removed by buffing. If a scuff is a little more stubborn, you can try rubbing it gently with a tennis ball. The slight give of the ball can sometimes lift the scuff without damaging the wax.
For Water Spots: If you accidentally left a water ring, try buffing it gently with a fine steel wool pad (grade #0000). Follow this immediately by buffing with a soft cloth. Then, apply a bit of paste wax to the area and buff to a shine.
Be very gentle with steel wool.
For Greasy Marks: For greasy spots, you can use a small amount of mineral spirits on a clean cloth. Rub the spot gently. The mineral spirits will dissolve the grease.
Make sure to wipe the area dry and then buff with wax afterward.
Refreshing the Entire Floor: If the whole floor looks a bit tired, but doesn’t need a full re-wax, consider using a product like Howard Restor-A-Finish (use the matching color for your floor) or a good quality lemon oil polish. These can help revive the look and add a bit of protection. Always test in an inconspicuous spot first.
Handy Hints for Waxed Floors
Simple solutions for common issues:
Dullness: Buff with cloth or add a touch of paste wax.
Light Scuffs: Buff or rub gently with a tennis ball.
Water Rings: Use fine steel wool (#0000) gently, then buff with wax.
Grease Spots: Use a bit of mineral spirits on a cloth, then wax.

Frequently Asked Questions
How often should I sweep my waxed wood floors?
You should sweep your waxed wood floors daily, especially in high-traffic areas. This removes abrasive particles like dust, dirt, and grit that can scratch the wax finish over time. Regular sweeping is the most important step in maintaining your floors.
Can I use a damp mop on waxed floors?
No, you should generally avoid using a damp mop on waxed wood floors. Water can penetrate the wax layer and damage the wood. If you need to clean a spot, use a cloth that is only slightly damp and dry the area immediately afterward.
What kind of cleaner is safe for waxed wood floors?
Safe cleaners for waxed wood floors are typically pH-neutral or specifically designed for waxed wood finishes. They should not contain harsh chemicals, ammonia, or excessive water. Many wax-based cleaners are excellent choices as they help refresh the finish as they clean.
How do I remove stubborn stains from a waxed floor?
For stubborn stains, you might need a specialized wood floor cleaner. For very tough stains like ink or dark pet accidents, you may need to try a wood bleach or consider professional refinishing. Always test any stain remover in an inconspicuous area first.
Can I use a steam mop on my waxed floors?
Absolutely not. Steam mops should never be used on waxed wood floors. The heat and moisture from steam can quickly damage the wax finish and even cause the wood itself to warp or swell.
My waxed floor looks dull. What should I do?
If your floor looks dull, it likely needs re-waxing. First, ensure it’s clean. Then, apply a new coat of good quality paste wax.
Allow it to dry thoroughly, and then buff it to a shine. Regular buffing between waxings can also help maintain the luster.
Conclusion
Caring for your waxed wood floors doesn’t have to be complicated. With the right knowledge and a few simple habits, you can keep them looking beautiful and protected. Embrace the gentle approach, pay attention to what your floors need, and enjoy the natural warmth and charm they bring to your home.