How to Glue a Split in Solid Wood
Clean the split with a brush and vacuum, test-fit it dry, and choose the least aggressive adhesive that seems to fit the joint: PVA for tight indoor wood joints, liquid hide glue for traditional furniture work, and epoxy for gaps, damaged fibers, or small exterior parts. Clamp only until the crack closes, then leave it clamped for the full cure time.
This guide is part of our Wood glue essentials: types, uses, and cure times series.
If the split is diagnosed poorly or the wrong adhesive is used, it can reopen, starve the joint, stain the wood, or fail under ordinary load. This guide shows how I inspect the split, choose the right wood adhesive, clamp it correctly, and wait long enough before stressing the repair.
Why did the wood split?


Wood can split for several reasons, and the cause often matters more than the glue. Moisture movement, fast drying, impact, fastener stress, or an old glue line failing can each suggest a different repair approach. A split caused by movement may be glueable; a split with crushed fibers or missing wood may need replacement.
Moisture movement and seasonal change
Wood generally expands and contracts across the grain as humidity changes. If a board split near a panel edge, drawer side, or trim return, the crack often follows a weak grain line that opened as the wood moved. Those splits are usually repairable if the edges still meet cleanly.
Drying defects, impact, and fastener stress
Rapid drying can leave internal tension in the board. A knock, dropped part, or screw placed too close to an edge can finish the job. When the crack started from a nail, screw, or bolt hole, check whether the surrounding wood is crushed or split beyond the visible line.
When the part is repairable and when it is not
Repair is sensible when the split edges still fit, the fibers are mostly intact, and the part is not load-bearing in a way that demands factory strength. Replacement is the better call when the split keeps opening, the wood is missing, or the piece is structurally crushed.
How do you judge the split before buying glue?
Judge the split by width, depth, movement, and damage before choosing adhesive. Hairline cracks, moderate splits, and open gaps do not all need the same product or clamp plan. A quick matrix prevents overbuilding the repair and keeps you from using a gap-filling adhesive where a tighter wood glue joint would hold better.
Repair-decision matrix
| Split condition | What you see | Best adhesive choice | Clamp plan | Repair or replace? |
|---|---|---|---|---|
| Hairline | Edges meet with little or no visible gap; no missing fibers | PVA wood glue or liquid hide glue | Light, even pressure until closed | Repair if the part is stable |
| Moderate | Visible opening, but the split can be closed without force | Liquid hide glue for furniture work; PVA for interior parts | Even pressure, watch alignment closely | Repair if fibers are intact |
| Gapped or damaged | Missing wood, crushed edges, or a crack that will not close cleanly | Epoxy resin and hardener | Clamp only for position, not brute force | Repair only if the part is otherwise sound |
Flex the part gently by hand. If the split opens and closes while the rest of the piece shifts, there may be movement elsewhere in the assembly. Look for crushed fibers, dark contamination, and old adhesive that can block penetration. Those details matter more than the crack’s length.
Which adhesive fits the split?
The best wood adhesive depends on split width, use, and exposure. High-quality wood glue or epoxy works best for most repairs, but the right choice is narrower than that. PVA fits tight indoor joints, liquid hide glue suits reversible furniture work, and epoxy fills damaged areas where wood glue cannot bridge the gap.
PVA wood glue for tight interior splits
PVA wood glue forms a long-lasting bond between wood pieces. Standard PVA is not waterproof and should not be used outdoors, but it is still the right choice for many interior splits. Carpenter’s glue is a water-resistant type of PVA for outdoor use. Use it where the split closes tightly and the part stays dry. (wikihow.com)
Liquid hide glue for furniture work and reversibility
Liquid hide glue is a natural, environmentally-friendly glue made from boiled animal collagen. It often gives you more open time than some common wood glues, which can help on furniture parts that need careful alignment. It is a strong choice for traditional repairs when later reversibility matters.
Epoxy resin and hardener for gaps, chips, and damaged sections
Epoxy is a two-part system consisting of resin and hardener. It is recommended for filling gaps and cracks in damaged wood, and it cures waterproof. Use epoxy when fibers are missing, the split has chipped edges, or the crack will not close tightly enough for a wood glue joint.
Glue choice by split condition
| Split type | Best choice | Why it fits |
|---|---|---|
| Hairline, indoor | PVA wood glue | Penetrates a tight joint and leaves a strong permanent bond |
| Moderate, furniture repair | Liquid hide glue | Longer open time and traditional reversibility |
| Gapped, chipped, or damaged | Epoxy resin and hardener | Fills cracks and bridges missing material better than regular wood glue |
What tools and prep steps do you need?
Good surface preparation starts with cleaning the split and removing anything that blocks adhesive contact. Old glue, dust, loose fibers, and rough debris prevent penetration. Dry-fitting the part first shows how much the crack opens, where the clamp lands, and whether any nearby finish needs masking.
Basic tools
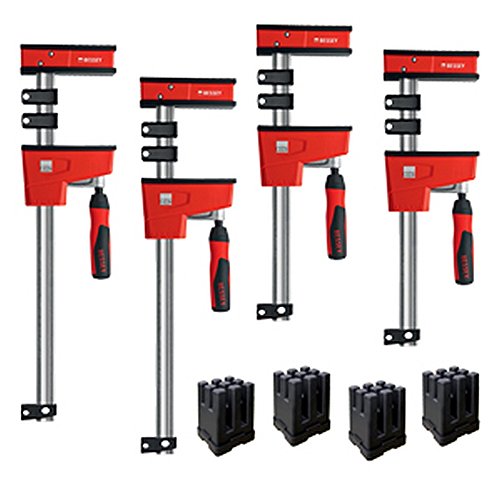
- Bar clamps for larger projects
- Pipe clamps for longer pieces of wood
- C-clamps for smaller repairs
- Brush, syringe, or thin nozzle for adhesive delivery
- Scraper or chisel for old glue
- Sandpaper or sanding block for rough edges
- Clean rag for squeeze-out
Preparation sequence
- Open the split just enough to inspect the full depth.
- Remove dust, loose fibers, and old adhesive.
- Sand the split edges lightly to remove debris and old adhesive.
- Dry-fit the part and confirm the crack closes without forcing it.
- Protect nearby finish before adhesive goes in.
How do you glue a split in solid wood without making it worse?
Use enough adhesive to coat the full split, but do not flood the joint. Work glue into the crack so it reaches the deepest fibers, then align the part before clamping. The goal is a closed, supported joint, not a swollen glue pocket that traps dust or pushes the split out of line.
Apply adhesive through the full split
Inject or brush the adhesive into the crack so both faces are coated. A syringe or thin nozzle helps on narrow splits, while a brush can work along an open edge. For epoxy, mix resin and hardener fully before application. For PVA or hide glue, move quickly and cover the entire split.
Avoid flooding and trapped debris
Dust inside the crack acts like a spacer. So does old finish. If the split is dirty, the glue may bridge the contamination instead of bonding wood to wood. That is the common failure case when a split reopens after a repair that looked fine on the first day.
Align before tightening
Check that the faces are flush before the clamps bite. Once pressure starts, a split can slide or step out of alignment. On visible furniture parts, that misalignment is harder to hide than a fine glue line.
Do I need clamps when gluing a split board?
Yes, clamps are usually needed because the split must stay closed while the adhesive cures. Use even pressure, not brute force. Bar clamps, pipe clamps, and C-clamps all have a place; the right one depends on the size of the piece and how much reach the clamp needs.
Choose the right clamp
Bar clamps are recommended for larger projects. Pipe clamps are recommended for longer pieces of wood. C-clamps are suggested for smaller repairs. The clamp only needs to hold the crack shut and keep the faces aligned while the adhesive sets.
How much pressure is enough
Tighten the clamps until the split closes and you see a small amount of squeeze-out, then stop. If the clamp keeps turning after closure, the joint can starve. A starved joint looks tight but has too little adhesive left in the bond line.
How do clamps and cure time affect the repair?
Clamp pressure and cure time decide whether the repair holds or fails later. The split should stay closed under even pressure until the adhesive has cured per the label. Hold it longer if the part is stressed or if the glue line is deep and needs full set before sanding or finishing.
Follow the manufacturer’s cure window
Follow the label for cure time, because it varies by adhesive. Do not sand too soon. A bond that feels firm on the surface can still be soft inside, and finishing over it too early can trap movement or weaken the glue line.
How long to clamp
Keep the clamp in place for the adhesive’s full set time, then leave the part alone until full cure. The exact wait depends on the product, room temperature, and joint depth. If the part is load-bearing, give it extra time before stressing it.
What if the split is open, dirty, or outdoors?
Open, dirty, or outdoor splits need a more careful plan. Trapped dust, moving wood, and exposure to moisture can defeat an ordinary repair. Regular wood glue is generally for interior use, while water-resistant PVA or epoxy may be needed outside, especially on parts that see weather or repeated wetting.
Handle squeeze-out and re-opening cracks
Wipe excess adhesive before it dries, but do not smear it deep into the grain around a visible surface. If the split reopens during clamping, stop and check for hidden debris, misalignment, or a clamp pushing the part sideways. Those are common reasons a repair looks good and then fails.
Outdoor exposure changes the adhesive choice
Can I repair a split piece of outdoor wood with regular wood glue? Usually no. Standard PVA is not waterproof and should not be used outdoors. For exterior parts, choose carpenter’s glue if the split is tight and sheltered, or epoxy when the crack is open, damaged, or exposed to weather.
Finish compatibility and cosmetic touch-up
On visible furniture parts, repair the finish after the bond sets. Stain can bleed into end grain around the split, and clear finish can make the glue line stand out if squeeze-out was left behind. Light sanding, color matching, and careful topcoat work usually matter as much as the glue itself.
Frequently asked questions
What is the best glue for a split wood repair?
For tight indoor splits, PVA wood glue is usually the first choice because it forms a long-lasting bond. Liquid hide glue is better for traditional furniture repairs or when reversibility matters. Epoxy is the better fit when the wood is chipped, gapped, or missing fibers.
Should I sand or clean the split before applying glue?
Both matter, but cleaning comes first. Remove dust, loose fibers, and old adhesive from the split so the glue can reach bare wood. Light sanding helps smooth rough edges and improve contact, but heavy sanding can widen the crack and reduce fit.
When should I use epoxy instead of wood glue for a split?
Use epoxy when the split is gapped, damaged, or missing wood, because epoxy fills cracks better than ordinary wood glue. It is also a good choice for parts exposed to moisture, or for repairs where the split cannot be closed tightly enough for PVA or hide glue.
How long should I clamp a split wood repair?
Clamp the repair for the adhesive’s stated set time, then leave the part untouched until full cure. That time varies with product and joint depth, so the label matters. Sanding or finishing before full cure can pull at the bond and weaken the repair.
How do you keep glue from squeezing out of the split?
Use only enough adhesive to coat the split faces, then stop tightening as soon as the crack closes. Excess squeeze-out can be wiped away before it hardens. If the joint keeps oozing heavily, too much glue or too much clamp pressure is being used.
Can I repair a split piece of outdoor wood with regular wood glue?
Usually not. Standard PVA is not waterproof and should not be used outdoors. For exterior parts, use water-resistant carpenter’s glue on tight joints or epoxy for damaged, open, or weather-exposed splits. Outdoor exposure changes the adhesive choice more than any other factor.
Sponsored / affiliate links. As an Amazon Associate I earn from qualifying purchases. I may earn additional commission from eligible campaigns.