How to Repair Rotting Wood Post Without Replacing It: DIY Guide
Dealing with a rotting wood post can be frustrating, especially when replacement seems like the only option. But what if you could avoid the hassle and expense of tearing out and replacing that post?
Imagine saving time and money while restoring strength and beauty to your wood structures. You’re about to discover how to breathe new life into those rotting wood posts without the need to replace them entirely. This guide will walk you through simple steps, using tools and materials you likely already have at home.
By the end, you’ll feel empowered to tackle this common problem with confidence. Ready to transform those unsightly posts back to their former glory? Let’s dive in and get your wood looking like new again.
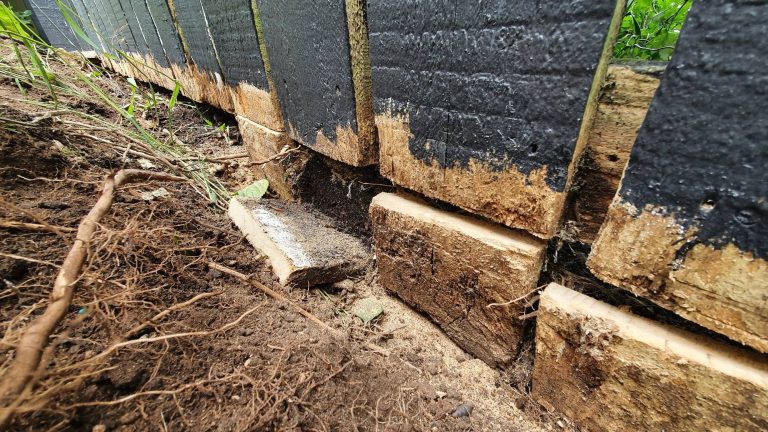
Identifying Rot In Wood Posts
Wood rot is not hard to spot. Soft spots can be a clear sign. Look for discoloration in the wood. Cracks in the post might show rot. Fungi growing are a big warning. The post might smell bad. Weak wood is a sign too. Listen for hollow sounds when tapped. Rot makes wood lose strength.
Simple tools can help find rot. A screwdriver can probe soft wood. Use a hammer to check strength. A flashlight helps see dark spots. Magnifying glasses can see tiny cracks. Moisture meters check for wet wood. Tape measures help find the rot area. Gloves protect your hands.

Credit: www.augustachronicle.com
Safety Precautions
Wearing protective gearis important. Use safety gogglesto protect your eyes. Wear glovesto keep your hands safe. A dust maskhelps you breathe clean air. Sturdy shoeskeep your feet safe. All these items keep you safe.
Choose a safe placeto work. Make sure it’s dryand well-lit. Clear any clutter around you. Keep tools organized. Check if the area is ventilated. A good environment helps you work better. Always be aware of your surroundings.
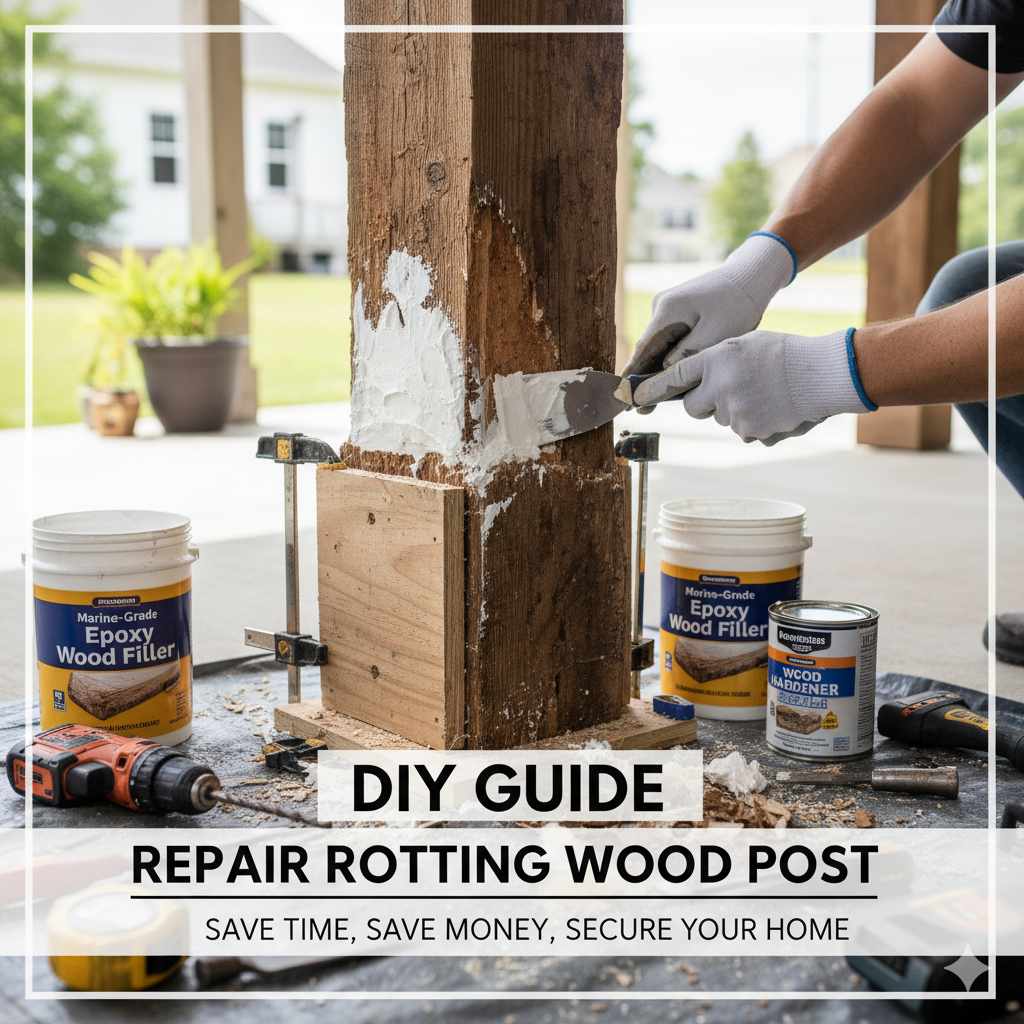
Gathering Necessary Materials
Wood fillers can fix small rotting areas. These fillers are easy to use. Choose a high-quality wood filler. It helps in restoring the wood’s shape. Epoxies are great for larger repairs. They make the wood strong again. Use epoxiesfor deep rotting spots. They bond well with wood. Both fillers and epoxies save time and money.
Tools make the repair easy. A chiselis useful for removing rotten wood. Sandpaper smooths the surface. Use a putty knifefor applying fillers. A drill helps in fixing screws. Safety goggles keep your eyes safe. Work gloves protect your hands. Keep all tools handy before starting.

Credit: www.youtube.com
Preparing The Post For Repair
First, clear away any dirt around the post. Use a brush for this task. Remove all dust and debris. After cleaning, allow the wood to dry completely. This might take a few hours. Dry wood is easier to repair. Wet wood can make repairs fail. Ensure no water remains.
Inspect the post carefully. Find soft and rotten parts. Use a chisel to cut away these sections. Only keep the solid wood. This step is crucial. It helps in making the post strong again. Rotten wood cannot be fixed. It is important to replace it. Removing it ensures a better repair.
Applying Wood Filler
Start by mixing the wood filler. Follow the instructions on the package. Usually, you need to mix until smooth. Use a stick or spatula. Ensure there are no lumps in the mixture. If it’s too thick, add a bit of water. Stir well to get the right texture. Smooth and creamy is ideal. The filler should be easy to spread. Avoid a runny consistency. It should stick to the wood easily.
After mixing, use a putty knife. Apply the filler to the damaged areas. Press it deep into the gaps. Make sure you cover all holes. Smooth the surface with the knife. Remove any extra filler. Let it dry completely. Check the package for drying time. Once dry, sand the surface. Make it smooth and even. Your wood post will look new again.
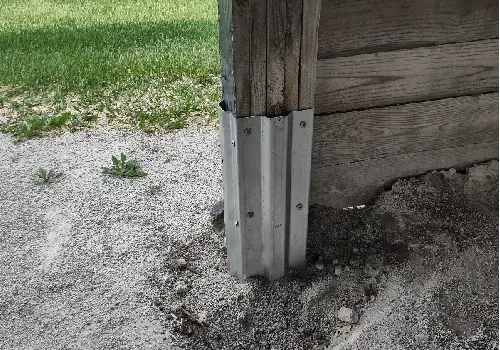
Reinforcing The Repaired Post
Strengthening Techniquescan make a wood post last longer. Use metal braces to support weak areas. These braces hold the wood tight and prevent future rot. Another option is to wrap the post in fiberglass. This material is strong and keeps moisture away. Fiberglass adds a solid layer around the wood.
Additional Support Optionsinclude using epoxy fillers. Epoxy fills gaps and cracks in the wood. It hardens and makes the wood stronger. Nails and screws can help too. They keep parts of the post together. Make sure they are rust-resistant. Rust can weaken the post over time.
Finishing Touches
Repairing a rotting wood post is manageable with the right technique. Clean the area thoroughly and remove decayed parts. Apply wood filler or epoxy to reinforce and restore strength, ensuring longevity without replacement.
Sanding And Smoothing
Start by sanding the wood with fine-grit sandpaper. This makes it smooth. Make sure to sand along the grain of the wood. This helps avoid scratches. Wipe away dust with a damp cloth. This makes the surface clean. Smoothing the edges helps the wood look nice. Sanding also prepares the wood for paint or stain. Take your time for the best finish.
Painting Or Staining
Choose between painting or staining the wood. Paint gives a solid color. Stain shows the wood’s natural look. Use a brush or roller for both. Apply a thin coat first. Let it dry completely. Add more coats if needed. Make sure each coat is dry before adding another. Use outdoor paint or stain for better protection. It keeps the wood safe from weather.
Credit: anthembuilt.com
Maintenance Tips
Repair rotting wood posts without replacing them by cleaning the area and removing loose wood. Apply a wood hardener to strengthen the post, followed by a wood filler for a smooth surface. Sand and paint the repaired area to match the original post.
Regular Inspections
Check your wood posts often. Look for signs of rot or damage. Small cracks can grow big fast. Early detection helps save time and money. Use a flashlight to see in dark spots. Tap on the wood with a stick. Listen for hollow sounds. Hollow wood can mean rot inside. Regular checks keep posts strong and safe.
Preventive Measures
Keep your wood posts dry. Water is wood’s enemy. Use a sealant to block moisture. Seal the wood once a year. Plant bushes away from the posts. Bushes can trap water near the wood. Use gravel around the base. Gravel helps water drain away. Keep the area clean and clear. This helps the wood last longer.
Frequently Asked Questions
How Do You Fix A Rotting Wood Post Without Replacing It?
Clean the rotted area thoroughly. Apply a wood hardener to strengthen the wood. Use wood filler to fill gaps and cracks. Sand the surface smoothly after it dries. Seal with paint or stain for protection.
What Is The Best Wood Filler For Rotted Wood?
Epoxy wood fillers are ideal for rotted wood. They offer durability and water resistance. Popular brands include Abatron WoodEpox and PC-Woody. These fillers can restore structural integrity effectively. Always follow the manufacturer’s instructions for best results.
How To Repair A Rotted Post Bottom?
Cut the rotted section off the post. Apply wood preservative to prevent further decay. Replace the removed section with treated wood. Secure it with screws or bolts. Seal the joint with waterproof sealant to ensure durability.
Can You Put New Wood Over Rotted Wood?
New wood should not be placed over rotted wood. Replace rotted wood to ensure structural integrity and safety. Ignoring rot can lead to further damage and costly repairs. Properly inspect and remove any decayed wood before installing new materials. Ensure the area is dry and well-prepared for new wood installation.
Conclusion
Repairing rotting wood posts can be easy and cost-effective. Follow simple steps to restore strength and appearance. Clean the area thoroughly before applying any treatment. Use wood hardeners for added durability. Fill gaps and cracks with wood fillers. Sand the surface for a smooth finish.
Regular maintenance extends the life of your wood posts. Check for signs of damage frequently. Quick fixes prevent larger issues later. Now you can confidently handle minor wood rot issues. Enjoy a strong, sturdy structure without replacement. Keep your space looking great with minimal effort.