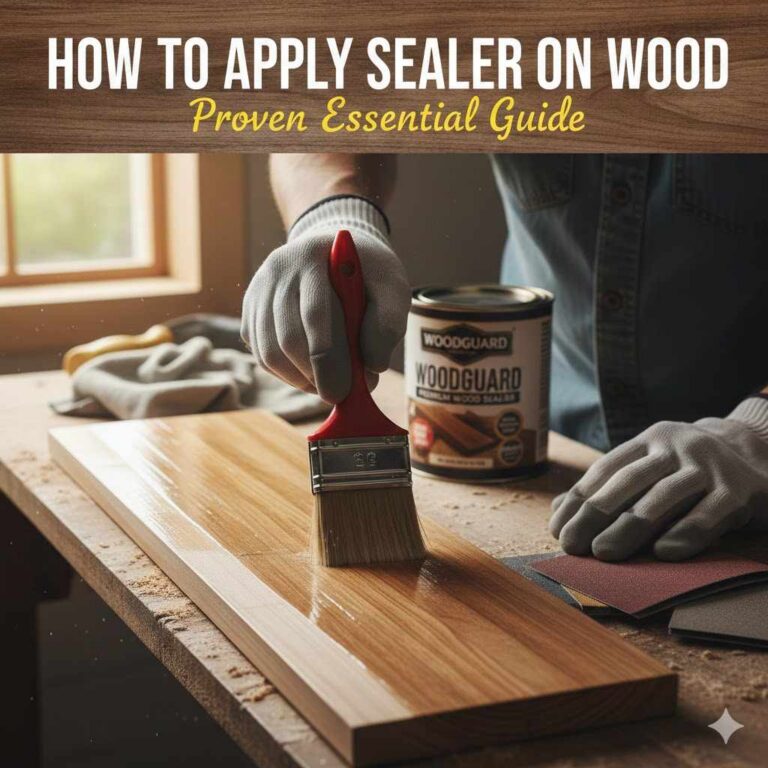
How To Seal Acrylic Painted Wood For A Perfect, Stunning Look
To seal acrylic painted wood, first ensure the paint is fully cured (1-3 days). Then, apply a thin, even coat of a clear sealer like water-based polycrylic using a quality brush. Let it dry completely, lightly sand with 220-grit sandpaper if needed, and apply 2-3 coats for a durable, stunning finish that protects your hard work.
Hello, fellow crafters! Md Meraj here, your friend in the workshop. Have you ever spent hours painting a beautiful design on a piece of wood, only to see it get scuffed, stained, or faded over time? It’s a common frustration, but I’m here to tell you there’s a simple solution. That final step—sealing your project—is the secret to making it last a lifetime.
It might sound like a complicated extra step, but don’t worry. Sealing your acrylic painted wood is easier than you think. In this guide, I’ll walk you through everything, step-by-step. We’ll cover picking the right sealant, gathering your tools, and applying it like a pro. Together, we’ll make sure your next project not only looks amazing but stays that way.
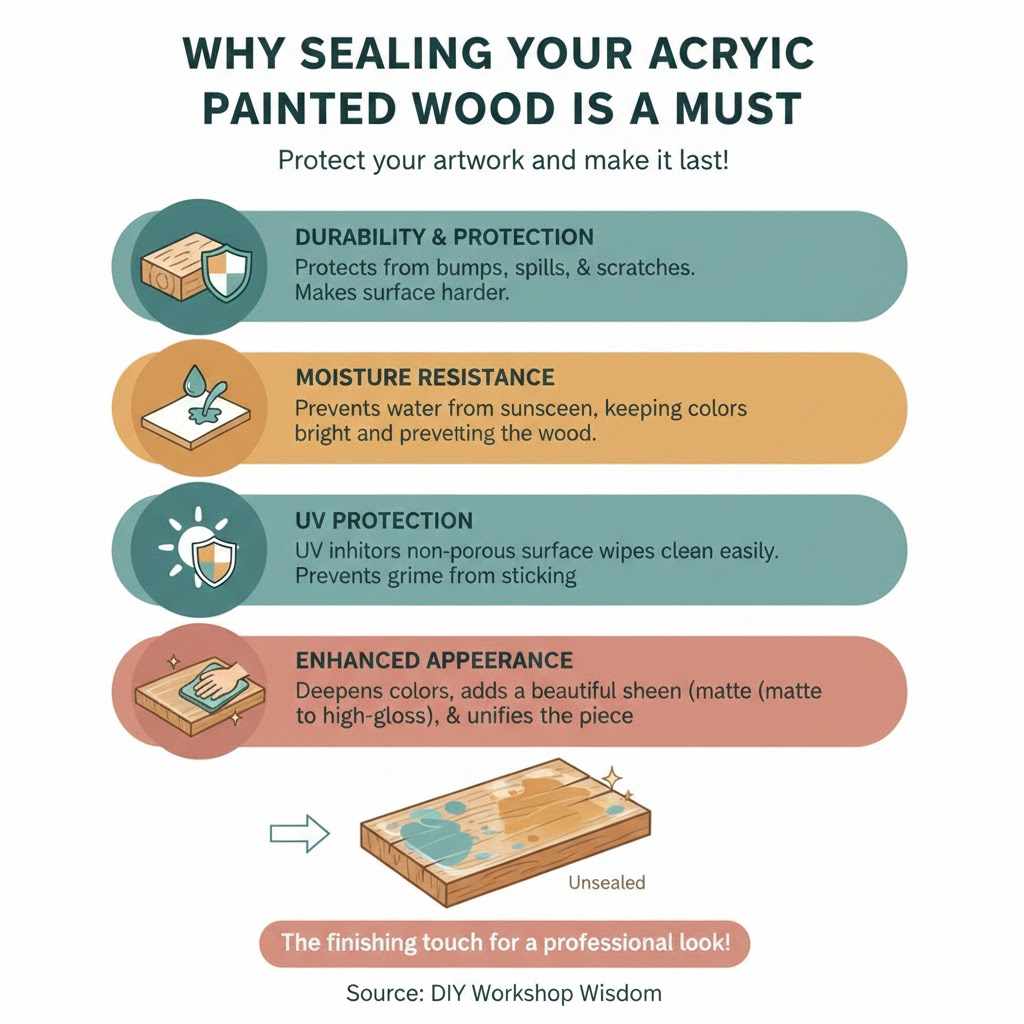
Why Sealing Your Acrylic Painted Wood Is A Must
You’ve done the fun part—you’ve picked your wood, chosen your colors, and brought your vision to life with acrylic paint. So why add another step? Think of a sealant as an invisible shield for your artwork. It’s the finishing touch that takes your project from “homemade” to “hand-crafted.”
Here’s exactly why you should never skip this final step:
- Durability and Protection: Life is full of bumps, spills, and scratches. A good sealer protects your paint from everyday wear and tear. It makes the surface much harder and more resistant to damage. This is especially important for functional items like trays, coasters, shelves, or furniture.
- Moisture Resistance: Wood and water aren’t the best of friends. Wood can warp, swell, or rot when exposed to moisture. A sealant creates a barrier that helps prevent water from seeping into the wood and ruining your beautiful paint job.
- UV Protection: Sunlight is a powerful force that can cause colors to fade and become dull over time. Many sealants contain UV inhibitors that act like sunscreen for your project, keeping your colors bright and vibrant for years, especially for pieces that will be near a window or used outdoors.
- Easier Cleaning: A sealed surface is smooth and non-porous. This means dust, dirt, and spills wipe away easily with a damp cloth. An unsealed painted surface, on the other hand, can feel slightly tacky and will trap grime, making it much harder to clean without damaging the paint.
- Enhanced Appearance: The right sealant can dramatically improve the look of your piece. It can deepen colors, add a beautiful sheen (from matte to high-gloss), and give your project a professional, polished finish. It unifies the surface and makes the colors pop.
Choosing the Right Sealant for Your Project
Walking into the hardware store and seeing a wall of sealants can feel overwhelming. Don’t worry! Choosing the right one is simple once you know what you’re looking for. The best sealer depends on your specific project, where it will be used, and the look you want to achieve.
Most sealants for acrylic paint are clear topcoats. The key is to choose one that is non-yellowing and compatible with acrylic paint. Let’s break down the most popular and beginner-friendly options.
The Main Types of Sealants
Here’s a quick comparison of the top choices for sealing your acrylic-painted wood projects. I’ve laid them out in a simple table to help you decide at a glance.
| Sealant Type | Best For | Finish Options | Cleanup | Key Feature |
|---|---|---|---|---|
| Polycrylic (Water-Based) | Indoor projects, furniture, crafts, light-colored wood/paint | Matte, Satin, Semi-Gloss, Gloss | Soap and Water | Crystal clear, non-yellowing, low odor |
| Polyurethane (Oil-Based) | High-traffic surfaces like floors, tabletops, outdoor furniture | Satin, Semi-Gloss, Gloss | Mineral Spirits | Extremely durable, adds a warm amber glow |
| Spar Varnish/Urethane | Outdoor projects exposed to sun and rain (doors, benches) | Satin, Gloss | Mineral Spirits | UV protection and moisture resistance |
| Finishing Wax | Decorative pieces, low-traffic items, rustic/antique look | Soft, natural luster | Buff with a cloth | Easy to apply by hand, soft feel |
A Closer Look at Your Options
Polycrylic Sealant (My Top Recommendation for Beginners)
For most indoor projects, water-based Polycrylic is your best friend. It’s incredibly easy to use, dries quickly, and has a very low odor, which is great for working indoors. Best of all, it dries perfectly clear and will not yellow over time. This is crucial for protecting projects with white or light-colored paint, as it won’t alter their color.
- Pros: Dries fast, low odor, easy soap-and-water cleanup, crystal clear finish.
- Cons: Not as durable as oil-based polyurethane for very high-traffic surfaces.
Polyurethane Sealant
Polyurethane is the workhorse of wood finishes. It comes in two main types: water-based and oil-based.
- Water-Based Polyurethane: Similar to Polycrylic, it offers low odor and easy cleanup. It’s a great choice for durability while still providing a clear finish.
- Oil-Based Polyurethane: This is the champion of durability. It creates a super-hard protective shell that stands up to heavy use. However, it has a strong smell, requires mineral spirits for cleanup, and adds a slight amber or yellowish tint to the finish. This ambering can be beautiful on darker wood stains but will change the color of white or light acrylic paints.
Spar Varnish (For the Great Outdoors)
If your painted wood project is going to live outside, you need a sealer with UV protection. Spar Varnish (also called Spar Urethane) is designed for this. It contains UV absorbers to protect against sun damage and is formulated to be more flexible, allowing it to expand and contract with the wood as temperature and humidity change. According to the U.S. Department of Agriculture’s guide on wood finishes, finishes with UV absorbers are essential for protecting exterior wood.
- Pros: Excellent UV and moisture protection, flexible.
- Cons: Can add an amber tint, requires mineral spirits for cleanup.
Finishing Wax
Wax offers a more subtle, natural-looking finish. It’s applied with a soft cloth and buffed to a gentle sheen. It provides some water resistance and a wonderfully smooth feel. However, it’s not very durable and isn’t suitable for items that will see heavy use or be exposed to heat (like coasters for hot drinks). It’s best for decorative pieces where you want a soft, hand-rubbed look.
- Pros: Easy to apply, beautiful soft finish, easy to repair.
- Cons: Not very protective, needs reapplication over time.
Essential Tools and Materials You’ll Need
Great news! You don’t need a lot of fancy equipment for this job. Gathering your supplies beforehand makes the process smooth and enjoyable. Here’s a simple checklist:
- Your Chosen Sealant: Polycrylic, polyurethane, varnish, or wax.
- A High-Quality Applicator:
- For water-based sealants: A synthetic bristle brush (like nylon or polyester) works best.
- For oil-based sealants: A natural bristle brush is ideal.
- A foam brush is a good, inexpensive option for small projects.
- A clean, lint-free rag for applying wax or wipe-on finishes.
- Fine-Grit Sandpaper: 220-grit or higher (or a fine sanding sponge). This is for smoothing the surface between coats.
- Tack Cloth or a Clean, Damp Rag: For wiping away dust after sanding.
- Drop Cloth or Newspaper: To protect your work surface.
- Good Ventilation: An open window or a fan, especially if using an oil-based product.
- Stir Stick: A clean paint stick or wooden dowel. Never shake your sealant!
Step-by-Step Guide: How to Seal Acrylic Painted Wood Perfectly
Alright, you’ve picked your sealer and gathered your tools. Now for the fun part! Follow these simple steps, and you’ll get a flawless finish every time. You’ve got this!
Step 1: Prepare Your Workspace
Find a clean, well-lit, and well-ventilated area to work. Lay down your drop cloth to catch any drips. Dust can be the enemy of a smooth finish, so try to work in a low-dust environment if possible. Check the temperature and humidity; most sealants cure best in moderate conditions, not extreme cold, heat, or humidity. Always read the instructions on the can for specific recommendations.
Step 2: Ensure Your Paint Is Completely Cured
This is the most important step! Your acrylic paint might feel dry to the touch in an hour, but it is not fully cured. Curing is the process where all the water evaporates from the paint, and the polymer molecules bond together to form a hard, durable film. Applying a sealer too early can trap moisture, causing a cloudy finish or causing the paint to peel later on.
Rule of thumb: Wait at least 24 to 72 hours for your acrylic paint to fully cure before sealing. If you applied thick layers of paint, wait even longer.
Step 3: Clean the Painted Surface Gently
Before you seal, you want the surface to be perfectly clean. Use a soft, dry cloth or a tack cloth to wipe away any dust, pet hair, or other tiny particles that may have settled on your project. Do not use any cleaning chemicals, as they could react with the paint.
Step 4: Stir, Don’t Shake!
Gently open your can of sealant. You’ll notice some of the flattening agents (the stuff that makes a satin or matte finish) may have settled at the bottom. Use your stir stick to gently and thoroughly stir the contents for a couple of minutes. Never shake the can! Shaking creates air bubbles that will get trapped in your finish and dry into tiny bumps on your surface.
Step 5: Apply the First Thin Coat of Sealer
Dip the tip of your brush (about one-third of the way up the bristles) into the sealer. Less is more here. The goal is to apply a thin, even coat.
Use long, smooth strokes and move in one direction, following the grain of the wood if it’s visible. Overlap each stroke slightly to ensure full coverage. Try not to go back and forth over an area you’ve already coated, as this can create brush marks. Once the entire surface is covered, leave it alone. Don’t be tempted to “fix” any spots as it starts to dry.
Step 6: Let It Dry Completely
Patience is key. Check the can for the recommended drying time. Water-based products typically dry to the touch in about an hour and are ready for a recoat in about two hours. Oil-based products take much longer. Let the piece dry in a dust-free area where it won’t be disturbed.
Step 7: Lightly Sand Between Coats (The Secret to a Silky-Smooth Finish)
Once the first coat is completely dry, you may feel tiny bumps or a slightly rough texture. This is normal. Take your 220-grit (or higher) sandpaper and very, very lightly sand the surface. You are not trying to remove the sealer, just to knock down any dust nibs and create a perfectly smooth base for the next coat. The pressure should be extremely light—just the weight of your hand is enough.
After sanding, wipe away all the dust with a tack cloth or a clean, damp rag. This step is critical for achieving that professional, buttery-smooth feel.
Step 8: Apply Additional Coats
Repeat the process of applying and drying for a second and possibly a third coat. For most projects, two or three thin coats provide much better protection and a more beautiful finish than one thick coat. Remember to lightly sand and clean the surface between each coat (but not after the final coat!).
Step 9: Allow the Final Coat to Cure
Just like paint, sealer needs time to cure and harden completely. Even though it might feel dry to the touch in a few hours, the finish is still soft and can be easily damaged. The full cure time can range from a few days to a month, depending on the product and conditions. Check the instructions on the can. Be gentle with your project during this time and avoid placing heavy objects on it.
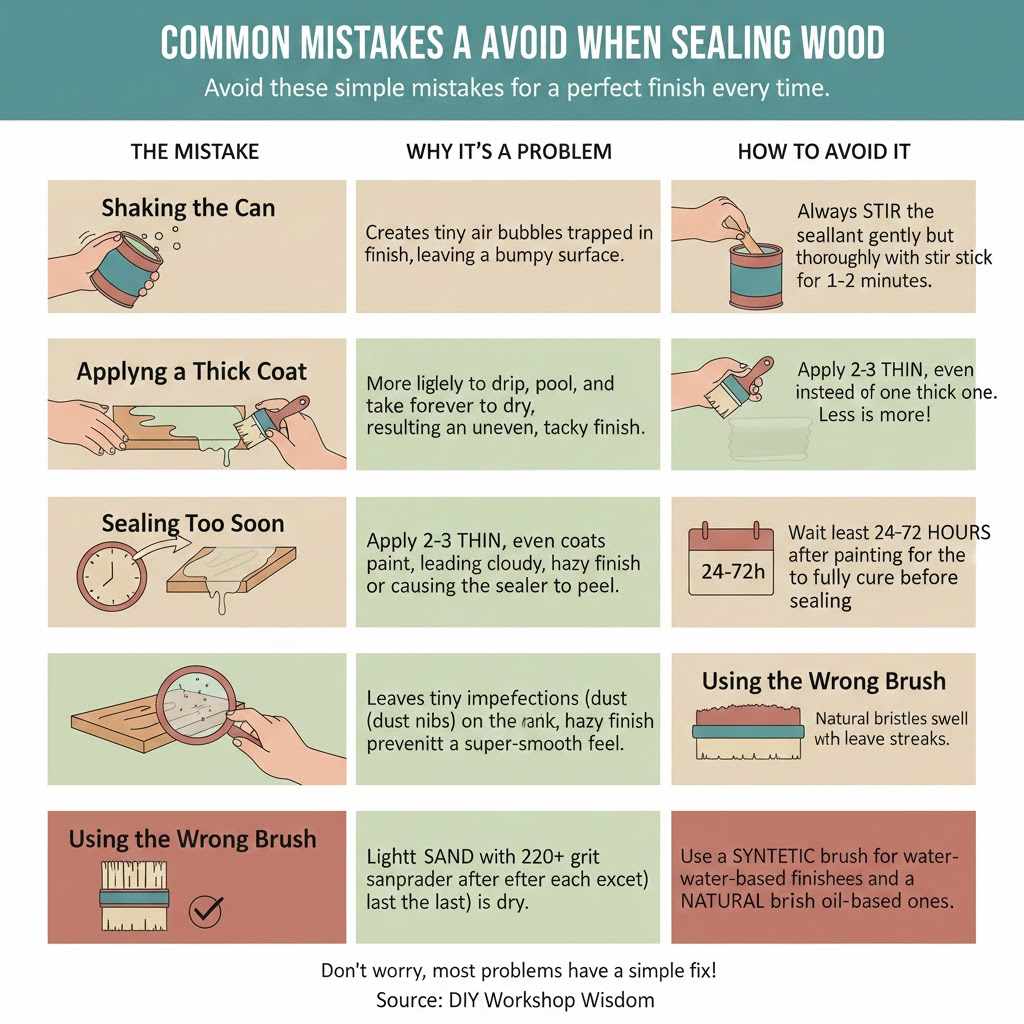
Common Mistakes to Avoid When Sealing Wood
We all make mistakes, but here are a few common ones you can easily avoid for a perfect finish every time.
| The Mistake | Why It’s a Problem | How to Avoid It |
|---|---|---|
| Shaking the Can | Creates tiny air bubbles that get trapped in the finish, leaving a bumpy surface. | Always stir the sealant gently but thoroughly with a stir stick for 1-2 minutes. |
| Applying a Thick Coat | Thick coats are more likely to drip, pool, and take forever to dry, resulting in an uneven, tacky finish. | Apply 2-3 thin, even coats instead of one thick one. Less is more! |
| Sealing Too Soon | Traps moisture from uncured paint, leading to a cloudy, hazy finish or causing the sealer to peel off later. | Wait at least 24-72 hours after painting for the acrylic to fully cure before sealing. |
| Skipping Sanding Between Coats | Leaves tiny imperfections (dust nibs) on the surface, preventing a super-smooth feel. | Lightly sand with 220+ grit sandpaper after each coat (except the last) is dry. |
| Using the Wrong Brush | Using a natural bristle brush with water-based finishes can cause the bristles to swell and leave streaks. | Use a synthetic brush for water-based sealers and a natural bristle brush for oil-based ones. |
Frequently Asked Questions (FAQ)
Can I use Mod Podge to seal acrylic paint on wood?
Yes, you can! Mod Podge is a popular all-in-one glue, sealer, and finish. It’s great for smaller craft projects. However, for furniture or high-use items, a dedicated sealer like Polycrylic or polyurethane will provide much more durable, long-lasting protection.
How long should acrylic paint dry before sealing?
You should let your acrylic paint cure completely before sealing, not just dry to the touch. A safe waiting period is 24 to 72 hours. If you live in a very humid environment or have applied very thick paint, it’s best to wait even longer.
Will the sealer make my acrylic paint colors run or bleed?
If your paint is fully cured, the sealer should not make the colors run. This is another reason why waiting is so important! Applying sealer to wet or semi-cured paint can reactivate it and cause smearing. Using a spray-on sealer can also be a good way to apply a first coat without touching the surface at all.
What’s the best sealer for outdoor painted wood?
For outdoor projects, you absolutely need a sealer with UV protection and weather resistance. Look for products labeled as “exterior” or “marine,” such as Spar Urethane or Spar Varnish. These are designed to protect your project from sun, rain, and temperature changes.
Do I have to sand between coats of sealer?
You don’t have to, but it’s highly recommended if you want the smoothest possible finish. The light sanding knocks down any tiny dust particles that have settled while it was drying, creating a much more professional result. If you’re happy with the feel after the first coat, you can skip it, but it truly makes a difference.
How can I get a finish without any brush strokes?
To avoid brush strokes, use a high-quality brush, apply thin coats, and always brush in one direction with a light touch. Avoid over-brushing an area that has already started to dry. Alternatively, you can use a spray-on sealer for a perfectly even application with no brush marks at all. Another option is a wipe-on poly, which is applied with a rag.
Can I use a hairdryer to speed up drying?
It’s best to avoid using a hairdryer or heat gun. Forcing the sealer to dry too quickly can cause it to crack, bubble, or not adhere properly to the surface. Patience is your best tool here! Let it air dry naturally according to the manufacturer’s instructions for the strongest finish.
Your Masterpiece is Now Complete and Protected!
There you have it! Sealing your acrylic painted wood isn’t a chore—it’s the final, rewarding step that honors all the hard work and creativity you poured into your project. By choosing the right sealant and following these simple steps, you’ve created a durable, beautiful piece that you can be proud of for years to come.
Remember, every project is a chance to learn and grow your skills. Don’t be afraid to experiment with different finishes to see what you like best. You’re not just painting on wood; you’re creating lasting art and functional pieces for your home. Now go enjoy your stunning, perfectly sealed creation!