How To Seal Chalk Paint On Furniture: The Ultimate Best Way
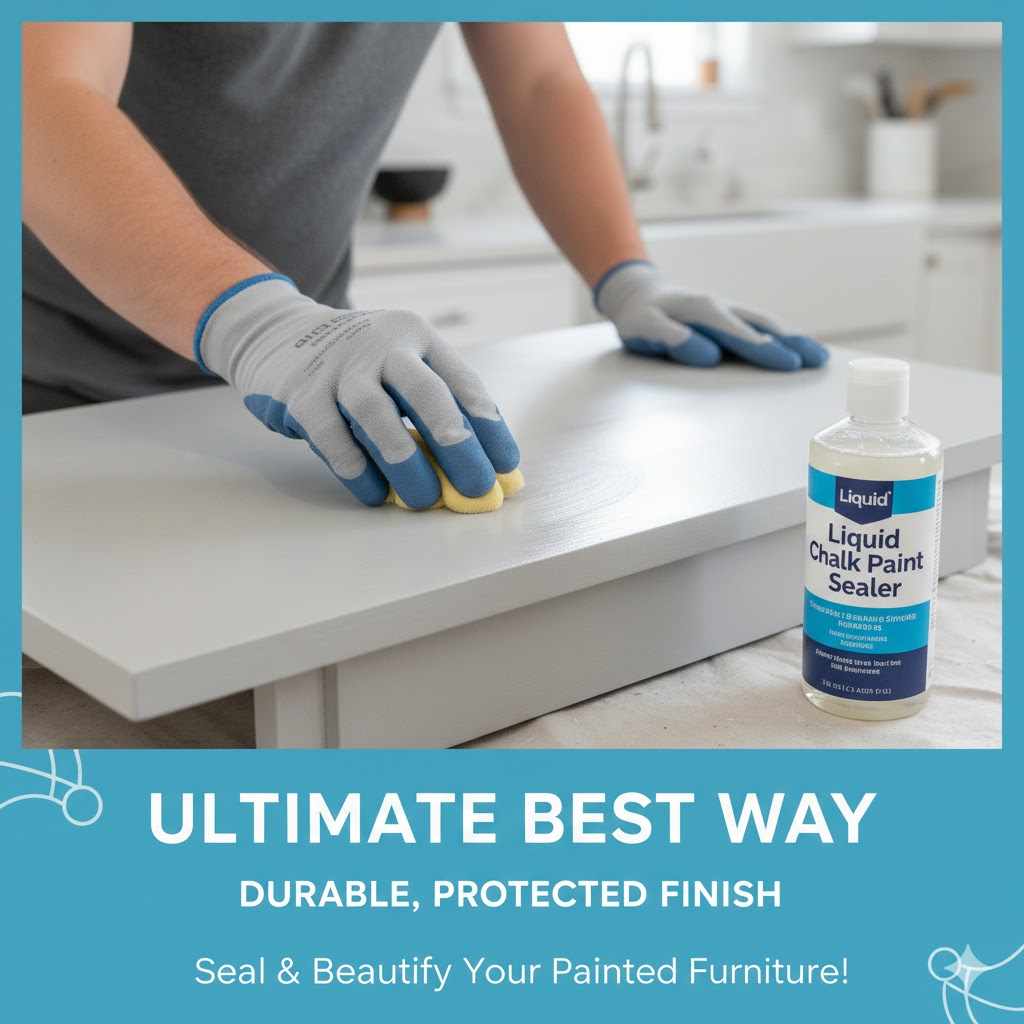
The ultimate best way to seal chalk paint for maximum durability is by applying two to three thin coats of a water-based polycrylic sealer with a quality synthetic brush. This method provides a crystal-clear, non-yellowing, and highly protective finish that is ideal for high-traffic furniture. It’s simple to apply and ensures your beautiful paint job lasts for years.
You did it. You took that old piece of furniture and gave it a new life with a beautiful coat of chalk paint. The color is perfect, the finish is velvety, and you’re feeling proud. But hold on—before you put that piece into service, there’s one final, crucial step: sealing it. This is the part where many DIYers get nervous, and I’m here to tell you there’s no need to worry. Sealing your work is what separates a short-lived project from a long-lasting treasure.
I know it can feel confusing with all the options out there—waxes, polys, and more. But don’t fret. I’m going to walk you through everything, step-by-step. We’ll explore the best options, and I’ll show you the most durable, reliable method to protect your hard work. Together, we’ll make sure your beautiful furniture stays that way.
Why You Absolutely Must Seal Chalk Paint
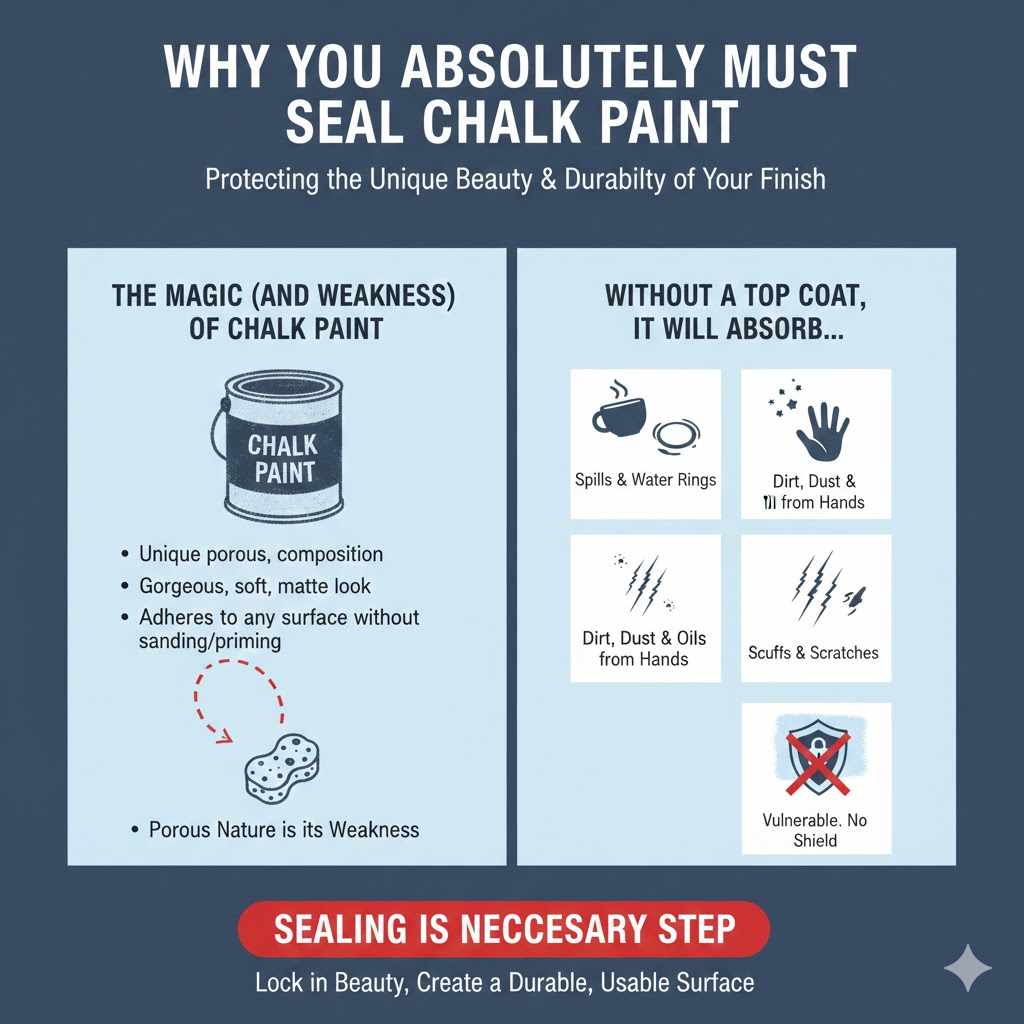
Before we dive into the “how,” let’s talk about the “why.” Chalk paint is unlike latex or oil-based paints. Its magic comes from its unique porous, chalky composition. This is what gives it that gorgeous, soft, matte look and allows it to stick to almost any surface without sanding or priming.
But that porous nature is also its biggest weakness. Without a top coat, chalk paint is like a sponge. It will absorb:
- Spills and water rings
- Dirt and dust from everyday use
- Oils from your hands
- Scuffs and scratches
Imagine your beautiful white dresser with a dark ring from a coffee cup, or your newly painted kitchen table covered in fingerprints and water spots. Sealing chalk paint isn’t just a suggestion; it’s a necessary step to lock in the beauty and create a durable, usable surface. It acts as a protective shield, keeping the paint clean and pristine underneath.
Choosing Your Champion: Wax vs. Polycrylic Sealers
When it comes to sealing chalk paint, there are two main contenders in the ring: traditional furniture wax and modern water-based polycrylic. Both can get the job done, but they offer very different results in terms of durability, look, and feel. Let’s break them down so you can pick the right champion for your project.
The Classic Choice: Sealing Wax
Furniture wax is the traditional partner for chalk paint. It’s been used for centuries to protect painted wood. Applying it is a hands-on process that involves rubbing it into the paint and buffing it to a sheen. It soaks into the porous paint and cures to a hard, but not indestructible, finish.
Pros of Using Wax:
- Beautiful, Soft Finish: Wax creates a lovely, velvety sheen that feels smooth to the touch and enhances the chalky look.
- Easy to Distress: It’s perfect for achieving that popular aged or shabby-chic look.
- Low Odor: Most furniture waxes have a very mild, pleasant smell.
- Simple to Repair: If you get a scratch, you can often just re-apply a bit of wax and buff it out.
Cons of Using Wax:
- Low Durability: Wax offers minimal protection against water, heat, and heavy wear. It is not ideal for kitchen tables, countertops, or outdoor furniture.
- Requires Reapplication: For a piece that gets regular use, you’ll need to re-wax it every 6-12 months.
- Labor-Intensive: The process of applying and buffing wax, especially on large pieces, can be physically demanding.
- Long Cure Time: Wax can take up to 30 days to fully cure and harden.
The Durable Defender: Water-Based Polycrylic
Water-based polycrylic is a modern, liquid top coat that you brush on. It dries to form a hard, clear, and highly protective layer over the paint. Think of it as armor for your furniture. For any piece that will see real-world use—especially tabletops, chairs, cabinets, or pieces in homes with kids and pets—polycrylic is the clear winner for durability.
Pros of Using Polycrylic:
- Superior Durability: It provides excellent protection against scratches, scuffs, water, and household cleaners.
- Water-Resistant: Perfect for kitchen tables, bathroom vanities, and side tables where spills might happen.
- Easy to Clean: You can simply wipe down a polycrylic-sealed surface with a damp cloth.
- Non-Yellowing: Unlike oil-based polyurethanes, water-based polycrylic stays crystal clear over light-colored paints.
Cons of Using Polycrylic:
- Application Can Be Tricky: If applied too thickly or over-brushed, it can show brush strokes or develop bubbles.
- Slightly Changes Finish: Even a matte polycrylic will have a slight sheen that is different from the chalky, velvety feel of wax.
Wax vs. Polycrylic: At a Glance
Still not sure? This table makes the choice simple.
| Feature | Sealing Wax | Water-Based Polycrylic |
|---|---|---|
| Durability | Low. Not suitable for high-traffic surfaces. | High. Excellent for everyday use. |
| Finish | Soft, velvety, low-sheen. | Clear, hard finish available in matte, satin, or gloss. |
| Maintenance | Requires reapplication every 6-12 months. | None. Lasts for years. |
| Ease of Cleaning | Requires gentle dusting. Avoid chemical cleaners. | Easy to wipe with a damp cloth and mild soap. |
| Best For | Low-use decorative pieces: picture frames, dressers in a guest room, bookcases. | High-use furniture: kitchen tables, coffee tables, cabinets, chairs, kids’ furniture. |
Gather Your Gear: Tools and Materials Needed
Having the right tools makes all the difference. You don’t need a professional workshop, just a few key items. Choose your list based on whether you’ve decided on the polycrylic or wax method.
For the Ultimate Polycrylic Method:
- Water-Based Polycrylic Sealer: I recommend a matte or satin finish to best preserve the look of chalk paint. Minwax Polycrylic is a popular and reliable choice.
- High-Quality Synthetic Brush: Do not use a cheap chip brush! A good quality brush (like a Purdy or Wooster) will prevent bristles from falling out and minimize brush strokes.
- Very Fine-Grit Sanding Sponge or Sandpaper (220-grit): For smoothing the surface between coats.
- Tack Cloth or Lint-Free Cloth: For removing every last bit of dust. A microfiber cloth works well.
- Stir Stick: To gently mix your polycrylic.
For the Traditional Wax Method:
- Clear Furniture Finishing Wax: Brands like Annie Sloan, Fiddes & Sons, or Behr make excellent options.
- Wax Brush or Lint-Free Cloth: A dedicated wax brush (often round) helps get wax into details and crevices, but a clean, lint-free cloth works well for flat surfaces.
- Clean Buffing Cloth: A separate soft cloth for buffing the wax to a sheen.
The Ultimate Method: Sealing Chalk Paint with Polycrylic (Step-by-Step)
For a finish that will truly last, this is my go-to method. It’s perfect for the pieces you use and love every single day. Just take your time, work in thin coats, and you’ll get a professional-looking result.
Step 1: Make Sure Your Paint is Fully Cured
Your chalk paint might feel dry to the touch in an hour, but it’s not ready for a top coat yet. The paint needs time to “cure,” which means all the water has evaporated and the paint has hardened completely. Sealing it too early can trap moisture, leading to a weak finish.
Wait at least 24 hours in a dry, well-ventilated area before moving on to sealing.
Step 2: A Gentle Sanding for a Silky Smooth Surface
This step is optional, but it takes your finish from good to great. Take your 220-grit sandpaper or sanding sponge and very lightly skim over the painted surface. Use almost no pressure. The goal is not to remove paint, but to knock down any tiny bumps or bits of dust that settled while it was drying. This will give you a surface as smooth as glass.
Step 3: Clean Up Every Speck of Dust
Dust is the enemy of a smooth finish. After sanding, wipe down the entire piece with a tack cloth or a slightly damp microfiber cloth. A tack cloth is sticky and designed to pick up every particle. Make sure the surface is completely clean and dry before you open your can of polycrylic.
Step 4: Apply Your First Thin Coat of Polycrylic
First, open your polycrylic and stir it gently but thoroughly with a stir stick. Never shake the can! Shaking creates thousands of tiny air bubbles that will dry into bumps on your finish.
Dip the first third of your synthetic brush into the polycrylic and wipe off any excess on the side of the can. Apply the sealer in long, smooth, even strokes, moving in one direction with the grain of the wood. Overlap each stroke slightly. The key here is thin coats. It’s better to apply three super-thin coats than one thick, gloppy one. Don’t go back and forth over an area you’ve already coated, as this can create streaks.
Step 5: Let it Dry and Lightly Sand Again
Follow the manufacturer’s instructions for dry time, which is usually around 2 hours. Once it’s fully dry, the first coat might feel slightly rough. This is normal; it’s just the wood grain raising a bit. Lightly sand the surface again with your 220-grit sandpaper, then wipe away all the dust with your tack cloth. This step ensures an ultra-smooth final finish.
Step 6: Apply the Second (and Optional Third) Coat
Apply your second coat of polycrylic exactly like the first—thin, long, even strokes. For most furniture, two coats are enough. For very high-traffic surfaces like a kitchen table or the top of a dresser, I strongly recommend a third coat for maximum protection. Just repeat the process: let it dry, lightly sand, and apply the final coat.
Step 7: The Final Cure – Be Patient!
Your piece will be dry to the touch in a few hours, but it isn’t fully cured. Polycrylic needs time to harden completely. According to the U.S. Environmental Protection Agency, proper curing is essential for sealant performance and indoor air quality. While polycrylics are low-VOC, allowing adequate ventilation is always wise.
It can take anywhere from 3 to 21 days for the finish to achieve maximum hardness. During this time, be gentle with your furniture. Use coasters, avoid sliding heavy objects across it, and clean up any spills quickly. After it’s fully cured, your furniture will be ready for anything.
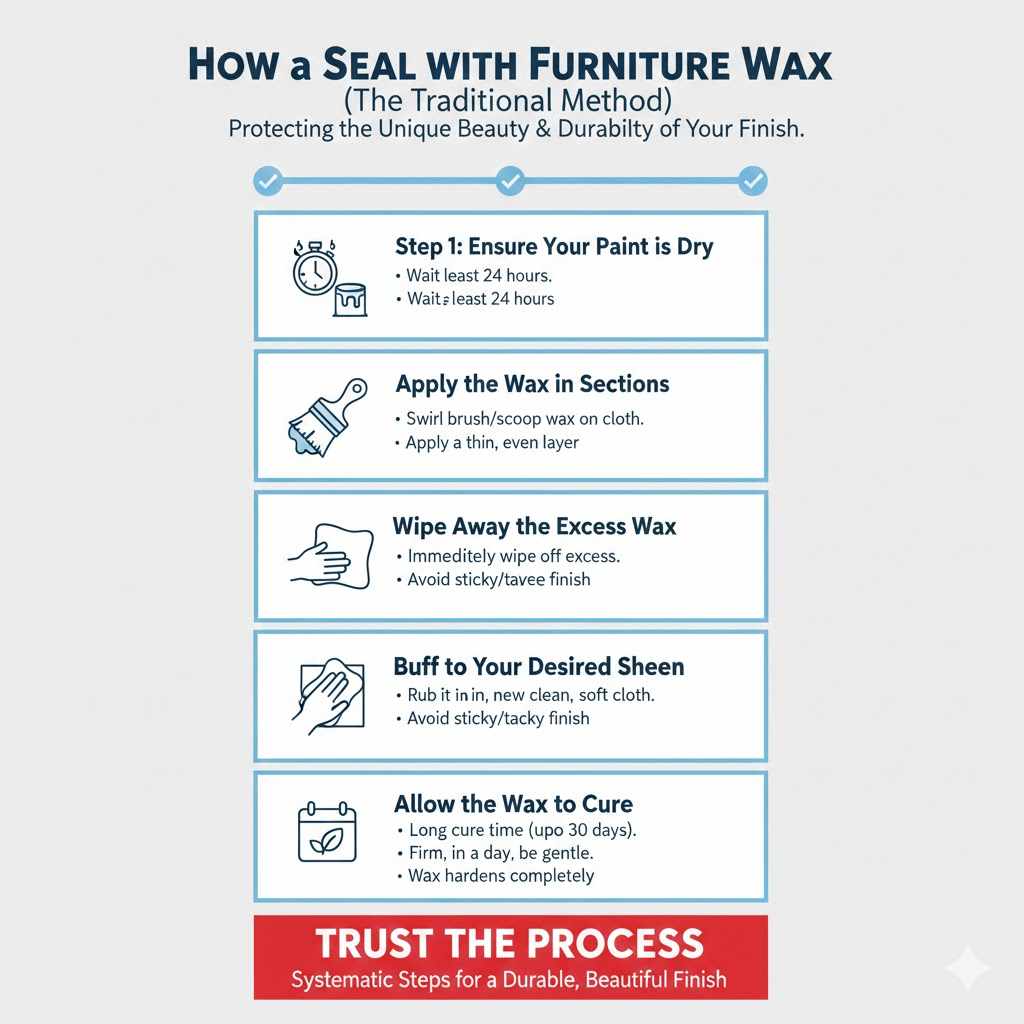
How to Seal with Furniture Wax (The Traditional Method)
If your piece is purely decorative or you absolutely love that hand-buffed finish, wax is a great choice. The process is more physical, but many people find it therapeutic.
Step 1: Ensure Your Paint is Dry
Just like with polycrylic, wait at least 24 hours after your final coat of paint before you start waxing.
Step 2: Apply the Wax in Sections
Work in small, manageable sections, about 2 feet by 2 feet. If you’re using a wax brush, swirl it in the wax to get a small amount on the tips. If using a cloth, scoop a small amount out. Apply the wax to the surface in a thin, even layer. You can use circular motions or go with the grain—the goal is simply to work it into the paint.
Step 3: Wipe Away the Excess Wax
This is the most important step! Immediately after applying the wax to a section, take a clean, lint-free cloth and gently wipe off the excess. Think of it like moisturizing your skin—you want to rub it in, not leave a layer on top. If you leave too much wax, it will feel sticky and tacky forever.
Step 4: Buff to Your Desired Sheen
Let the wax sit for about 15-20 minutes. Then, take a new clean, soft cloth and begin to buff the surface. Use firm, circular motions. You’ll feel the wax begin to glide and see a beautiful, subtle sheen emerge. The more you buff, the shinier it will get.
Step 5: Allow the Wax to Cure
Wax also has a long cure time, often up to 30 days. The surface will be usable within a day or so, but be gentle with it as the wax hardens completely.
Frequently Asked Questions (FAQ)
Can I put polycrylic over wax?
No, never. Nothing sticks to wax, including paint and polycrylic. If you have a waxed piece that you want to apply polycrylic to, you will have to completely remove the wax first using mineral spirits, which is a big job.
How long does chalk paint sealer last?
A polycrylic sealer will last for many years without any maintenance. A wax finish is less durable and will need to be reapplied every 6 to 12 months on pieces that get regular use to maintain its protective qualities.
Do I absolutely have to seal chalk paint?
Yes. Unsealed chalk paint is very porous and will easily stain, scratch, and absorb dirt. Sealing is what makes it a durable, long-lasting finish suitable for furniture.
What happens if you don’t wax chalk paint?
If you don’t seal chalk paint with either wax or another top coat, the surface will quickly get dirty from fingerprints, dust, and spills. It will be difficult to clean and can be easily damaged, scuffed, or worn away with use.
Can I use polyurethane instead of polycrylic?
You should be very careful with this. Traditional oil-based polyurethane has an amber tint that will make your beautiful white or light-colored paint job look yellow and dingy. Water-based polycrylic is specifically designed to dry crystal clear and not yellow over time, making it the best choice for painted furniture.
How do I clean furniture sealed with wax versus polycrylic?
For a wax finish, just dust with a dry, soft cloth. For light cleaning, you can use a slightly damp cloth, but avoid all chemical cleaners as they can break down the wax. For a polycrylic finish, you can clean it as you would any modern furniture—with a damp cloth and mild soap and water.
Can I paint over a sealed piece later?
Yes. If the piece is sealed with polycrylic, you just need to lightly sand the surface to scuff it up, clean it well, and then you can paint right over it. If it’s sealed with wax, you must completely remove the wax with mineral spirits before you can paint.
Conclusion: Your Beautifully Protected Furniture
Congratulations! You’ve not only transformed a piece of furniture with paint but also given it the armor it needs to stand up to everyday life. Choosing the right sealer and applying it correctly is the final act of craftsmanship that ensures your hard work pays off for years to come.
Whether you chose the classic, soft glow of wax for a decorative piece or the unbeatable durability of polycrylic for a family workhorse, you now have the skills to protect your projects with confidence. That sealed finish is more than just a clear coat; it’s peace of mind. Now, you can step back, admire your work, and actually use the beautiful furniture you created. Happy building!