Ideas For Cedar Slabs: Genius & Essential Designs
Unlock the natural beauty and durability of cedar slabs with these genius design ideas! Perfect for beginners, these projects transform simple slabs into stunning, functional pieces for your home, from rustic coffee tables to elegant wall art and more.
Cedar slabs are amazing! Their natural grain and warm color bring a unique charm to any space. But sometimes, figuring out what to make with them can feel a little overwhelming. If you’ve got a beautiful cedar slab and aren’t sure where to start, you’re in the right place! We’ll explore simple, yet impactful ways to turn that slab into something truly special. Get ready to discover designs that are both easy for beginners and look incredibly professional!
Why Cedar Slabs Are Perfect for DIY Projects
Cedar is a dream wood for many DIYers, especially beginners. It’s relatively lightweight, making it easier to handle, and it’s naturally resistant to decay and insects. This means your finished projects will not only look great but also last for a long time, even in areas that might get a bit damp. The distinctive aroma of cedar is a bonus, filling your workshop and home with a pleasant, natural scent. Plus, the unique patterns and knots in each slab mean every project is a one-of-a-kind masterpiece.
Essential Tools for Working with Cedar Slabs
Before we dive into the fun designs, let’s talk tools. You don’t need a professional workshop to create beautiful cedar slab projects. Here are some basics that will get you started:
- Safety Gear: Always start with safety! This includes safety glasses, gloves, and a dust mask. Working with wood creates dust, and protecting your eyes and lungs is crucial. The Occupational Safety and Health Administration (OSHA) offers great resources on personal protective equipment (PPE).
- Measuring Tape & Pencil: For accurate cuts and placement.
- Sander (Orbital or Belt): Cedar can be rough straight from the mill. A sander is key to achieving a smooth finish. You’ll need various grits of sandpaper (e.g., 80, 120, 220).
- Clamps: Essential for holding pieces together while glue dries or for stabilizing the slab during cutting.
- Saw: Depending on your project, a handsaw, jigsaw, or circular saw can work. For more complex cuts, a miter saw or table saw might be helpful, but start with what you have.
- Wood Glue: For any assembly that requires strong bonds.
- Finish (Oil, Varnish, or Polyurethane): To protect the wood and enhance its natural beauty.

Genius Cedar Slab Design Ideas for Beginners
Let’s get creative! Here are some fantastic ideas that are perfect for those new to woodworking and eager to make something beautiful with their cedar slabs.
1. The Rustic Coffee Table
A cedar slab coffee table is a showstopper. Its natural shape and grain make it a natural focal point for any living room.
Getting Started:
- Find a slab with a shape you love. The natural edge (live edge) is what gives it that rustic charm.
- Clean the slab thoroughly. Brush off any loose bark or debris.
- Sand the top and sides. Start with a coarser grit (like 80 or 120) to smooth out any rough spots and then move to finer grits (like 220) for a silky finish.
- Decide on legs. You can buy pre-made metal legs (hairpin legs are popular and easy to attach) or use simpler wooden legs.
- Attach the legs securely using screws. Ensure they are placed so the table is stable.
- Apply a protective finish. An oil-based finish can really bring out the wood’s natural color and warmth.
Pro-Tip:
If your slab has cracks or knot holes you want to fill, you can use a clear epoxy resin for a modern look, or a contrasting colored epoxy for a bold statement. This is a great way to stabilize the wood and add unique character. Check out resources like Wood Magazine’s guide on using epoxy for more detailed tips.
2. The Stunning Entryway Console Table
Create a welcoming first impression with a slim, elegant cedar slab console table. Perfect for placing keys, mail, or a decorative lamp.
Design Options:
- Floating Shelf Style: Mount a cleaned and finished slab directly to the wall using heavy-duty floating shelf brackets. This gives a sleek, modern, and airy feel.
- Simple Leg Design: Attach two or four slim, straight legs (wood or metal) to the underside of the slab. This creates a more traditional console.
Key Steps:
- Select a thinner, longer slab for this application.
- Ensure the slab is flat. You might need to plane it if it’s very uneven, or choose a naturally flatter piece.
- Sand and finish the slab. A matte or satin finish often works well for console tables.
- For wall mounting, use sturdy wall anchors and brackets designed for the weight of the wood. For leg attachment, similar to the coffee table, ensure secure screwing.
3. Elegant Cedar Slab Shelving
Add warmth and character to any room with floating cedar slab shelves. They’re surprisingly simple to install and make a big impact.
Benefits:
- Aesthetic Appeal: The natural beauty of cedar adds warmth and texture.
- Durability: Cedar is strong and holds up well.
- Versatility: Use them in the kitchen for spices, in the living room for decor, or in the bathroom for towels.
Installation Tips:
- Cut your slab to the desired shelf length.
- Sand thoroughly.
- Apply your chosen finish.
- Choose appropriate shelving brackets. Heavy-duty, concealed floating shelf brackets are ideal for a clean look. Ensure they are rated for the weight you intend to place on the shelves.
- Locate wall studs for maximum support. This is crucial for safety and longevity. You can find stud finders at any hardware store.
- Attach brackets securely into studs, then place the slab onto the brackets.
4. The Unique Cedar Slab End Table
Smaller than a coffee table, an end table is a great starter project for cedar slabs. It’s manageable in size and adds a touch of rustic elegance next to a sofa or chair.
Variations:
- Single Slab with Legs: Similar to the coffee table, but on a smaller scale.
- Stacking Slabs: For a more substantial look, you could stack two smaller, but similarly sized, slabs. Ensure they are well-secured to each other.
- Mounted Ottoman/Stool Style: Mount a relatively thin, sanded slab onto sturdy legs or casters. This can double as a small table or extra seating.
Finishing Touches:
For end tables, consider a higher sheen finish like polyurethane to protect against spills from drinks. A couple of coats of a good quality polyurethane will provide excellent durability.
5. The Artistic Cedar Slab Wall Art
Sometimes, the most stunning design is simply celebrating the wood itself. A beautifully finished cedar slab can be a piece of art on your wall.
How-To:
- Select a slab with particularly interesting grain patterns, knots, or a unique shape.
- Clean and sand the slab to highlight its natural features.
- Consider a clear finish to simply enhance the wood’s natural beauty without altering its color.
- For hanging, use D-rings or a French cleat system attached securely to the back of the slab and the wall. Ensure the slab is well-balanced for hanging.
This project requires minimal woodworking skills and focuses on the inherent beauty of the material. It’s perfect for adding a natural, organic element to a minimalist or modern decor.
6. Cedar Slab Desk or Workbench Top
If you need a sturdy and beautiful surface for your home office or workshop, a cedar slab desk is an excellent choice. Its natural beauty can make even mundane tasks feel more inspiring.
Considerations:
- Size: Measure your space carefully to ensure the slab fits. You might need to have a slab cut to size or glue two pieces together.
- Thickness: A thicker slab will be more robust but also heavier.
- Support: Ensure you have adequate support. This could be a metal desk frame, sturdy wooden legs, or a sturdy cabinet.
Finishing Strength:
For a desk or workbench, durability is key. A durable finish like a water-based polyurethane or an oil-wax blend will protect against scratches and daily wear. If you’re placing heavier items or tools, consider a slightly thicker slab or a reinforced underside.
7. Cedar Slab Cutting Boards and Charcuterie Boards
For smaller projects, cedar slabs can be transformed into beautiful, functional cutting boards or charcuterie boards. Remember to choose a piece of cedar that is safe for food contact and has not been treated with harsh chemicals.
Important Notes:
- Food Safety: Ensure the wood is raw and unfinished for direct food contact surfaces. For a protective finish, use food-grade mineral oil or a beeswax blend.
- Dimensions: Aim for thinner slabs for easier handling as a board.
- Shaping: You can leave the natural edge or cut it into a more defined shape.
Finishing for Food Use:
After sanding to a very fine grit (320 grit or higher is recommended for food surfaces), apply several coats of food-grade mineral oil. Let the oil soak in between coats. For extra protection, a blend of beeswax and mineral oil (often called “board butter”) can be applied. A great resource for food-safe finishes can be found from organizations like the U.S. Forest Service discussing wood stabilization and finishes, though always confirm food-grade suitability for direct contact.
A Note on Cedar Bark and Live Edges
The “live edge” or natural edge of a cedar slab is often its most appealing feature. However, the bark can sometimes be loose or prone to falling off over time. Here’s how to handle it:
- Cleaning: Gently remove any loose bark with a brush or a stiff scraper. Be careful not to damage the wood underneath.
- Stabilizing: For very loose bark, you might consider using a wood glue or a clear epoxy to secure it. Test this on a less visible spot first.
- Leaving it Natural: Many people prefer to leave the bark on for a more rustic look. If you do this, be aware it might shed over time. Regularly brushing and inspecting can help manage this.
- Removing Bark: If you prefer a cleaner look, you can carefully remove all the bark. This can be done with a pry bar or chisel, but it takes patience. Once the bark is off, you’ll have a smooth wood edge ready for finishing.
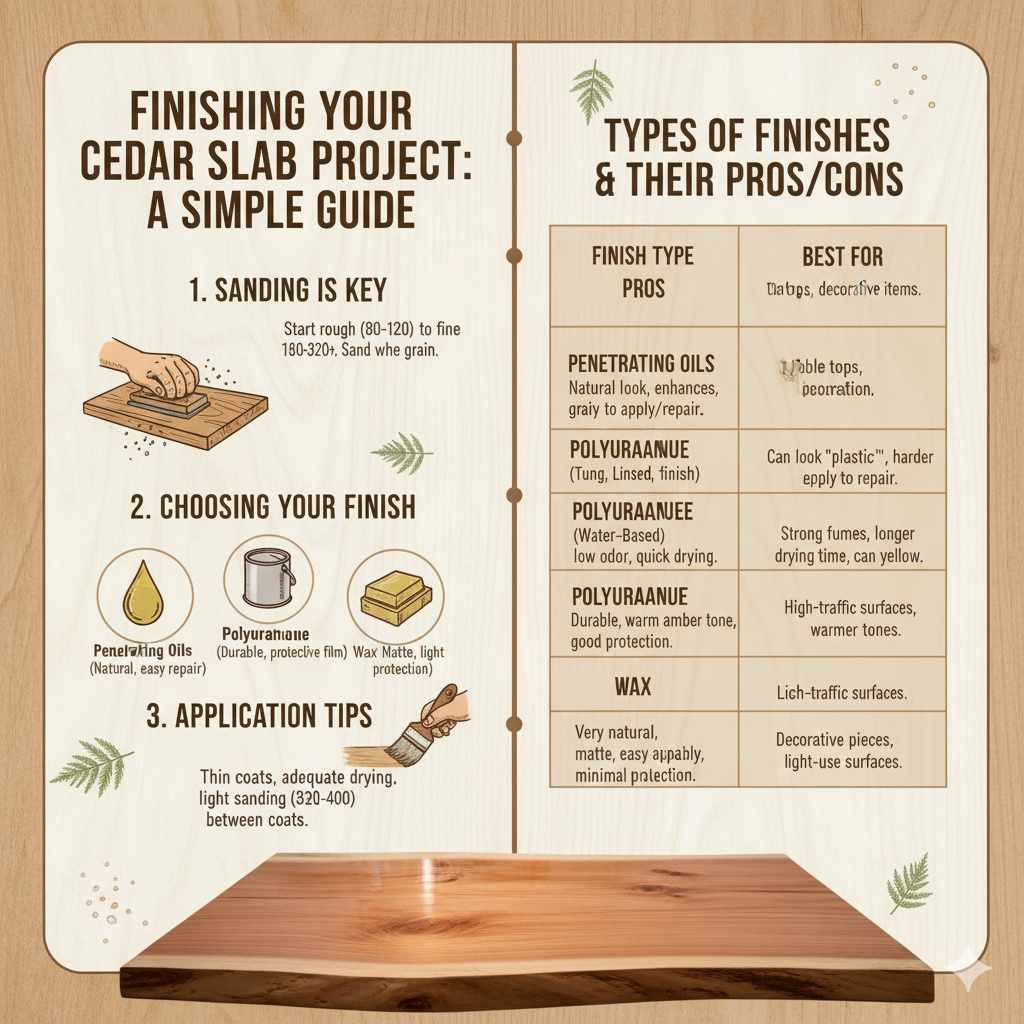
Finishing Your Cedar Slab Project: A Simple Guide
The finish you choose not only protects your cedar slab but also enhances its natural beauty. For beginners, simple and effective are key.
1. Sanding is Key
As mentioned, proper sanding is crucial. Start with a rough grit (80-120) to remove imperfections, then work your way up to finer grits (180-220, or even 320 for smoother finishes like cutting boards). Always sand with the grain.
2. Choosing Your Finish
Here are some beginner-friendly options:
- Tung Oil or Linseed Oil: These are penetrating oils that soak into the wood, giving it a natural, understated look and a good level of protection. They enhance the wood’s color and grain beautifully. They are also relatively easy to apply and repair.
- Polyurethane (Water-Based or Oil-Based): Polyurethane provides a durable, protective film on the surface of the wood. Water-based poly dries clear and is low in odor, making it great for indoor projects. Oil-based poly tends toAmber and offer a richer look but may have stronger fumes and longer drying times.
- Wax Finish: Often used over oil or as a standalone finish for a very natural, matte look. It provides light protection and is easy to reapply.
Types of Finishes and Their Pros/Cons
| Finish Type | Pros | Cons | Best For |
|---|---|---|---|
| Penetrating Oils (Tung, Linseed) | Natural look, enhances grain, easy to repair, easy to apply. | Less durable than film finishes, requires reapplication over time. | Table tops, decorative items, rustic pieces. |
| Polyurethane (Water-Based) | Durable, clear finish, low odor, quick drying, good protection. | Can look more “plastic-like” if applied too heavily, harder to repair seamlessly. | Most indoor furniture, desks, shelves. |
| Polyurethane (Oil-Based) | Durable, provides a warm amber tone, good protection. | Strong fumes, longer drying time, can yellow over time. | Items where a warmer tone is desired, high-traffic surfaces. |
| Wax | Very natural, matte look, easy to reapply, good for light protection. | Least durable, offers minimal protection against moisture/scratches. | Decorative pieces, items already finished with oil, light-use surfaces. |
3. Application Tips
- Always read the manufacturer’s instructions for your chosen finish.
- Apply thin coats for a smoother, more even finish.
- Allow adequate drying time between coats.
- Lightly sand with very fine grit sandpaper (e.g., 320 or 400) between coats for a super smooth surface, then wipe clean.
FAQ: Your Cedar Slab Questions Answered
Here are some common questions beginners have about working with cedar slabs.
Q1: Is cedar wood hard to work with?
No, cedar is generally considered one of the easier woods to work with. It’s soft, lightweight, and easy to cut, sand, and finish. Its natural oils can sometimes cause a bit of “stickiness” when sanding, but it’s manageable.
Q2: How do I choose the right cedar slab?
Look for a slab that is relatively flat and free from major cracks or rot. Consider the size and shape that best fits your intended project. Inspect the live edge to see if the bark is mostly secure or if you’ll need to stabilize or remove it.
Q3: Do I need to seal the live edge?
It’s a good idea to seal or stabilize the live edge, especially if the bark is loose. This prevents shedding and protects the wood. A clear epoxy, resin, or a few coats of a durable finish can work well.
Q4: How much finish (oil, polyurethane) should I apply?
For oils, apply enough to let the wood soak it up, then wipe off excess. For film finishes like polyurethane, apply thin, even coats and allow each to dry fully before applying the next. Usually, 2-3 coats are sufficient for most projects.
Q5: Can I use cedar slabs for outdoor projects?
Yes! Cedar is naturally resistant to rot and insects, making it excellent for outdoor use. However, for maximum longevity outdoors, it’s best to use marine-grade varnish or specially formulated exterior wood sealers to protect it from UV rays and moisture.
Q6: How do I clean a finished cedar slab table?
For oiled or waxed finishes, wipe with a soft, damp cloth and dry immediately. For polyurethane finishes, you can use a mild soap and water solution, but avoid harsh chemicals that can damage the finish.
Q7: What is the best way to cut a cedar slab to size?
For straight cuts, a circular saw works well. If the slab is very thick, you might need a specific type of blade. If you’re just starting and have a small slab, a good handsaw (like a Japanese pull saw) can also be effective for smaller pieces.