Rustic Painted Wood Floors: Ideas, Tips And How-To Guide
You’re not alone in feeling that way. Many homeowners look at their floors and see potential, but also a whole lot of uncertainty. This guide is here to help.
We’ll walk through everything you need to know. You’ll get inspired by beautiful ideas. You’ll learn the best ways to prep.
And you’ll find out how to make your painted floors look amazing and last for years.
Painting wood floors can give them a fresh, rustic look. It’s a budget-friendly way to update a room. Proper preparation and the right paint are key to a durable, beautiful finish that lasts.
What Are Rustic Painted Wood Floors?
Rustic painted wood floors mean giving old wooden floors a new lease on life. We often think of them as having a charming, aged look. This isn’t always about making them look perfect.
It’s more about character. Think of soft, worn colors. Maybe some gentle scuffs that show the floor has been lived on.
It feels cozy and welcoming. It’s not a slick, factory-new shine. Instead, it has depth and history.
This style fits well in many homes. Especially those going for a farmhouse, cottage, or coastal vibe. But it can also add warmth to modern spaces.
The “rustic” part comes from how the paint is applied and the colors chosen. We aim for a look that feels a bit imperfect. This can include subtle distressing.
It might mean using chalk paint or milk paint. These give a matte finish. Or it could be a simple, solid color painted over the wood.
The goal is to create a floor that feels natural and unpretentious. It should look like it belongs in the home. Like it has always been there, adding comfort and style.
It’s a way to embrace the beauty of imperfection. Instead of fighting every scratch or ding, you let it add to the story of the floor. This approach makes the whole process less intimidating.
It’s about creating a look that is both beautiful and practical for everyday life. And it can be a fantastic way to save money. Refinishing wood floors can be very costly.
Painting offers a more affordable, DIY-friendly alternative.
The durability is a big part of this. Modern paints are designed to be tough. When you use the right ones and prepare the surface well, painted floors can be surprisingly resilient.
They can stand up to foot traffic and daily wear. The rustic style even hides minor imperfections that might bother you on a natural wood floor. This makes them a great choice for busy families or high-traffic areas.
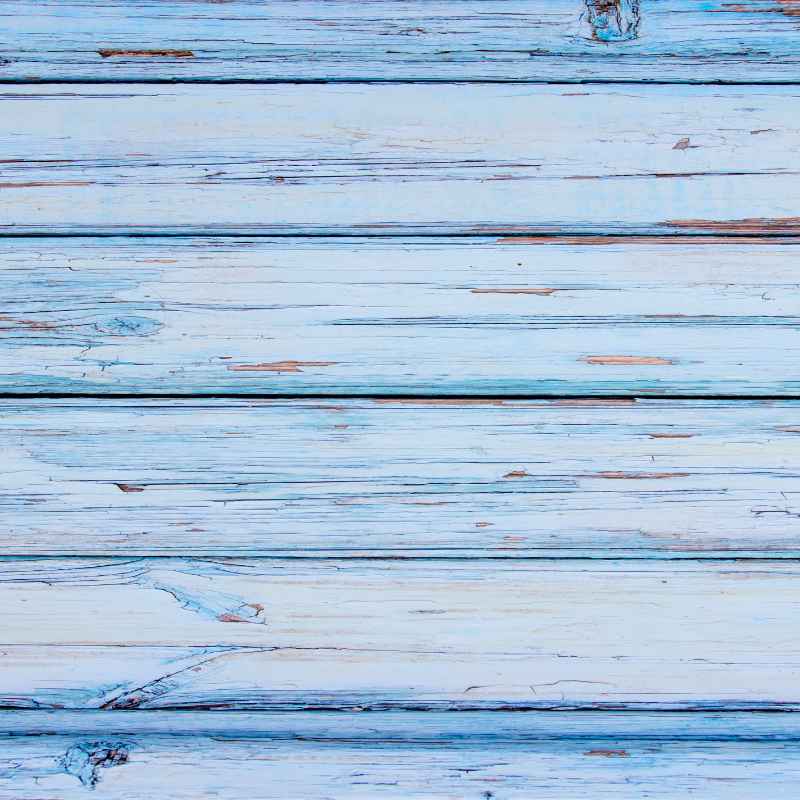
When people talk about rustic painted floors, they often imagine specific colors. Whites, grays, soft blues, and muted greens are popular. Sometimes, people even paint patterns.
Like checkerboards or simple stripes. The key is that the finish is usually matte or has a low sheen. This contributes to the soft, natural feel.
It’s a far cry from a high-gloss polyurethane. That’s the kind of shine you usually see on new, unstained wood floors.
This style is also very forgiving. If you’re a beginner DIYer, this is good news! You don’t need to be a master painter.
A few brush strokes here and there might even add to the charm. The focus is on the overall impression. The feeling of warmth, comfort, and lived-in beauty.
It’s a way to express your personal style without breaking the bank. And it’s a project that can truly transform a room.
My Own Floor Transformation Story
I remember staring at my old kitchen floor. It was this tired, yellowish-brown wood. It had seen better days, that’s for sure.
Years of kids, pets, and dropped things had taken their toll. It was scratched, dented, and honestly, a bit depressing. I wanted a brighter, more modern feel for the kitchen.
But new flooring seemed like such a huge expense. Plus, I wasn’t sure I wanted to deal with the mess and disruption of a full install.
I’d seen Pinterest boards full of gorgeous painted floors. They looked so inviting and cozy. But I was scared.
Would it look cheap? Would it peel up after a few months? My friend, Sarah, had painted her dining room floor a few years back.
I went over and saw it myself. It looked amazing! She had used a soft gray chalk paint.
It had a lovely matte finish. Even after all that time, it still looked great. She told me it wasn’t as hard as I thought.
That gave me the push I needed. I decided to try painting my kitchen floor. I picked a soft, creamy white color.
I spent a whole weekend just cleaning and sanding. It felt like a lot of work, but I knew it was important. Then came the primer.
Then the paint. I did three thin coats. It felt like I was painting forever!
The hardest part was waiting for each coat to dry. I had to live with tape on my feet to get to the fridge. It was a little comical, actually.
When it was all done, and the final coat of sealer was dry, I stood back. Wow. The kitchen felt so much bigger and brighter.
It was like a completely new room. The white really opened up the space. It looked so clean and fresh.
And yes, it looked rustic. Not perfect, but perfectly charming. It was one of the most satisfying DIY projects I’d ever done.
It proved that you don’t need a massive budget to get a big style change.
Even now, a couple of years later, it still looks great. There are a few scuffs here and there, especially near the back door. But they just add to the character.
It doesn’t look worn out; it looks lived-in. And the best part? When it eventually does need touching up, it’s an easy fix.
I can just repaint that small area. It’s a testament to how well this approach can work. It really does breathe new life into tired old floors.
Choosing Your Perfect Rustic Paint Color
Whites & Off-Whites: These are classic. They make rooms feel airy and spacious. Think creamy white, antique white, or a soft linen color.
Grays: From light silver to deep charcoal, grays offer a sophisticated rustic look. They pair well with almost any decor style.
Soft Blues & Greens: These colors bring a touch of nature indoors. They can create a calming and serene atmosphere. Think sage green or a muted robin’s egg blue.
Beiges & Tans: Earthy tones provide warmth. They can mimic natural wood colors but with a more uniform, painted finish.
Distressed & Two-Tone: For a more complex rustic look, consider layering colors. Paint a base color, let it dry, then add a second, lighter or darker color. Gently sand away some of the top layer to reveal the color underneath.
The Best Types of Paint for Wood Floors
When you decide to paint wood floors, the type of paint matters. You can’t just grab any old can from the hardware store. You need something tough.
Something that can handle feet walking on it all day. This means looking for paints made for floors or high-traffic areas. They have special additives that make them more durable.
Latex Floor Paint: These are a popular choice. They are water-based, so cleanup is easy. They dry relatively fast.
Look for “1-part epoxy” or “high-traffic” latex floor paints. They are designed to be durable. They offer good adhesion to wood.
Many come in a satin or matte finish, which is perfect for a rustic look.
Chalk Paint: Chalk paint is famous for its matte, chalky finish. It adheres well to many surfaces without much prep. This makes it appealing for DIYers.
You can easily distress chalk paint. This adds to the rustic charm. However, chalk paint needs a good topcoat sealer.
Without it, it’s not durable enough for floors. It can get scuffed easily.
Milk Paint: Similar to chalk paint, milk paint offers a matte, natural look. It’s also good for distressing. Traditional milk paint is a powder you mix with water.
It can sometimes chip or flake in a beautiful way, creating a very aged look. Like chalk paint, it requires a strong protective topcoat for floor use.
Epoxy Floor Coatings: For the absolute toughest finish, consider a two-part epoxy coating. These are incredibly durable and resistant to abrasion and chemicals. They are often used in garages.
You can get them in various colors. Some come with decorative flakes. They require careful mixing and application, and they have a strong odor.
They might be more industrial-looking than purely “rustic,” but a matte topcoat can soften them.
Elastomeric Paint: This type of paint is flexible. This is good for wood floors that might expand and contract with temperature changes. It can help prevent cracking and peeling.
Some floor paints incorporate elastomeric properties.
Oil-Based Paint: While durable, oil-based paints are harder to clean up. They also take longer to dry and can have strong fumes. They are less common for DIY floor painting projects today compared to water-based options.
The key is always the system. The paint is one part. The primer is another.
And the topcoat or sealer is crucial for durability. Don’t skimp on these steps. A good quality primer helps the paint stick.
A strong topcoat protects your hard work from daily wear and tear. Think of it as layering protection.
Topcoat Essentials: Sealing Your Painted Floors
Water-Based Polyurethane: This is a very popular and effective choice. It dries clear and is available in matte, satin, or semi-gloss finishes. Matte is best for a rustic look.
Apply at least 2-3 thin coats. Ensure good ventilation.
Water-Based Urethane or Acrylic Sealers: Similar to polyurethane, these offer good protection. They are designed to be durable and resist wear and tear.
Wax (for Chalk/Milk Paint): If you used chalk or milk paint, a good quality furniture wax can seal it. Apply it in thin layers and buff well. This gives a soft sheen.
However, wax can be less durable than polyurethane for high-traffic floors. It may need reapplication.
Note: Always choose a sealer that is compatible with your chosen paint. Check the paint can or ask for advice at the store.
Getting Started: Prep Work is Key
This is the part most people want to skip. But I’m telling you, good prep makes all the difference. It’s like building a house.
You need a solid foundation. For painted floors, that means clean, smooth, and well-primed wood. Skipping prep is the fastest way to have your paint chip or peel later.
Step 1: Clear Everything Out. Yes, everything. Take all furniture, rugs, and anything else off the floor.
This gives you full access. It also means you won’t accidentally paint over your couch.
Step 2: Deep Clean the Floor. Sweep and vacuum thoroughly. Then, wash the floor.
Use a good degreaser or a solution of TSP (trisodium phosphate) substitute. Make sure to rinse very well. You want to remove all dirt, grease, wax, and grime.
Any residue will prevent the paint from sticking. Let the floor dry completely. This can take 24 hours or more, especially if there’s any moisture trapped between the boards.
Step 3: Repair Imperfections. Fill any holes, deep scratches, or gouges with wood filler. Let the filler dry completely.
Then, sand it smooth so it’s flush with the floor surface. Address any loose boards or squeaks now, too. Nail them down securely.
Step 4: Sand the Floor. This is a big step. You don’t necessarily need to sand down to bare wood unless the finish is peeling badly.
But you do need to scuff up the existing finish. This creates a “tooth” for the primer to grab onto. Use a random orbital sander or a floor sander.
Start with a medium grit sandpaper (like 80-100 grit). Work your way across the floor. If you have very old, thick varnish, you might need to start with a coarser grit.
Step 5: Clean Up Dust Again. After sanding, your floor will be covered in dust. Vacuum the entire floor thoroughly.
Then, use a tack cloth or a damp (not wet) microfiber cloth to pick up any fine dust particles. Repeat this process until no dust remains. This is super important.
Dust is the enemy of good paint adhesion.
Step 6: Prime the Floor. Apply a high-quality primer. Use a primer specifically designed for wood or floors.
A good bonding primer will help your paint adhere better and cover any stains. Apply it in thin, even coats. Avoid leaving puddles.
Let the primer dry completely according to the manufacturer’s instructions. Some people recommend a light sanding with fine-grit sandpaper after the primer dries to ensure a super-smooth surface. If you do this, clean off the dust again.
This prep work might take a weekend, or even longer. But think of it as an investment. It’s what makes your painted floor last.
It’s the difference between a job that looks good for a year or two, and one that looks great for many years to come. The effort now saves you so much heartache later.
Quick Scan: Prep Checklist
- Clear room
- Deep clean
- Repair holes/scratches
- Sand entire floor
- Remove all dust
- Apply quality primer
Applying the Paint: Patience and Technique
Once your primer is dry and your floor is spotless, it’s time to paint. This is the fun part! But remember, thin coats are better than thick coats.
This applies to primer, paint, and the topcoat.
Step 1: Cut in the Edges. Use an angled paintbrush to carefully paint along the edges of the room. Get into corners and around any built-in features.
Work in small sections.
Step 2: Paint the Main Area. For the larger areas, use a high-quality roller. A good roller cover designed for smooth surfaces will give you the best finish.
Roll in long, even strokes. Work from the furthest point in the room towards the exit. This prevents you from getting trapped.
Overlap your strokes slightly. Avoid pressing too hard, which can create an uneven texture.
Step 3: Apply Thin Coats. It’s much better to apply three thin coats of paint than one thick, gloppy coat. Thin coats dry faster.
They are less likely to drip or streak. They also adhere better and are more durable.
Step 4: Allow Drying Time. This is where patience comes in. Read the paint can instructions carefully.
Most paints need several hours to dry to the touch. But they need much longer to fully cure before you can walk on them or apply another coat. Rushing this step is a common mistake.
It can lead to smudges and peeling.
Step 5: Apply Multiple Coats. Apply your second coat of paint after the first coat is sufficiently dry. Repeat the cutting in and rolling process.
Continue applying coats until you achieve the coverage and color depth you desire. Most projects will need at least two coats, and sometimes three.
Step 6: The Final Topcoat. Once the final coat of paint has dried (and ideally cured for the time recommended by the paint manufacturer), it’s time for the topcoat. This sealer is what protects your painted floor.
Apply it just like you applied the paint. Use thin, even coats. Again, allow each coat to dry completely before applying the next.
Most experts recommend at least two coats of a high-quality sealer for maximum protection.
The drying and curing process can take a while. You might need to avoid walking on the floor for a few days after the final topcoat. Full cure can take up to 30 days for some products.
During this time, be gentle with the floor. Avoid dragging heavy furniture. Use felt pads on furniture legs.
This will help protect your beautiful new floor.
Creating a Distressed or Antiqued Look
Rustic floors often have a bit of age and character. You can achieve this “distressed” look in a few ways. It’s all about adding subtle signs of wear.
Distressing Techniques
Sanding After Painting: This is a very common method. After your final coat of paint has dried, use a fine-grit sandpaper (150-220 grit). Gently sand in random areas, especially on edges, corners, and high-traffic paths.
You want to lightly scuff the paint to reveal the wood or primer underneath. Don’t overdo it! The goal is subtle wear, not a completely stripped floor.
Using a Wire Brush: For a more aggressive distressed look, you can use a wire brush. Scrape it lightly across the painted surface after the paint is dry. This can create deeper scratches and a more rugged appearance.
Using Chains or Tools: Some people use chains or even the back of a hammer to bang on the floor after painting. This creates dents and marks that look like old damage. Be careful not to gouge the wood too deeply.
Two-Tone Distressing: Apply your base color. Let it dry. Then apply a second, contrasting color.
Before the second color dries completely, wipe some of it away with a damp rag. Or, let it dry, then sand through the top layer to reveal the base color. This creates a layered, aged effect.
Wax Resist Technique: Apply a layer of wax to areas where you want the paint to look worn before you paint. After the paint dries, the wax will allow the paint to be wiped away easily in those spots, revealing the color beneath.
If you’re using chalk paint or milk paint, distressing is often built into the process. These paints have a matte finish that is easier to sand. You can apply the paint, let it dry, then lightly sand the edges and high-traffic areas.
Then, you’ll still need that protective topcoat to seal it all in. The key is to make the distressing look natural. Like it happened over many years, not just in one afternoon.
Think about how real wood floors age. They get scuffs from shoes. They get worn down in pathways.
They might get chipped near doorways. Try to replicate that natural wear pattern. Don’t just distress randomly.
Focus on areas where real wear would occur. This will make your rustic painted floor look much more believable and beautiful.
Sometimes, a little bit of this distressing can actually hide future wear and tear. If the floor gets a new little scuff mark, it might blend right in with the existing distressed look. This is one of the beauties of the rustic style.
It’s forgiving. It embraces the journey of a home.
When you’re distressing, always step back and look at your work. Is it too much? Is it not enough?
You can always sand away a little more if needed. It’s usually harder to add more distressing once you’ve gone too far. So, take your time and go slowly.
You’re creating character.
Maintaining Your Rustic Painted Floors
Taking care of your painted wood floors is important to keep them looking their best. But the good news is, it’s usually quite simple. And the rustic style is forgiving, remember?
Regular Cleaning: Sweep or vacuum your floors regularly. This removes dirt and grit that can scratch the paint. Use a vacuum cleaner with a soft brush attachment.
Avoid vacuums with beater bars, as they can scratch the finish.
Damp Mopping: For general cleaning, use a damp mop. Mix a mild cleaner (like a pH-neutral floor cleaner or a little dish soap) with water. Wring out the mop very well so it’s just damp, not wet.
You don’t want standing water on your painted floors. This can seep between the boards and cause damage.
Avoid Harsh Chemicals: Stay away from abrasive cleaners, ammonia-based cleaners, or strong degreasers. These can break down the paint and the protective topcoat over time. Always test any new cleaning product in an inconspicuous area first.
Protect from Furniture: Use felt pads on the legs of all your furniture. This is a simple step that prevents scratches and dents. When moving heavy furniture, lift it completely.
Don’t drag it across the floor.
Wipe Up Spills Quickly: Liquids can damage the paint and sealer if left to sit. Wipe up any spills immediately with a soft cloth. Pay special attention to spills of water, juice, or anything that could stain.
Area Rugs and Mats: Place rugs or mats in high-traffic areas, like entryways and in front of the sink or stove. This provides an extra layer of protection. Make sure the backing of the rug is safe for painted floors.
Some rubber-backed mats can react with the paint over time. It’s often best to use woven or natural fiber rugs.
Touch-Ups: If you notice any small chips or scratches, don’t wait too long to touch them up. You can often buy a small amount of your paint and topcoat. Apply a thin layer to the damaged spot.
If you distressed the floor, you can often blend the touch-up in by lightly sanding it after it dries.
The key to long-term beauty is gentle care. Think of it as maintaining a well-loved piece of furniture. With a little bit of attention, your rustic painted floors can stay beautiful for a very long time.
They’ll be a source of pride and comfort in your home.
What This Means For You: When is it Normal?
Normal Wear: Faint scuffs, slight variations in color, a few tiny nicks. These all add to the rustic charm and are expected.
Normal Cleaning: Daily sweeping, damp mopping with mild soap and water.
Normal Aging: Over time, the finish might soften slightly, and any distressing you did might become more pronounced. This is a good thing for a rustic look!
When to Worry About Your Painted Floors
While painted floors are generally durable, there are a few signs that mean you should pay attention. These usually point to a problem with adhesion, moisture, or wear and tear beyond what the paint can handle.
Peeling or Chipping Paint: If large sections of paint are peeling or chipping off, it’s a clear sign that adhesion was poor. This often happens if the floor wasn’t cleaned or prepped properly. Or if the wrong type of primer or paint was used.
This is usually not fixable with a simple touch-up and might require redoing the affected area.
Bubbling or Blistering: This often indicates moisture trapped beneath the paint. It could be from spills that weren’t wiped up, or from moisture coming up through the subfloor. If you see bubbles, try to address the moisture source first.
Then, you may need to remove the affected paint and reseal.
Soft or Sticky Spots: If parts of the floor feel soft or sticky, even after drying, it could mean the paint or topcoat hasn’t cured properly. This can happen if coats were applied too thickly, if the temperature was too low during application, or if you walked on it too soon. Sometimes, more curing time is needed.
Other times, the product may have failed and needs to be redone.
Scratches Through to Bare Wood: While some minor scratches can add character, deep gouges that go all the way through the paint and sealer can be a problem. These are entry points for dirt and moisture. They also look jarring against a painted surface.
Discoloration or Stains: If you notice dark spots or stains that don’t come up with gentle cleaning, it could mean something has penetrated the topcoat. This might be a chemical reaction or a spill that has seeped in.
If you see any of these issues, don’t panic. Assess the situation. For minor issues, a touch-up might be enough.
For more significant problems, you might need to do some repairs. Sometimes, this means sanding down a section and repainting and resealing. It’s always better to address problems early before they spread.
Ideas for Rustic Painted Floors
Beyond just a solid color, there are so many ways to make your painted floors uniquely rustic and charming.
Creative Rustic Floor Designs
Checkerboard Pattern: A classic for a reason! Use two contrasting colors. A crisp white and a deep charcoal gray, or a soft beige and a muted blue.
You can paint clean squares or go for a more distressed, hand-painted look.
Stenciled Designs: Use stencils to add patterns. Think simple geometrics, floral motifs, or even a repeating motif like stars or leaves. You can stencil over a solid color base.
For an extra rustic touch, use a slightly worn-looking stencil.
Faux Wood Grain: This is more advanced, but you can use special tools and techniques to create a convincing faux wood grain pattern on your painted floor. It can mimic the look of planks or even reclaimed wood.
Ombre or Gradient Effect: Paint your floor in shades that fade from one color to another. For example, darker at one end of the room and lighter at the other. This can add visual interest and depth.
Plank Effect: If your floor has existing planks, you can paint them to look like separate boards. Use painter’s tape to create lines between the planks. Paint each plank a slightly different shade, or just paint the lines to define them more clearly.
Distressed White or Gray Wash: Apply a thin layer of white or gray paint. Then, immediately wipe off a good portion of it with a rag, revealing the original wood color underneath. This creates a soft, weathered look.
When choosing a design, consider the overall style of your home. A busy pattern might be overwhelming in a small room. A simple, solid color can be very effective.
The key is to create a look that you love and that fits your space. Don’t be afraid to experiment! You can always paint over it if it doesn’t turn out quite right.
That’s the beauty of paint.

Frequent Questions About Rustic Painted Floors
Can I paint over existing laminate or vinyl flooring?
It’s generally not recommended for longevity. Laminate and vinyl have very smooth surfaces that paint struggles to adhere to without specialized primers and preparation. The movement and expansion of these materials can also cause paint to crack.
For the best results, paint is best applied directly to properly prepared wood floors.
How long does it take to paint a room of floors?
This varies greatly. A typical room might take a full weekend for prep and the first coats of paint. Drying time between coats and the final curing period can add several days or even a week or two before you can fully use the room.
Patience is key.
Will painted floors be slippery?
Matte finishes are generally not slippery. If you use a high-gloss sealer, it can become slippery. Most people opt for a matte or satin finish for rustic floors, which offers good traction.
You can also add an anti-slip additive to your topcoat if you’re concerned.
Can I paint over previously varnished or stained wood floors?
Yes, but proper preparation is crucial. You must thoroughly clean and sand the floor to create a surface for the primer to adhere to. Skipping sanding will likely lead to peeling paint.
How do I clean painted wood floors?
Sweep or vacuum regularly with a soft brush. Mop with a damp (not wet) mop using mild soap and water. Avoid harsh chemicals and excessive water.
Is it difficult to paint your own wood floors?
It requires patience and attention to detail, especially during the prep phase. However, it is a very achievable DIY project for most homeowners. The rustic style is also forgiving of minor imperfections.
Final Thoughts on Your Rustic Floor Project
Painting your wood floors is a fantastic way to refresh your home. It offers a budget-friendly path to a custom, charming look. Remember, good preparation is the foundation of success.
Don’t rush the cleaning, sanding, and priming steps. Choose durable paints and a strong topcoat.
Embrace the rustic style. It’s about character, not perfection. A few imperfections can add to the charm.
Take your time, enjoy the process, and you’ll end up with beautiful floors you’ll love for years to come. Your home will feel so much more personal and inviting.