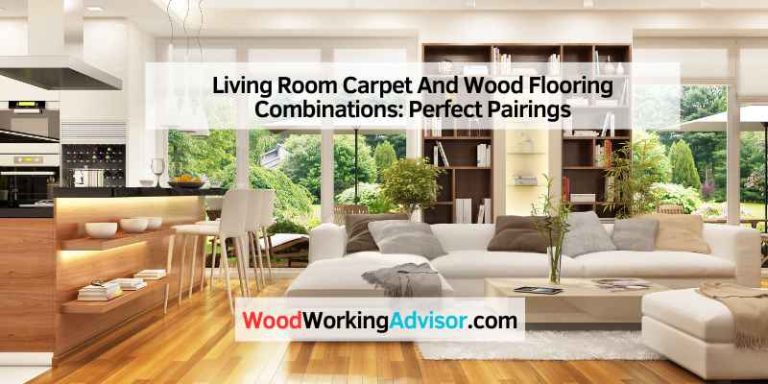
Wood Floor Bathroom Ideas: Essential Styles
Transform your bathroom with elegant wood flooring! Discover the best wood floor bathroom ideas, focusing on durable, water-resistant styles perfect for humid spaces. Get clear tips on choosing wood, installation tips, and maintenance to create a beautiful, long-lasting bathroom sanctuary.
Thinking about wood floors for your bathroom might seem a bit daring, right? Bathrooms get steamy and have water splashes, and wood and water don’t always mix well. But what if I told you there are fantastic, beautiful, and even practical ways to bring the warmth and elegance of wood into your bathroom? Many homeowners worry about moisture damage, warped boards, and the general upkeep. It’s a common concern, and for good reason. But with the right knowledge and smart choices, you can absolutely achieve that stunning wood floor look you’ve been dreaming of without the headache. This guide will walk you through the best wood floor bathroom ideas, focusing on styles that stand up to the challenges of a bathroom. We’ll cover everything from choosing the right wood to ensuring it stays gorgeous for years. Ready to make your bathroom dreams a reality?
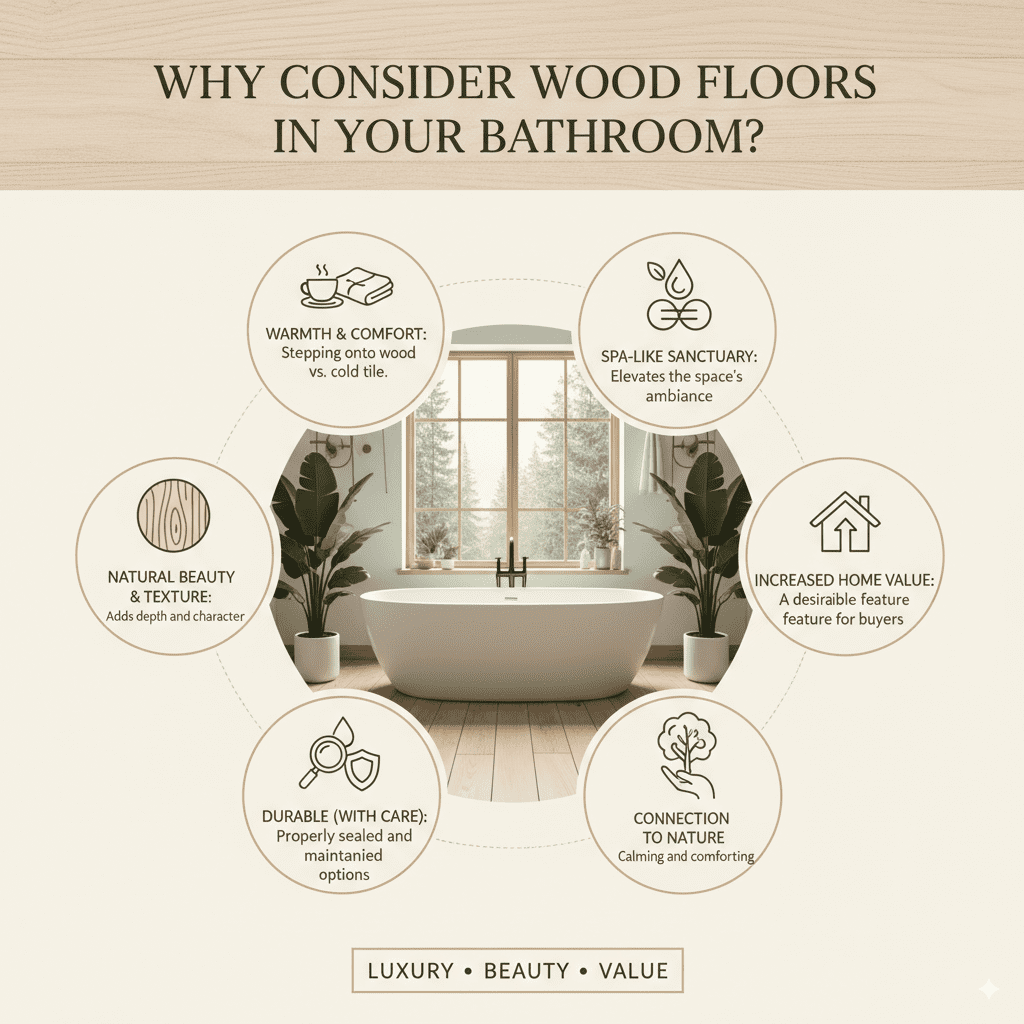
Why Consider Wood Floors in Your Bathroom?
Wood floors can bring an unparalleled sense of warmth, luxury, and natural beauty to any room, and the bathroom is no exception. While traditional choices like tile have long been the go-to for bathrooms due to their water resistance, wood offers a unique aesthetic that can elevate your space. Imagine stepping onto rich, warm wood each morning instead of cold tile – it’s a little touch of everyday luxury.
Beyond aesthetics, wood flooring can make your bathroom feel more like a cozy retreat, a spa-like sanctuary, or an extension of a beautifully designed living space. The natural grains and textures of wood add depth and character that synthetic materials often can’t replicate. Plus, when properly sealed and maintained, many wood options can be surprisingly durable and suitable for bathroom environments.
For those who love the feel and look of natural materials, wood flooring offers a connection to nature that can be very calming and comforting. It can also increase your home’s value, as high-quality, well-maintained flooring is always a desirable feature for potential buyers.
Choosing the Right Wood: Styles and Materials for Bathrooms
The key to successful wood flooring in a bathroom lies in selecting the right type of wood and finish. Not all woods are created equal when it comes to moisture resistance. We need materials that can handle high humidity and occasional splashes without warping, swelling, or rotting.
Engineered Hardwood: The Smart Choice
Engineered hardwood is often the star of the show for wood floors in bathrooms. Why? It’s designed for stability. It consists of a top layer of real hardwood veneer bonded to multiple layers of plywood or high-density fiberboard. This construction makes it far more resistant to changes in humidity and temperature than solid hardwood.
- Construction: Multiple layers of wood or composite material are glued together with the wood grain running in different directions. This cross-grain construction locks the layers, preventing swelling and shrinking that can happen with solid wood.
- Durability: The top veneer is real wood, so it looks and feels like solid hardwood. The layered core provides excellent stability, making it a fantastic option for moisture-prone areas like bathrooms.
- Installation: Engineered wood can often be installed using a floating method, glue-down, or even stapled, depending on the product. This flexibility can make DIY installation more manageable.
- Water Resistance: While not waterproof, engineered hardwood is significantly more water-resistant than solid wood. Quick clean-ups of spills are usually sufficient.
When selecting engineered hardwood, look for options with a thicker veneer layer, as these can be sanded and refinished if needed, similar to solid wood. The quality of the top hardwood layer also impacts its appearance and durability.
Solid Hardwood: Proceed with Caution (and Extra Protection)
Solid hardwood is beautiful, but it’s also the most susceptible to moisture damage. If you’re set on solid hardwood, it’s crucial to choose denser wood species and apply multiple, robust protective sealants. This option is best suited for bathrooms with excellent ventilation and where water spills are diligently wiped up immediately. It’s generally not the recommended choice for high-moisture bathrooms.
Water-Resistant Wood-Look Options: The Best of Both Worlds
Sometimes, you want the look of wood without the inherent risks. Thankfully, there are excellent alternatives that mimic wood grain and texture remarkably well while offering superior water resistance.
- Luxury Vinyl Plank (LVP): This is a hugely popular choice for bathrooms. LVP flooring is made from PVC vinyl and is entirely waterproof. It comes in planks that look incredibly realistic, mimicking the grain, knots, and texture of real wood. It’s durable, easy to clean, and can be installed as a floating floor or glued down.
- Waterproof Laminate Flooring: Modern laminate flooring has come a long way. Many options now feature a water-resistant core and a strong, sealed top layer. While not fully waterproof like LVP, they can handle bathroom humidity and minor spills much better than traditional laminate. Always look for “waterproof” or “water-resistant” labels specifically designed for wet areas.
These alternatives offer the aesthetic appeal of wood with the practical durability needed for a bathroom. They are often more budget-friendly and easier to install for DIYers.
Essential Wood Floor Bathroom Styles to Consider
Once you’ve chosen a suitable wood or wood-look material, the next step is to think about the style that best fits your bathroom’s overall design. Here are some essential styles that work wonderfully:
1. Coastal Whites and Light Grays
Think airy, bright, and breezy. Light-colored wood, especially those with a subtle whitewash or gray stain, can evoke a sense of calm and spaciousness, perfect for a coastal or Scandinavian-inspired bathroom.
- Aesthetics: Light, clean, and airy. These colors reflect light, making smaller bathrooms feel larger.
- Materials: Engineered hardwood with a white oak or maple veneer, or LVP/waterproof laminate in light gray or whitewashed finishes.
- Pairs well with: White subway tile, natural fiber accents (like jute rugs), brushed nickel or chrome fixtures, and sea-inspired decor.
- Tip: Choose a matte or satin finish to avoid glare and enhance the natural look.
2. Natural Oak and Warm Neutrals
This is a timeless, versatile style that brings warmth and natural beauty to any space. Natural oak tones, or other warm-toned hardwoods like walnut or cherry (with proper sealing), create an inviting and grounded atmosphere.
- Aesthetics: Classic, warm, inviting, and organic.
- Materials: Engineered hardwood in natural oak, maple, or hickory finishes. LVP or waterproof laminate that replicates these wood species.
- Pairs well with: A wide range of colors, from soft creams and beiges to deeper greens and blues. Consider pairing with natural stone elements, brass or matte black fixtures.
- Tip: Look for planks with a subtle grain pattern for a sophisticated feel.
3. Dark and Dramatic
For a luxurious and modern feel, consider darker wood tones like a deep espresso, walnut, or even faux dark wood LVP. This style adds depth, drama, and a touch of opulence to your bathroom.
- Aesthetics: Sophisticated, modern, luxurious, and grounding.
- Materials: Engineered hardwood with a dark stain (e.g., walnut, espresso, or dark oak). Dark wood-look LVP or waterproof laminate.
- Pairs well with: Crisp white elements (like vanity and toilet), metallic accents (gold, brass, or matte black), and jewel tones for pops of color.
- Tip: Dark floors can show dust and water spots more easily, so a slightly textured finish can help mask minor imperfections.
4. Distressed and Rustic Charm
Embrace a more relaxed, farmhouse, or rustic aesthetic with distressed or reclaimed wood-look flooring. These styles often feature variations in color, knots, and subtle imperfections that add character and a lived-in feel.
- Aesthetics: Cozy, charming, rustic, and character-filled.
- Materials: LVP or waterproof laminate designed to look like reclaimed wood, weathered oak, or barn wood.
- Pairs well with: Shiplap walls, vintage-inspired fixtures, natural textures like wood beams, and a muted color palette.
- Tip: This style hides wear and tear very well, making it a practical choice for busy households.
5. Plank Size and Layout
Beyond the color and material, the plank size and how you lay them out can significantly impact the style. Wider planks tend to create a more modern and spacious feel, while narrower planks can mimic traditional hardwood flooring. Herringbone or chevron patterns can add a unique, upscale touch, but they require more complex installation and potentially more material.
Consider the scale of your bathroom. In smaller bathrooms, wider planks or a simpler running bond pattern can make the space feel larger. In expansive bathrooms, you have more freedom to play with different plank widths or intricate patterns.
Installation Tips for Wood Floors in Bathrooms
Even with the right materials, proper installation is critical for ensuring longevity and water resistance in a bathroom. Here are some key tips, especially for DIYers.
1. Subfloor Preparation is Crucial
- Cleanliness: Ensure your subfloor is perfectly clean, dry, and free of any debris. Any bumps or imperfections can transfer to the new flooring.
- Levelness: The subfloor must be perfectly level. Use a leveling compound if necessary. Many manufacturers recommend a specific tolerance for subfloor flatness.
- Moisture Barrier: For most wood or wood-look flooring, a moisture barrier (like a polyethylene sheeting) is essential. This acts as an additional layer of protection against moisture seeping up from the subfloor. Always check the flooring manufacturer’s specific recommendations. According to the Building Science Corporation, proper moisture management is fundamental to building durability.
2. Acclimation is Key
Before installation, all wood and wood-composite flooring (including engineered hardwood and laminate) needs to acclimate to the room’s temperature and humidity for at least 48-72 hours. Lay the planks flat in the room where they will be installed. This allows the material to expand or contract to its final size before being laid down, preventing problems later.
3. Sealing the Edges and Gaps
This is a critical step for moisture-prone areas. Even with water-resistant materials, properly sealing all perimeter gaps and expansion joints is vital.
- Perimeter Expansion: Leave the manufacturer-recommended expansion gap (typically 1/4 to 1/2 inch) around the entire perimeter of the room. This gap needs to be covered by baseboards or trim.
- Caulking: After installation, use a high-quality, flexible caulk (like silicone caulk) around the entire perimeter. Pay special attention to areas where the floor meets the tub, shower, and toilet. This seals any small gaps that might allow water to seep underneath.
- Around Fixtures: When installing around toilets, tubs, or shower bases, ensure a watertight seal between the flooring and the fixture.
4. Consider the Installation Method
- Floating Floor: Many engineered hardwoods, LVP, and laminate floors are designed for a floating installation, where planks click or lock together and are not attached to the subfloor. This can be DIY-friendly.
- Glue-Down: For bathrooms, a glue-down installation can offer a very secure and water-resistant finish, especially for engineered hardwood. Ensure you use a high-quality, moisture-resistant adhesive recommended by the flooring manufacturer.
- Professional Installation: If you’re unsure about any of these steps or want the peace of mind that comes with expert work, consider hiring a professional installer. Especialy for patterned layouts or solid hardwood.
Maintaining Your Wood Bathroom Floors
Keeping your wood bathroom floors looking their best is straightforward if you implement a few simple maintenance habits. The goal is to minimize prolonged exposure to moisture and clean up spills quickly.
Daily & Weekly Care:
- Wipe Up Spills Immediately: This is the number one rule. Don’t let water, soap, or shampoo sit on the floor. Keep a soft cloth or paper towel handy for quick clean-ups.
- Dry Mats: Place absorbent mats outside showers, tubs, and in front of the sink to catch dripping water. Ensure these mats are breathable and don’t trap moisture underneath.
- Regular Sweeping or Vacuuming: Use a soft-bristle broom or a vacuum cleaner with a hard floor attachment to remove dust, hair, and grit. This prevents scratching the finish. Avoid vacuums with beater bars that can damage the wood.
- Damp Mopping: Use a damp mop (not wet!) with a pH-neutral cleaner specifically designed for wood or the type of flooring you have. Wring out the mop thoroughly so it’s barely damp.
Annual or As-Needed Maintenance:
- Deep Cleaning: Periodically, you might need a more thorough cleaning. Again, use the right cleaner and ensure the mop is only slightly damp.
- Reapplying Sealant (for Solid Hardwood): If you have solid hardwood, you may need to reapply a high-quality polyurethane sealant every few years, especially in high-traffic or high-moisture areas.
- Inspect Seals: Check the caulking around the perimeter and fixtures annually. If you notice any cracks or gaps, reapply caulk to maintain a waterproof seal.
For engineered wood, LVP, and waterproof laminate, follow the specific care instructions provided by the manufacturer. Generally, their durable wear layer means they require less intensive maintenance than solid hardwood.
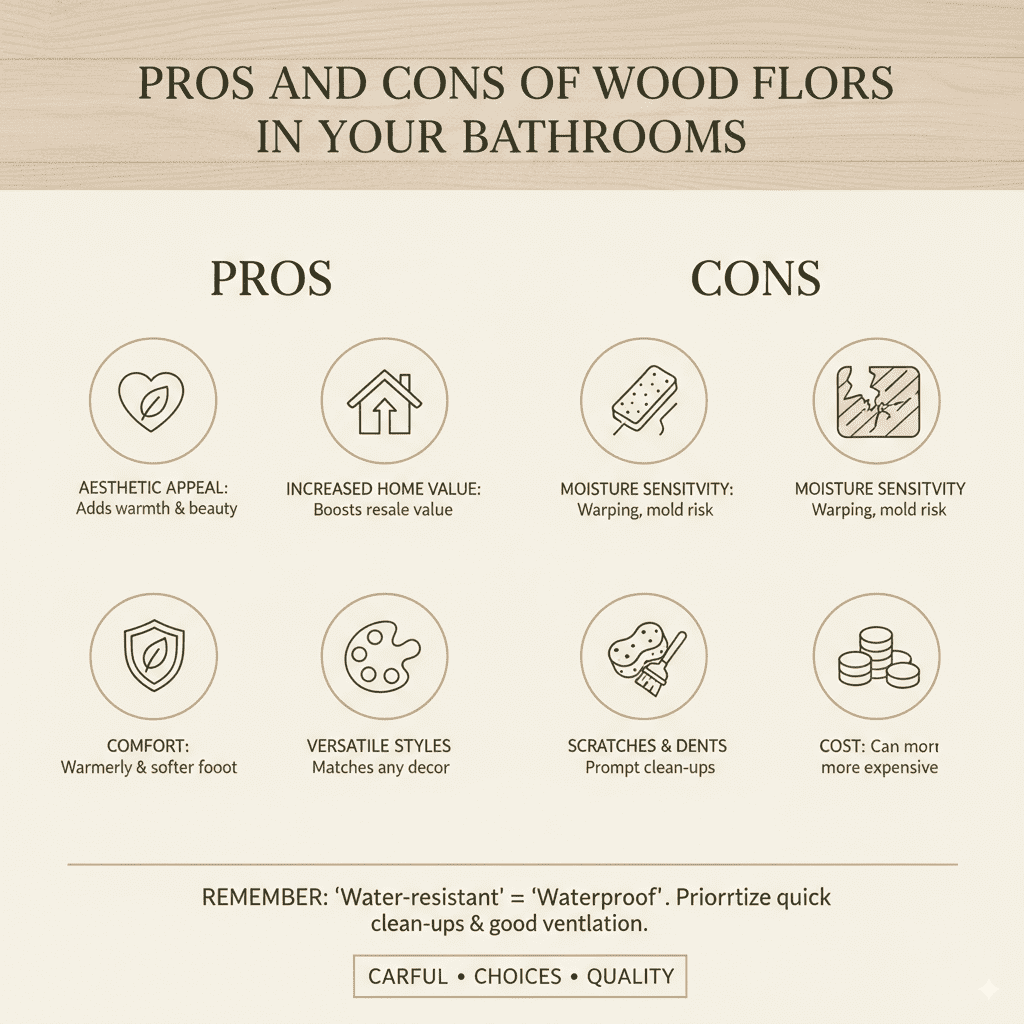
Pros and Cons of Wood Floors in Bathrooms
Like any design choice, wood floors in bathrooms come with their own set of advantages and disadvantages. Making an informed decision means weighing these factors carefully.
| Pros | Cons |
|---|---|
| Aesthetic Appeal: Adds warmth, natural beauty, and a touch of luxury that tile can’t match. | Moisture Sensitivity: Even with water-resistant options, prolonged exposure to water can still cause damage (warping, mold). |
| Increased Home Value: High-quality wood flooring is a desirable feature that can boost resale value. | Maintenance Requirements: Requires more careful maintenance than tile; spills must be wiped up promptly. |
| Comfort: Feels warmer and softer underfoot than cold tile, especially in cooler climates. | Potential for Scratches and Dents: Wood can be scratched or dented by heavy objects or pet claws, especially softer woods. |
| Versatile Styles: Available in a vast array of colors, species, and finishes to match any decor. | Cost: Can be more expensive than some other flooring options like vinyl or basic laminate, depending on the type and quality. |
| DIY Potential (with LVP/Laminate): Many wood-look options are designed for easy DIY installation. | Not Suitable for All Bathrooms: Not ideal for very small, poorly ventilated bathrooms or those with frequent heavy splashing (e.g., master showers directly onto the floor). |
A crucial point to remember is that “water-resistant” does not mean “waterproof.” Always prioritize quick clean-ups and good ventilation.
Frequently Asked Questions (FAQ)
Q1: Can I use solid hardwood in my bathroom?
While technically possible, it’s generally not recommended for most bathrooms due to its high susceptibility to moisture damage. If you choose solid hardwood, opt for very dense species and ensure excellent ventilation, diligent spill clean-up, and robust, multiple layers of waterproof sealant. Engineered hardwood or water-resistant alternatives are usually a much safer bet.
Q2: How do I protect my wood bathroom floor from water damage?
The best protection involves a multi-pronged approach: choose water-resistant flooring like engineered hardwood or LVP, ensure proper installation with a moisture barrier, seal all perimeter gaps with caulk, and most importantly, wipe up any spills immediately. Good ventilation in the bathroom also helps reduce humidity.
Q3: What is the best type of wood for a bathroom?
Engineered hardwood is often considered the best choice for a real wood look in bathrooms because its layered construction makes it more stable and resistant to moisture fluctuations than solid hardwood. For even greater peace of mind regarding water, luxury vinyl plank (LVP) flooring offers a highly realistic wood look and is completely waterproof.