Best Way To Install Shelves: Effortless Closet Magic
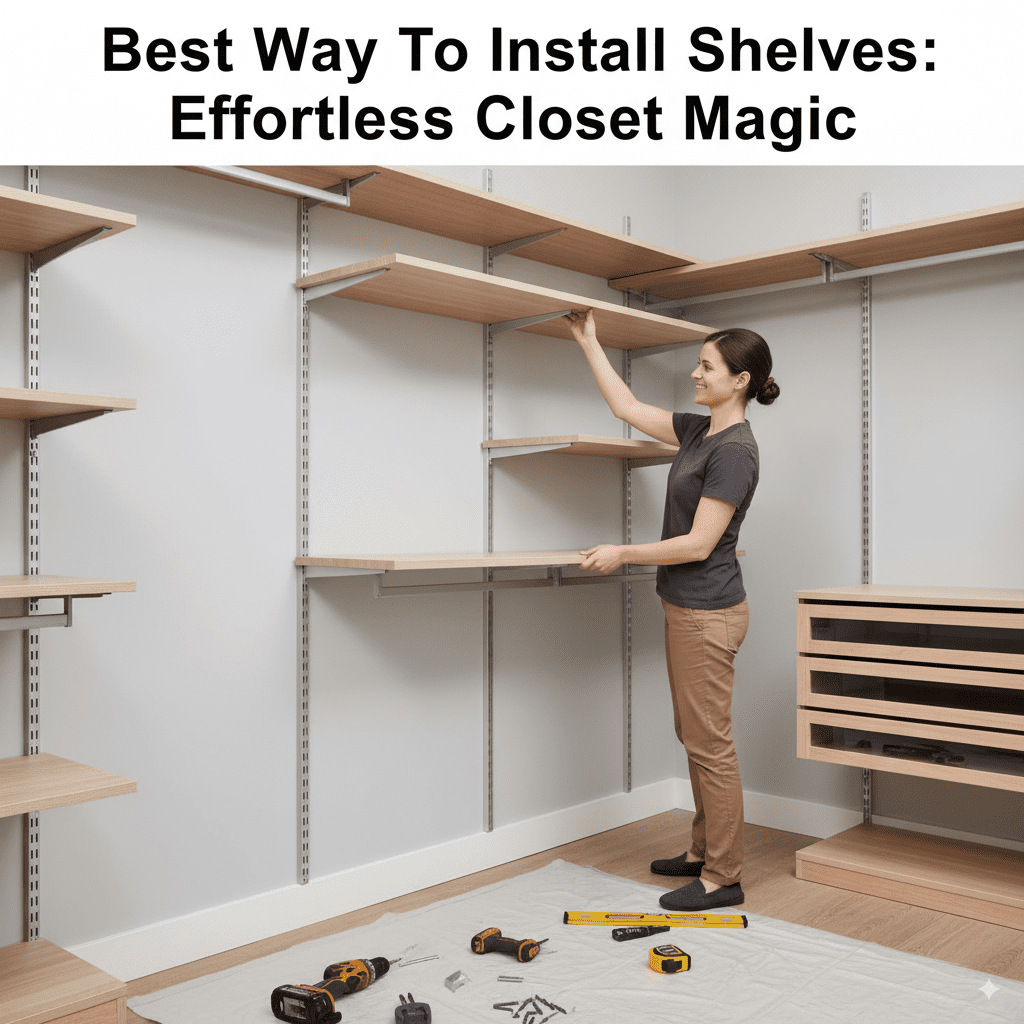
Installing shelves in your closet is a straightforward DIY project that can transform cluttered chaos into organized bliss. With a few basic tools and clear instructions, you’ll be enjoying functional, attractive shelving in no time, no matter your experience level.
Is your closet a jumbled mess? Do clothes, shoes, and accessories pile up in a way that makes finding anything a chore? You’re not alone! Many of us dream of a beautifully organized closet, and the secret weapon is often simple, well-placed shelves. But if you’ve ever stared at a bare wall and felt overwhelmed by the thought of putting up shelves, this guide is for you. I’m Md Meraj, and I’m here to show you the easiest, most effective way to install shelves in your closet. We’ll break it down step-by-step, making it totally manageable. Get ready to unlock some effortless closet magic!
Why Shelves Are Closet Superstars
Shelves are the unsung heroes of home organization. They take advantage of vertical space, turning what would be wasted air into valuable storage real estate. Think about it: instead of a limited floor area, you can stack items neatly, keep things visible, and create a sense of order that makes getting ready each day so much smoother. Whether you’re storing folded sweaters, shoe boxes, or even decorative baskets, shelves are the foundation of a functional closet.
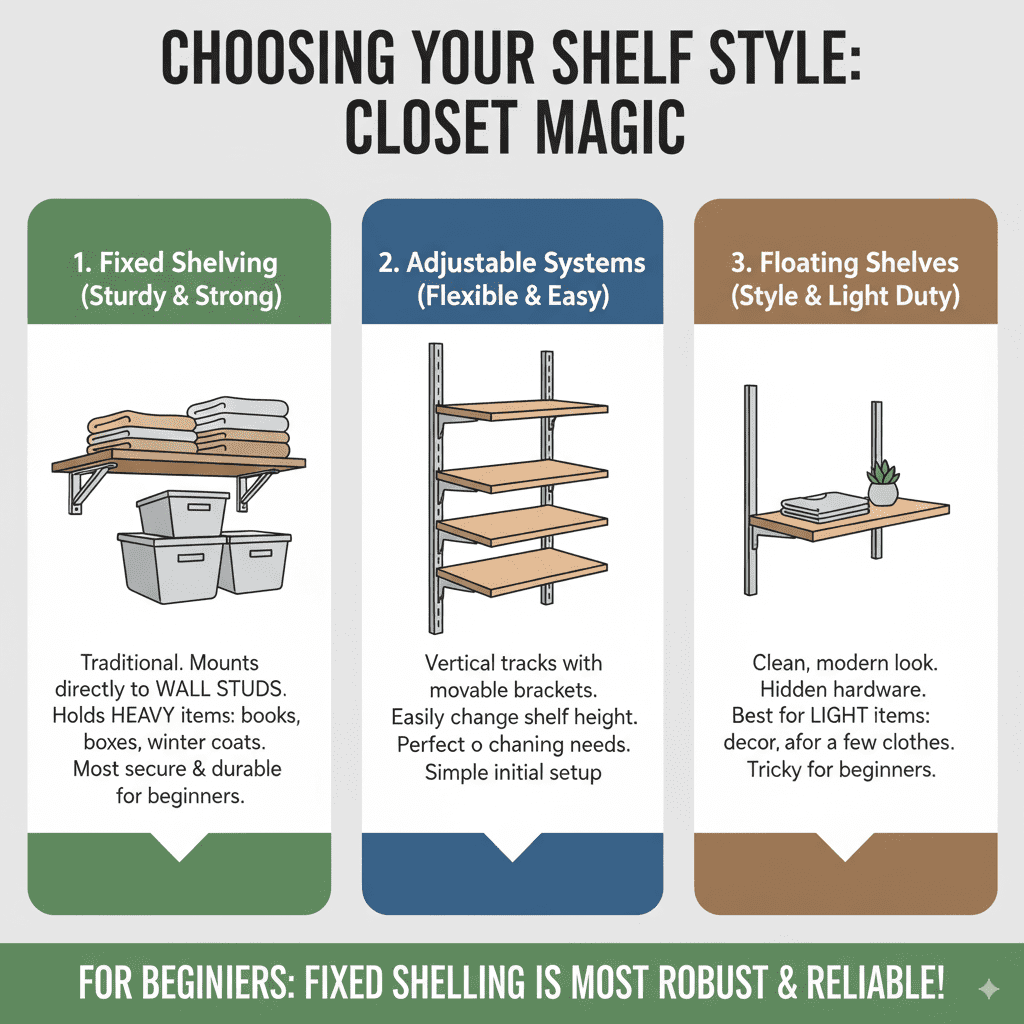
Choosing Your Shelf Style: What Works Best?
Before we grab any tools, let’s talk about the types of shelves that are perfect for closets. The “best way to install shelves in closet” really depends on what you want to store and how sturdy they need to be. For beginners, two popular and effective methods are:
1. Fixed Shelving (Most Common & Sturdy)
This is your traditional shelf attached directly to the wall studs. It’s incredibly strong and can hold a lot of weight, making it ideal for heavier items like stacks of books, winter coats, or bins filled with gear. Installation involves locating wall studs and screwing the shelf supports or the shelf itself directly into them.
2. Adjustable Shelving Systems
These systems use vertical standards that are mounted to the wall, with adjustable brackets that can be placed at different heights. This offers incredible flexibility. As your storage needs change, you can easily move the shelves up or down without any new drilling. While they might seem more complex, the initial installation of the standards is often quite simple.
3. Floating Shelves (For Lighter Items & Style)
These shelves have a minimalist look because the hardware is hidden. They attach to the wall with hidden brackets. They’re great for lighter items like decorative items or a few folded shirts, but for heavy storage, traditional fixed shelving is usually a better bet. They can also be a bit trickier for complete beginners.
For this guide, we’ll focus on installing fixed shelving, as it’s the most robust and common method for maximizing closet storage and offers reliable results for beginners. We’ll also touch on how adjustable systems work.
Tools & Materials You’ll Need
Don’t let a long list of tools scare you! For installing basic fixed shelves, you probably have most of what you need, or they are very affordable to pick up. Here’s our essential toolkit:
Essential Tools:
- Tape Measure: For accurate measurements.
- Pencil: For marking your lines and drill points.
- Stud Finder: Crucial for locating wall studs to ensure secure mounting. You can find these at any hardware store.
- Level (2ft or longer is best): To ensure your shelves are perfectly straight. A crooked shelf just looks wrong and can even be less functional.
- Drill/Driver: For pre-drilling holes and driving screws. A cordless one is a real time-saver!
- Drill Bits: A set of various sizes, including one slightly smaller than your screws for pilot holes.
- Screwdriver: If you’re not using a drill, or for specific screw types.
- Safety Glasses: Always protect your eyes when drilling or working overhead.
Materials for Fixed Shelving:
- Shelving Material: This could be pre-cut shelving boards (common in home improvement stores), plywood cut to size, or even laminated particleboard. Plywood is a great choice for durability and can be painted or stained. Aim for 1/2-inch or 3/4-inch thickness for good support.
- Shelf Brackets: These are the supports that attach to the wall and hold the shelf. Choose sturdy L-brackets for fixed shelves. Consider their weight capacity.
- Screws: You’ll need screws long enough to go through the bracket, the drywall, and securely into the wall stud. Typically, 2-inch or 2.5-inch wood screws work well.
- Drywall Anchors (Optional, but recommended for non-stud locations): If you can’t hit a stud for every mounting point, use appropriate drywall anchors (like toggle bolts or heavy-duty plastic anchors) for lighter loads. However, always aim for studs for maximum strength! See this guidance from the FTC on home improvements for general safety tips.
Step-by-Step Guide: Installing Fixed Shelves
Let’s get our hands dirty! This method is perfect for the “best way to install shelves in closet” when you need strong, reliable storage.
Step 1: Plan Your Shelf Layout
First, decide where you want your shelves. Measure the height of your closet walls. Think about what you’ll be storing on each shelf. For example, taller items might go on the bottom, while folded clothes could be stacked higher. Use your pencil and tape measure to mark the desired height for the bottom of each shelf. Make sure these marks are level with each other!
A good tip: Leave about 1 inch of space between the top of the items you plan to store and the bottom of the shelf above them. This makes it easy to place and remove things without scraping them.
Step 2: Locate Wall Studs
This is the most critical step for sturdy shelves. Most interior walls have studs (vertical wooden beams) spaced about 16 or 24 inches apart. Your shelf brackets must be screwed into these studs for strength.
- Turn on your stud finder and run it horizontally across the wall where you plan to install your shelves.
- It will beep or light up when it detects a stud. Mark the center of each stud with your pencil.
- Measure to see if your spacing is 16 or 24 inches between studs. This helps you plan where your brackets can go.
- If you can’t find studs where you need them, you might need to adjust your shelf placement or use heavy-duty drywall anchors, but studs are always the preference for any significant weight. For more on finding studs, Family Handyman offers some great visual guides.
Step 3: Mark Bracket Placement
Hold a shelf bracket against the wall at your desired height, ensuring it’s aligned with a marked stud. Use your level to make sure the bracket is perfectly vertical. Mark the screw hole locations on the wall with your pencil.
Repeat this for all the brackets you’ll be using for that shelf. Ensure the brackets are all at the same height and aligned with studs wherever possible. For a typical 8-foot shelf, you’ll likely need at least two brackets, sometimes three for extra support.
Step 4: Drill Pilot Holes and Attach Brackets
Wearing your safety glasses, use a drill bit slightly smaller than your screws to drill pilot holes at the pencil marks you made. This makes it easier to drive the screws and prevents the wood or drywall from splitting.
- If you’re drilling into a stud, the pilot hole will go deep into the wood.
- If, by necessity, you must use a drywall anchor, follow the anchor’s instructions for drilling the correct hole size.
Now, align the brackets with your pilot holes and drive in your screws using your drill/driver. Make sure the brackets are snug and secure against the wall. Give them a gentle tug to ensure they won’t move.
Step 5: Place and Secure the Shelves
Lay your shelving board on top of the installed brackets. Use your level to confirm the shelf is perfectly horizontal. Once it’s level, mark the underside of the shelf where the bracket holes are located.
Remove the shelf. Drill pilot holes through the shelf at your marks. Place the shelf back on the brackets, align the holes, and secure the shelf to the brackets using shorter screws – typically 1-inch or 1.25-inch screws are sufficient here.
Quick Tip: For extra security, especially with heavier items, consider screwing directly down through the shelf into the top of the bracket arms, provided the brackets have pre-drilled holes for this purpose. Always use screws specifically designed for wood or metal as appropriate.
Step 6: Repeat for Additional Shelves
Follow the same process to install any additional shelves above your first one. Remember to account for adequate spacing between shelves based on what you plan to store.
Installing Adjustable Shelving Systems (A Quick Look)
Adjustable shelf systems are fantastic for flexibility and can be a great “best way to install shelves in closet” for evolving needs. The installation is generally as follows:
- Mount the Standards: These are long metal strips with slots. You’ll use your stud finder to locate studs and then securely screw the standards into the wall studs at your desired vertical locations. Use a level to ensure they are perfectly plumb (straight up and down).
- Insert Shelf Brackets: Once the standards are up, you simply insert a pair of shelf brackets into the slots at the height you want your shelf.
- Add Shelves: Place your shelves on the brackets. Many adjustable systems have their own shelf boards, or you can use your own cut-to-size wood.
The beauty here is that you can move the shelves anytime without re-drilling. However, the initial mounting of the standards still relies on securing them to wall studs for proper support.
Table: Choosing the Right Shelf Material
The material you choose impacts durability, cost, and appearance. Here’s a quick comparison:
| Material | Pros | Cons | Best For |
|---|---|---|---|
| Plywood (3/4 inch) | Very strong, durable, can be painted or stained, relatively affordable. | Requires cutting (or paying for cuts), can be heavy. | Heavy items, general storage, custom sizes. |
| Laminate/Particle Board (pre-sized) | Lightweight, often pre-finished, very affordable, easy to cut. | Less durable than plywood, can sag under heavy loads over time, edges can chip. | Light to medium storage, budget-friendly projects. |
| MDF (Medium-Density Fiberboard) | Smooth surface perfect for painting, consistent density. | Can be heavy, susceptible to moisture damage, requires good ventilation. | Painted finishes, projects where a smooth surface is key. |
| Solid Wood (Pine, Poplar, etc.) | Looks great unfinished or stained, strong, can be very decorative. | Can be more expensive, may warp if not properly sealed, requires finishing. | Display shelves, areas where aesthetics are important, sturdy storage. |
For most closet applications where durability is key, 3/4-inch plywood is an excellent, reliable choice. You can often get it cut to size at the hardware store.
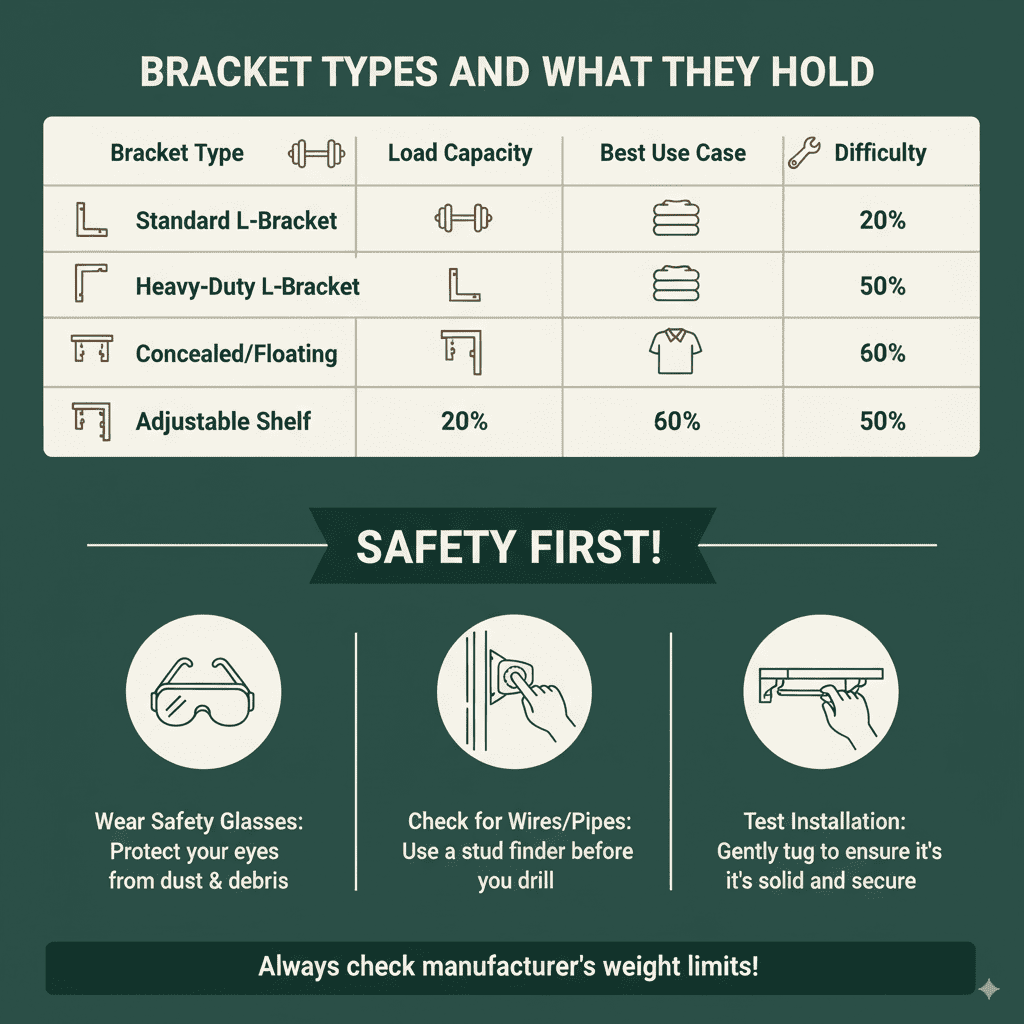
Table: Bracket Types and What They Hold
The type of bracket you choose is as important as how securely it’s installed.
| Bracket TypeTypical Load Capacity (per pair, secured to studs)Best Use CaseInstallation Difficulty | |||
|---|---|---|---|
| Standard L-Bracket (4-6 inch) | 20-40 lbs | Light to medium duty shelving, general closet storage. | Easy |
| Heavy-Duty L-Bracket (8+ inch) | 50-100+ lbs | Heavier items, long shelves needing extra support, deep shelves. | Easy |
| Concealed/Floating Shelf Bracket | 15-30 lbs (depends heavily on anchor/bracket quality) | Decorative items, lighter folded clothes, minimal look. | Moderate (requires precise alignment) |
| Adjustable Shelf Bracket (into standards) | 20-50 lbs (per bracket) | Flexible storage needs, adaptable layouts. | Easy (once standards are mounted) |
Always check the manufacturer’s stated weight capacity for any bracket you purchase. Remember that these capacities are usually based on installation directly into wall studs. If you’re relying on drywall anchors, the capacity will be significantly lower.
Safety First!
Woodworking and DIY are rewarding, but safety should always be your top priority.
- Always wear safety glasses when drilling, cutting, or hammering.
- Be mindful of where your hands are when operating power tools.
- If you’re working with power tools for the first time, read the manual or watch a quick tutorial on how to use them safely.
- Don’t overreach when drilling or screwing. Ensure you have stable footing.
- If you’re unsure about an electrical outlet or wiring within a wall, it’s best to consult a professional.
For more general home safety guidelines, check out resources from organizations like the U.S. Consumer Product Safety Commission.
Frequently Asked Questions About Installing Closet Shelves
Q1: How far apart should shelf brackets be?
For standard 12-inch deep shelves, placing brackets about 16-24 inches apart is usually sufficient, especially when they are screwed into wall studs. For longer shelves (over 3 feet), consider adding a third bracket in the middle for extra support.
Q2: Can I put shelves directly into drywall without hitting studs?
For very light items, you might get away with heavy-duty drywall anchors. However, for anything beyond a few books or that will experience any significant weight, it’s crucial to screw into wall studs. Shelves without stud support can sag, fall, and be dangerous.
Q3: What is the best height for closet shelves?
This is very personal! For general clothing storage, shelves around 5-7 feet from the floor are common. If you’re storing shoes, lower shelves might be ideal. If you’re storing bins or items you don’t access often, higher shelves are great for utilizing all vertical space.
Q4: How deep should my closet shelves be?
12 inches is a very common and practical depth for closet shelves, as it fits most folded clothes and standard-sized storage bins. You can go deeper, but ensure you have enough clearance in your closet doorway. You can also go shallower for very narrow closets.
Q5: Should I install shelves before or after I paint my closet?
It’s generally much easier to paint the closet walls before you install the shelves. This allows you to get a clean, smooth paint job without having to work around brackets and shelving. You can then touch up any scuffs after installation.
Q6: What if my closet wall isn’t perfectly straight?
Don’t worry, most walls aren’t! Use your level diligently when marking and installing. You can use thin shims (small wedges of wood) behind brackets if needed to make the shelf appear level, even if the wall isn’t. The key is that the shelf itself is level.
Conclusion: Your Organized Closet Awaits!
See? Installing shelves in your closet is completely achievable, even for a beginner. By following these steps, using the right tools, and always prioritizing safety, you can transform your closet from a source of frustration to a model of organization. Remember, the “best way to install shelves in closet” is the way that makes your space work for you. Whether you choose sturdy fixed shelves for heavy-duty storage or opt for the flexibility of an adjustable system, the result is always the same: more usable space, less clutter, and a home that feels a little more put-together. So grab your tape measure, find those studs, and get ready to enjoy your newly organized closet!