Build A Table For Your Table Saw: Step-By-Step Diy Guide
Building a table saw stand is a smart project for any woodworker. It creates a stable, organized workspace. This guide walks you through the process step-by-step.
You’ll learn about materials, tools, and common design ideas. The goal is a functional and safe stand tailored to your needs and shop.
What is a Table Saw Stand?
A table saw stand is simply a sturdy base. It holds your table saw up off the ground. Think of it like a table for your saw.
It keeps the saw at a good working height. It also stops the saw from moving when you cut wood. This is super important for safety and good cuts.
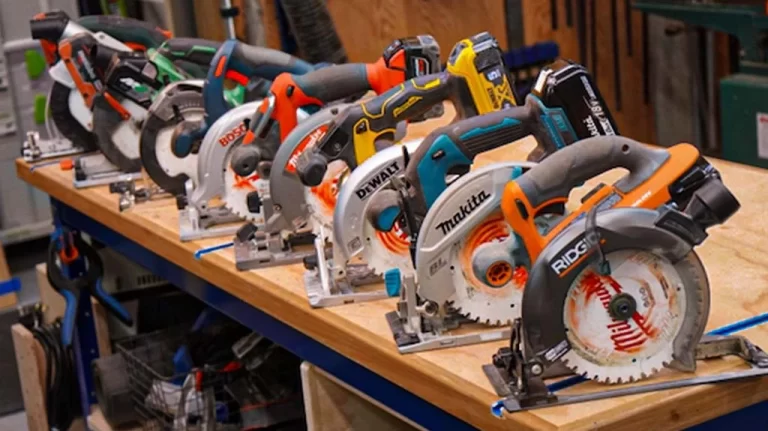
Why does it matter so much? Well, table saws are heavy. They also vibrate a lot.
If your saw is on a weak or wobbly surface, it can be dangerous. The wood might jump. Your cuts won’t be straight.
A good stand makes your saw a reliable tool. It’s the foundation for great woodworking projects.
My First Table Saw Wobble
I remember my first table saw. It was a used one, and I was so excited. I set it up on a couple of sawhorses.
I thought, “This will work for now.” I was trying to make some simple shelving for my garage. I put a piece of plywood on it. As soon as the blade touched the wood, the whole thing shook like a leaf in a storm.
I heard this awful rattling noise. My heart jumped into my throat. I quickly backed the wood away.
That was the moment I knew my setup was bad. It felt really unsafe. I could feel the vibration through the floor.
I realized then how much a good, solid stand matters for a table saw. My project had to wait until I built something better.
Why a Solid Stand is Key
Stability: Prevents saw movement during cuts. This means safer operation. It also leads to cleaner, straighter cuts.
Working Height: Many stands bring the saw to a comfortable height. This saves your back during long work sessions. You won’t have to stoop as much.
Organization: Good stands often include shelves or storage. This keeps your shop tidy. Blades, jigs, and other tools have a place.
This saves you time looking for things.
Dust Control: Some designs help manage sawdust. They might have ports for dust collection systems. This makes cleanup much easier.
Real-World Saw Stand Needs
Think about your workshop. Is it big or small? Do you move your tools often?
These things change what kind of stand you need. A small shop might need a stand on wheels. This lets you roll the saw out of the way when not in use.
A bigger shop might have a dedicated spot. You could build a heavier, fixed stand there. The materials you use also matter.
Plywood is common. Solid wood can also be used. Metal is another option, but often harder for DIY.
Your habits matter too. Do you cut big sheets of plywood often? You might need a stand with good outfeed support.
This is a surface that extends behind the saw. It helps support long pieces of wood. Or maybe you mostly cut smaller pieces.
In that case, simple shelves might be enough. The design should fit how you work. It’s not a one-size-fits-all thing.
Saw Stand Design Ideas
Mobile Base Stand
What it is: A stand with casters (wheels). Lets you move the saw easily.
Good for: Small shops, users who need to clear space.
Stationary Cabinet Stand
What it is: A heavy, fixed stand. Often with built-in storage. Can be made from plywood or solid wood.
Good for: Larger shops, users who have a dedicated space.
Open Frame Stand
What it is: A simpler frame structure. Usually made from lumber like 2x4s. Less storage, but very sturdy.
Good for: Budget builds, users who don’t need much storage.
Choosing Your Materials and Tools
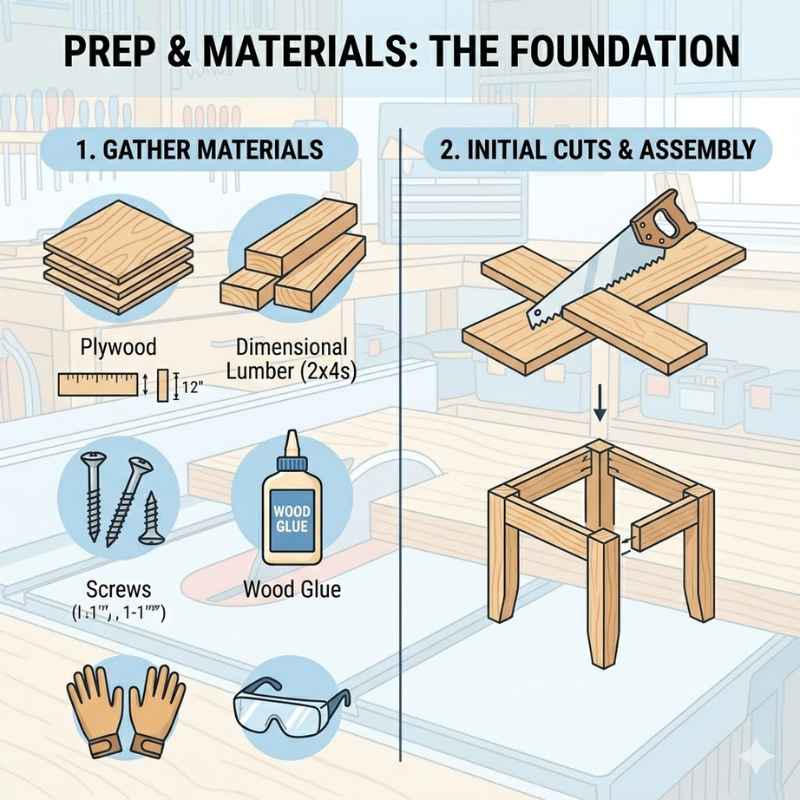
For a strong stand, you’ll need good materials. ¾-inch plywood is a great choice. It’s strong and stable.
You can get it at any lumber store. You can also use 2x4s or 2x6s for a frame. These are sturdy wood pieces.
Some people use MDF, but it’s not as strong or water-resistant. Always check the quality of your wood.
What tools will you need? You’ll need a way to cut the wood. A circular saw or a miter saw works well.
You’ll also need screws or bolts to put it all together. Wood glue adds extra strength. A tape measure and a pencil are for marking.
A drill is needed to make holes for screws. Safety gear is a must. This means safety glasses and maybe ear protection.
Essential Tools Checklist
- Circular Saw or Miter Saw
- Drill and Drill Bits
- Screws (wood screws, e.g., 2.5-inch)
- Wood Glue
- Tape Measure
- Pencil
- Safety Glasses
- Optional: Jigsaw (for cutouts), Sander
Planning Your Stand Design
Before you cut anything, plan your design. First, measure your table saw. Get its exact width, depth, and height.
You need to know how big the top of your stand needs to be. It should be just a little larger than your saw. This gives you room to work around it.
Think about the height. When your saw is on the stand, the top of the saw should be around your waist level. This is a good height for most people.
It makes cutting much easier on your body. If you’re shorter or taller, adjust this. You can also decide on shelves.
Do you want one shelf? Two? Where will they go?
Design Steps: Quick Guide
- Measure Your Saw: Get width, depth, and height.
- Determine Top Size: Make it slightly larger than the saw.
- Set Working Height: Aim for waist level.
- Sketch the Frame: Draw out the legs and supports.
- Plan Shelves: Decide on number and placement.
- Add Wheels (Optional): If you need mobility.
Building the Base Frame
Let’s start with the frame. This is the strongest part. You can build this from 2x4s or sturdy plywood.
If using 2x4s, you’ll build four legs. Then connect them with more 2x4s. These connect the legs to make a box shape.
Make sure all your cuts are straight. Use wood glue on the joints. Then, screw them together securely.
Use at least two screws per joint.
Check that the frame is square. You can use a large square. Or, measure the diagonals.
They should be the same length. This ensures the frame won’t twist later. If you’re using plywood, cut four side panels.
These will form the sides of your stand. Then cut support pieces to join them. The goal is a strong, solid box structure.
Constructing the Table Top
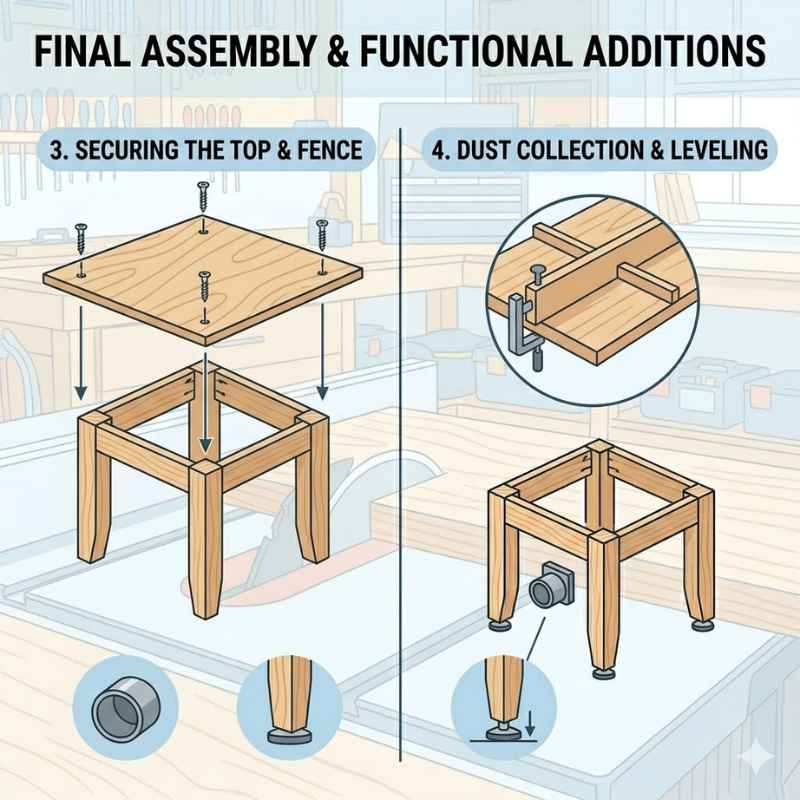
The table top is where your saw will sit. It needs to be very strong and flat. You can make this from a single piece of ¾-inch plywood.
Cut it to the size you planned. Or, for extra strength, you can make a double-layer top. Cut two pieces of plywood.
Glue them together. Screw them from the bottom up. This makes a very rigid surface.
It helps absorb vibration.
If you’re mounting the saw to the top, think about how. Many table saws have mounting holes on the bottom. You’ll want to drill pilot holes in your table top.
Then use bolts to secure the saw. Make sure the bolts don’t stick up too far. They shouldn’t interfere with the wood you’re cutting.
Table Top Strength Tips
- Use Thick Plywood: ¾-inch is best for stability.
- Double Up: Glue and screw two layers for maximum rigidity.
- Flat Surface: Ensure the top is perfectly flat.
- Secure Mounting: Use bolts, not just screws, to attach the saw if possible.
Adding Shelves for Storage
Shelves are great for keeping your workshop organized. Decide where you want your shelves. You can add shelves inside the frame.
They can hold extra saw blades, dado sets, or shop accessories. Cut pieces of plywood for your shelves. They should fit snugly inside the frame.
You can support the shelves with simple cleats. These are small pieces of wood. You attach them to the inside of the frame.
Then the shelf rests on top of the cleats. Use wood glue and screws to attach the cleats. Make sure they are level.
For extra strength, you can also screw through the shelf into the cleats.
Attaching Casters for Mobility (Optional)
If you want to move your table saw, add casters. Get heavy-duty casters. They need to support the weight of the saw and the stand.
Four casters are standard. For extra maneuverability, you can use two swivel casters and two locking casters. Or, use four locking casters for maximum stability when the saw is in use.
You’ll need to attach the casters to the bottom of your stand frame. If your frame is made of 2x4s, you can screw the casters directly to the wood. If you have a plywood base, you might want to add a reinforced corner.
This could be a thicker piece of plywood or a block of wood. This gives the caster screws something strong to bite into. Make sure the casters are all the same height.
You don’t want a wobbly stand.
Caster Placement Tips
- Reinforce Corners: Add extra wood blocks under caster mounts.
- Level Check: Ensure all casters are the same height.
- Locking Wheels: Use at least two locking casters.
- Weight Rating: Choose casters rated for more than your saw’s weight.
Mounting Your Table Saw
Now for the most important part: attaching your table saw. Carefully lift the saw onto the stand. Position it so it’s centered on the top.
Make sure the controls are easily reachable. Check that there’s enough space around it for safety.
If your saw has mounting holes on its base, drill corresponding holes in your stand’s top. Use a drill bit that’s the same size as your bolts. Then, use carriage bolts or hex bolts with washers.
Pass them through the saw base and the stand top. Secure them with nuts and washers on the underside. Tighten them firmly.
This connection must be solid. It ensures the saw won’t shift at all.
Safety Checks and Finishing Touches
Once everything is assembled, give it a good shake. Does it feel solid? Are there any loose parts?
Check all the screws and bolts. Make sure they are tight. If you used casters, lock them.
Try to rock the stand. It should not move at all. This is your final safety check.
You can finish the stand if you like. A coat of paint or varnish will protect the wood. It also makes it look nicer.
Make sure any finish is durable. It needs to withstand shop dust and minor bumps. Let it dry completely before putting your saw back on.
A well-built stand is a safe stand.
Final Safety Inspection
Shake Test
Push and pull the stand. It should feel completely solid. No wobbling or creaking.
Bolt Check
Ensure all bolts and screws are snug. Re-tighten any that feel loose.
Caster Lock
If you have casters, engage their locks. Test that they hold firmly.
Level Surface
Make sure the stand sits flat on your workshop floor.
When is a Stand “Good Enough”?
A table saw stand is “good enough” when it meets your needs safely. It should be stable. When you run the saw, it shouldn’t move or shake.
The working height should be comfortable for you. If you need to store things, it should have adequate shelves.
If your stand feels wobbly, it’s not good enough. If the saw feels unstable on it, it’s not good enough. If you can’t reach the controls easily, it’s not good enough.
You know your workshop best. Listen to your gut. If something feels off, it probably is.
A few extra screws or a bit more time can make a big difference.
Common Mistakes to Avoid
One big mistake is using flimsy materials. Cheap plywood or thin lumber won’t hold up. It will lead to a wobbly stand.
Another mistake is not measuring carefully. If your cuts aren’t square, your stand will be crooked. This affects stability.
Not securing the saw properly is also a major error. It must be bolted down. Just placing it on top is not safe.
Finally, forgetting about safety gear is a risk. Always wear safety glasses when cutting or drilling. Your eyes are too important to gamble with.
A good stand takes care of you.
Mistake vs. Fix
Mistake: Wobbly Frame
Fix: Use thicker wood, add more bracing, ensure all joints are glued and screwed.
Mistake: Saw Slides Around
Fix: Bolt the saw directly to the stand top. Add non-slip material under the saw base.
Mistake: Uncomfortable Height
Fix: Adjust leg length. Rebuild with a different height in mind.
Mistake: Flimsy Shelves
Fix: Use thicker plywood for shelves, add shelf supports (cleats).
Troubleshooting Common Issues
What if your stand rocks slightly? First, check your floor. Is it perfectly level?
If not, you might need to shim the legs. Check all your screws and bolts. Tighten anything that feels loose.
Sometimes, a small adjustment can fix a big wobble.
If your saw seems to vibrate too much, the top might not be rigid enough. You could add another layer of plywood to the top. Or, reinforce the support beams under the top.
Make sure the saw itself is in good condition. A worn-out saw will vibrate more, no matter how good the stand is.
Can I Build a Stand for Any Table Saw?
Yes, absolutely! The process is the same for most portable or contractor-style table saws. The key is measuring your specific saw.
Its dimensions will guide your stand’s size. Even larger cabinet saws can have custom stands built. They just require much stronger materials and a more robust design.
The principles of stability and support remain the same.
For very heavy cabinet saws, you might consider welding a steel frame. But for most home workshop saws, wood construction is perfectly adequate. Just make sure the wood is good quality and thick enough.
Don’t skimp on materials for the top and frame. Those are critical for safety.
What About Dust Collection Ports?
Many table saws have a port to connect a dust collection hose. You can build this into your stand design. You might have a shelf with a hole in it.
The hose can go through the hole. Or, you can create a space inside the stand. This space can act as a mini-collection chamber.
You can then add a vacuum port to the outside of the stand.
Some DIY plans include a dedicated drawer or compartment. This space is designed to catch sawdust. You can then empty it easily.
This helps keep your shop cleaner. It also makes cleanup much faster. Remember to consider airflow when designing this.
You don’t want to block the saw’s own dust port.
Long-Term Care for Your Saw Stand
Your table saw stand should last a long time if built well. Keep an eye on it. Periodically check all the screws and bolts.
Make sure they stay tight. Wood can move a little over time. Dust and moisture can also affect it.
If you notice any cracks or damage, fix them right away. Don’t let small problems turn into big ones. A little bit of maintenance goes a long way.
It keeps your saw safe and your stand working well. Clean off sawdust regularly. This prevents build-up and looks nicer.
When to Consider a Different Approach
If your needs change drastically, you might need a new stand. For example, if you upgrade to a much larger cabinet saw. Or, if you move to a shop with very different space constraints.
Sometimes, a mobile base is the best solution. Other times, a heavy, integrated cabinet is better.
If you find yourself constantly struggling with the current stand. Maybe it’s too low, too small, or too hard to move. It might be time to design a new one.
Or, consider buying a pre-made mobile base if your saw fits one. But for many, a well-built DIY stand is perfect for years.
Frequently Asked Questions
What is the best material for a table saw stand?
The best material is usually ¾-inch plywood. It is strong, stable, and readily available. For a very heavy-duty stand, you could use thicker hardwoods or even metal, but plywood is a great balance for DIY.
How high should my table saw stand be?
A common comfortable height is around waist level. This means the top of the saw blade is roughly 36-40 inches from the floor. Adjust this based on your personal height and comfort.
Do I need to bolt my table saw to the stand?
Yes, it is highly recommended. Bolting the saw securely to the stand prevents it from shifting during operation. This is a critical safety measure for preventing accidents and ensuring accurate cuts.
Can I put my table saw on sawhorses?
While you can temporarily place a saw on sawhorses, it is not recommended for regular use. Sawhorses are often not stable enough. They can wobble and move.
This makes the saw unsafe and can lead to poor cuts.
What kind of screws should I use?
For joining wood parts like frames and shelves, use good quality wood screws. For attaching plywood to 2x4s, 2.5-inch screws are usually sufficient. For attaching the saw to the top, use bolts (like carriage bolts or hex bolts) with washers and nuts for maximum security.
How do I make sure my stand is square?
After assembling the frame, use a large carpenter’s square to check corners. Alternatively, measure the diagonals of the frame. If the diagonal measurements are equal, the frame is square.
Final Thoughts on Your New Workspace
Building your own table saw stand is a rewarding project. It’s more than just building furniture. You’re building a safer, more efficient workspace.
Take your time with the planning and building steps. A little extra effort now means better results later. Enjoy your improved workshop!