Drilling-Free Decor: Securely Hang Things on Concrete Walls
Attach items to a concrete wall without drilling using strong adhesives like Command strips for lights up to 8 lbs or polyurethane glue for shelves up to 50 lbs. Clean well, apply firmly, and wait for cure time for a safe, lasting hold anyone can do at home.
Concrete walls look tough and solid, but they can be a real puzzle when you want to hang something without making holes. Maybe you’re renting and can’t drill, or you just don’t have the tools. It feels frustrating, right? Don’t worry, friend. I’ve helped tons of homeowners like you tackle this exact issue. With simple adhesives and a few easy steps, you can securely attach shelves, pictures, or decor without a single drill mark. In this guide, I’ll walk you through proven methods that are safe and beginner-friendly. You’ll gain the confidence to get started today, and by the end, your space will feel more like home.
Why Attaching to Concrete Walls Feels Challenging
Concrete is super hard and smooth, which makes regular nails or screws tricky without drilling. But here’s the good news: modern adhesives are designed just for this. They create a strong bond that holds up to weight and time. No more worrying about landlord damage or messy tools. These methods work great for basements, garages, or any concrete surface. Let’s dive into what you’ll need and how to do it right.
Gathering Your Tools and Materials
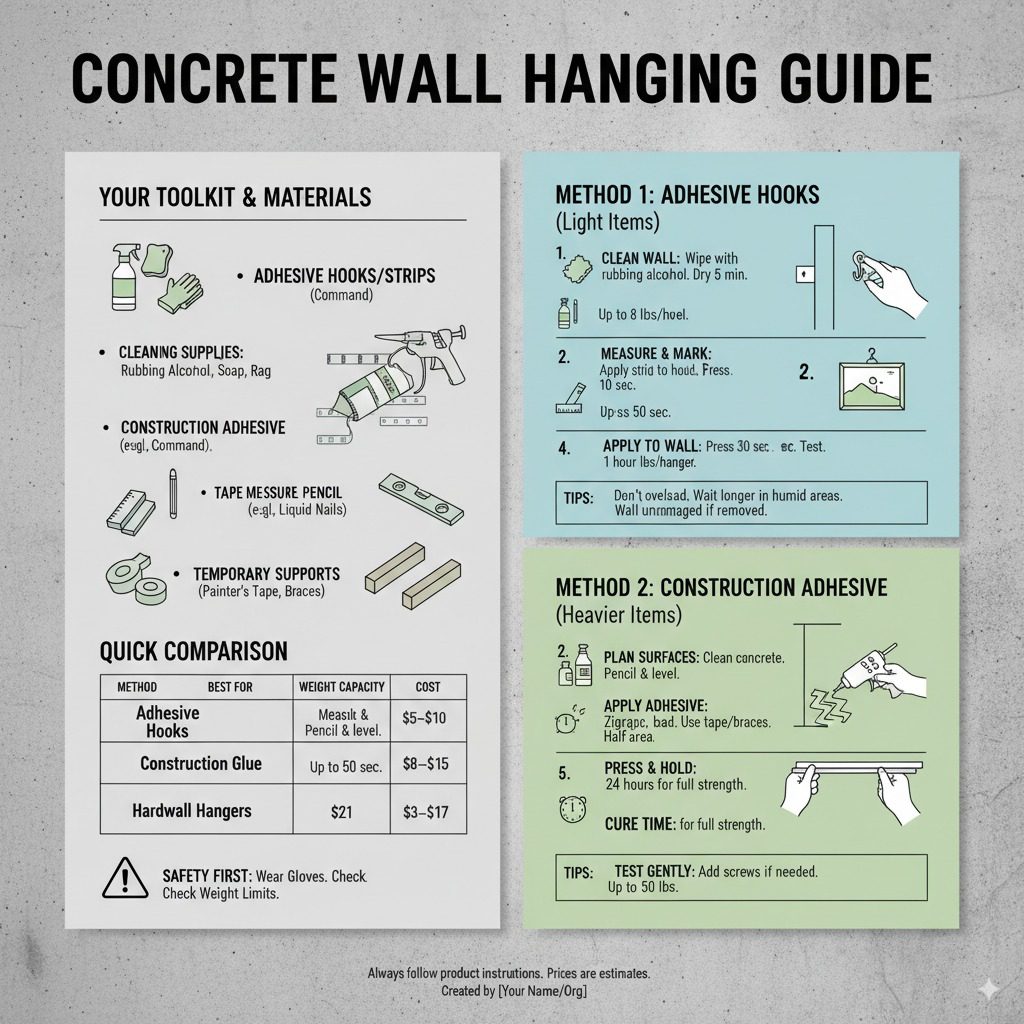
Before you start, grab a few basics. You don’t need fancy stuff – just items from your local hardware store. Focus on quality adhesives rated for concrete. Here’s a simple list to make shopping easy.
- Cleaning supplies: Rubbing alcohol, soap, and a rag for prepping the wall.
- Adhesive hooks or strips, like Command brand, for light items.
- Construction adhesive, such as Liquid Nails or Gorilla Glue, for heavier loads.
- Tape measure and pencil for marking spots.
- Level to keep things straight.
- Temporary supports, like painter’s tape or braces, if needed for curing.
For safety, always wear gloves when handling adhesives. And check weight limits – better safe than sorry. If you’re unsure, start small to test.
| Method | Best For | Weight Capacity | Cost Estimate |
|---|---|---|---|
| Adhesive Hooks | Light decor, pictures | Up to 8 lbs per hook | $5–$10 per pack |
| Construction Glue | Shelves, wood pieces | Up to 50 lbs with proper application | $8–$15 per tube |
| Hardwall Hangers (hammer only) | Medium frames | Up to 25 lbs per hanger | $3–$7 per set |
This table shows quick comparisons so you can pick what fits your project. Prices are rough guides from stores like Home Depot. Remember, always follow the product’s instructions for the best results.
Method 1: Using Adhesive Hooks for Lightweight Items
Adhesive hooks are a game-changer for beginners. They’re perfect for hanging pictures, towels, or small shelves without any mess. Brands like Command make ones specially for concrete. They stick strong but peel off clean when you’re done. Let’s go step by step – it’s easier than you think.
- Clean the wall spot. Wipe with rubbing alcohol on a rag. This removes dust and grease so the adhesive grips tight. Let it dry fully – about 5 minutes.
- Measure and mark. Use your tape measure to find the perfect height. Mark with a pencil. For two hooks, space them the width of your item divided by three. Grab a level to check it’s even.
- Prep the hook. If the strip isn’t on, peel the backing and stick it to the hook base. Press firm for 10 seconds.
- Apply to wall. Peel the other side and press the hook to your mark. Hold for 30 seconds with steady pressure. Do this for all hooks.
- Wait and hang. Give it 1 hour to set. Then, gently hang your item. Start with something light to test.
Tips for success: Don’t overload – stick to the weight limit. In humid spots like bathrooms, wait longer for curing. If it fails, the wall stays undamaged. For more details, check this helpful guide from WikiHow. It’s got pictures that make it even clearer.
I’ve used these in my own garage for tools, and they hold great. You can too – just take it slow and enjoy the process.
Method 2: Gluing with Construction Adhesive for Heavier Attachments
For bigger jobs like mounting a wooden shelf or bracket, construction adhesive is your best friend. It’s like super glue for home projects but flexible and waterproof. Products like Liquid Nails Heavy Duty work wonders on concrete. This method bonds wood or metal directly, no drilling needed. Safety first: Work in a ventilated area and wear gloves.
- Prep both surfaces. Clean the concrete with soap and water, then rubbing alcohol. For wood, sand lightly if rough. Dry everything completely.
- Plan your spot. Mark where the item goes. Use a level. If it’s a long piece like a furring strip, mark multiple points.
- Apply adhesive. Cut the tube tip at a 45-degree angle. Squeeze a zigzag line on the back of your item or the wall – cover about half the area to avoid squeeze-out mess.
- Press and hold. Align and push firmly for 30 seconds. Use tape or braces to keep it in place while it cures. Don’t move it!
- Cure time. Wait 24 hours for full strength. Some adhesives set in 20 minutes but take longer for heavy loads.
- Test gently. After curing, tug lightly. If secure, add screws to the wood piece if needed for extra support.
This works for attaching a wooden batten first, then screwing shelves into it. It’s strong – up to 50 lbs easily. For expert advice on adhesives, see the Family Handyman tutorial. They explain types and when to use each.
One time, I glued a tool board in my workshop this way. It held all my saws without a wobble. You’ll love how sturdy it feels.
Advanced Tip: Creating a No-Drill Stud Wall
If you need a full tool wall or heavy storage, try this clever trick: Build a frame that uses the ceiling and floor for support. No wall attachment needed! It’s great for basements.
- Materials: 2×4 lumber, screws, wedges or shims.
- Steps: Screw top board to ceiling joists. Cut bottom board to fit snugly against floor. Wedge in place. Attach plywood or pegboard to the frame.
- Pros: Holds 100+ lbs, fully removable.
- Cons: Needs ceiling access, more setup time.
For visuals, watch this Instructables guide. It’s step-by-step with photos.
Safety Tips and Common Mistakes to Avoid
Safety keeps things fun. Always check if your wall is painted or sealed – test adhesive on a small spot first. Avoid overloading; distribute weight evenly. In cold weather, adhesives cure slower, so add extra time.
Common slip-ups: Skipping cleaning – leads to weak bonds. Rushing cure time – item falls. Or using wrong adhesive for the weight. Start light, build up. If you’re gluing outdoors, pick weatherproof types.
| Mistake | Why It Happens | How to Fix |
|---|---|---|
| Not cleaning surface | Dust blocks bond | Wipe with alcohol, dry well |
| Too much adhesive | Messy squeeze-out | Apply in thin lines |
| Ignoring weight limit | Fall risk | Read package, use multiples |
This table saves headaches. Follow it, and you’ll avoid most issues. Remember, patience pays off in DIY.
Choosing the Right Adhesive for Your Project
Not all glues are equal. For quick hangs, go Command strips. For wood, polyurethane like Loctite PL Premium. Epoxy for super strength, but it’s messier. Read labels for “concrete” or “masonry.”
- Light (under 10 lbs): Removable strips.
- Medium (10-30 lbs): Hardwall pins (hammer only).
- Heavy (30+ lbs): Construction adhesive with braces.
Pro tip: Buy extra – better to have than not. And store leftovers properly for next time.
Real-Life Examples from Homeowners
One friend rented an apartment with concrete walls. She used adhesive hooks for curtains – held for years. Another guy in my neighborhood glued floating shelves for books. No sags! These stories show it’s doable for anyone. Imagine your space organized just like that.
For more inspiration, browse Home Depot’s how-to. They’ve got renter-friendly ideas.
FAQ
Can Command strips really work on concrete walls?
Yes, they stick great to clean concrete. Just follow the weight limit and wait the full hour. I’ve used them for posters and small frames with no issues.
How long does construction adhesive take to cure on concrete?
Most set in 20-30 minutes but need 24 hours for full strength. Use supports during that time to keep it secure.
What if the adhesive fails – will it damage my wall?
Good ones like Command peel off clean. For glues, a little residue might stay, but it’s easy to wipe with soap. Test first!
Can I hang heavy shelves without drilling?
For up to 50 lbs, yes with strong glue and a wooden backer. For more, consider professional help or the stud frame method.
Is it safe for bathrooms or outdoors?
Pick waterproof adhesives. They hold in humidity. Avoid direct sun for curing, though.
What tools do I need if I avoid drilling?
Just a rag, level, and maybe a caulk gun. No power tools required – keeps it simple and affordable.
Are there eco-friendly options for concrete attachment?
Look for low-VOC adhesives from brands like 3M. They bond strong without harsh smells.
Wrapping It Up: Your Concrete Wall Awaits
There you have it, friend – simple ways to attach anything to a concrete wall without drilling. From quick hooks for decor to sturdy glue for shelves, these steps build real confidence. You’ve got the tools, tips, and know-how now. Start with a small project, see it hold strong, and watch your home transform. Remember, every great space starts with one easy step. Go make it yours – safely and with a smile. If you try these, you’ll wonder why you waited so long.