How Do I Seal Painted Rocks? Proven Essential Guide
To properly seal painted rocks, you must clean the surface, choose a durable, weather-resistant sealant (like an acrylic spray or clear coat), apply thin, even coats following drying times, and finish with two or three layers for maximum protection against fading and chipping.
Welcome to the workshop! If you have spent time carefully painting beautiful designs onto rocks—maybe for garden markers, paperweights, or fairy gardens—you know the heartache when that lovely finish fades or washes away after just a few weeks outside. It is frustrating when hard work isn’t protected! Sealing painted rocks is simple, but doing it right makes all the difference. You do not need fancy skills, just the right steps. I’m Md Meraj, and I’ll walk you through the proven essentials to make your rock art last for years, looking as good as the day you finished painting them. Let’s learn how to lock in that beautiful color!
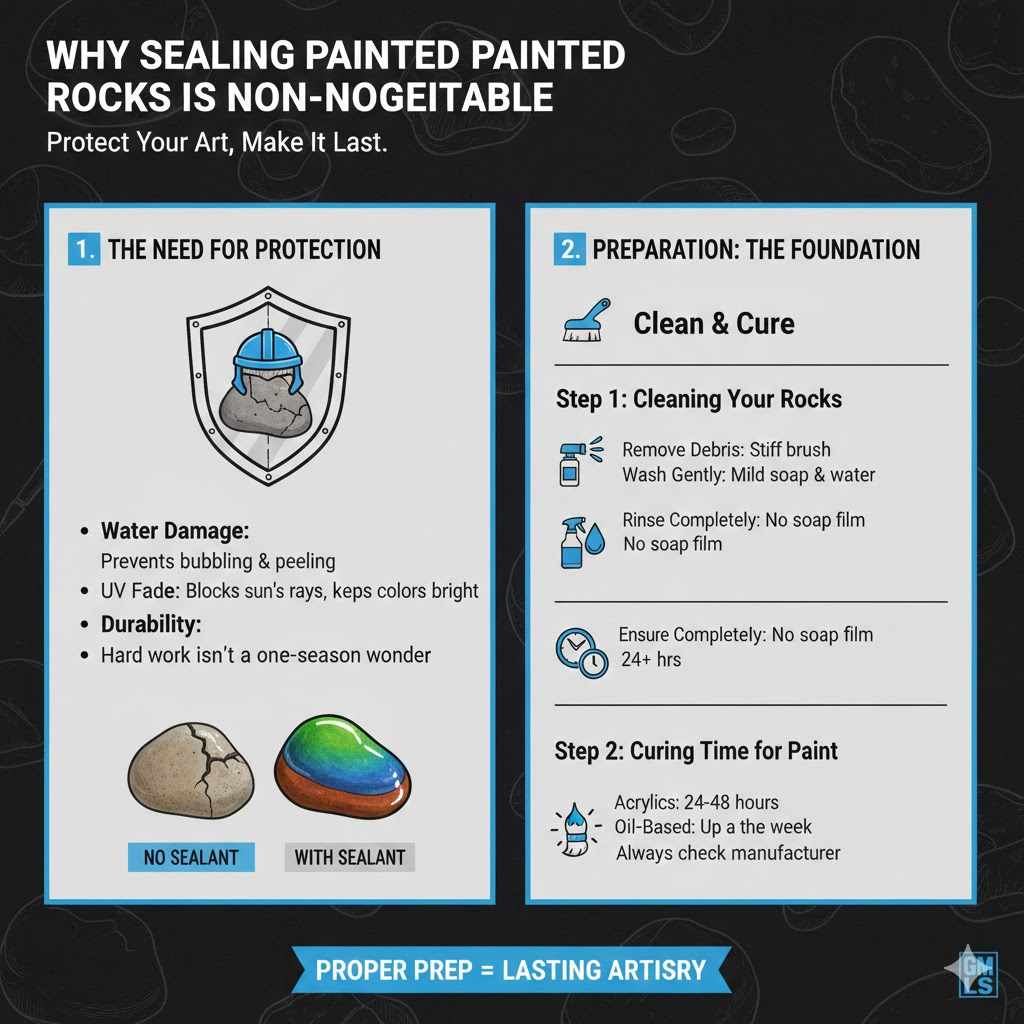
Why Sealing Painted Rocks Is Non-Negotiable
Think of sealant as the ultimate suit of armor for your painted art. Rocks live tough lives; they get rained on, baked by the sun, and sometimes bumped around. Without a sealant, water can seep in, causing the paint to bubble or peel. More importantly, UV rays from the sun are experts at breaking down paint pigments, leading to that frustrating chalky fade. Sealing keeps the colors bright and the edges sharp.
For beginners, understanding the need for protection is the first step toward true craftsmanship. Good preparation and a quality topcoat ensure your hard work doesn’t become a one-season wonder. This protection applies whether you used acrylic craft paint, oil-based paint, or even permanent markers.

Preparation: The Foundation of Great Sealing
We learned in woodworking that you cannot skip sanding and cleaning before applying a finish—the same holds true for rocks. A good seal sticks best to a clean, stable surface. If the surface is dusty, oily, or has loose paint chips, the sealer will lift off with them.
Step 1: Cleaning Your Rocks Thoroughly
Before any sealer touches your painted masterpiece, the rock must be completely clean. Even handling a rock leaves behind natural skin oils that repel sealants.
- Remove Debris: Use a dry, stiff-bristled brush (an old toothbrush works well) to scrub away any loose dirt, dust, or tiny gravel embedded in the rock’s surface or crevices.
- Wash Gently: Wipe the entire rock down with a cloth lightly dampened with warm water and a tiny bit of mild dish soap. Scrub gently; we do not want to disturb the paint underneath!
- Rinse Completely: Rinse the rock under clean running water to ensure all soap residue is gone. Leftover soap film can prevent the sealer from adhering properly.
- Ensure Bone Dry: This is critical. Place the rocks on a clean, dry surface in a warm, well-ventilated area for at least 24 hours, or until you are 100% sure they are dry all the way through, especially in any tiny pits or cracks. Moisture trapped underneath the sealer will eventually cause it to fail.
Step 2: Curing Time for the Paint
Paint needs time to harden fully before being coated. Sealing wet or semi-cured paint traps solvents and moisture, guaranteeing cracking later. This cure time often depends on the type of paint used.
- Standard Acrylic Craft Paints: Allow 24 to 48 hours after the last paint coat is dry to the touch.
- Oil-Based Paints or Enamels: These need much longer—sometimes up to a week—to fully cure before sealing. Always check the paint manufacturer’s recommended drying time.
Choosing the Right Sealer for Your Project
The million-dollar question is: Which sealer is best? The answer depends on where your rock will live. Rocks kept indoors require less heavy protection than those permanently placed in a garden bed exposed to the elements.
Sealer Types Explained (The Mentor’s Breakdown)
For our purposes, we generally look at three main categories. For maximum durability, especially outdoors, clear acrylics are usually the easiest and most effective choice for beginners.
| Sealer Type | Best For | Finish Options | Durability Note |
|---|---|---|---|
| Clear Acrylic Spray Sealer | Indoor/Outdoor, most craft paints | Gloss, Matte, Satin | Very good; must be UV resistant for true outdoor use. |
| Polyurethane (Brush-on or Spray) | High-traffic surfaces, demanding outdoor use | Gloss, Satin | Excellent water and abrasion resistance; can sometimes slightly yellow light colors over many years. |
| Resin Coatings (e.g., Clear Epoxy) | Indoor display pieces (requires precision) | Very High Gloss | Superior durability but messy and complex for beginners; not recommended for casual rock painting. |
Pro Tip from the Workshop: When you buy acrylic spray sealers, look specifically for bottles labeled “Triple Thick,” “Exterior Grade,” or mention protection against “UV Damage.” This ensures they have the stabilizers needed to resist sun fading. For example, products specifically rated for outdoor patio furniture or murals usually work wonders on rocks. Always check the Environmental Protection Agency (EPA) guidelines if you are working with very harsh chemical sealants, though for standard craft projects, consumer-grade sprays are usually sufficient and safer for home use.
Deciding on the Finish (Gloss vs. Matte)
The finish changes how the final rock looks:
- Glossy: This finish adds depth, making the colors look richer and wetter. It tends to reflect more light, making the painted details pop. However, it shows fingerprints and dust more easily.
- Matte (or Satin): This finish is subtle. It reduces glare and gives a smooth, non-reflective look, which is great if you want the rock to look more “natural” while still being sealed. Matte finishes are often more forgiving of slight application imperfections.
The Essential Sealing Technique: Application Made Easy
We are ready to apply the armor! The biggest mistake beginners make here is applying one thick, goopy coat. Think thin, controlled layers—it is better to do four light coats than one heavy one.
Tools You Will Need
- Your chosen clear sealant (Spray is usually easiest)
- Gloves (to keep oils off the rock)
- A well-ventilated area (ideally outdoors or in a garage with doors open)
- A clean drop cloth or scrap cardboard
Step-by-Step Sealing Process (The Light Coat Method)
- Prep Your Area: Lay down your drop cloth. Make sure the surrounding area is free of dust or anything you don’t want to accidentally coat. If using spray sealant, always read the safety warnings on the can first, especially regarding ventilation.
- Shake the Can Vigorously: For aerosol sprays, shake the can hard for at least one full minute after you hear the mixing ball rattle. This ensures the protective chemicals are perfectly mixed into the propellant.
- Practice Your Distance: Hold the spray can about 10 to 12 inches away from the rock. Moving too close causes drips; moving too far causes a cloudy, dry spray pattern.
- Apply the First Light Coat: Spray in slow, even, side-to-side sweeping motions. Do not linger in one spot. Think of it as a very light mist—just enough to see a slight sheen on the paint. Move past the rock at the end of each pass, then return. Cover the top and the sides.
- Wait for Tacky Dry: Check the can for recoat time. Typically, you must wait 15 to 30 minutes between coats. The surface should feel dry, but perhaps slightly tacky, not completely hardened.
- Apply the Second Coat (Crucial Layer): Apply the second coat perpendicular to the first. If the first coat went left-to-right, this coat should go top-to-bottom. This crosshatching technique ensures total, even coverage and seals in any microscopic gaps missed in the first layer.
- The Final Coat(s): For outdoor durability, I strongly recommend a minimum of three, or preferably four, thin coats. Continue applying coats perpendicular to the previous one, allowing the specified drying time between each application.
- Final Cure: Once the final coat is applied, resist the urge to move or handle the rock immediately. Let it cure for the full time specified on the can, which is usually 24 to 72 hours before placing it outdoors where it will face weather and handling.
Special Considerations for Different Rock Types
While the process above works for most smooth river stones, you might encounter rocks with unusual surfaces. Knowing how to adjust your technique builds real DIY confidence.
Sealing Highly Porous or Textured Rocks
If you find a porous, chalky-looking rock (sometimes called “soft” rock), standard acrylic sealants may absorb too quickly or leave a patchy, flat look. This happens because the sealer soaks into the pores instead of forming a film on top.
For these difficult surfaces, use a sealer designed to fill voids or a heavy-bodied primer first. A trick used by decorative artists is to apply a thin coat of watered-down PVA glue (like Elmer’s, diluted 1:1 with water) first, let that dry completely (this fills pores), and then apply your chosen clear acrylic spray sealer over the top. This pre-sealing step provides a smoother canvas.
Sealing Rocks Painted with Oil-Based Products
If you used oil-based paints or permanent markers (like industrial markers), you need a solvent-based sealer, which usually means polyurethane or certain high-quality acrylic enamels. Oil-based products rarely play nicely with water-based acrylic sprays; trying to seal them with acrylic can cause the oil paint to soften or lift.
Safety Note: Solvent-based sealers require even better ventilation than acrylics. They emit stronger fumes. Work outdoors on a calm day and ensure you wear a respirator if using solvent-based finishes frequently, as recommended by organizations focused on air quality, such as those listed by the Environmental Protection Agency regarding VOCs (Volatile Organic Compounds).
Troubleshooting Common Sealing Issues
Even with the best intentions, sometimes things go slightly wrong. Don’t panic! Here are fixes for the most common beginner sealant blunders.
Issue 1: Cloudy or Foggy Finish (Hazing)
This usually happens for two main reasons:
- Moisture Trapped: Humidity in the air was too high when you sprayed, causing the moisture in the sealer to flash freeze on the surface.
- Applied Too Thick: If you sprayed too close, the layer of coating was too thick for the solvents to evaporate cleanly.
The Fix: If it is slightly hazy, you can try warming the rock slightly (out of direct sun) to see if the trapped moisture releases. If the haze is permanent, you may have to lightly buff the area with 0000 steel wool (very fine grade) to gently cut through the haze, then re-coat with a very light, controlled mist. For future attempts, try sealing on a low-humidity day.
Issue 2: The Paint Looks Blotchy or Uneven After Sealing
This almost always means you skipped a cleaning step or the paint was not fully cured before sealing. The sealer pulled up tiny paint flecks or reacted with residual oils.
The Fix: If the blotches are significant, the paint may need gentle repair with a touch-up brush after the sealer has fully hardened. To prevent recurrence, let the paint cure for a minimum of 48 hours next time, and ensure thorough cleaning and drying.
Issue 3: Sealer Won’t Stick or Drips
This is generally application error. You sprayed too heavily or too close.
The Fix: If the paint is dry and hard, you may need to gently sand the entire rock with very fine-grit sandpaper (220 grit or higher) to “key” the surface, creating microscopic scratches for the sealer to grab onto. Wipe off all dust with a tack cloth or a damp rag, dry completely, and reapply using the light-coat technique described earlier.
Long-Term Care and Maintenance of Sealed Rocks
A quality seal job should protect your rock for years, especially if you used high-quality exterior-grade sealant. However, no protection is permanent. Understanding maintenance helps keep your garden art looking its best.
When to Re-Seal
Check your rocks seasonally. If you notice the colors seem slightly duller, or if the surface starts looking chalky again, it is time for a light refresher coat. Typically, an outdoor rock may need a new coat every two to three years, depending on how much harsh weather it endures.
Cleaning Before Re-Sealing
When you are ready to add a new protective layer, you usually don’t need to scrub heavily. Simply wash the rock lightly with water and mild soap, allow it to dry fully, and apply one or two fresh, light coats of your preferred sealant. You don’t usually need the intensive three-coat system again unless the old seal is completely failing.
FAQ: Your Beginner Sealing Questions Answered
- Q: Can I use Mod Podge as a sealer for my painted rocks?
- A: Yes, Mod Podge is great for indoor rocks, as it is easy to apply. However, for rocks that will sit outside in rain and sun, you must choose the Mod Podge formula specifically labeled “Outdoor.” Even then, many professionals find dedicated acrylic or polyurethane sprays offer better long-term UV and water resistance.
- Q: How long does it take for spray sealant to dry completely?
- A: While spray sealants dry to the touch quickly (often in under an hour), full curing—when the protective film is hardened against chemicals, moisture, and handling—can take 48 to 72 hours. Wait the full cure time before putting them in demanding environments.
- Q: Do I have to sand the rock before painting and sealing?
- A: You do not have to sand a naturally rough rock before painting. However, if your rock is very smooth, polished, or sealed already, a light sanding (using 220 grit sandpaper) before you paint or seal helps the paint/sealer “grab” the surface better.
- Q: Can I seal the rocks inside the house if it is not raining?
- A: If you are using water-based acrylic sprays, you can work indoors, but you must ensure strong ventilation—open all windows and perhaps use a fan to draw fumes outside. If using solvent-based sealers (like true polyurethane), you absolutely must work outside or in a professional spray booth due to dangerous VOC levels.
- Q: What happens if I seal rocks that are slightly wet underneath?
- A: This is a recipe for failure! Water gets trapped under the non-porous sealant layer. Over time, as the trapped moisture tries to escape or as it freezes and thaws (if left outdoors), the sealant film will bubble, crack, or peel away completely, taking your paint with it.
- Q: Is one clear coat of sealant enough for painted rocks?
- A: For indoor decorative rocks, maybe. For anything that will see sunlight or rain, no. One coat is often not enough to build the necessary film thickness to repel water effectively or block UV rays completely. Always aim for two light coats minimum, and three or four for longevity.
Conclusion: Protecting Your Artistic Investment
Taking the extra time to properly seal your painted rocks is where the difference between a hobby project and a lasting piece of outdoor art lies. Remember the mantra: Preparation, thin coats, and patience. By cleaning meticulously, selecting an exterior-grade sealer, and patiently applying three or four light, sweeping coats, you are not just adding a topcoat; you are locking in the hours of effort and creativity you poured into the design.
Now, go ahead and place those beautifully protected creations outside with confidence. You have done the work of a craftsman by ensuring your piece withstands the test of time and weather. Every painted rock you finish from now on will be durable, vibrant, and a testament to careful finishing!