How To Sand And Refinish Wood Floors Like A Professional
Understanding the process of sanding and refinishing wood floors is key. It involves removing old finishes, smoothing the wood, applying new stain or color, and adding protective topcoats. This gives your floors a fresh, updated look and extends their life. It’s a DIY-friendly project that can save you money while delivering professional-looking results.
Understanding the Wood Floor Refinishing Process
Sanding and refinishing wood floors is a multi-step journey. It starts with preparing your room. Then comes the sanding itself.
This is where the magic begins. We get rid of the old stuff. Next, we clean up really well.
After that, we apply a new stain or finish. Finally, we put on protective coats.
This whole process breathes new life into tired wood. It fixes scratches. It removes old wear.
It can even change the color of your floor. It’s not a quick job. But it is a job that offers amazing results.
You are essentially giving your floors a brand-new beginning.
My Own Floor Refinishing Adventure
I remember the first time I decided to refinish my own floors. It was in my old apartment. The wood was a beautiful oak, but it was covered in years of scuffs, dark spots, and a dull, worn-out finish.
Honestly, I was a little scared. The thought of renting a huge floor sander and messing it up felt overwhelming. My friend, who had done it before, came over.
She brought her dad, who was a carpenter. He just smiled and said, “It’s just wood, kiddo. You can do this.”
We started by clearing out every single piece of furniture. Then, we taped off doorways and covered vents. The noise of the sander was louder than I expected.
Dust flew everywhere, even with the shop vac running. At one point, I think I got the sanding a little uneven in a corner. My heart sank.
But my friend showed me how to go over it again, gently. Seeing the raw, pale wood appear under the old finish was like uncovering a treasure. That feeling of accomplishment, even amidst the dust and noise, was worth every bit of effort.
Step 1: Getting Ready for Sanding
Before you even think about touching a sander, you need to get the room ready. This is super important. It makes the sanding go smoothly.
It also protects your house from dust.
Clear Everything Out
You need to remove all furniture. Take out rugs too. Even small items like lamps or picture frames should go.
You need a completely empty room. This lets you move around freely. It prevents you from damaging your things.
It also stops dust from settling on them.
Protect What Stays
If you can’t move everything, cover it well. Use plastic sheeting. Tape it down securely.
Cover all vents and doorways. This stops dust from getting into other parts of your home. Think of it like building a mini-house for the room.
Remove Baseboards and Trim (Optional but Recommended)
For the best results, remove the baseboards. You can carefully pry them off. Then, you can put them back on after you finish.
This lets you sand right up to the wall. It gives a cleaner, more professional look. If you can’t remove them, you’ll need to be very careful with the sander near the edges.
Inspect Your Floors
Look for loose nails or staples. Hammer them down so they are flush with the wood. Or even slightly below the surface.
Anything sticking up can tear sandpaper. It can also damage the sander. Check for any squeaks.
You might be able to fix these now.
Repair Damaged Boards
If you have boards that are badly cracked or warped, now is the time to fix them. You might need to replace them. This is best done before sanding.
It makes the floor look even. It also prevents problems later on.
Room Preparation Checklist
- Clear all furniture and rugs.
- Cover vents and doorways with plastic.
- Remove baseboards (optional).
- Hammer down loose nails or staples.
- Repair or replace damaged floorboards.
- Sweep and vacuum the floor thoroughly.
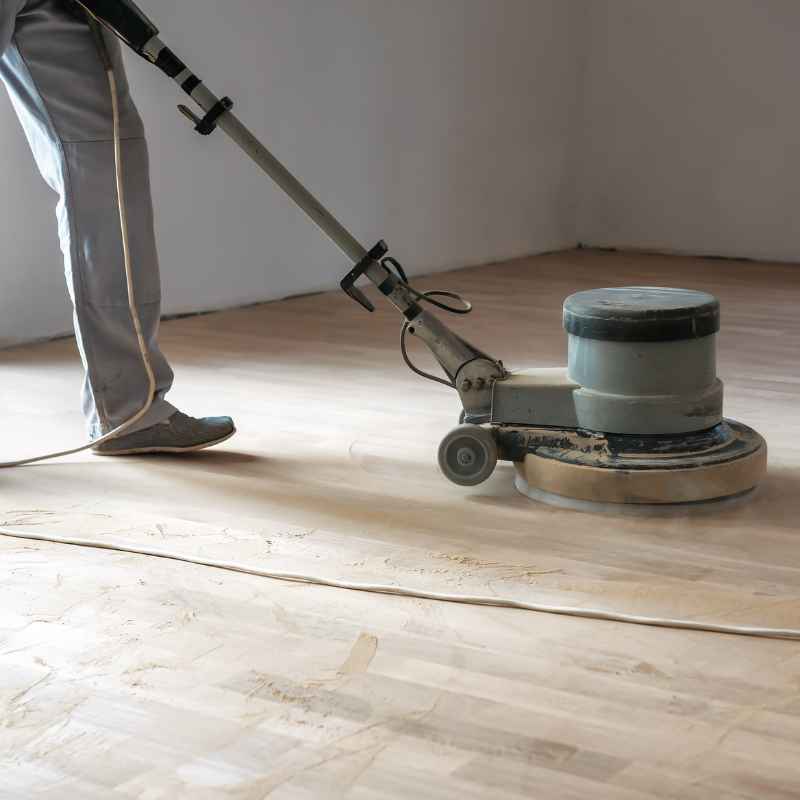
Step 2: The Sanding Process
This is the heart of the project. You will rent a floor sander. There are different types.
A drum sander is powerful. It’s good for large areas. An orbital sander is lighter.
It’s easier to control. You will also need an edge sander. This gets into corners.
Handheld sandpaper blocks are for very tight spots.
Choose the Right Grit Paper
You start with coarse grit sandpaper. This removes the old finish. Then you move to finer grits.
This smooths the wood. Always go up in grit numbers. Never skip a grit.
This ensures a smooth finish. Common grits are 36, 60, 100, and 150.
First Pass: Coarse Grit (e.g., 36 or 40)
Load the drum sander with your coarsest grit paper. Start sanding along one wall. Move the sander slowly and steadily.
Never stop moving the sander in one spot. Always overlap your passes by about half the width of the sander. Go with the grain of the wood.
This is important. Listen to the sander. If it sounds like it’s struggling, you’re going too fast.
Or the sandpaper is worn out.
Second Pass: Medium Grit (e.g., 60 or 80)
After the first pass, remove the old sandpaper. Vacuum up all the dust. Load the sander with your medium grit paper.
Now, sand the floor again. You can sand in a different direction. For example, if you went north-south first, now go east-west.
Or you can go at a slight angle. This helps remove any scratches left by the coarser grit. Again, overlap your passes and keep the sander moving.
Third Pass: Fine Grit (e.g., 100 or 120)
Vacuum again. Change to your finer grit sandpaper. Sand the entire floor one more time.
This pass is about smoothing. You want to prepare the wood for stain. Make sure all scratches are gone.
The wood should feel soft and smooth.
Edge Sanding
While the drum sander is great for open areas, it can’t reach the edges. Use the edge sander for this. It works like a smaller, more focused sander.
Work in the same grit sequence as the drum sander. Be careful. Edge sanders can be aggressive.
Go slowly. Always work in a controlled way.
Hand Sanding Corners and Tight Spots
For areas the edge sander can’t reach, you’ll need to hand sand. Use sandpaper blocks. You can also wrap sandpaper around a small block of wood.
Use the same grit sequence here. This is where those detailed touches make a big difference. Be patient.
These spots take time.
Vacuum, Vacuum, Vacuum!
After every sanding pass, you must vacuum. Use a good shop vacuum. Get into every corner.
Vacuum up all the dust. Dust is the enemy of a good finish. If dust is left on the floor, it will get trapped in the stain or finish.
This will ruin the look. You might even need to tack cloth the floor. A tack cloth is sticky.
It picks up fine dust particles.
Sanding Grit Progression
Use a sequence like this:
- Initial Sand: 36 or 40-grit (Removes old finish)
- Second Sand: 60 or 80-grit (Smooths out initial scratches)
- Third Sand: 100 or 120-grit (Prepares for stain)
- Optional Final Sand: 150-grit (For ultra-smooth finish if needed)
Remember: Always go up in grit number. Never skip a grit.
Step 3: Cleaning and Staining
After all that sanding and vacuuming, your floor is ready for color. This is where your floor starts to look like a new creation. You have two main choices: a clear finish or a stain.
A clear finish just seals the wood. A stain adds color.
Vacuum and Tack Cloth Again
Before you apply any stain or finish, clean the floor one last time. Vacuum it very well. Then, use a tack cloth.
Wipe down the entire floor. This removes the very last bits of dust. You want a perfectly clean surface.
Any dust left will show up in the finish.
Choosing Your Stain
Stains come in many colors. You can go with a natural wood tone. Or you can choose something bold.
Consider the look of your room. Think about your furniture. It’s a good idea to test a stain in an inconspicuous area first.
This could be inside a closet. Or under a rug you’ll place later. You want to see how the color looks on your specific wood.
Applying the Stain
Stains can be oil-based or water-based. Oil-based stains penetrate deeper. They offer richer color.
Water-based stains dry faster. They are easier to clean up. Read the can carefully.
Follow the directions.
Usually, you apply stain with a brush or a foam applicator. Work in small sections. Apply the stain evenly.
Then, let it sit for a few minutes. The longer it sits, the darker the color. Wipe off the excess stain with a clean cloth.
Always wipe with the grain of the wood. This is very important for a smooth look.
Be Prepared for the Smell
Stains, especially oil-based ones, have a strong smell. Make sure the room is well-ventilated. Open windows.
Use fans. Wear a mask if you’re sensitive.
Let the Stain Dry Completely
Drying times vary. Check the stain can. It might take 24 hours or more.
Do not rush this step. If the stain isn’t fully dry, the finish might not adhere properly.
Stain Application Tips
- Test stain in a hidden spot first.
- Apply stain with a brush or applicator.
- Work in small, manageable sections.
- Wipe off excess stain with the grain.
- Ensure good ventilation during application and drying.
- Allow stain to dry completely before applying finish.
Step 4: Applying the Protective Finish (Topcoat)
The stain gives your floor its color. The finish protects it. It also gives it that beautiful sheen.
There are several types of finishes you can use. Polyurethane is very common. It’s durable and easy to find.
Types of Finishes
Polyurethane: This is the most popular choice for DIYers. It comes in oil-based and water-based formulas. Oil-based polyurethane is more durable and gives a warmer, amber tone.
Water-based polyurethane dries faster, is clearer, and has less odor. It’s also more resistant to yellowing.
Varnish: Similar to polyurethane but often with more natural oils. It’s very tough.
Lacquer: Dries very fast. It’s less durable than polyurethane. Often used by pros for quick jobs.
Wax: Gives a soft, matte finish. It’s not very durable. It needs frequent reapplication.
Choosing Your Sheen
Finishes come in different sheens. Matte has the least shine. Satin has a soft sheen.
Semi-gloss has more shine. High-gloss is the most reflective.
For a natural look, satin or matte is often best. For a more traditional, glossy look, semi-gloss or high-gloss works. High-gloss shows imperfections more easily.
Applying the First Coat
Read the product instructions. Most finishes require thin, even coats. Use a good quality brush or roller.
Work in the direction of the wood grain. Avoid overworking the finish. This can create brush marks.
Apply thin coats. It’s better to do three thin coats than one thick one.
Light Sanding Between Coats
After each coat of finish dries, you need to lightly sand. Use very fine grit sandpaper (220-grit or higher). Or use a sanding screen.
This knocks down any dust nibs. It also helps the next coat adhere better. Vacuum thoroughly after sanding.
Then use a tack cloth.
Applying Subsequent Coats
Repeat the application and sanding process for each coat. Most floors need at least two coats of finish. For high-traffic areas, three coats are recommended.
The more coats, the more durable the floor.
Drying and Curing Time
The finish will feel dry to the touch in a few hours. However, it takes much longer to fully cure. Curing is when the finish reaches its maximum hardness.
Avoid heavy foot traffic for at least 24-48 hours. Avoid placing furniture back for at least 7-14 days. Be gentle with your new floors during this time.
Finish Application Steps
- Choose your finish type (polyurethane is common).
- Select your desired sheen (matte, satin, semi-gloss, gloss).
- Apply thin, even coats with a brush or roller.
- Sand lightly between coats with fine-grit sandpaper.
- Vacuum and tack cloth after each sanding.
- Apply at least two to three coats for durability.
- Allow proper drying and curing time before use.
Real-World Scenarios and Considerations
Refinishing wood floors isn’t just about the steps. It’s about understanding the wood itself. And the environment you’re working in.
Every home is a little different.
Humidity and Temperature
Wood expands and contracts with changes in humidity. This is normal. If your home is very humid, the wood might swell.
If it’s very dry, it might shrink. This can create small gaps between boards. Always check the weather.
Try to work when the humidity is stable. Ensure good ventilation in your home after finishing. This helps maintain consistent moisture levels.
It protects your new finish.
Type of Wood
Different wood types react differently to sanding and staining. Oak floors are very common. They take stain well.
Pine floors are softer. They can get dents more easily. They also sometimes have blotchy results with stain.
If you have pine, you might need a pre-stain wood conditioner. This helps the stain go on more evenly.
Existing Finish
The type of old finish on your floor matters. If it’s an oil-based varnish, it might be tougher to sand off. If it’s a water-based poly, it might come off easier.
Knowing what you’re dealing with helps choose the right sandpaper. It also helps predict how much effort will be needed.
Your Skill Level
Be honest about your DIY skills. If you’re new to this, take your time. Watch videos.
Read instructions twice. Don’t be afraid to ask for help. For very old or damaged floors, a professional might be a better choice.
They have the experience and tools to handle tricky situations.
Cost vs. Professional Help
DIY can save a lot of money. Sanding and finishing supplies add up. But labor costs for professionals are high.
Weigh the cost of renting equipment and buying materials against hiring someone. Consider your time and the potential for mistakes. For many, the satisfaction of a DIY job is priceless.
Wood Floor Considerations
Wood Type: Oak, maple, pine, and others behave differently.
Existing Finish: Oil-based, water-based, wax – all require different approaches.
Home Environment: Humidity and temperature affect wood and finishes.
DIY Skill: Be realistic about your abilities and time.
What This Means for Your Home
Refinishing your wood floors can totally change the feel of your home. It’s more than just a cosmetic fix. It’s a restoration.
Increased Home Value
Beautiful, well-maintained wood floors add significant value to a home. If you’re thinking of selling, this is a great investment. It makes your home more attractive to buyers.
They see modern, cared-for features.
Improved Air Quality
Old finishes and layers of dirt can harbor allergens. Sanding removes these. A new, clean finish means a healthier living space.
This is especially important for families with children or pets. Or for anyone with allergies.
Aesthetic Makeover
You can completely update your home’s look. Choose a new stain color. Match your current decor.
Or go for a trendy shade. A fresh floor makes everything else look better. It’s like a fresh coat of paint, but for your floor.
Durability and Longevity
A properly refinished floor with a good protective coating can last for many years. It’s much more durable than a worn-out finish. You are protecting your investment in your home.
You are ensuring the floors will last.
When It’s Normal and When to Worry
It’s normal to have some dust during sanding. It’s normal for the smell of stain and finish to linger for a few days. It’s normal for the floor to look a bit patchy right after staining.
It’s normal to need several coats of finish.
You should worry if you see deep gouges after sanding that didn’t come out. Or if the stain looks very uneven and blotchy after wiping. You should worry if the finish seems to be peeling or not drying.
These might indicate a problem with the sanding or application. Or a problem with the wood itself.
Quick Tips for Success
Here are some quick tips to keep in mind for your project. These can make a big difference.
Work in Good Light
Always sand and stain in bright light. Natural daylight is best. This helps you see imperfections.
It ensures even coverage. If you have to work at night, use extra lamps. You want to see every bit of dust and every stroke.
Go Slow and Steady
This isn’t a race. Take your time with each step. Especially during sanding.
Moving too fast can cause damage. It can lead to uneven results. Patience here pays off big time.
Think of it as a marathon, not a sprint.
Follow Manufacturer Instructions
For stains, finishes, and even sandpaper, always read the labels. Manufacturers know their products best. Their instructions are there to help you get the best results.
Don’t guess. Read and follow.
Ventilation is Key
This can’t be stressed enough. Good airflow is critical. It helps with drying.
It reduces the fumes. It keeps you safer. Open windows.
Use fans to circulate air. Wear a respirator mask when sanding and applying finishes.
Keep Tools Clean
Clean your tools between coats. This prevents dried finish from getting into your next coat. Brushes and rollers should be cleaned as directed.
For sanders, make sure the dust bag is emptied often.
DIY Floor Refinishing Cheat Sheet
- Preparation: Clear, protect, inspect.
- Sanding: Start coarse, go finer, overlap passes, sand edges.
- Cleaning: Vacuum and tack cloth religiously.
- Staining: Test color, apply evenly, wipe excess with grain.
- Finishing: Thin coats, sand between coats, proper drying.
- Safety: Ventilate, wear masks, follow instructions.

Frequently Asked Questions About Sanding and Refinishing Floors
Can I refinish a floor with a lot of scratches?
Yes, you absolutely can. Sanding is designed to remove the old finish and the top layer of wood. This process removes most scratches.
Deeper scratches might require more aggressive sanding or even board
How long does it take to refinish wood floors?
The time it takes varies greatly. For a small room, it might take 2-3 days of work. For a whole house, it could be a week or more.
This includes prep, sanding, staining, drying, and applying multiple finish coats. Always factor in drying and curing times.
Do I need a professional floor sander, or can I use a hand sander?
For most wood floors, a professional-grade floor sander is essential. Handheld sanders are not powerful enough to remove old finishes efficiently or to create an even surface. You’ll need a drum sander for large areas and an edge sander for the perimeter.
Hand sanders are only for very small repairs or tight spots.
How do I prevent blotchiness when staining pine or maple floors?
Pine and maple floors are known for absorbing stain unevenly, leading to blotchiness. To prevent this, always use a pre-stain wood conditioner. Apply it according to the product’s instructions before staining.
This helps the wood absorb the stain more uniformly. Also, wipe off excess stain promptly.
What’s the best way to clean up dust after sanding?
The best way is to use a powerful shop vacuum with a good filter. Vacuum the entire floor thoroughly. Then, use a tack cloth.
A tack cloth is a sticky material that traps fine dust particles. Wipe down the entire floor again with the tack cloth before applying stain or finish.
Can I refinish laminate or engineered wood floors?
Generally, no. Laminate flooring has a wear layer that cannot be sanded. Engineered wood floors have a thin top veneer of real wood.
They can sometimes be refinished once or twice, but it depends on the thickness of the veneer. Solid wood floors are the best candidates for sanding and refinishing.
Bringing Your Floors Back to Life
Refinishing your wood floors is a rewarding process. It takes time and effort. But the result is a beautiful, refreshed space.
You’ve learned the steps. You know the importance of preparation. You understand the sanding stages.
And how to apply stain and finish.
With careful work, your floors can look brand new. Enjoy your revitalized home. Your hard work will shine through!