How To Vent A Wood Stove Through Wall: Proven, Safe Steps
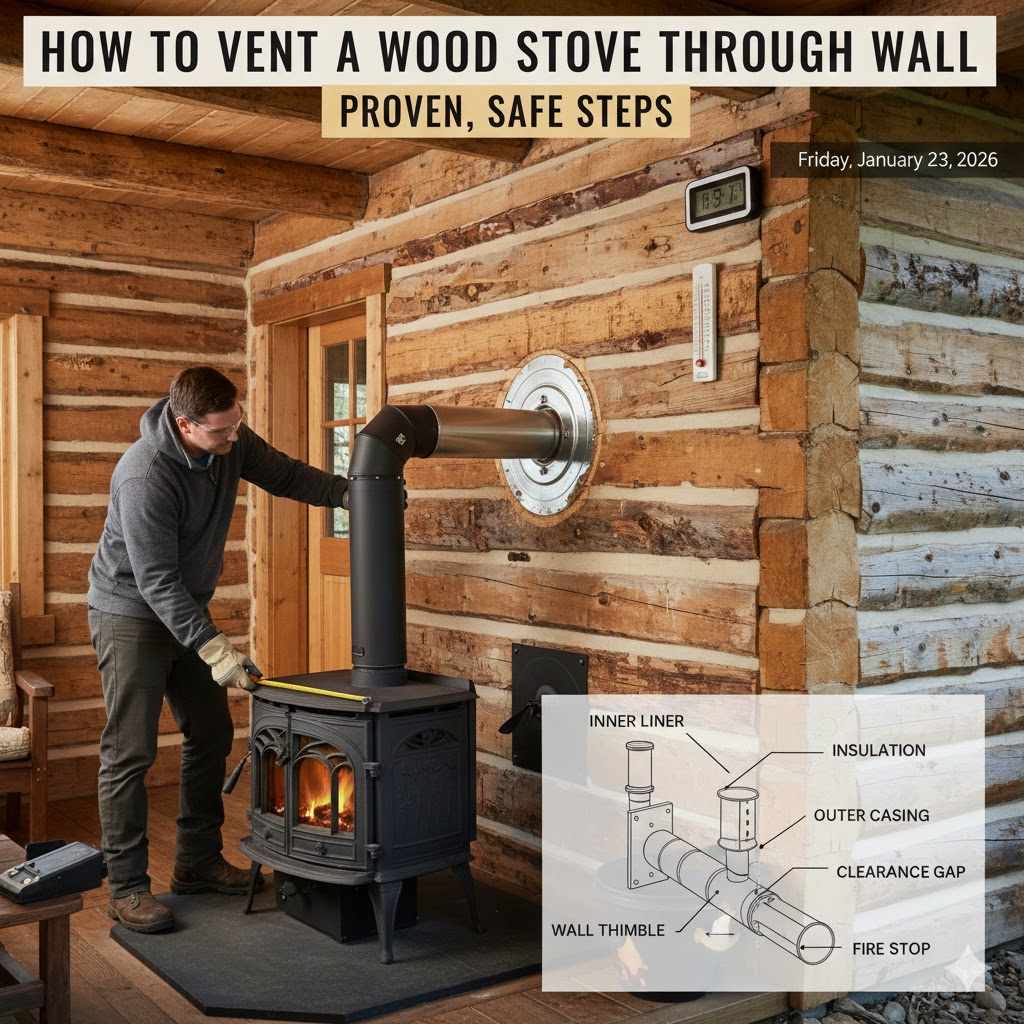
Venting a wood stove through a wall involves installing a specialized wall thimble, connecting insulated Class A chimney pipe, and extending it vertically above the roofline according to safety codes. This process ensures dangerous exhaust is safely directed outside while protecting your home’s structure from high temperatures. Always follow the manufacturer’s instructions and local building codes for a safe installation.
Hello, friends! Md Meraj here. Bringing a wood stove into your home or workshop is a wonderful thing. It provides warmth, comfort, and a cozy gathering spot. But the idea of cutting a hole in your wall to vent it can feel a little daunting. Where do you start? What parts do you need? Is it safe?
Don’t worry. This is a common challenge for many DIYers, and I’m here to tell you that with the right guidance, it’s a project you can handle. We’re going to walk through this together, step by step. I’ll show you exactly how to vent your wood stove through a wall safely and correctly. By the end of this guide, you’ll have the confidence and knowledge to get it done right. Let’s get that stove roaring!
Why Venting Through a Wall is a Great Option
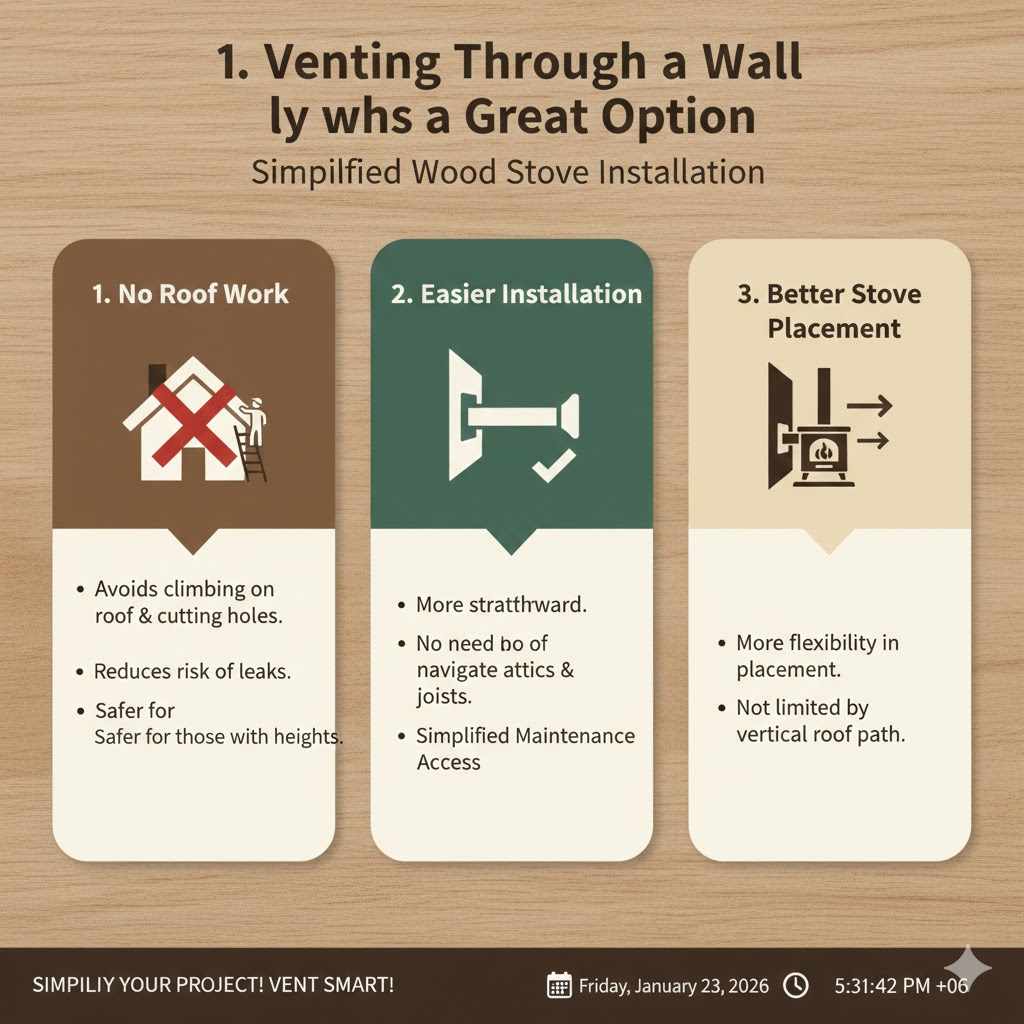
While venting through the roof is common, a through-the-wall installation offers several key advantages, especially for beginners. It often simplifies the project and can be a more practical choice for many homes.
No Roof Work: The biggest benefit is avoiding climbing on your roof and cutting a hole in it. This reduces the risk of leaks and is generally safer for those uncomfortable with heights.
Easier Installation: Running a chimney pipe up an exterior wall is often more straightforward than navigating attics and roof joists.
*Simplified Maintenance: An exterior chimney is typically easier to access for regular cleaning and inspection, which is crucial for safety.
Better Stove Placement: A wall vent gives you more flexibility in where you place your stove, as you aren’t limited by the direct vertical path required for a straight-up roof vent.
Safety First: The Unbreakable Rules of Wood Stove Venting
Before we pick up a single tool, let’s talk about safety. This is the most important part of the entire project. When it comes to fire, there are no shortcuts. Following these rules isn’t just recommended—it’s essential for protecting your home and family.
Rule #1: Know Your Local Codes
Every town, city, and state has building codes that govern wood stove installations. These rules are there for your safety. Before you buy any materials or start cutting, contact your local building department or fire marshal. Ask them about specific requirements for wood stove venting in your area. They can provide information on required permits, inspections, and clearance distances.
Rule #2: Respect Clearances
Clearance is the minimum safe distance between your stove, stovepipe, and any combustible materials like wood framing, drywall, insulation, and furniture. These distances are non-negotiable.
- Stove to Wall: Your stove’s manual will specify the required clearance from the back and sides of the stove to combustible walls. This can be anywhere from 12 to 36 inches.
- Stovepipe to Wall/Ceiling: Single-wall stovepipe (the black pipe connected directly to your stove) typically requires an 18-inch clearance from combustibles.
- Chimney Pipe to Wall: Insulated Class A chimney pipe (the kind you’ll use to pass through the wall and run outside) usually requires a 2-inch clearance.
Always follow the manufacturer’s specific clearance requirements for both your stove and your chimney components. For a deep dive into the official standards, you can review the NFPA 211 Standard for Chimneys, Fireplaces, Vents, and Solid Fuel-Burning Appliances.
Rule #3: Use the Right Pipe in the Right Place
Not all pipes are created equal. Using the wrong type of pipe is one of the most dangerous mistakes you can make.
| Pipe Type | Where to Use It | Key Feature |
|---|---|---|
| Single-Wall Stovepipe | Inside the room, from the stove to the wall thimble. NEVER use it to pass through a wall, ceiling, or roof. | Made of steel. Gets very hot and radiates heat into the room. Requires 18″ clearance from combustibles. |
| Class A Chimney Pipe | From the wall thimble connection, through the wall, and all the way up to the chimney cap. This is the only pipe rated to pass through combustible structures. | Double or triple-walled with insulation. Keeps the outer wall cool enough for a 2″ clearance from combustibles. |
Mixing these up can cause a house fire. Remember: black pipe stays in the room, and insulated chimney pipe goes through the walls and outside.
Understanding the Parts of a Through-the-Wall System
A wood stove venting kit can look like a pile of confusing metal tubes. Let’s break down the key components so you know what you’re working with. It’s like a big LEGO set for adults—once you know what the pieces are, it all starts to make sense.
| Component Name | What It Does | Where It Goes |
|---|---|---|
| Stovepipe (or Connector Pipe) | Connects the stove’s flue collar to the rest of the system. | Inside the room, running from the stove to the wall thimble. |
| Wall Thimble | A metal sleeve that safely frames the opening in the wall, ensuring the required 2-inch clearance is maintained around the chimney pipe. | Installed inside the hole you cut through the wall. The Class A pipe passes through it. |
| Chimney Tee & Tee Cap | A T-shaped piece that transitions the horizontal pipe coming through the wall to the vertical chimney running up the exterior. The cap on the bottom allows for easy cleanout. | On the exterior of the house, connected to the pipe coming through the wall thimble. |
| Class A Chimney Pipe Sections | Insulated, double-wall pipes that make up the main chimney stack. | Used for the entire run outside the house, from the tee, up the wall, and past the roofline. |
| Wall Support / Wall Braces | Brackets that secure the vertical chimney to the exterior wall, providing stability. | Installed every 8 feet (or as required by manufacturer) along the exterior chimney. |
| Chimney Cap | Sits on top of the chimney to keep rain, snow, animals, and debris out. Often includes a spark arrestor. | The very top piece of the entire system. |
Tools and Materials You’ll Need
Having everything ready before you start makes the process so much smoother. Here’s a checklist to help you get organized. You don’t need a professional workshop, just some basic tools for the job.
Tools List
- Tape Measure
- Pencil
- Level
- Stud Finder
- Drill with Bits and a Hole Saw Attachment (or Jigsaw/Reciprocating Saw)
- Screwdrivers (Phillips and flathead)
- Caulking Gun
- Safety Glasses
- Work Gloves
- Ladder
Materials List
- Wood Stove
- Through-the-Wall Venting Kit (ensure it matches the stove’s flue diameter, usually 6 inches)
- Single-Wall Stovepipe
- Wall Thimble
- Tee with Cleanout Cap
- Class A Chimney Pipe Sections
- Wall Supports/Braces
- Roof Flashing (if pipe extends close to roof edge)
- Chimney Cap
- High-Temperature Sealant (rated for stovepipes)
- Exterior-Grade Caulk or Silicone Sealant
- Sheet Metal Screws (often included in the kit)
- Hearth Pad or other non-combustible floor protection
- Heat Shield for Wall Protection (if needed to reduce clearances)
Step-by-Step: How to Vent a Wood Stove Through the Wall
Alright, let’s get to work! Take your time with each step. Measure twice, cut once, and always prioritize safety. We’re building something that will bring warmth and joy for years, so let’s do it right.
Step 1: Position Your Wood Stove and Hearth Pad
First, decide on the final location for your stove. Place your non-combustible hearth pad on the floor where the stove will sit. Then, put the stove on top of the pad. Use your tape measure to ensure you are meeting all the manufacturer’s required clearances to the back and side walls. This is your foundation for the entire project, so get it perfect.
Step 2: Mark the Center of the Vent Hole
With the stove in its final position, attach a section of single-wall stovepipe to the flue collar. Use a level to make sure it’s plumb (perfectly vertical). If your system requires an elbow piece to turn toward the wall, attach that as well. Extend a horizontal piece of stovepipe from the elbow towards the wall, maintaining a slight upward pitch (about 1/4 inch per foot) to encourage good draft. Use a level to check this slope.
Where the center of the pipe meets the wall, make a clear mark with your pencil. This mark is the center point for your wall thimble.
Step 3: Check for Obstructions in the Wall
Before you cut, you must know what’s inside that wall. Use a stud finder to locate the studs around your center mark. Ideally, your hole will be centered perfectly between two studs. If your mark lands on a stud, you’ll need to adjust your stove’s position slightly left or right to avoid it. Cutting a wall stud can compromise your home’s structure and should be avoided.
Also, be aware of any electrical wiring or plumbing in the area. If you’re unsure, it’s safest to cut a small exploratory hole and peek inside with a flashlight before cutting the full-sized opening.
Step 4: Cut the Interior Wall Opening
Your wall thimble’s instructions will specify the exact diameter of the hole you need to cut. It will be significantly larger than the chimney pipe itself to accommodate the thimble and maintain the required air gap. For a 6-inch pipe, the hole might be 12 to 14 inches in diameter.
Use a compass or trace the outline provided with your thimble. A hole saw of the correct size is the easiest way to make a clean cut. If you don’t have one, you can drill a pilot hole and use a jigsaw or reciprocating saw to carefully cut along your marked circle.
Step 5: Cut the Exterior Wall Opening
Now, move to the outside. From the center of the interior hole, drill a long bit all the way through the exterior wall. This gives you a center point on the outside. Go outside and use this point to trace the same size circle you cut on the interior. Carefully cut through your home’s siding and sheathing to complete the opening.
Step 6: Install the Wall Thimble
The wall thimble usually comes in two pieces that slide together from the inside and outside, adjusting to the thickness of your wall. Slide the two halves into the hole and secure them together according to the manufacturer’s instructions, usually with screws. The thimble creates a safe, insulated barrier between the hot chimney pipe and the combustible materials of your wall.
Step 7: Connect the Interior Stovepipe and Chimney Tee
Back inside, assemble your single-wall stovepipe sections, connecting them from the stove’s flue collar to the wall thimble. Secure each joint with at least three sheet metal screws. The crimped (male) ends of the pipe should always point down towards the stove to allow any condensation or creosote to run back into the stove to be burned off.
Next, head outside. Slide the first piece of Class A chimney pipe through the thimble from the outside. Attach the chimney tee to this section, making sure the cleanout cap is facing down. Ensure it connects securely to the interior stovepipe.
Step 8: Install the Vertical Exterior Chimney
Now you’ll build the chimney upwards. Attach your first vertical section of Class A pipe to the top of the chimney tee. Continue adding sections, twisting and locking them into place as you go. Make sure each connection is secure.
The chimney must extend at least 3 feet above the point where it passes through the roofline, AND it must be at least 2 feet taller than any part of the building within 10 feet of it. This “3-2-10” rule is critical for safety and proper draft.
Step 9: Secure the Chimney with Wall Braces
Your chimney needs to be rock-solid. Attach a wall brace to the chimney and secure it to the exterior wall just above the tee. You must install another wall brace every 8 feet as you go up, or as specified by the chimney pipe manufacturer. These braces prevent the chimney from swaying in the wind.
Step 10: Install the Chimney Cap
Once you’ve reached the required height, the final piece is the chimney cap. It twists and locks onto the top section of pipe just like the others. This cap is vital for keeping out rain, animals, and debris, and it helps prevent downdrafts.
Step 11: Seal All Openings
Time to weatherproof your hard work. Inside, use high-temperature sealant around the connection where the stovepipe enters the wall thimble. Outside, use a high-quality, weather-resistant exterior caulk or silicone to seal the gap between the thimble and your home’s exterior siding. This prevents water and cold air from getting into your walls.
Step 12: Final Inspection and First Burn
Give your entire installation a final look-over. Check that all connections are secure, all clearances are met, and all gaps are sealed. If your area required a permit, now is the time for the final inspection.
For your first fire, start small. Burn just a few pieces of kindling. This allows the stove and chimney to cure. You may notice a slight smell from the paint and sealant curing—this is normal. Open a window for ventilation during this first small burn. Congratulations, you did it!
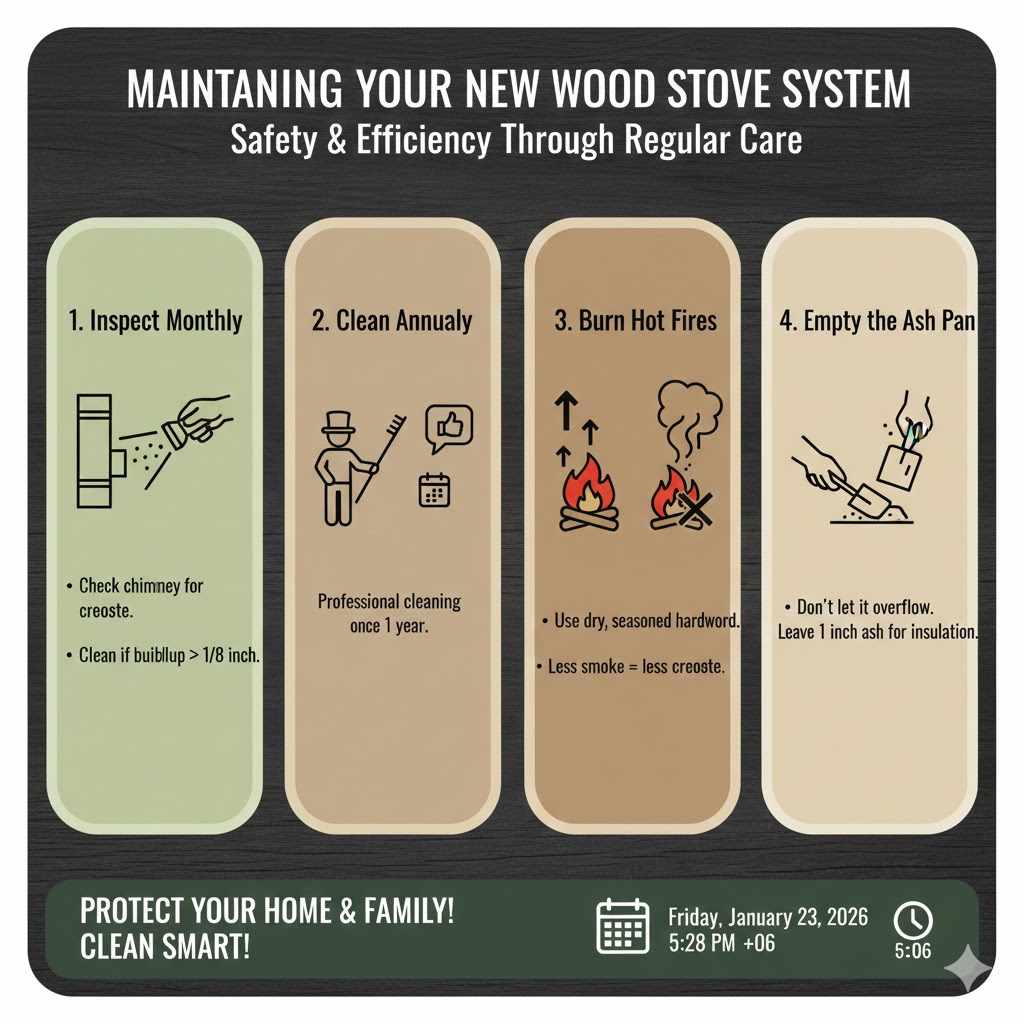
Maintaining Your New Wood Stove System
Your job isn’t done after the installation. Proper maintenance is key to keeping your wood stove running safely and efficiently for years. The biggest threat is creosote, a flammable tar-like substance that builds up inside your chimney.
According to the Chimney Safety Institute of America (CSIA), chimney fires are a leading cause of home heating fires. Regular cleaning is your best defense.
- Inspect Monthly: During the burning season, inspect your chimney monthly for creosote buildup. Shine a flashlight up the cleanout tee. If you see a buildup of 1/8 inch or more, it’s time to clean.
- Clean Annually: At a minimum, your chimney should be professionally cleaned once a year.
- Burn Hot Fires: Burning smaller, hotter fires with dry, seasoned hardwood produces less smoke and therefore less creosote than long, smoldering fires.
- Empty the Ash Pan: Keep the ash pan from overflowing, but leave a small layer of ash (about 1 inch) on the bottom of the firebox to insulate it and promote hotter, cleaner burns.
Frequently Asked Questions (FAQ)
Can I vent a wood stove horizontally?
You can run the pipe horizontally for a short distance to get through the wall, but the exterior chimney must be vertical. A good rule is that the total horizontal run should not exceed 25% of the total vertical chimney height to ensure a good draft. Always slope horizontal sections upward toward the chimney at 1/4 inch per foot.
What is the difference between stovepipe and chimney pipe?
Stovepipe (usually black single-wall) is used only inside the room to connect the stove to the chimney system. Chimney pipe (usually stainless steel, insulated Class A) is the only pipe approved to pass through walls, ceilings, and run outside because its insulated design keeps the outer surface cooler and safer.
How high does my chimney need to be?
This is known as the “3-2-10 Rule.” Your chimney must extend at least 3 feet above the roof at the point where it penetrates. Additionally, it must be at least 2 feet higher than any part of the roof within a 10-foot horizontal distance.
Do I need a permit to install a wood stove?
In most areas, yes. Installing a wood stove is considered a major modification that affects your home’s safety. Always check with your local building department or fire marshal before starting. A permit also ensures the installation is inspected for safety.
What is a wall thimble and why do I need it?
A wall thimble is a crucial safety device. It’s an insulated sleeve that fits into the hole in your wall. The Class A chimney pipe passes through the thimble, which keeps the hot pipe from ever touching the combustible wood and drywall in your wall, preventing a fire.
Can I use any kind of wood in my stove?
No, you should only burn dry, seasoned hardwood like oak, maple, or ash. Seasoned wood has been split and dried for at least 6-12 months. Burning wet, green, or treated wood creates excessive smoke and creosote, which can lead to a chimney fire.
How often should I clean my wood stove chimney?
It should be inspected annually and cleaned as needed. A general rule is to clean it when you have 1/8 inch of creosote buildup. For heavy users, this might be once a year. For occasional users, it might be less. A professional chimney sweep can give you the best advice for your usage habits.
Bringing It All Together
There you have it—a complete guide to safely venting your wood stove through a wall. It may seem like a big project, but by breaking it down into small, manageable steps, it becomes much less intimidating. The most important things to remember are to respect safety clearances, use the correct materials, and follow the instructions from your stove and chimney manufacturers.
Taking the time to do this correctly will reward you with years of safe, reliable, and cozy heat. There’s nothing quite like the warmth of a wood fire on a cold day, and knowing you built it safely with your own two hands makes it even better. Stay safe, take your time, and enjoy your new stove!