
Turn Circular Saw into Table Saw: DIY Mastery Tips
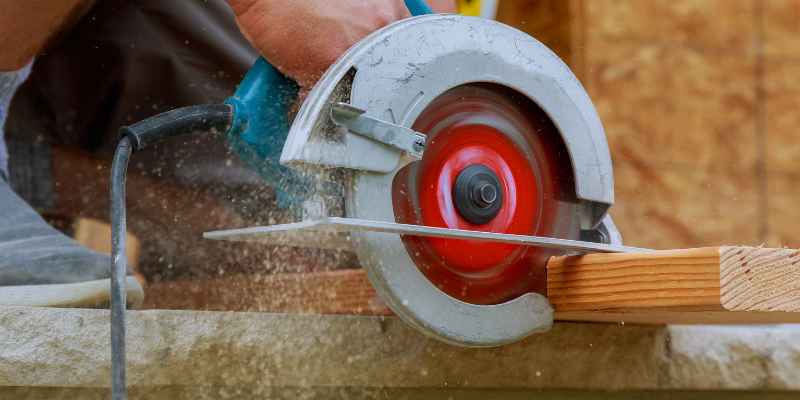
To convert a circular saw into a table saw, build a stable platform with a slot for the blade. Secure the circular saw upside down and adjust the height for optimal cutting.
Transforming a circular saw into a table saw offers a cost-effective solution for woodworking enthusiasts. Many hobbyists may not have the budget for a dedicated table saw. With some creativity and basic materials, you can create a functional table saw setup.
This conversion not only maximizes your existing tools but also enhances your cutting accuracy and safety. Utilizing a circular saw in this manner allows for a versatile workspace, perfect for various projects. Whether you’re crafting furniture or tackling home repairs, this DIY approach can save time and resources while delivering impressive results.
The Concept Of Circular Saw Conversion
Converting a circular saw into a table saw can enhance your woodworking experience. This process involves creating a stable surface for the circular saw. It allows for more precise cuts and better control. You can also save space in your workshop.
Benefits Of Transforming A Circular Saw
- Increased Precision: A table saw offers better accuracy.
- Enhanced Stability: A fixed position improves cutting control.
- Space Saving: Combine tools to free up workspace.
- Cost-Effective: Use existing tools instead of buying new ones.
- Versatility: Adapt for different types of cuts.
Essential Safety Considerations
Safety is crucial during this conversion. Follow these guidelines:
- Always wear protective gear.
- Ensure the saw is unplugged during adjustments.
- Use proper clamps to secure materials.
- Inspect the saw for any damage before use.
- Keep hands clear of the blade at all times.
| Safety Tip | Description |
|---|---|
| Protective Gear | Wear goggles, gloves, and ear protection. |
| Unplug Saw | Prevent accidental startups during adjustments. |
| Secure Materials | Use clamps to hold wood steady. |
| Inspect Tools | Check for any issues before starting. |
| Hand Safety | Keep fingers away from the blade. |

Tools And Materials Required
Transforming a circular saw into a table saw requires specific tools and materials. Having the right items on hand makes this project easier and safer. Below is a detailed list to guide you.
List Of Necessary Items
- Circular Saw
- Wood Base (Plywood or MDF)
- Angle Brackets
- Wood Screws
- Measuring Tape
- Wood Glue
- Clamps
- Safety Goggles
- Dust Mask
Selecting The Right Circular Saw
Choose a circular saw that fits your needs. Look for a model with a power rating of at least 15 amps. This ensures smooth cuts and durability. Check the blade size; a 7.25-inch blade is ideal.
Consider the saw’s weight. A lightweight model is easier to handle. Ergonomic designs provide better grip and control. Ensure the saw has a reliable safety guard for protection.
Designing Your Table Saw Setup
Creating a table saw from a circular saw can enhance your woodworking projects. A well-designed setup makes cutting easier and safer. Focus on the layout, size, and materials needed for the best results.
Blueprint For The Conversion
A clear blueprint is vital for your table saw conversion. It guides you through the process. Here’s a simple plan:
- Choose a sturdy base material, like plywood.
- Decide the size of your table.
- Mark the position for the circular saw.
- Plan for a fence to ensure straight cuts.
- Include a dust collection system if possible.
Consider these measurements:
| Component | Recommended Size |
|---|---|
| Table Surface | 3 ft x 2 ft |
| Height | 30 inches |
| Circular Saw Opening | 10 inches |
Space And Size Considerations
Space is crucial for your table saw setup. Ensure you have enough room for safe operation. Consider these factors:
- Work area size: Aim for a minimum of 4 ft x 4 ft.
- Access to power: Ensure a nearby outlet.
- Clearance: Leave space around the saw for materials.
- Storage: Plan for storing tools and materials.
Choose the right size for your needs. A larger table supports bigger projects. A smaller table works well for compact spaces.
Building The Table Saw Base
Creating a solid base for your circular saw is essential. A well-built base enhances stability and safety. Follow the steps below to construct a reliable table saw base.
Step-by-step Construction Guide
- Gather Materials:
- Two sheets of plywood (3/4 inch thick)
- Four 2×4 wood pieces (for the frame)
- Wood screws
- Wood glue
- Measuring tape
- Drill
- Saw
- Cut the Plywood:
Cut one sheet to 4×8 feet for the top. Cut another for the base, adjusting as necessary.
- Construct the Frame:
Use the 2x4s to create a rectangular frame. Ensure the dimensions match the plywood sheet.
- Attach the Base:
Secure the plywood base to the frame using wood screws.
- Install the Top:
Attach the plywood top to the frame. Use wood glue for extra strength.
- Drill a Circular Hole:
Make a hole in the center for the circular saw blade. Ensure it fits snugly.
Tips For A Sturdy Foundation
- Choose Quality Materials: Use strong plywood and sturdy 2x4s.
- Check for Level: Ensure the base is perfectly level. This prevents accidents.
- Use Reinforcements: Add extra 2x4s for additional support.
- Secure All Joints: Use screws and glue at each joint for stability.
- Test Stability: Before use, apply pressure to check for wobbling.
| Material | Size | Purpose |
|---|---|---|
| Plywood | 4×8 feet | Table surface |
| 2×4 Wood | Varied | Frame construction |
| Screws | N/A | Joining materials |
| Wood Glue | N/A | Additional bonding |
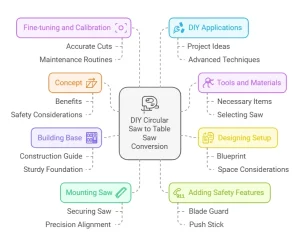
Mounting The Circular Saw
Mounting your circular saw correctly is essential for safety and precision. A stable base allows for accurate cuts. Follow these steps to secure your saw effectively.
Securing The Saw To The Base
Start by gathering your materials:
- Circular saw
- Wooden base or table
- Clamps or screws
- Drill
- Measuring tape
Place the circular saw upside down on the wooden base. Make sure the blade is hanging off the edge. This setup allows for easy access to the blade.
Use the measuring tape to find the center of the saw. Mark the spots where screws will go. Ensure the saw is snug against the base.
Secure the saw using either clamps or screws. If using screws, drill pilot holes first. This prevents the wood from splitting.
Alignment For Precision Cutting
Proper alignment ensures clean cuts. Follow these steps for accurate positioning:
- Check the blade’s alignment with the edge of the base.
- Adjust the saw until it is perfectly straight.
- Use a square to verify the angle.
Make small adjustments as needed. Tighten all screws once satisfied with the alignment. Check the blade guard for proper operation.
Finally, test the setup with a scrap piece of wood. This ensures everything is functioning correctly before starting your projects.
Adding Safety Features
Safety is crucial when turning a circular saw into a table saw. Proper safety features help prevent accidents. Here are two essential components to ensure safety while using your modified tool.
Installing A Blade Guard
A blade guard protects users from accidental contact with the saw blade. Follow these steps to install it:
- Choose a guard that fits your circular saw.
- Attach it securely to the saw body.
- Ensure it covers the blade completely.
Benefits of using a blade guard include:
- Minimized risk of injury
- Reduced debris exposure
- Improved visibility of the workpiece
Creating A Push Stick
A push stick keeps hands away from the blade. This tool enhances safety during cuts. Here’s how to create one:
- Use a sturdy piece of wood.
- Shape it into a comfortable handle.
- Add a flat end for pushing wood.
Benefits of a push stick:
- Keeps hands safe from the blade
- Improves control during cuts
- Helps maintain focus on the workpiece
Fine-tuning And Calibration
Fine-tuning and calibration are essential for a successful conversion. A well-calibrated setup ensures precision and safety. Accurate cuts lead to better results in your projects.
Adjusting For Accurate Cuts
Start with the following steps to adjust your circular saw:
- Check the Blade Alignment: Ensure the blade is parallel to the fence.
- Set the Cutting Depth: Adjust the blade depth to just below the material.
- Square the Saw: Use a carpenter’s square to align the blade.
- Test Cut: Make a test cut on scrap wood.
Here’s a quick checklist to help with adjustments:
| Adjustment | Action |
|---|---|
| Blade Alignment | Check and adjust using a straight edge. |
| Cutting Depth | Set to 1/8 inch below the material thickness. |
| Square the Saw | Use a square to ensure accuracy. |
| Test Cut | Verify cuts for precision on scrap wood. |
Regular Maintenance Routines
Regular maintenance keeps your circular saw in top shape. Follow these routines:
- Clean the Saw: Remove dust and debris after each use.
- Inspect the Blade: Check for dullness and damage.
- Lubricate Moving Parts: Apply lubricant to reduce wear.
- Check Electrical Components: Inspect cords and switches regularly.
Schedule maintenance every month for best results. Keep a log of maintenance actions. This practice helps track the saw’s performance.
DIY Table Saw Applications
Transforming a circular saw into a table saw opens up many possibilities. This tool can enhance your woodworking projects. With a few adjustments, you can achieve precise cuts and improve efficiency.
Project Ideas For Your New Tool
- Furniture Making: Create tables, chairs, and shelves.
- Cabinetry: Build custom cabinets for your home.
- Wooden Toys: Craft unique toys for children.
- Picture Frames: Make personalized frames for your photos.
- DIY Home Decor: Design decorative wooden items.
Each project allows for creativity and skill development. Use your new table saw for intricate designs and accurate cuts. Choose projects based on your skill level.
Advanced Techniques For Skilled Woodworkers
Once you’re comfortable with your DIY table saw, try these advanced techniques:
- Bevel Cuts: Create angled edges for a professional finish.
- Dado Cuts: Make grooves for joining pieces securely.
- Resawing: Cut thick lumber into thinner boards.
- Curved Cuts: Use jigs to cut curves and intricate shapes.
| Technique | Description |
|---|---|
| Bevel Cuts | Angles edges for better aesthetics. |
| Dado Cuts | Creates grooves for strong joints. |
| Resawing | Thins lumber for various projects. |
| Curved Cuts | Allows for creativity in designs. |
Master these techniques to elevate your woodworking skills. Experimenting with your DIY table saw can yield impressive results.
Frequently Asked Questions
How To Convert A Circular Saw To A Table Saw?
To convert a circular saw into a table saw, you need a sturdy base. Secure the circular saw upside down on a table. Create a fence for accurate cuts. Ensure proper safety measures are in place. This setup allows for controlled, precise cuts like a traditional table saw.
What Materials Do I Need For This Conversion?
You will need a circular saw, a plywood board, and a sturdy table. Use screws to secure the saw and the board. A ruler or measuring tape helps in creating accurate dimensions. Also, consider clamps for added stability during use.
These materials ensure a successful conversion process.
Is It Safe To Use A Circular Saw As A Table Saw?
Yes, it can be safe if precautions are taken. Always ensure the saw is securely mounted to prevent movement. Use push sticks for guiding material through the blade. Wear proper safety gear like goggles and gloves. Following safety measures minimizes the risk of accidents.
Can I Use Any Circular Saw For This Project?
Most circular saws can be converted, but check for compatibility. Ensure your saw has a sturdy base and adequate power. Some models may require additional modifications for better results. It’s best to use a saw known for its reliability and performance to achieve optimal results.
Conclusion
Transforming your circular saw into a table saw can enhance your woodworking projects. This conversion boosts precision and safety. With the right tools and setup, you can achieve professional results at home. Embrace this DIY approach to elevate your craftsmanship.
Start your journey today and enjoy the benefits of a versatile workspace.