Wood Burning Temperature Chart for Pyrography Tips
Start at about 450°F to 650°F for softwoods and 650°F to 900°F for hardwoods, then lower heat for shading and raise it for bold outlines. Too much heat scorches fibers fast, while too little heat leaves scratchy lines and uneven shading. This guide gives a practical wood-burning temperature chart, plus setup steps for matching heat to tip type, wood species, and burn task.
Pyrography tip settings by wood type


This chart pairs tip shape, wood density, and burn goal so you can begin in a useful range instead of guessing. Higher heat darkens the mark faster. Lower heat leaves a lighter line and gives you more time to correct it. Basswood burns faster than hardwoods, while maple, birch, ash, and oak usually need more heat and a slower hand.
| Tip type | Wood species | Starting temperature band | Stroke speed | Expected mark quality | Troubleshooting notes |
|---|---|---|---|---|---|
| Solid point | Basswood | 450°F to 525°F | Fast for outline, moderate for text | Clean dark line with low grain pull | Underburn: raise 25°F. Overburn: lower 25°F. Fuzzy line: move with the grain and sand finer. |
| Solid point | Maple | 600°F to 700°F | Moderate | Controlled line, slightly slower take-up | Underburn: add 25°F. Overburn: reduce dwell time. Fuzzy line: shorten pauses at turns. |
| Solid point | Oak | 675°F to 800°F | Slow to moderate | Firm outline, more grain interruption | Underburn: step up 25°F. Overburn: lighten pressure. Fuzzy line: burn with the grain where possible. |
| Ball tip | Basswood | 475°F to 550°F | Slow dots, short taps | Even dot field, soft edge | Underburn: hold 1 second longer. Overburn: shorten contact. Fuzzy dots: clean the tip more often. |
| Ball tip | Birch | 600°F to 700°F | Short taps | Crisper dots than softwood | Underburn: raise heat 25°F. Overburn: reduce tap time. Fuzzy dots: follow the grain direction in rows. |
| Shader | Basswood | 425°F to 500°F | Quick sweeping passes | Light fill, smooth gradient | Underburn: increase 25°F. Overburn: speed up. Fuzzy shading: keep passes even and overlap consistently. |
| Shader | Ash | 650°F to 775°F | Moderate sweeps | Controlled fill with visible tone changes | Underburn: add 25°F. Overburn: lift sooner. Fuzzy shading: reduce pressure and make longer passes. |
| Spear or skew tip | Basswood | 500°F to 575°F | Moderate for lettering | Sharp lettering edges, narrow strokes | Underburn: increase 25°F. Overburn: move faster. Fuzzy line: rotate the wrist less at corners. |
| Spear or skew tip | Maple | 650°F to 775°F | Moderate to slow | Crisp script, better edge control | Underburn: raise 25°F. Overburn: shorten pauses. Fuzzy line: burn with the grain on long strokes. |
| Wire-nib round | Birch | 625°F to 725°F | Moderate | Consistent dot texture, tight curves | Underburn: step up 25°F. Overburn: lower heat before the next pass. Fuzzy marks: keep the nib clean. |
| Wire-nib chisel | Oak | 700°F to 850°F | Slow, controlled strokes | Defined edges, stronger fill bands | Underburn: add 25°F. Overburn: reduce dwell time. Fuzzy line: switch to the grain or change direction sooner. |
| Ball tip or shader | Basswood | 450°F to 525°F | Very light pressure, medium speed | Soft texture marks without deep grooves | Underburn: increase 25°F. Overburn: reduce pressure. Fuzzy texture: let the tip glide instead of pressing. |
What you’ll need
- A wood burner with adjustable heat.
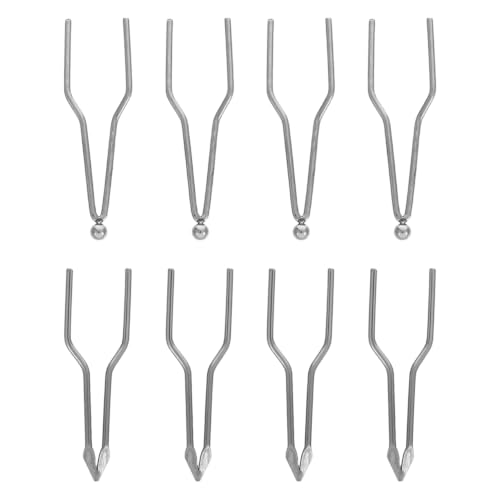
- Interchangeable tips: solid point, ball tip, shader, and spear or skew tip.
- Scrap wood from the same species you plan to burn.
- Basswood blanks for practice.
- Sandpaper in fine grits for smoothing the surface before burning.
- A clean way to transfer the design.
- Dust control and smoke capture or a work area with strong ventilation.
- Heat-safe support for the hot pen.
What temperature should you start with?
Begin at the low end of the band for the wood and task chosen, then move up in about 25°F steps until the mark is dark enough without roughening the surface. Softwoods usually need less heat than hardwoods, and shading generally needs less heat than outlines.
Typical working range in Fahrenheit
Pyrography tools commonly work in the 600°F to 1,200°F tip range, and many burners can reach 750°F to 1,050°F. A practical starting band for most hobby work is lower than the top end of the tool, because the goal is controlled burn depth, not max heat.
Softwood starting range
For softwoods such as pine, start at about 450°F to 650°F. Softer, lower-density woods such as basswood tend to burn faster and require less heat, and basswood is a common practice wood because it has very little grain.
Hardwood starting range
For hardwoods such as maple, birch, ash, and oak, start at about 650°F to 900°F. Hardwoods tend to burn slower than basswood and often need more heat for a clean line, though birch can still burn crisper than many softwoods.
How heat changes line darkness
Higher heat darkens the line faster and can cut through fibers more aggressively. Cooler tips leave lighter marks and give you more room to correct a line. If the edge looks dusty or scratchy, the heat is usually too low for the wood and tip shape.
How do tip shapes change the mark?
Tip shape changes both line width and how much heat reaches the wood. A narrow point concentrates heat in one place, while a shader spreads heat over a wider contact area. Match the tip to the task before you change the temperature.
Solid point for outlines
Solid-point burners suit outlines, calligraphy, extra-fine detail, and general-purpose lines. They give you a narrow burn path and clear edges on letters, borders, and small shapes.
Ball tip for dots and textures
Ball tips make dots, stippling, and texture fields. They work well when you want repeated marks with a rounded edge rather than a sharp cut.
Shader for fills and gradients
Shaders work best for fills, gradients, and smooth tone changes. Use a lower heat and steady movement so the stroke lays down color without gouging the wood.
Spear or skew tip for lettering and narrow strokes
Spear and skew tips are useful for lettering, thin curves, and narrow directional strokes. Their angle helps you pull crisp lines and keep corners neat when the hand stays light.
How should you set heat by wood type?
Wood density and grain change how fast the burn develops. Basswood usually gives the easiest control, while maple, birch, ash, and oak ask for more heat and steadier movement. Burn with the grain where possible, because that direction is smoother and easier to control.
Basswood calibration
Basswood is a common practice choice because it has very little grain and burns faster than hardwoods. Start low, usually in the 450°F to 550°F area for lines, and move up only if the mark stays pale after a clean pass.
Maple, birch, ash, and oak
Maple and birch usually need moderate heat and careful speed control. Ash and oak often need more heat still, and oak’s grain can interrupt the line more strongly. Birch is known for burning crisper than softwoods like pine, but it still needs more control than basswood.
Burning with the grain
Burning with the grain is easier because the tip meets less resistance. Across the grain, the stroke can catch and look rougher. If a line turns fuzzy, check whether the stroke changed direction against the grain before you raise the heat again.
Adjusting for density and grain
Dense wood usually needs either more heat or slower movement, but not both at once to the extreme. Make one change at a time: add 25°F, or slow the stroke slightly, then check the result on scrap of the same wood.
How do you dial in the burner?
Use a start-low, step-up method. Test on scrap from the same board, keep pressure light, and change only one variable at a time. A common first-timer mistake is to turn up heat and press harder at the same time, which hides the real problem.
- Sand the wood smooth before burning.
- Choose the tip for the task: outline, lettering, shading, or texture.
- Set the burner to the low end of the wood’s starting band.
- Test one 2-inch line on scrap with the grain.
- Increase heat by 25°F if the line stays pale.
- Slow the stroke slightly if the mark is still light after one recheck.
- Drop the heat or move faster if the line turns too dark or fuzzy.
- Switch settings mid-project only after a fresh scrap test.
Say your basswood lettering looks pale at 475°F with a spear tip. Raise the setting to 500°F, keep the stroke speed the same, and test again before touching the final piece. That single change is easier to read than changing heat, speed, and pressure at once.
Common mistakes
These problems usually come from heat, speed, grain direction, or pressure. Fix the simplest cause first. If that does not solve it, move to the next step in the ladder rather than making bigger adjustments all at once.
Pressing too hard
Light pressure is the rule. Too much force can bend tips, widen the burn unexpectedly, and create rough edges. Let temperature and speed do the work.
Running too hot
Excess heat makes dark marks fast, but it can also scorch fibers and leave brittle edges. If the wood begins to char before the line shape is set, lower the heat by about 25°F to 50°F and move sooner.
Ignoring grain direction
Burning across or against the grain can make the stroke look shaky. If the line drags, rotate the work so the next pass follows the grain where possible.
Skipping ventilation
Burning wood produces smoke, so work outdoors or in a very well-ventilated area. Smoke capture or extraction is a smart add-on when you burn often, especially on longer shading sessions.
Suppose a maple outline at 700°F looks blotchy in short sections. First, keep the tip moving faster on the next pass. If the blotching remains, step up to 725°F and recheck on scrap. If that still fails, inspect the grain direction before changing tips.
Prevention
Keep the wood flat, smooth, and dry enough for clean transfer, and recheck the burner on a scrap offcut before each new species. That habit prevents most fuzzy edges and lets you catch a weak setting before it reaches the project surface.
Frequently asked questions
What temperature should I use for wood burning tips?
Most hobby burners work somewhere in the 600°F to 1,200°F tip range, but a practical starting band is lower than the top end.
How hot should a pyrography pen be for basswood?
Start around 450°F to 550°F for basswood, then adjust by task. Outlines and lettering usually need the higher end of that band, while shading often looks better a little cooler. Basswood burns quickly, so increase heat only after a scrap test.
Do different wood species need different burning temperatures?
Yes. Basswood burns faster and needs less heat, while maple, birch, ash, and oak usually need more heat and slower movement. Pine is easier to burn than harder woods, but birch often gives a crisper line than many softwoods.
Which wood burning tip is best for outlines versus shading?
Use a solid point for outlines and lettering, then switch to a shader for fills and gradients. Ball tips are better for dots and texture fields. A spear or skew tip helps with narrow strokes and angled lettering where edge control matters.
How do I avoid fuzzy lines or scorch marks in pyrography?
Sand the surface smooth, burn with the grain when possible, and use light pressure. If the line fuzzes, raise heat only 25°F at a time or slow the stroke slightly. If scorch marks appear, reduce heat and shorten the contact time.
How much pressure should I use when burning wood?
Use light pressure. The tip should glide with controlled contact, not dig into the board. Too much force can bend the tip and widen the burn. If the line is too light, adjust heat or speed first before adding pressure.
Sponsored / affiliate links. As an Amazon Associate I earn from qualifying purchases. I may earn additional commission from eligible campaigns.