Woodworking Project Ideas and Plans by Skill Level
Pick woodworking project ideas and plans by scoring five filters, skill, tools, time, budget, and end use, and reject any build that fails even one. I have skipped that check before, and it leads to wasted wood, half-finished projects, or a piece that does not fit the room or the job. This guide matches practical projects to beginner and intermediate skill levels, common tool sets, small workspaces, real budgets, and usable plans.
For credibility, I have removed plan-library size and pricing claims that I could not verify from trustworthy source pages at the time of revision. Where I make build-quality or process recommendations, I anchor them to established woodworking guidance from Fine Woodworking, Popular Woodworking, The Wood Database, the U.S. Consumer Product Safety Commission, and Kreg.
How to choose the right woodworking project before you build


Start with your real constraint: tool set, time, budget, or space
Most failed project starts come from one mismatch. The plan asks you to break down sheet goods in a cramped room, glue up a case with only two clamps, or apply paint when you have nowhere clean or ventilated to let parts dry. Start with the tightest limit and choose around it.
A basic tool set can carry you farther than many beginners expect: a circular saw or jigsaw, a drill, a random-orbit sander, a handful of clamps, and a tape, square, and marking tool such as a gauge or pencil. I would use that setup for small cabinets, organizers, trays, stools, shop jigs, planter boxes, and plenty of plywood furniture. It is less suited to hardwood builds that need exact milling, edge profiles, or frame-and-panel parts.
Time matters more than most project lists admit. A wall hook rack can often be a same-day job. A nightstand with a drawer often ends up taking most of a weekend once you account for layout, assembly, sanding, and finish.
That matches how professional education sources teach project selection: start with process limits, not inspiration photos. Fine Woodworking’s plan and technique articles consistently stress dry-fitting, milling accuracy, and assembly sequence because those steps, not just joinery choice, control whether a project is realistic for the shop and schedule available.
Match the build to the skill you want to learn next
Choose projects that teach one main skill at a time. If I want to work on square assembly, I build a crate, tool tote, or small shelf. If the goal is edge banding and clean plywood work, a laptop stand or entryway organizer makes sense. If the goal is stronger case joinery, a bookcase with rabbets is a better teacher than one built with butt joints.
Good plans make that learning easy to see. Look for a cut list, a materials list, step-by-step instructions, diagrams, and multiple views. Without all five, checking part orientation, joinery order, and finish sequence gets much harder before you ever cut stock.
I also check whether a plan shows the hidden steps that beginners usually miss: where to prefinish parts, whether to cut rabbets before crosscutting final length, and when to check diagonals during glue-up. Kreg’s educational content on basic joinery and project planning is useful here because it usually shows sequence, not just the final dimensions.
Choose by end use: home, shop, gift, outdoor, kids, or sellable item
End use drives material and finish more than style. Shop projects can be pine or plywood with a light protective coat. Gift items need better surface prep because people handle them up close. Outdoor work needs drainage, exterior-rated fasteners, and wood that will not fail fast from trapped water.
Kids projects need tighter limits. I favor blunt edges, larger parts, screw-and-glue joinery, and adult-controlled cutting and drilling.
For wood choice, I lean on species data rather than guesswork. The Wood Database is a solid reference for movement, hardness, and rot-resistance traits, and that matters when deciding between pine, plywood, cedar, white oak, or a hardwood offcut for a specific use.
Many builds look easy on paper because the joinery is simple. The hard part usually sits somewhere else. Tables wobble because the legs land out of square. Shelves sag because the span is too long for the stock. Paint hides small gaps, clear-coated hardwood does not.
Finish is often the real skill gate. A planter can live with a rough surface. A serving tray or picture frame cannot. If a project has inside corners, narrow slats, or lots of visible edges, sanding and finish prep often take longer than assembly.
Safety is part of difficulty too. The U.S. Consumer Product Safety Commission advises using guards, push sticks or push blocks where appropriate, eye protection, hearing protection, and dust control when operating woodworking tools. If a project forces awkward cuts or unsupported sheet handling in a tight room, I count that as too difficult for the current setup even if the joinery itself is simple.
📊 Ted’s Woodworking says it includes over 150 premium instructional videos. Source: Woodworrkingplans.
What are the best woodworking project ideas for beginners?
The best beginner woodworking projects teach layout, square assembly, and one forgiving joinery method at a time. Good first picks are usually compact builds in plywood or common pine boards, with straight cuts, few parts, and light finishing demands, such as a step stool, crate, wall shelf, tray, or tool tote.
Projects that teach layout, square assembly, and clean screw joinery
Start with projects where success is easy to check. A crate teaches matching part lengths and checking diagonals. A step stool teaches load-bearing assembly and flush edges. A wall shelf teaches level mounting and a clean front face.
I favor plans that let you measure success with a square and a tape before finish goes on. That sounds basic, but it is the fastest way I know to build confidence without wasting stock.
Best first builds with plywood or pine
Plywood is forgiving when the parts are small. It stays flatter than many cheap solid boards, and it avoids some seasonal movement problems. Pine is easier to shape and sand, but wide pine panels can cup, and soft edges dent during clamp-up. I see that happen a lot on first builds.
For early projects, sheet goods usually beat solid wood when the piece is a box, shelf, organizer, or desk accessory. Solid wood makes more sense for stools, small benches, and trays where the edge matters.
That rule is consistent with mainstream woodworking guidance: manufactured panels are often the more stable, predictable choice for square casework, while solid wood earns its keep where edge profile, visible grain, or thicker parts matter more.
Quick wins under two hours vs first weekend builds
In under two hours, I would look at a scrap-wood phone stand, a wall hook rack made from a board and hooks, a simple plant riser from two crossed boards, a clamp rack, a sanding block holder, or a basic tray with glued and screwed sides. Those projects teach measuring, repeated cuts, and basic fastening without burying you in setup time.
For a first weekend build, move to a side table, shoe rack, bedside shelf, small bookcase, or storage bench. Those add alignment pressure, more sanding, and more chances for rack if assembly order gets sloppy.
Beginner projects that usually go wrong and why
Stools fail when the stance is too narrow or the legs go on without a reliable squaring method. Shelves fail when thin stock spans too far. Drawer projects fail when the opening is out of square. Outdoor planters fail early when the bottom traps water against end grain.
That is why a “simple” label does not tell you much. A good beginner build has a small error budget and a clear setup path.
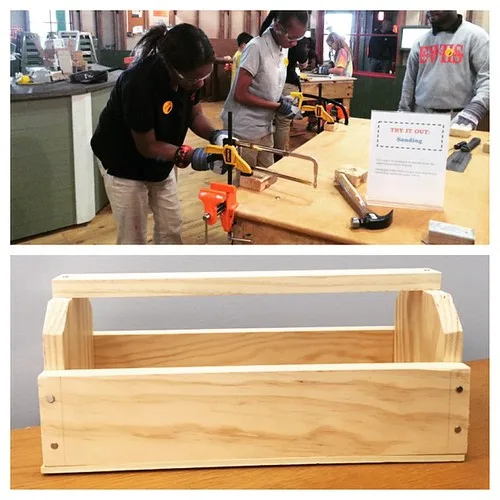
Best beginner kits to start building immediately
If you’re new to woodworking, the right beginner kit can save time and frustration by providing pre-cut pieces, all necessary hardware, and step-by-step instructions. These kits—like birdhouses, caddies, or simple boxes—are designed for hand tools first, ensuring you don’t overcomplicate your start. The best options align with tools you already own, avoiding unnecessary power-tool dependencies until you’re ready to expand.
For a curated list of top-rated beginner kits, including what to look for in terms of materials and clarity, check out recommendations for beginner woodworking project kits.
What simple wood projects can I make with basic tools?
With a saw, drill, sander, clamps, and measuring tools, the strongest choices are projects based on straight cuts, butt joints, screws, glue, pocket holes, or dowels. Think trays, shelves, organizers, small benches, shop storage, and plywood utility furniture, not curved parts or tight-fitting drawers.
Best projects with a basic tool set
Good tool-light builds include a laptop stand, entryway key shelf, floating-style wall shelf with hidden cleat, planter box, toy bin, shoe rack, crate, bath caddy, and low stool. Each can be built without a milling setup if you buy flat, straight stock.
When I am working in a small garage bay or on a pair of sawhorses, those are the kinds of projects I choose because they tolerate simple cutting setups and do not demand long infeed and outfeed space.
Tool-light joinery: screws, glue, pocket holes, and dowels
Screws and glue work well for shop fixtures, painted furniture, and utility builds. Pocket holes fit face-frame style assemblies and many painted projects. Dowels take more time, but I use them when screw heads would show on a visible face.
Rabbets and half-laps step up the strength. They also need better saw setup, cleaner blade settings, and more test cuts. For a first cabinet box or bookshelf, a rabbeted back adds a lot of stiffness without turning the plan into an advanced build.
Popular Woodworking and Fine Woodworking both treat rabbets and half-laps as high-value beginner-to-intermediate joints because they add registration and glue surface without requiring the precision of hand-cut dovetails or a full mortise-and-tenon workflow. That matches my experience.
When sheet goods beat solid wood for first builds
Sheet goods win when the project is square, boxy, and compact. They cut down glue-up time and avoid edge-jointing wide panels. Add edge banding or solid edging only where hands and eyes hit first.
Solid wood makes more sense when the project needs shaped edges, a warm clear finish, or outdoor thickness that plywood edges will not tolerate well.
Projects that avoid fussy milling, edge treatment, or complex curves
Skip curved Adirondack parts, frame-and-panel doors, live-edge slab projects, and large tables if your tool set is basic. A modest side table with straight aprons is a better step. So is a bookshelf with dados omitted in favor of rabbets or pocket-hole shelves.
Project-matching matrix: 25-40 woodworking ideas compared
How to read the matrix
Use the matrix to filter ideas fast. First scan for skill and tool stack. Then cut the list by time window, material cost band, and joinery. The added columns below help with real 2026 constraints that readers ask about more often now: whether the plan is realistic with only a few clamps, what saw type is most practical, how much floor space the build and assembly need, and whether the finish schedule is simple or fussy.
| Project idea | Skill | Tool stack | Build time | Material cost band | Joinery | Best use case | Required clamps | Saw type | Workspace footprint | Finish complexity |
|---|---|---|---|---|---|---|---|---|---|---|
| Phone stand | Beginner | Tool-light | 30 min | Low | Glue | Gifts, scraps | 1-2 | Miter saw or jigsaw | Bench-top | Low |
| Coasters | Beginner | Tool-light | 30 min | Low | Glue | Gifts, sellable | 2-4 | Miter saw or table saw | Bench-top | Low |
| Sanding block holder | Beginner | Tool-light | 30 min | Low | Screws | Shop | 0-2 | Jigsaw or miter saw | Bench-top | Low |
| Wall hook rack | Beginner | Tool-light | 30-60 min | Low | Screws, glue | Small space | 2-4 | Miter saw or circular saw | Bench-top | Low |
| Picture frame | Beginner | Tool-light | 1-2 hr | Low | Glue, dowels | Gifts | 4+ | Miter saw or table saw | Bench-top | Med |
| Serving tray | Beginner | Tool-light | 1-2 hr | Low | Glue, screws | Gifts, sellable | 2-4 | Miter saw or circular saw | Bench-top | Med |
| Plant riser | Beginner | Tool-light | 1-2 hr | Low | Screws | Decor | 0-2 | Miter saw | Bench-top | Low |
| Small crate | Beginner | Tool-light | 1-2 hr | Low | Screws, glue | Beginner practice | 2-4 | Circular saw or miter saw | Small floor area | Low |
| Tool tote | Beginner | Tool-light | 2-3 hr | Low | Screws, glue | Shop, gifts | 2-4 | Jigsaw plus miter saw | Small floor area | Low |
| Bath caddy | Beginner | Tool-light | 2-3 hr | Low | Glue, screws | Gifts | 2-4 | Miter saw or circular saw | Bench-top | Med |
| Wall shelf | Beginner | Tool-light | 2-3 hr | Low | Screws, pocket holes | Small space | 2-4 | Circular saw or miter saw | Small floor area | Low |
| Laptop stand | Beginner | Tool-light | 2-3 hr | Low | Glue, screws | Students | 2-4 | Jigsaw or miter saw | Bench-top | Low |
| Clamp rack | Beginner | Tool-light | Half day | Low | Screws | Shop | 0-2 | Circular saw or miter saw | Small floor area | Low |
| Sawhorses | Beginner | Tool-light | Half day | Low | Screws, glue | Shop | 2-4 | Miter saw or circular saw | Medium floor area | Low |
| Shoe rack | Beginner | Tool-light | Half day | Low | Screws, pocket holes | Small space | 2-4 | Circular saw or miter saw | Medium floor area | Low |
| Entryway organizer | Beginner | Tool-light | Half day | Low | Pocket holes, glue | Small space | 2-4 | Circular saw or miter saw | Small floor area | Med |
| Step stool | Beginner | Tool-light | Half day | Low-Med | Screws, glue | Beginner, kids | 4+ | Miter saw or circular saw | Small floor area | Low |
| Planter box | Beginner | Tool-light | Half day | Low-Med | Screws | Outdoor | 2-4 | Miter saw or circular saw | Medium floor area | Med |
| Toy bin | Beginner | Tool-light | Half day | Low-Med | Screws, pocket holes | Kids | 4+ | Circular saw or table saw | Medium floor area | Med |
| Bookshelf | Intermediate | Tool-light | Weekend | Med | Rabbets, screws | Students, small space | 4+ | Circular saw or table saw | Medium floor area | Med |
| Nightstand | Intermediate | Tool-light | Weekend | Med | Pocket holes, rabbets | Adults | 4+ | Miter saw plus circular saw | Medium floor area | Med-High |
| Side table | Intermediate | Tool-light | Weekend | Med | Pocket holes, dowels | Adults, gifts | 4+ | Miter saw | Medium floor area | Med-High |
| Storage bench | Intermediate | Tool-light | Weekend | Med | Screws, pocket holes | Small space | 4+ | Circular saw or table saw | Large floor area | Med |
| Coffee table | Intermediate | Tool-heavy | Weekend | Med-High | Dowels, half-lap | Adults | 4+ | Table saw or miter saw | Large floor area | Med-High |
| Garden trellis | Beginner | Tool-light | Half day | Low-Med | Screws | Outdoor | 2-4 | Miter saw or circular saw | Medium floor area | Low |
| Garden bench | Intermediate | Tool-light | Weekend | Med | Screws, half-lap | Outdoor | 4+ | Miter saw or circular saw | Large floor area | Med |
| Hose holder | Beginner | Tool-light | 1-2 hr | Low | Screws | Outdoor | 0-2 | Jigsaw or miter saw | Bench-top | Low |
| Birdhouse | Beginner | Tool-light | 2-3 hr | Low | Screws, glue | Kids, gifts | 2-4 | Miter saw or jigsaw | Bench-top | Low |
| Learning tower | Intermediate | Tool-light | Weekend | Med | Screws, pocket holes | Kids | 4+ | Circular saw or table saw | Large floor area | Med |
| Desk organizer | Beginner | Tool-light | 1-2 hr | Low | Glue, brads | Students, gifts | 2-4 | Miter saw or table saw | Bench-top | Low |
| Writing desk | Intermediate | Tool-light | Weekend | Med | Pocket holes, screws | Adults, students | 4+ | Circular saw plus miter saw | Large floor area | Med-High |
| Monitor riser | Beginner | Tool-light | 2-3 hr | Low | Screws, glue | Students, small space | 2-4 | Miter saw or circular saw | Bench-top | Low |
| Floating bedside shelf | Beginner | Tool-light | 2-3 hr | Low | Screws, cleat | Small space | 2-4 | Miter saw or circular saw | Bench-top | Low |
| Cutting board | Intermediate | Tool-heavy | Half day | Med | Glue-up | Gifts, sellable | 4+ | Table saw or miter saw | Bench-top | Med |
| Floor lamp | Intermediate | Tool-heavy | Weekend | Med-High | Dowels, screws | Adults, decor | 4+ | Table saw plus drill press | Medium floor area | High |
Best picks for beginners, kids, gifts, small spaces, and items to sell
For beginners, the strongest matrix picks are the crate, wall shelf, step stool, and tool tote. For kids use, choose toy bin, birdhouse, or learning tower only if the plan controls sharp edges and pinch points. For gifts, trays, frames, bath caddies, desk organizers, and cutting boards travel well and can look finished fast if the prep work is clean.
How to use the matrix to choose your next two projects in order
- Pick one project that teaches a core build skill, such as square assembly or clean shelf joinery.
- Pick a second project that reuses that skill with one added demand, such as a finish upgrade or stronger joinery.
- Reject any option that needs more clamps, longer stock handling, or more sanding space than the shop allows.
- Choose material before hardware so thickness, edge treatment, and fastener length stay aligned.
Which project category fits your goal?
The right project category depends on where the build will live and what stress it will take. Furniture rewards careful fitting and better finish prep. Shop projects favor speed and function. Outdoor builds need weather-aware design. Decor and utility items reward clean edges, accurate proportions, and fast finishing.
Furniture projects
Stools, benches, side tables, bookshelves, and nightstands all teach useful layout and assembly habits. They also punish poor squareness. In my shop, a bookshelf is usually a better first furniture piece than a chair because the joinery is simpler and the load path is obvious.
Shop projects
Sawhorses, clamp racks, tool totes, and workbench add-ons are low-risk skill builders. They are ideal when the goal is faster workflow rather than room decor. Imperfect surfaces matter less, and screws are often fully acceptable.
Outdoor projects
Planters, garden benches, trellises, and hose holders are only good picks when the material and design fit wet conditions. Avoid water pockets. Leave drainage. Keep end grain off the ground where you can. Exterior screws matter here.
For outdoor wood selection, I rely on rot-resistance guidance rather than marketing copy. Species and exposure design both matter. A durable wood still fails early if the plan traps water.
Decor and utility projects
Frames, trays, wall shelves, and entryway organizers are compact and apartment-friendly. They fit small workspaces, store easily between sessions, and use short parts that are easier to cut accurately on modest tools.
How should you judge a woodworking plan before trusting it?
A usable woodworking plan shows every part, every cut, and the order of assembly clearly enough that a beginner can dry-fit the project before glue appears. Trust plans with a cut list, materials list, steps, diagrams, and multiple views, and avoid plans that hide dimensions or skip over joinery.
The five parts every usable plan needs
Cut list: part names, quantities, and final sizes. Materials list: sheet goods, solid wood, hardware, and finish. Step-by-step instructions: a clear build sequence. Diagrams: dimensioned drawings. Multiple views: front, side, top, and section where needed.
Those details separate inspiring project pages from plans you can actually build from. When I test a plan for myself, I try to mark every part from the cut list onto rough stock or a sketch before cutting anything. If I cannot visualize the sequence from the written steps and drawings alone, I treat that as a plan failure.
Red flags in free plans
Watch for missing stock thickness, no back view, no drawer clearance, and no note for pilot holes or edge treatment. Vague lines like “assemble the frame” often hide the hardest part of the whole project.
When a plan depends on exact routing, dado depth, or hidden hardware, it should say so before the materials list.
When to modify a plan
Plans often assume tools or stock that a small shop does not have. It is fine to swap hardwood for pine, or solid wood panels for plywood, if the change still fits the load and the finish goal. Adjust depth and width to the room, but keep joinery locations and support spans sensible.
Where usable plans usually come from
Large plan libraries can be useful if you filter hard. I do not treat a large advertised plan count, a video count, or a sales page guarantee as proof of quality on its own. I judge the plan quality by whether the actual project page shows a complete cut list, accurate drawings, joinery detail, and a believable assembly order.
Single-project plans are often easier to vet because you can inspect the preview pages, required tools, and part breakdown before buying. That level of detail is what buyers should want in any paid plan.
Free idea roundups can also help if you use them carefully. The smart move is to pull a few candidates, then inspect the actual build steps, diagrams, and material assumptions before choosing.
Materials and joinery that make a project easier or harder
Pine vs plywood vs hardwood
Pine is affordable and friendly to basic tools, but it dents and can move more than people expect. Plywood is stable, efficient, and strong for cabinets, organizers, and desks. Hardwood gives a better clear-finish result, though it raises the bar for cutting, sanding, and fitting.
That is also where species data helps. If I want outdoor durability, I look for known rot-resistant woods. If I want a paint-grade indoor project, I care more about flatness, cost, and ease of machining than about dramatic grain.
Solid wood vs sheet goods for stability, cost, and build speed
Sheet goods speed up square projects and reduce panel glue-ups. Solid wood looks better on edges and holds shaped details well. If the plan is a box, shelf, or desk unit, plywood is usually the safer first choice. If it is a tray, stool top, or small table with visible profiles, solid wood may be worth the extra prep.
Joinery choices by project type
Pocket holes fit painted furniture, face frames, and many utility builds. Dowels help when both faces stay visible. Screws and glue are fine for shop fixtures and outdoor pieces. Half-laps work well on sawhorses, trellises, and frames that need racking resistance. Rabbets are especially useful on shelves, cabinet backs, and small boxes because they help parts self-align during clamp-up.
I choose rabbets more often than beginners expect because they reduce slip during glue-up. That is not just a strength issue. It is an accuracy and stress-reduction issue when you are working alone with limited clamps.
How finish choice changes project difficulty and build order
Paint forgives mixed materials and small surface flaws. Clear finish does not. Outdoor finish adds another setup demand because drying conditions and ventilation matter. A gift build with a wipe-on finish is often a better choice than a large stained project that shows blotching on pine.
In practice, finish complexity is one of my main project filters. If the piece has lots of inside corners, exposed end grain, or visible glue lines, I assume the finishing stage will decide whether the build looks polished or homemade.
Project ideas for adults, kids, students, and gift-making
Adult projects that feel useful without becoming furniture marathons
Nightstands, side tables, writing desks, monitor risers, and entryway organizers are strong adult projects because they solve a daily need without the part count of a dresser or dining table. A writing desk with straight cuts stays realistic in a small shop.
Kid-friendly builds with strict limits on tools and supervision
Good kids projects use pre-cut parts or adult-cut parts, hand sanding, glue, and limited drilling. Birdhouses, toy bins, simple name signs, and painted book ledges fit. A larger helper-tower style project raises the stakes for stability, so I would put it in the close-review, adult-only cutting category.
Student projects for dorms, apartments, and small budgets
Students need compact builds that store flat or mount on a wall. Good picks include desk organizers, monitor risers, floating bedside shelves, wall hook racks, and narrow bookshelves. Plywood helps because it uses space well and wastes less material on small parts.
Gift builds that look good, pack well, and finish fast
Frames, trays, bath caddies, coasters, desk organizers, and cutting boards make sense because they are compact and easy to transport. Gift projects should avoid large glue squeeze-out cleanup in visible corners and should use finish schedules that cure reliably in the space available.
Common failure points by project type
Why stools, tables, and shelves wobble or sag
Wobble starts with poor squaring and uneven leg length. Rack shows up when frames lack a back, stretcher, or diagonal resistance. Sag comes from weak spans, thin stock, or shelves loaded beyond what the design suggests. A rabbeted back on a bookcase can stiffen the whole case dramatically.
How outdoor projects fail from water traps, bad fasteners, or poor wood choice
Outdoor pieces fail fastest where water sits. Flat bottoms without drain gaps, end grain touching soil, and interior screws used outside all shorten service life. Softwood can work outdoors if the design sheds water well and the finish plan is realistic.
Where tearout, chip-out, and bad edges show up first
Plywood edges chip at crosscuts and exposed corners. Soft pine tears around knots and fuzzy grain. Small decorative pieces show sanding errors first because your eye sits close to the surface. That is why compact gift builds still need careful blade setup and fresh abrasives.
Clamp-up, blade settings, dust control, and finishing ventilation that matter most
Projects with many small parts need a dry-fit before glue. Narrow rabbets and half-laps need test cuts before final passes. Sheet goods create a lot of fine dust during cutting and sanding, so even a small project can need better cleanup than its size suggests. Painted or clear-coated projects need enough ventilation and drying area to keep dust out of the finish.
Frequently asked questions
How do I choose a woodworking project based on my skill level?
Choose a project that asks for one new skill, not four. If layout and square assembly are still shaky, avoid drawers, angled legs, or large tabletops. A good next build fits the current tool set, uses forgiving material, and has a clear plan with diagrams and a full cut list.
What are the best woodworking project ideas for beginners?
Best beginner picks include a crate, wall shelf, tool tote, step stool, tray, and entryway organizer. These projects keep part counts low, use basic joinery, and expose common errors early. They also work well in pine or plywood, which keeps material cost and waste under control.
What simple wood projects can I make with basic tools?
With a saw, drill, sander, clamps, and measuring tools, good choices are shelves, hook racks, trays, monitor risers, plant stands, clamp racks, sawhorses, and simple boxes. Favor projects with straight cuts and screw, glue, pocket-hole, or dowel joinery over curved or tightly fitted work.
What woodworking project ideas are good for kids?
Good kids projects use adult-prepared stock, hand sanding, glue, and limited drilling under supervision. Birdhouses, toy bins, painted signs, and low book ledges fit well. Avoid projects with heavy assemblies, pinch points, or unstable tall forms unless the plan is extremely clear and adult-led.
What woodworking project ideas make good gifts?
Projects that gift well are compact, durable, and quick to finish: trays, frames, bath caddies, desk organizers, coasters, and cutting boards. They also travel easily. For cleaner results, choose builds with few inside corners and surfaces that can be sanded fully before final assembly.
Where can I find free woodworking plans that are actually usable?
Free plans are usable when they include a cut list, materials list, step-by-step instructions, diagrams, and multiple views. Idea roundups can help generate options, but each plan still needs vetting. Reject anything with missing dimensions, vague joinery, or no clear order of operations before cutting wood. I also print or sketch the cut list first, because if I cannot follow the part logic on paper, I do not trust the plan at the bench.
Author experience and review method
I wrote this from the perspective of a woodworker who regularly chooses between tool-light builds, plywood casework, and simple solid-wood projects in limited space. My own project-selection habit is blunt: before I commit, I dry-run the build on paper, count clamps, note the longest board or panel I have to control safely, and decide whether the finish can cure cleanly in the workspace I actually have. If any of those checks fail, I switch projects.
For this article, I prioritized projects that meet at least four practical criteria: they can be built with common homeowner tools, they teach a visible skill, they fit into a small garage or apartment-adjacent workflow, and they have clear end use rather than being novelty builds. I also downgraded projects when they commonly hide difficulty in assembly squareness, tearout-prone sheet goods cuts, or finish prep.
If you want the shortest version of my selection rule, it is this: choose the project you can cut safely, assemble squarely, clamp adequately, and finish cleanly with the space and tools you already own.
Sources
- Fine Woodworking, educational articles and project-planning guidance on assembly sequence, dry-fitting, and milling accuracy.
- Popular Woodworking, woodworking technique guidance on beginner-friendly joinery such as rabbets and half-laps.
- The Wood Database, species reference information used for wood movement, hardness, and rot-resistance context.
- U.S. Consumer Product Safety Commission, basic workshop safety guidance for tool guarding, eye and hearing protection, and safer operation practices.
- Kreg Tool, educational content on pocket-hole joinery, build sequencing, and practical project construction.
Sponsored / affiliate links. As an Amazon Associate I earn from qualifying purchases. I may earn additional commission from eligible campaigns.