Can You Use Polyurethane On Painted Wood? Full Breakdown
What Is Polyurethane and Why Use It?
Polyurethane is a type of plastic coating. It’s super popular for wood finishing. Think of it as a tough shield for your wood.
It comes in different forms. You can get oil-based or water-based versions. Each has its own pros and cons.
Oil-based is often tougher. Water-based is easier to clean up. It dries faster too.
Most people use it to protect wood from water, scratches, and wear. It can also change the look of the wood. It might add a golden tint or make it look a bit darker.
Using polyurethane helps your finished wood items last longer. It stops everyday bumps and spills from damaging the surface. It can also make cleaning much easier.
A smooth, sealed surface wipes clean quickly. This is why it’s a go-to for furniture, floors, and cabinets.
Can You Use Polyurethane on Painted Wood?
Yes, you absolutely can use polyurethane on painted wood. It’s a common practice. But there are some important steps to follow.
If you just slap it on, you might run into problems. The key is good preparation. This ensures the polyurethane sticks well.
It also helps you get a smooth, even finish. A little care upfront saves a lot of headaches later.
The main goal is to create a surface the polyurethane can bond to. Paint can be smooth or textured. It can also have different finishes, like matte or glossy.
These factors affect how well the polyurethane adheres. Getting this part right is super important for a job that lasts.
Understanding the Paint Layer
Before we talk about applying polyurethane, let’s think about the paint itself. What kind of paint is on the wood? Is it latex paint?
Is it oil-based paint? Is it a spray paint? This matters.
Some paints are more durable than others. Some don’t stick as well to begin with. You also need to consider the condition of the paint.
Is it flaking or chipping? If it is, the polyurethane won’t help it stick. It will just peel off with the old paint.
A well-applied, solid coat of paint is essential. If the paint layer is weak, the polyurethane will fail. It might lift the paint.
It could also cause bubbles. This is not what anyone wants. So, always check the paint first.
Make sure it’s secure and in good shape.
The Importance of Surface Preparation
This is where many DIY projects go wrong. Proper prep work is the secret sauce. For polyurethane on painted wood, prep means more than just dusting.
You need to clean the surface really well. You need to smooth it out. And you need to make sure it’s dry.
Skipping these steps is like building a house without a foundation. It’s not going to stand up for long.
Think of it like getting ready for a big event. You wouldn’t just throw on any old clothes. You’d shower, groom, and pick out something nice.
Your painted wood deserves the same attention. This careful work makes a huge difference in the final look and how long it lasts. It shows you care about the outcome.
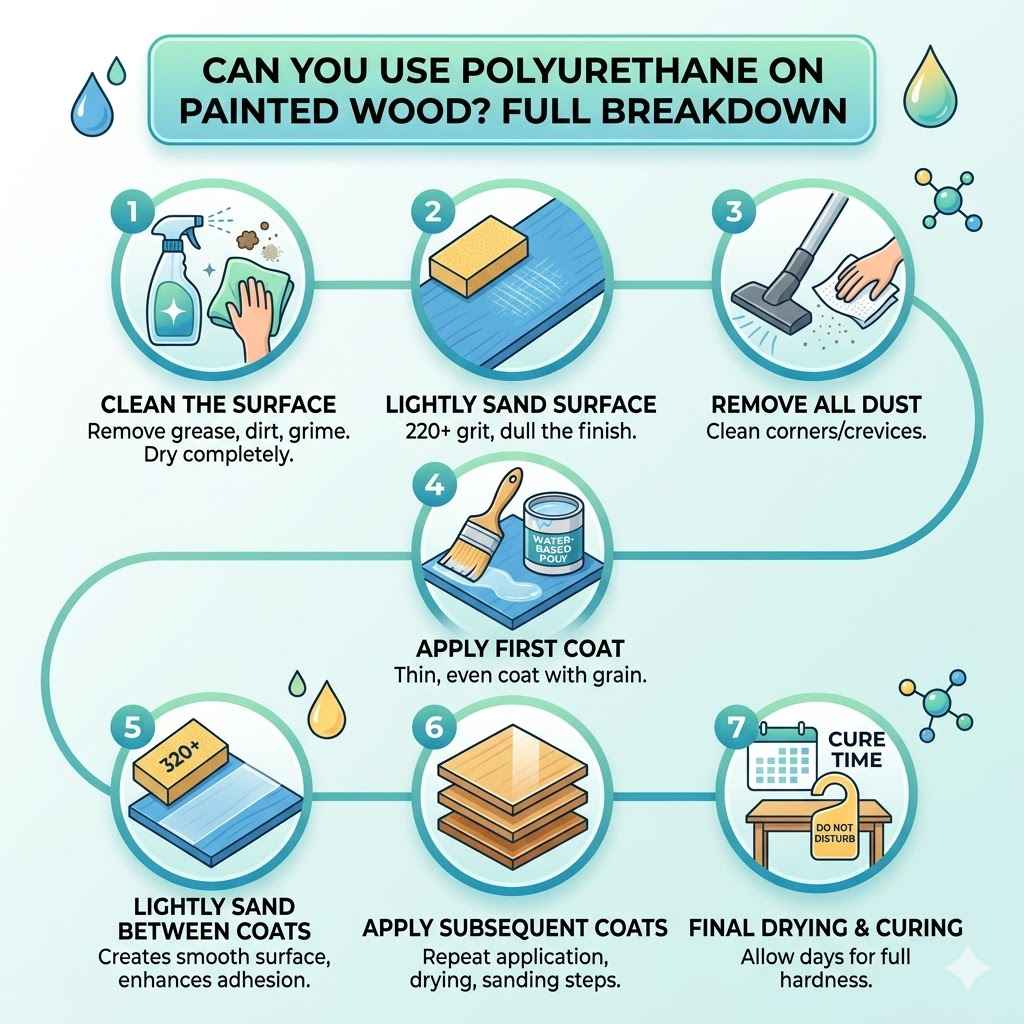
Step-by-Step Guide to Applying Polyurethane on Painted Wood
Let’s walk through how to do this the right way. It’s not super complicated. But each step is important.
Step 1: Clean the Surface Thoroughly
First, you need to get rid of all dirt, grease, and grime. Use a mild soap and water solution. A degreaser can also be very helpful.
If you’re working on something like a kitchen table, grease is a big problem. Wipe it down well. Then, rinse it with clean water.
Make sure no soap residue is left behind. Soap can prevent the polyurethane from sticking.
Allow the wood to dry completely. This might take a few hours. You can speed it up with a fan.
But avoid using heat guns. They can sometimes warp the wood. A damp cloth is not enough.
You need a truly clean surface. Imagine trying to glue two things together with dirt in between. It just won’t hold.
Step 2: Lightly Sand the Surface
This step is crucial for adhesion. Even if the paint looks smooth, it has a certain gloss. Polyurethane needs a slightly rough surface to grip.
Grab some fine-grit sandpaper. Look for something around 220 grit or higher. You don’t want to sand through the paint.
You just want to dull the finish. This is called “scuff sanding.”
Sand the entire area you plan to coat. Work in the direction of the wood grain if possible. It doesn’t need to take a lot of effort.
A few gentle passes should be enough. The goal is to create tiny scratches that the polyurethane can grab onto. Think of it like roughing up a surface before applying glue.
It creates tiny anchor points.
Step 3: Remove All Sanding Dust
After sanding, there will be a fine dust everywhere. This dust is the enemy of a smooth finish. You must remove it completely.
Start by vacuuming the surface. Use a brush attachment on your vacuum cleaner. Then, go over it again with a tack cloth.
A tack cloth is a sticky cloth that traps fine dust particles.
Be thorough. Get into corners and crevices. If you leave dust, it will get trapped under the polyurethane.
This will make your finish look lumpy and unprofessional. You might even see little bumps under the clear coat. A clean surface is key for a professional look.
Step 4: Apply the First Coat of Polyurethane
Now for the fun part! Choose your polyurethane. For painted wood, water-based poly is often a good choice.
It dries clear and doesn’t yellow like some oil-based ones can. It also has less odor. You’ll need a good quality brush or a foam applicator.
Avoid cheap chip brushes. They can leave bristles behind.
Stir the polyurethane gently. Do not shake it. Shaking creates air bubbles.
You don’t want those. Apply a thin, even coat. Work in one direction.
Go with the grain of the wood. Don’t try to overwork it or brush back and forth too much. This can cause streaks.
A thin coat is better than a thick one. You can always add more coats later.
Let the first coat dry completely. Check the product instructions for drying times. They can vary.
It usually takes a few hours. Make sure it’s not tacky to the touch. If it feels sticky, it needs more time.
Rushing this step will ruin your finish.
Step 5: Lightly Sand Between Coats
Yes, you need to sand again! This is for smoothing out any imperfections. It also helps the next coat stick better.
Use very fine-grit sandpaper, like 320 or 400 grit. Again, you’re not trying to remove the polyurethane. You’re just making the surface super smooth.
Sand lightly over the entire surface. Then, clean off all the dust with a tack cloth. This makes a big difference.
It creates a perfectly smooth canvas for the next layer. It’s like preparing a cake for frosting. You want it level and clean.
Step 6: Apply Subsequent Coats
Apply more thin, even coats. Repeat the process: apply, let dry, light sand, and clean dust. Most projects will need at least 2-3 coats.
Some might need more. A high-traffic surface like a tabletop might need 4-5 coats for maximum durability. Each coat builds on the last.
It creates a stronger, more protective layer.
Pay attention to how the finish looks as you add coats. The surface will become smoother and more uniform. The color of the paint might also deepen slightly, which can be a nice effect.
Don’t get discouraged if the first coat looks a bit splotchy. That’s normal. The later coats fill in the gaps and even everything out.
Step 7: Final Drying and Curing
After the last coat, let the piece dry thoroughly. This means it’s dry to the touch. But it’s not fully cured.
Curing is when the polyurethane reaches its maximum hardness. This can take several days, even up to a month for some types. Be gentle with the surface during this time.
Avoid placing heavy objects on it. Try not to slide things across it. Give it time to fully harden.
This ensures your hard work pays off with a durable finish that will last for years to come.
Quick Scan: Polyurethane Types for Painted Wood
Water-Based Polyurethane:
- Dries clear
- Low odor
- Fast drying
- Good for lighter paint colors
- Easy cleanup with soap and water
Oil-Based Polyurethane:
- Dries to a slight amber tint
- Stronger odor
- Slower drying
- Can yellow over time, especially on white paint
- More durable in some applications
- Cleanup with mineral spirits
When Is It NOT a Good Idea?
While polyurethane is generally safe for painted wood, there are times to pause. If the paint is old, brittle, or already peeling, poly won’t fix it. It will just peel off with the loose paint.
In this case, you’d need to remove the old paint first. Then prep the wood properly before painting and sealing.
Also, consider the type of paint. Some chalk paints or highly textured paints might require special sealers. Always check the paint manufacturer’s recommendations if you’re unsure.
For most standard latex or acrylic paints, the steps above should work well. But it’s always wise to do a small test patch first.
Testing Your Approach
Before you commit to coating your entire project, test your method. Find an inconspicuous spot. This could be the underside of a table or the back of a drawer.
Apply the polyurethane there according to the steps. Let it dry completely. Then check for any issues.
See how it looks. Does it adhere well? Does it affect the paint color in an undesirable way?
Is the finish smooth? This small test can save you from a big mistake on your main project. It gives you confidence in your technique.
Contrast: Normal Paint vs. Problem Paint
Normal Paint:
- Smooth, even finish
- No chipping or peeling
- Good adhesion to the wood
- Ready for scuff sanding and poly
Problem Paint:
- Chalky or dusty surface
- Peeling, flaking, or bubbling
- Weak adhesion
- Needs paint removal and re-priming
Choosing the Right Polyurethane for Your Project
The type of polyurethane you choose can impact the final look. Water-based poly is often preferred for painted surfaces. It dries clear and won’t change the color of your paint much.
This is great if you have white or pastel colors. It also dries faster, letting you finish your project sooner.
Oil-based poly offers a bit more durability. But it tends to give a warmer, slightly yellowish tint. This might not be ideal for all paint colors.
If you want a really classic, slightly aged look, oil-based might work. But for most modern finishes, water-based is the safer bet.
Consider the sheen too. Polyurethane comes in matte, satin, semi-gloss, and high-gloss finishes. Matte offers a very subtle, non-reflective look.
High-gloss is very shiny and modern. Satin and semi-gloss are popular middle grounds. They offer a nice balance of protection and subtle shine without being overly reflective.
Observation: How Polyurethane Enhances Paint
Initial State: Painted wood, susceptible to scratches and moisture.
Application: Thin, even coats applied after proper prep.
Drying: Each coat dries, creating a protective film.
Sanding Between Coats: Smoothes the surface for better adhesion and finish.
Multiple Coats: Build a strong, clear shield.
Final Result: Durable, protected painted wood with enhanced appearance.
My Own Experience with Painted Wood and Poly
I remember working on an old wooden rocking chair. It had been painted a lovely pale blue years ago. The paint was mostly intact, but it was starting to show wear.
Little chips were appearing around the arms and the base. I wanted to protect it and give it a smoother feel. I decided to try polyurethane.
I wasn’t sure if it would work well.
I cleaned it really well first. Then I took some fine sandpaper and lightly scuffed up the whole surface. It felt weird sanding painted wood!
But I trusted the process. After wiping away all the dust with a tack cloth, I nervously applied the first coat of water-based polyurethane. It went on okay.
It didn’t look amazing, but it wasn’t bad.
After it dried, I did that light sanding again. Then I applied a second coat. That’s when I started to see the magic.
The blue color seemed to deepen a little. The surface felt much smoother. I added a third coat.
By the end, the chair looked fantastic. It had a subtle sheen. The blue was richer.
And most importantly, it felt protected. No more worrying about every little scratch. That chair still looks great today, years later.
That experience taught me that good prep work makes all the difference.
What This Means for Your Projects
Applying polyurethane to painted wood is a great way to add durability and a professional look. It’s achievable for most DIYers. It extends the life of your painted items.
It also makes them easier to care for. You can wipe them down without worrying about damaging the paint.
When it’s normal: It’s normal for the paint color to look slightly richer or deeper. It’s also normal for the finish to have a slight sheen, depending on the poly you choose. You might notice a smoother feel to the surface.
When to worry: Worry if the polyurethane lifts the paint. Worry if you see bubbles forming as you apply it. Worry if the finish remains sticky after days of drying.
These are signs that something went wrong with the prep or application. You might need to remove the poly and start over.
Simple Checks Before You Start
Before you even open a can of polyurethane, do these checks:
- Paint Condition: Is the paint firmly attached? No peeling or chipping?
- Cleanliness: Is the surface free of dust, dirt, and grease?
- Smoothness: Are there any major bumps or rough spots in the paint?
- Test Area: Have you done a small test patch in an hidden area?
If any of these checks raise a red flag, address the issue first. Don’t try to cover up problems with polyurethane. It won’t work.
It will only make the problem worse or more visible.
Quick Fixes & Tips
For Bubbles: If you see bubbles, stop. Let it dry. Lightly sand them out.
Then reapply a thin coat.
For Streaks: If you have streaks, let it dry. Sand smooth and apply a thin, even coat, going with the grain.
For Stickiness: If it’s still sticky after 24 hours, it may not have cured properly. You might need to carefully remove it with mineral spirits (for oil-based) or denatured alcohol (for water-based) and reapply.
Ventilation: Always work in a well-ventilated area, especially with oil-based poly. Open windows and use fans.
Brush Care: Clean your brushes immediately after use. For water-based poly, use soap and water. For oil-based, use mineral spirits.
Frequently Asked Questions
Can I put polyurethane directly over new paint?
Yes, but make sure the paint is fully dry and cured. Some latex paints recommend waiting 72 hours. Check the paint can’s instructions.
Then follow the prep steps: clean, scuff sand, and remove dust before applying poly.
Will polyurethane change the color of my painted wood?
Water-based polyurethane dries clear and should not significantly change the color. Oil-based polyurethane can add a slight amber or yellowish tint, which might alter lighter colors like white or pastels. Test first if color is critical.
How many coats of polyurethane do I need on painted wood?
Most projects benefit from 2-3 coats. High-traffic items like tabletops or chairs might need 4-5 coats for maximum durability. Always sand and clean between each coat.
What is the best way to clean painted wood before applying polyurethane?
Clean the surface thoroughly with a mild soap and water solution or a degreaser. Rinse well to remove any residue. Ensure the wood is completely dry before proceeding with sanding.
Can I use polyurethane on chalk paint or milk paint?
Chalk paint and milk paint often have a matte, powdery finish. They usually require a specific wax or sealer. Applying polyurethane directly might react with the paint or lift it.
It’s best to follow the paint manufacturer’s instructions or use a specialized topcoat for these types of paints.
My painted wood feels rough after applying polyurethane. What happened?
This usually happens if dust was not completely removed between coats or if the sanding between coats wasn’t done properly. Make sure to use a tack cloth diligently after every sanding step.
Conclusion
So, to sum it up, using polyurethane on painted wood is definitely a good idea. It adds a protective layer that keeps your painted items looking great for longer. Just remember that preparation is key.
Clean, sand, and dust thoroughly. Apply thin, even coats, and be patient. With a little care, you can give your painted wood furniture a beautiful, durable finish.