Best Way to Cut a Circle in Wood: Simple Methods
Cutting a perfect circle in wood can seem tricky, especially when you’re just starting out. Many people wonder about the Best Way to Cut a Circle in Wood: Simple Methods because getting those smooth, round edges isn’t always straightforward. Don’t worry!
We’ll walk through some easy ways to get great results without any fuss. Get ready to learn how to make clean circles with simple tools and techniques.
Mastering Wood Circles Simple Techniques
Creating a circle in wood is a fundamental skill for many woodworking projects, from making decorative elements to functional items like tabletops or bases for lamps. While the concept sounds simple, achieving a precise and smooth circular cut can be a challenge for beginners. The tools and methods you choose significantly impact the final outcome.
This guide explores the Best Way to Cut a Circle in Wood: Simple Methods that anyone can use to get professional-looking results.
When you’re aiming for a circle, you’re not just making a cut; you’re aiming for consistency, smoothness, and accuracy. A wobbly or rough edge can ruin the look of your project. Fortunately, there are several reliable techniques, each suited to different tools and skill levels.
We’ll break down these methods so you can pick the one that works best for you and your available equipment.
Understanding Your Tools
Before you start cutting, it’s important to know which tools are most effective for creating circles in wood. The best method often depends on the size of the circle you need, the type of wood you’re working with, and the tools you have on hand. Some methods require specialized jigs, while others can be done with more common tools.
Using a Jigsaw with a Circle Cutting Jig
A jigsaw is a versatile power tool, and with a simple attachment, it becomes a circle-cutting champion. A circle cutting jig allows the jigsaw to pivot around a central point, creating a perfect circle as you move the saw.
- What you’ll need: Jigsaw, circle cutting jig for your jigsaw, tape measure, pencil, clamp, safety glasses, dust mask.
- How it works:
- First, determine the diameter of the circle you want to cut.
- Mark the center point of your desired circle on the wood.
- Attach the circle cutting jig to your jigsaw. Adjust the jig’s arm so that the blade is the correct distance from the pivot point to match your desired radius (half the diameter).
- Insert a pilot screw or nail into the center mark on your wood. This will be the pivot point for the jig.
- Position the jigsaw so the pivot point of the jig fits onto the screw or nail.
- Clamp the wood securely to your workbench.
- Put on your safety glasses and dust mask.
- Start the jigsaw and slowly rotate the saw around the pivot point, allowing the blade to cut the circle. Keep the jig centered on the pivot.
- Work at a steady pace to ensure a smooth cut.
This method is excellent for cutting circles of various sizes and offers a good balance of accuracy and ease of use for many woodworkers.
Using a Router with a Circle Cutting Jig
A router, especially when paired with a circle cutting jig, offers superior precision and a cleaner cut than a jigsaw for many applications. It’s ideal for creating smooth, furniture-quality circles.
- What you’ll need: Router, router circle cutting jig (many are universal or specific to router brands), straight router bit, tape measure, pencil, clamp, safety glasses, hearing protection, dust mask.
- How it works:
- Measure and mark the center of your circle on the wood.
- Set up the router circle cutting jig according to its instructions. This usually involves attaching an arm to the router’s base and setting the distance from the router bit to the pivot point.
- Insert a pilot screw or nail into the center mark of your wood.
- Place the router jig onto the wood, aligning the jig’s pivot with the center mark.
- Clamp the wood firmly.
- Install the correct router bit into your router.
- Put on all safety gear.
- With the router turned off, position the pivot on the screw.
- Turn on the router and begin to slowly rotate it around the pivot point. You might need to make multiple shallow passes to cut through thicker wood cleanly.
Routers generally produce a much cleaner edge than jigsaws, often requiring less sanding afterward. This is a go-to for those who want a high-quality finish.
Using a Scroll Saw
For smaller circles and intricate designs, a scroll saw is an excellent choice. Its fine blade allows for precise turning and detailed work, making it perfect for decorative elements.
- What you’ll need: Scroll saw, wood of appropriate thickness, pencil, tape measure, clamp, safety glasses, dust mask.
- How it works:
- Draw your circle clearly on the wood.
- Clamp the wood securely to the scroll saw’s table.
- Feed the wood into the blade at the edge of your circle.
- Slowly and carefully turn the wood as you guide it along the pencil line. The scroll saw blade is thin and flexible, allowing you to make tight turns.
- Keep the blade on your waste side of the line to maintain the exact circle size.
Scroll saws are less suitable for very large circles due to their limited throat depth but shine when precision on smaller pieces is key.
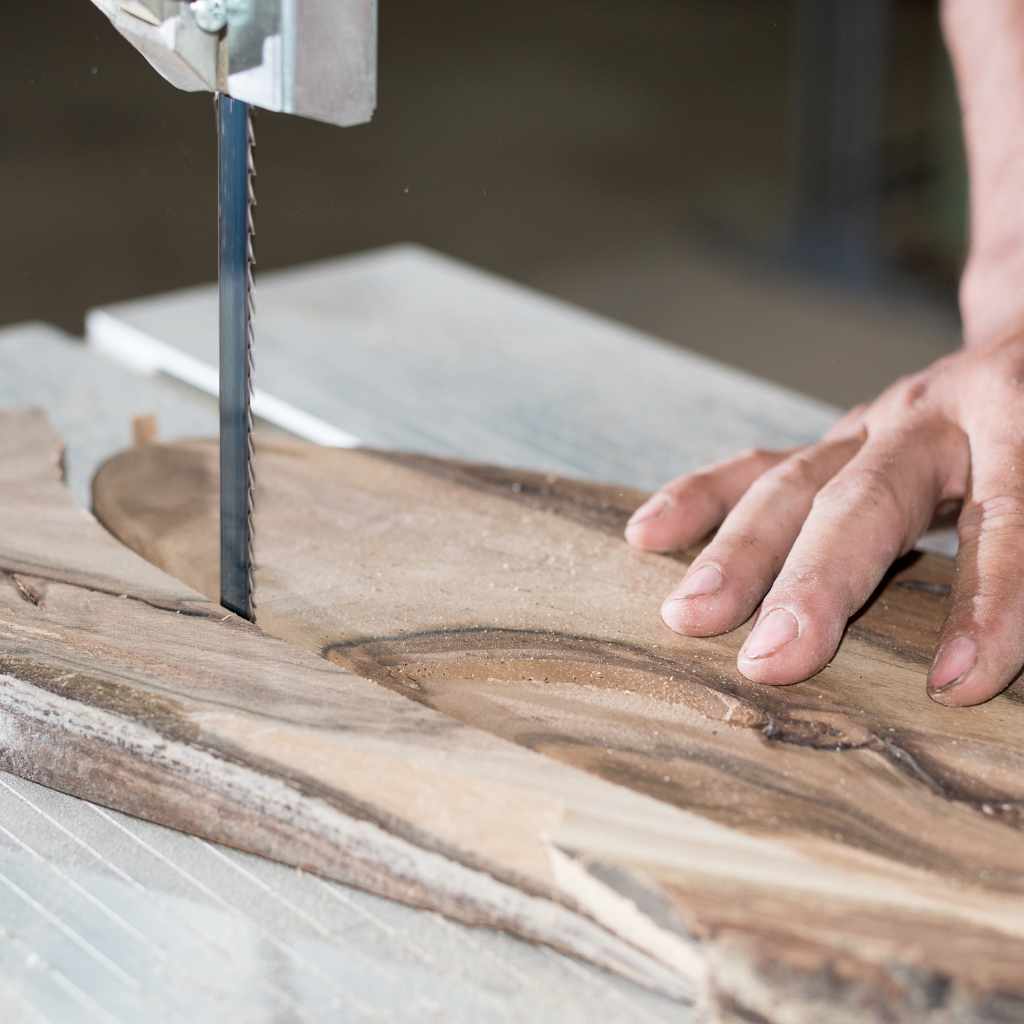
Using a Bandsaw with a Circle Cutting Jig
A bandsaw can also be used for cutting circles, especially larger ones, when equipped with a circle cutting jig. This method offers a good balance of speed and accuracy.
- What you’ll need: Bandsaw, bandsaw circle cutting jig, pencil, tape measure, clamp, safety glasses, dust mask.
- How it works:
- Mark your circle center and radius on the wood.
- Attach the circle cutting jig to your bandsaw, adjusting the arm to the correct radius.
- Use a temporary pin or screw in the center of your marked circle.
- Align the jig’s pivot with this center pin.
- Feed the wood into the blade, keeping the jig against the pivot point.
- Slowly rotate the wood around the pivot as the blade cuts the circle.
Bandsaws can cut thicker material and larger diameters than scroll saws, making them a good option for bigger projects.
The Compass and Jigsaw Method
For a simpler approach without a dedicated jig, you can adapt a compass and jigsaw combination. This is a practical method for medium-sized circles.
- What you’ll need: Jigsaw, pencil, tape measure, a long screw or nail, a piece of scrap wood, a drill and drill bit, a compass, clamp, safety glasses, dust mask.
- How it works:
- Determine the diameter of your circle and find the center point on your wood.
- On a piece of scrap wood, mark the center. Drill a small hole for your screw or nail.
- Measure the radius of your desired circle. On the scrap wood, measure out from the center hole by that radius.
- Drill a small pilot hole at this measured point on the scrap wood. This hole will hold your pencil.
- Place the scrap wood over the center mark on your project wood. Secure it with the screw or nail through the center hole into your project wood.
- Insert a pencil into the pilot hole you drilled on the scrap wood.
- Now, use the compass action to draw a perfect circle on your project wood.
- Remove the scrap wood.
- Drill a starter hole for your jigsaw blade inside the circle, near the edge.
- Insert the jigsaw blade into the starter hole.
- Carefully cut along the drawn line. You’ll need to keep the jigsaw moving smoothly around the circle.
- Once cut, remove the center screw/nail and fill the small holes if needed.
This DIY method is surprisingly effective and uses common tools you likely already have.
Using a Table Saw with a Circle Jig Attachment
While less common for freehand circles, a table saw can be used with a specialized circle jig for repeatable and accurate circular cuts, especially for larger diameters.
- What you’ll need: Table saw, table saw circle cutting jig, pencil, tape measure, clamp, safety glasses, hearing protection, dust mask.
- How it works:Mark the center and radius of your circle.
- Assemble the table saw circle jig according to its instructions. This jig typically involves a pivot point and an arm that guides the wood against the blade.
- Secure the wood to the jig’s base or using clamps as directed by the jig’s manual.
- Position the pivot of the jig onto the center mark of your wood.
- Turn on the table saw.
- Slowly rotate the wood against the blade using the jig to guide the cut.
This method offers a very stable and controlled way to cut circles, particularly useful for larger projects where a bandsaw or router might be less convenient.
Essential Tips for a Smooth Cut
Regardless of the method you choose, a few tips can help you achieve the best possible results when cutting circles in wood.
- Practice: If you’re new to cutting circles, practice on scrap wood first. This helps you get a feel for the tool and the process.
- Sharp Blades: Always use sharp blades or bits. A dull blade will tear the wood, resulting in a rough cut and making the process harder.
- Slow and Steady: Don’t rush the cut. A slower, controlled pace will give you a cleaner edge and more accuracy.
- Support Your Wood: Ensure the wood is well-supported and clamped down to prevent movement during the cut.
- Dust Collection: Wood dust can be hazardous. Always use a dust mask and consider connecting dust collection to your tools if possible.
- Sanding: Even the best cuts might need a little sanding to achieve a perfectly smooth finish. Start with a coarser grit sandpaper and move to finer grits.
Comparing Cutting Methods
Choosing the right tool and method depends on your project’s needs. Here’s a quick look at how some methods compare:
| Method | Best For | Pros | Cons |
|---|---|---|---|
| Jigsaw with Jig | Medium to large circles, general woodworking | Versatile, relatively easy to use | Can leave rougher edges, requires practice for smoothness |
| Router with Jig | Precise circles, furniture-quality edges | Very smooth cuts, excellent accuracy | Requires more setup, can be noisy |
| Scroll Saw | Small circles, intricate designs, detailed work | High precision for small pieces, good for curves | Limited by throat depth, not for large cuts |
| Bandsaw with Jig | Medium to large circles, thicker wood | Good for larger diameters, relatively fast | Requires a bandsaw, jig can be an extra cost |
| Compass & Jigsaw | DIY circles when no jig is available | Uses common tools, cost-effective | Can be less precise than dedicated jigs, requires careful technique |
Each of these methods offers a viable way to achieve the Best Way to Cut a Circle in Wood: Simple Methods, catering to different skill levels and tool availability.
Frequently Asked Questions
Question: What is the easiest way for a beginner to cut a circle in wood?
Answer: For absolute beginners, using a jigsaw with a circle cutting jig is often the easiest to learn. It provides a guided path and is more forgiving than freehand cutting.
Question: Can I cut a perfect circle without any special jigs?
Answer: Yes, it’s possible, but much harder. You can try drawing a precise circle and carefully cutting with a jigsaw or scroll saw, making very slow, controlled turns. The compass and jigsaw method is a good step up from freehand.
Question: How do I prevent tear-out when cutting circles?
Answer: Using a sharp blade, cutting on the waste side of your line, and using a backing strip of wood can help reduce tear-out. For routers, climb-cutting (opposite of normal feed direction) can sometimes help on the final pass, but this should only be done with caution and experience.
Question: What is the best way to cut a very large circle in wood?
Answer: For very large circles, a router with a long-reach circle cutting jig or a bandsaw with an extended jig are usually the best options. Some people also use a string and pencil to draw and then cut with a jigsaw, but accuracy can be harder to maintain.
Question: How much sanding is usually needed after cutting a circle?
Answer: This depends heavily on the tool and your technique. A router with a jig typically leaves a very clean edge needing minimal sanding. A jigsaw might require more work to smooth out any minor wobbles or saw marks, often starting with 80-grit sandpaper and moving up.
Final Thoughts
Cutting circles in wood is a skill that becomes easier with practice and the right approach. Whether you’re crafting a small decorative inlay or building a large tabletop, knowing the Best Way to Cut a Circle in Wood: Simple Methods gives you confidence. Remember that sharpness of your tools is key; dull blades make the job harder and the results worse.
Always prioritize safety by wearing your protective gear. Don’t be discouraged if your first attempts aren’t perfect; every woodworker learns by doing. Experiment with the methods discussed, find what works best with your tools and projects, and enjoy the process of creating smooth, precise circles in your woodworking endeavors.
Keep practicing, and you’ll be cutting perfect circles in no time, adding a professional touch to all your creations.