Built In Shelves Between Studs: Easy DIY Guide For Beginners
Building shelves between wall studs creates custom, built-in storage that looks professional. This method uses the existing space within your walls to add functional shelves without adding bulk to your room. It’s a great DIY project for beginners looking to add style and utility.
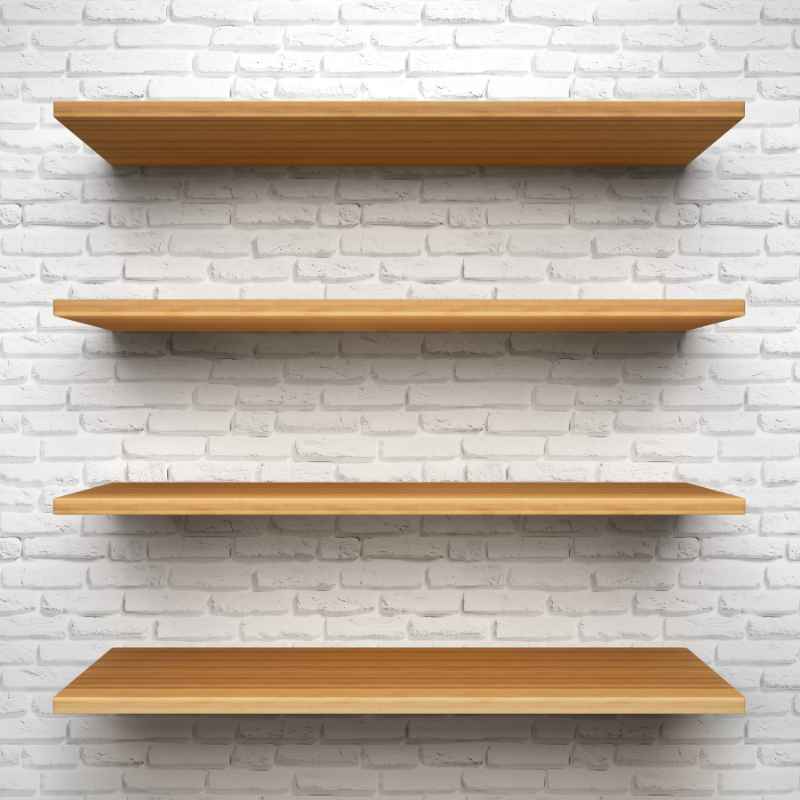
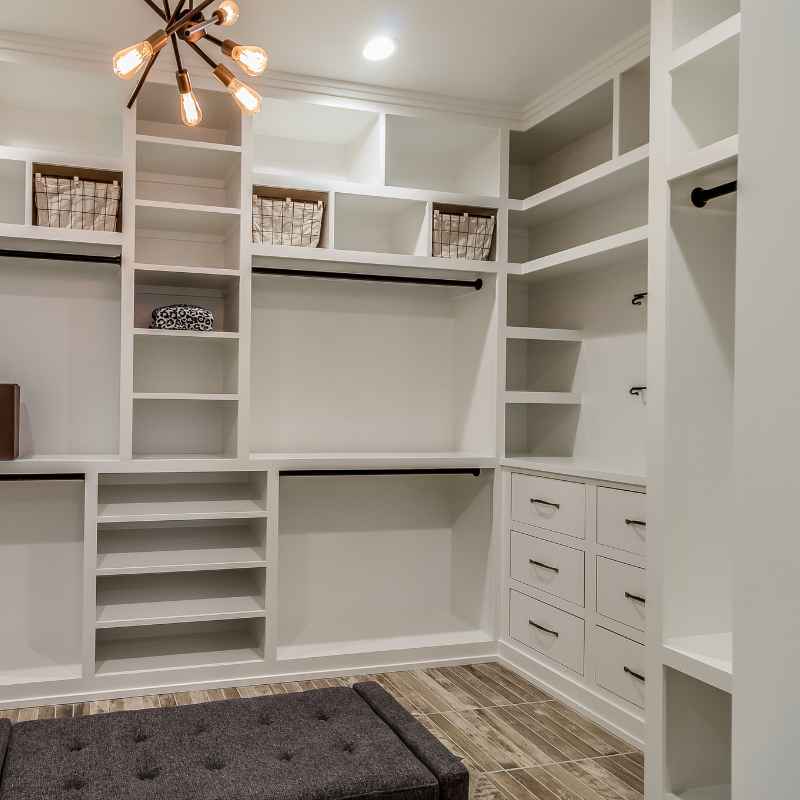
What Are Shelves Between Studs?
Shelves built between wall studs are basically hidden shelves. Your wall has empty space between the wooden beams, called studs. These studs give the wall its shape and support.
You can open up a section of drywall to access this space. Then, you build a shelf unit that fits snugly inside. This makes the shelf look like it’s part of the wall.
It’s not sticking out. This is why they are called “built-in” shelves. They feel like they came with the house.
Think of your wall as having a hollow middle. The studs are like vertical planks holding up the outside layers of drywall. Between these planks, there’s usually empty air.
This empty space is perfect for adding storage. You aren’t adding a big cabinet. You’re just using the space that’s already there.
This type of shelving is great for small items. Think books, photos, or decorative pieces. It’s also a good way to add a little extra space where you really need it.
Maybe in a hallway, a bedroom, or even a bathroom. The look is clean and modern. It can make a room feel bigger.
It also adds a touch of custom design to your home.
My First Attempt at Built-Ins
I remember staring at this one wall in my living room. It was just… there. A big, flat expanse.
I’d tried everything – a tall bookshelf, a console table with some plants. Nothing felt quite right. One evening, I was reading a home magazine and saw a picture of a room with these amazing built-in shelves.
They looked so seamless, like the wall was designed that way. My mind immediately went to that blank wall in my own place. Could I do that?
I had zero carpentry experience back then. Just a basic toolkit and a lot of ambition. I spent hours watching DIY videos.
I sketched out rough ideas on scrap paper. The first time I cut into drywall, my heart was pounding. What if I hit a wire?
What if the space wasn’t deep enough? It was a mix of excitement and pure terror. But slowly, piece by piece, it started to come together.
It wasn’t perfect, far from it. But seeing those books finally have a neat home, flush with the wall, felt like a huge accomplishment. That feeling stuck with me.
It showed me that even big projects are possible with patience.
Planning Your Stud Shelf Project
Measure Twice, Cut Once: Before you buy anything, measure the space where you want your shelves. Figure out how wide they should be. Most walls have studs spaced 16 or 24 inches apart.
This spacing will guide how many shelves you can fit. Also, check the depth. You need to know how deep your shelves can be.
This means measuring from the drywall to the inside of the opposite wall. Always leave a little wiggle room.
Sketch It Out: Draw a simple picture of your plan. Show where the shelves will go. How many will there be?
What size will each one be? This helps you visualize the final look. It also helps you figure out how much wood you need.
You don’t want to run out halfway through.
Consider the Load: Think about what you’ll put on these shelves. If it’s just light decorations, standard lumber is fine. If you plan to stack heavy books, you’ll need stronger wood.
You might also need extra support. Your plan should account for this. It’s better to build it strong from the start.
Getting Ready: Tools and Materials
To build shelves between studs, you’ll need a few key things. First, you need tools to cut and measure. A tape measure is essential.
A level will make sure your shelves are straight. You’ll also need a stud finder. This helps you locate the studs behind the wall.
A drywall saw or a utility knife is needed to cut the drywall. A pencil is good for marking lines. You’ll want a drill for screws.
Safety glasses are a must. Always protect your eyes.
For building the shelves themselves, you’ll need wood. Common choices are pine or plywood. You’ll need lumber for the shelf boards.
You might also need smaller wood pieces for framing or support. Screws are needed to hold everything together. Drywall screws are usually best for attaching to studs.
Wood glue can add extra strength. If you plan to paint or stain your shelves, get those supplies too. Primer and paint are good for a finished look.
Don’t forget about finishing touches. Sandpaper is important for smoothing rough edges. You might want wood filler to hide screw holes.
Caulk can seal any gaps between the shelf and the wall. This makes it look super clean and professional. Taking the time to gather everything makes the building process much smoother.
It’s like preparing for a big cooking project; having all your ingredients ready makes a difference.
Quick-Scan Tool List
- Tape Measure
- Level
- Stud Finder
- Drywall Saw or Utility Knife
- Pencil
- Drill
- Safety Glasses
- Screwdriver Bits
- Sandpaper
Step-by-Step: Building Your Shelves
First, locate the studs. Use your stud finder on the wall. Mark the edges of the studs where you want your shelf.
You’ll need to find at least two studs to create a shelf opening. The space between the studs will be the width of your shelf opening. Measure the height you want your shelf.
Then, draw a rectangle on the drywall. This box will be the area you cut out.
Next, carefully cut out the drywall along your lines. Be gentle so you don’t damage the wall too much. Once the drywall is out, you can see the space between the studs.
You can also see the insulation if there is any. You might want to clean out any loose bits of drywall or insulation. This gives you a nice, clear space to work with.
You can also check for wires or pipes. If you see any, stop and be very careful.
Now, it’s time to frame the opening. You’ll need to add wood pieces inside the wall. These pieces will attach to the sides of the studs.
They give you something to screw your shelf into. You can use small strips of wood for this. Cut them to fit between the studs.
They should be the same depth as your wall. Screw these strips into the sides of the studs. Make sure they are level.
This framing is important for support.
The next step is to add the shelf itself. You can use a piece of wood cut to size. It should fit snugly into the opening you created.
Make sure it’s level. Screw the shelf into the wood framing you just added. You might also screw up into the bottom of the shelf from the framing.
This makes it very strong. You can also add small pieces of wood underneath the shelf for extra support. These act like shelf brackets.
If you’re adding multiple shelves, repeat the process. Make sure each shelf is level. You can use a long level to check them all at once.
Once the shelves are in place, it’s time to finish the edges. You’ll need to put new drywall around the opening. Cut a piece of drywall to fit.
Screw it into the framing you added. Then, you’ll need to mud and tape the seams. This is like patching the wall.
This might sound like a lot of drywall work. But it’s key to making it look built-in. Once the mud is dry, sand it smooth.
You can then prime and paint the area. Try to match your existing wall color. Caulk can be used to fill small gaps.
This makes the shelf look like it grew there. It hides any small imperfections. The final look is worth the effort.
Material Selection Tips
Shelf Board Depth: Choose a wood thickness that matches your wall depth. A standard 1×6 or 1×8 board works well. If your wall is deeper, you might need to combine boards.
Or use a thicker piece of plywood.
Wood Type: Pine is affordable and easy to work with. Plywood offers strength and a smooth surface, especially for painted shelves. Hardwoods like oak are beautiful but cost more and are harder to cut.
Fasteners: Use drywall screws for attaching framing to studs. Use wood screws for joining shelf pieces. Ensure screw lengths are appropriate so they don’t poke through.
For finished shelves, consider pocket hole screws for hidden joints.
Real-World Context: Where and Why?
Building shelves between studs is fantastic for enhancing small spaces. Think about a narrow hallway. Instead of just being a walkway, it can become a display area.
You can put up a few shelves for family photos or small plants. It makes the space functional and more inviting. This is common in older homes where layouts are sometimes a bit awkward.
Another great spot is a bedroom. Especially near a bed. You can create a built-in nightstand or a small book nook.
This frees up floor space. It’s also perfect for kids’ rooms. You can make shelves for toys or books that are at their level.
This helps keep things tidy without taking up valuable room for play. I’ve seen this done in nurseries too, for baby books and knick-knacks.
In a living room, these shelves can break up a large, blank wall. They add architectural interest. You can put art, candles, or your favorite books there.
It feels more custom than a freestanding bookshelf. In a kitchen, they can hold spices or small decorative items. Or in a home office, for displaying awards or organizational bins.
The key is that they are shallow, so they don’t stick out too far into the room. They blend in.
The design of these shelves often follows the existing structure. The studs dictate the width of each shelf bay. The height is up to you.
This flexibility is why they are so popular. You’re working with your home’s structure, not against it. It’s an intelligent way to use space.
Especially in apartments or smaller houses where every inch counts.
Contrast Matrix: Myth vs. Reality
| Myth | Reality |
| Building shelves between studs is too hard for a beginner. | With clear steps and patience, it’s a manageable beginner project. |
| You need a lot of expensive tools. | Basic tools like a drill, saw, and level are usually enough. |
| The finished shelves will look shaky and weak. | Proper framing and fastening create strong, stable shelves. |
| It’s impossible to make them look professional. | Careful finishing with drywall, mud, and paint creates a seamless, built-in look. |
What This Means for You
So, what does all this mean for your home? It means you have an opportunity. An opportunity to add practical storage.
An opportunity to improve your home’s look. For many people, it’s a way to tackle clutter. Instead of having things piled on tables, they have a neat place.
It can also make a room feel more finished. A wall with built-in shelves looks intentional. It looks like a design choice.
When is this normal? It’s normal when the shelves are securely attached. They should feel solid when you touch them.
If you tap on them, they shouldn’t wobble. They should be able to hold the weight you put on them. For most decorative items or books, this means they are perfectly fine.
The key is that they are built to last.
When should you worry? You should worry if the shelves feel loose. If they sag in the middle, that’s a sign they need more support.
If you notice any cracking or damage to the drywall around them, check the connections. Also, if you accidentally hit a wire or pipe while cutting, that’s a serious issue. Always be mindful of what’s inside your walls.
If you’re unsure about electrical or plumbing, it’s best to get professional advice.
Simple checks are easy to do. Gently push on the shelves. See if they move.
Place a few items on them and see how they feel. If you notice any issues, it’s better to fix them early. This might mean adding more screws or reinforcing the framing.
For most DIY projects, these shelves are very safe. They are a fantastic addition when done right.
Simple Shelf Checks
- Stability Test: Gently push down on the front edge of the shelf. It should not move or flex significantly.
- Weight Bearing: Place a few heavier books or items. Watch for any sagging or creaking sounds.
- Visual Inspection: Look for any cracks in the paint or drywall around the shelf edges. This might indicate movement.
- Attachment Points: If possible, check that screws are firmly holding the shelf to the framing.
Tips for a Professional Finish
Want your shelves to look like they were professionally installed? It all comes down to the finishing touches. After you’ve installed the shelves and framed the opening, you’ll be patching drywall.
This is where patience pays off. Apply thin coats of drywall mud. Let each coat dry completely.
Sand lightly between coats. This creates a smooth surface. It hides the new drywall seams.
When it’s time to paint, use a good quality primer. This seals the drywall mud and creates a uniform base. Then, apply two coats of your chosen paint color.
Try to match your wall color exactly. Use a small roller for a smooth finish. For a truly seamless look, use caulk.
Apply a thin bead of paintable caulk where the shelf meets the wall. This fills any tiny gaps. Once painted, it looks like the wall and shelf are one piece.
Consider the edges of your shelves. If you used solid wood, you can round the edges slightly with sandpaper. This makes them softer to the touch.
For plywood, you might want to use edge banding. This covers the exposed layers of plywood and gives a cleaner look. If you plan to stain the wood, use a pre-stain conditioner first.
This helps the stain go on evenly.
The goal is to make the transition from wall to shelf invisible. It should look intentional and clean. Every step, from cutting the drywall precisely to applying the final coat of paint, matters.
These details elevate the project. They turn a DIY job into a custom feature. It’s the difference between a “homemade” look and a “designed” look.
Enhancement Ideas
- Accent Lighting: Install small LED strip lights under the shelves for a dramatic effect.
- Wallpaper Backing: Line the back of the shelves with decorative wallpaper for a pop of color.
- Custom Insets: If you have the skill, create unique shapes or cut-outs within the shelf boards.
- Floating Shelf Look: For a more advanced project, use hidden brackets to create a “floating” shelf effect.
Frequently Asked Questions
How deep can shelves between studs be?
The depth of shelves between studs is limited by the thickness of your walls. Standard interior walls are about 3.5 to 4 inches deep (the width of a 2×4 stud). So, you can typically build shelves that are about 3 to 3.5 inches deep.
If your wall has thicker insulation or framing, the depth might be less.
What kind of wood is best for built-in shelves?
Pine is a popular choice for beginners because it’s affordable and easy to cut and finish. Plywood, especially a good-quality birch or sanded pine plywood, is also excellent. It offers a smooth surface for painting and is very stable.
For a more premium look, you could use hardwoods like oak, but they are more expensive and harder to work with.
Do I need to worry about electrical wires or plumbing?
Yes, this is a very important safety concern. Always use a stud finder that can detect live electrical wires and pipes. If you are unsure, or if your stud finder indicates potential hazards, it’s best to consult a qualified electrician or plumber before cutting into the wall.
Sometimes, you might need to adjust your shelf placement to avoid these.
How do I make the shelves strong enough for books?
To make shelves strong enough for books, ensure you attach them securely to the studs or framing within the wall. Use wood screws that are long enough to go through your shelf material and into the solid framing. If your shelves are wide (over 24 inches), you might need to add small support pieces underneath, or use a thicker piece of wood for the shelf itself.
Can I do this project if I have plaster walls?
Yes, you can build shelves between studs in plaster walls. However, plaster can be more brittle and prone to cracking than drywall. You’ll need to be extra careful when cutting.
Using a fine-tooth blade and scoring the plaster first can help. You may also need to use more joint compound and tape when finishing to get a smooth blend.
What if the studs are not perfectly straight or spaced evenly?
Walls are rarely perfectly straight. If your studs are slightly uneven, you can use shims behind your framing pieces to level them. For spacing, measure carefully.
You might need to slightly adjust the size of your opening or the framing pieces to make everything fit. A bit of creative problem-solving is often needed in DIY.
Final Thoughts
Building shelves between studs is a fantastic project. It’s a way to get custom storage without a huge expense. It adds a unique touch to your home.
You can make your walls work harder for you. With a little planning and effort, you can create beautiful, useful shelves. These shelves will serve you well for years to come.
Enjoy your new space!