Do You Sand After Staining Before Poly? Yes, Here’S Why
It’s a question many DIYers and woodworkers grapple with. You’ve just finished staining your piece. The color looks amazing.
You’re eager to protect it. But then you pause. Do you need to sand again?
Especially before that final protective layer of polyurethane? It feels like an extra step. And who doesn’t want to save time?
But skipping this step can lead to a finish that isn’t as smooth or durable as you’d hoped. Let’s break down why sanding after staining is often a good idea, and when it makes the most sense.
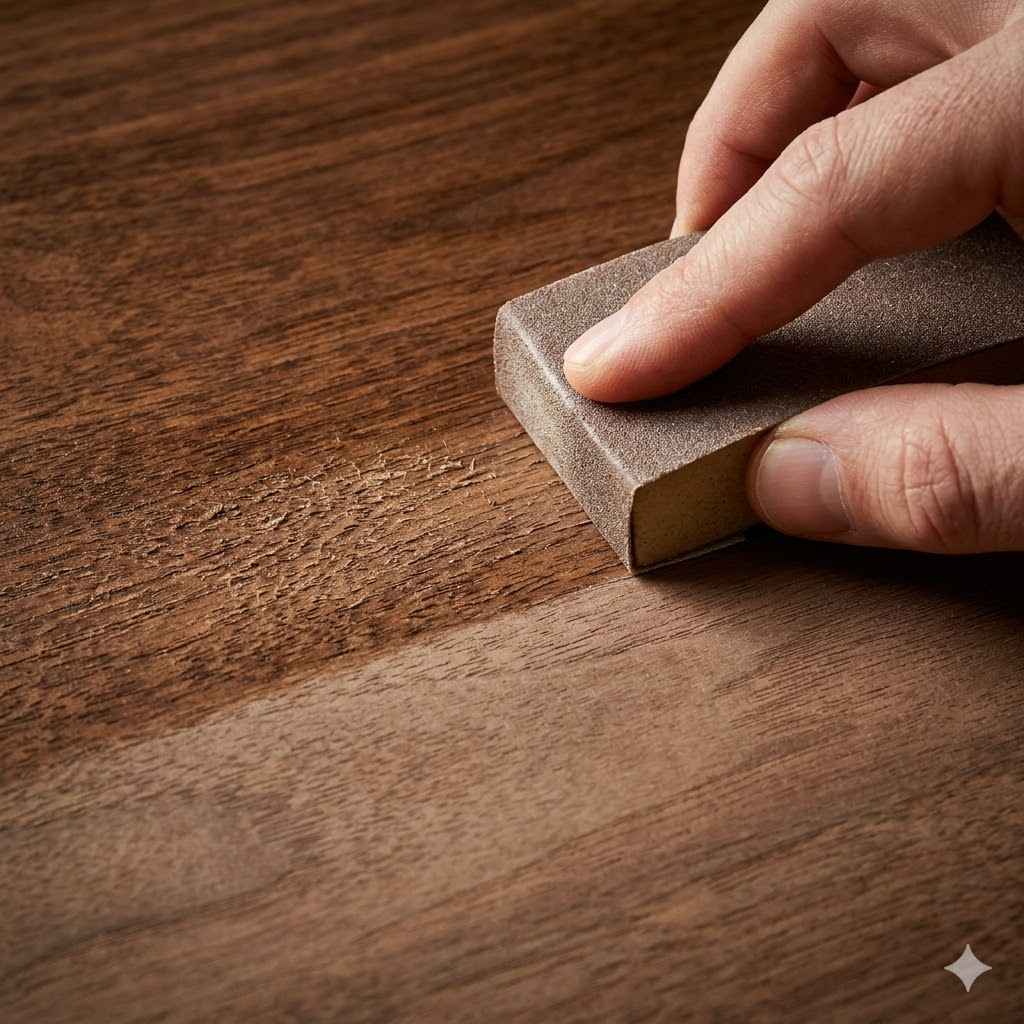
Yes, you often need to lightly sand after staining before applying polyurethane. This step, called ‘scuff sanding,’ removes raised grain and any dust or imperfections. It helps the polyurethane adhere better and creates a smoother final finish.
The Why Behind Sanding After Staining
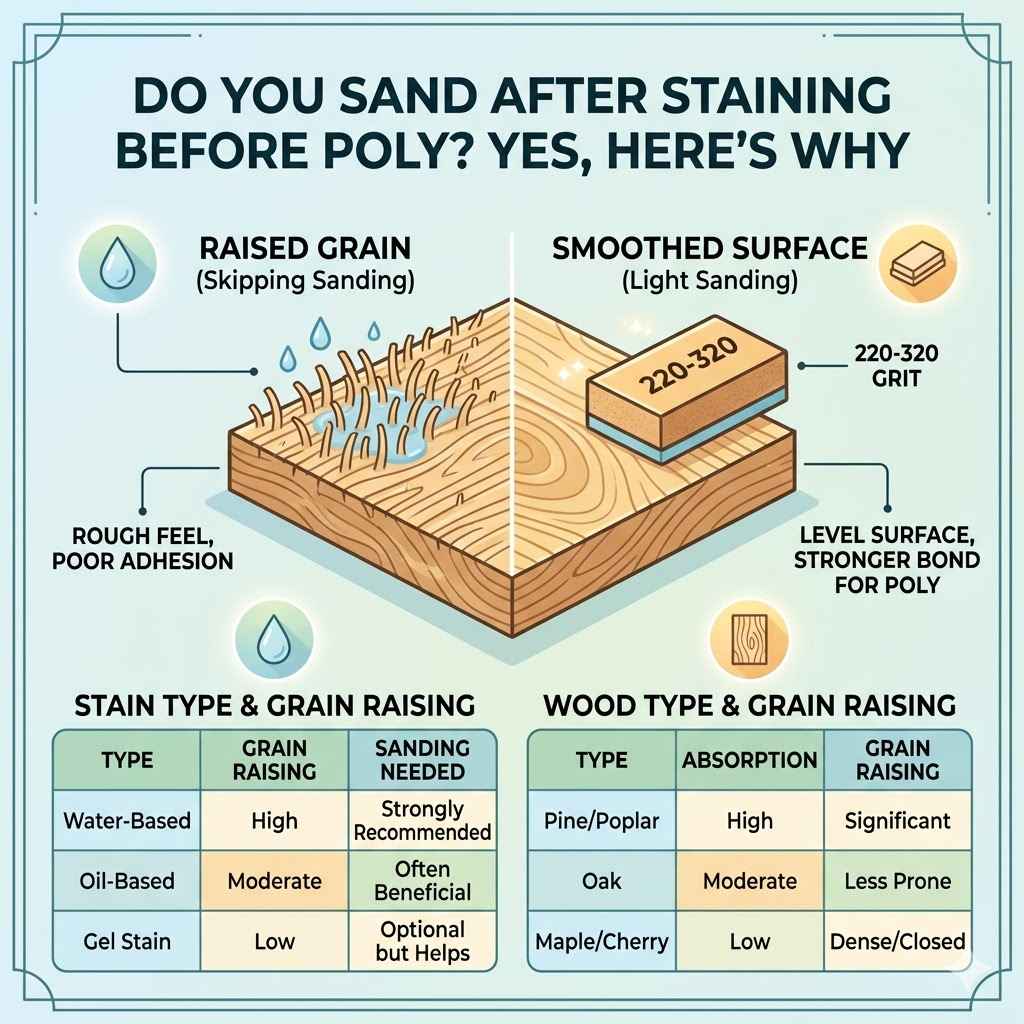
So, why does this extra sanding make such a difference? It all comes down to the wood itself and how stains and finishes interact with it. When you apply wood stain, it soaks into the wood fibers. But sometimes, the moisture in the stain causes the wood fibers to swell and stand up. This is called “raising the grain.”
If you don’t address this raised grain, it will feel rough to the touch. It can also show up visually, making your finish look less professional. This is where light sanding comes in. It’s not about removing the stain. It’s about leveling those raised fibers.
Think of it like preparing a wall for paint. You wouldn’t just slap paint over a bumpy, unprimed surface and expect it to look good, right? Wood finishing is similar. Each layer needs a good foundation.
What is “Raising the Grain”?
When wood gets wet, its cells expand. This is natural. After you stain, the water content in the stain causes these wood cells to swell. As they swell, the tiny fibers on the wood’s surface can lift up. This makes the wood feel rough. Softwoods like pine are more prone to raising their grain than hardwoods like oak.
How Stain Affects Wood
Stains are designed to color the wood. Some stains are oil-based, and some are water-based. Water-based stains tend to raise the grain more because water is the primary agent causing swelling. Oil-based stains have less water. They can still cause some swelling, but often to a lesser degree.
The stain itself doesn’t remove any wood. It just adds color. So, when you sand after staining, you’re not taking away your hard work. You’re just making the surface ready for the next step.
My Own Little Woodworking Oopsie
I remember this one project vividly. It was a small bookshelf for my daughter’s room. I’d found this beautiful piece of cherry wood. I stained it a deep, rich color. I was so pleased with how even the color looked. I was ready for the poly. I grabbed my brush and started applying.
But as I worked, I noticed it. A slight roughness under my fingertips. I’d forgotten to do that crucial light sand after staining. I’d been so focused on getting that perfect stain color, I rushed the drying time and jumped ahead.
Panic set in. I’d already applied one coat of poly. It wasn’t awful, but I knew it could be so much better. I had to sand off the poly. Then, I had to sand the stained wood. It was a disheartening feeling. I felt a bit foolish. It added hours to my project. But that mistake taught me a valuable lesson. Sometimes, taking that extra minute really pays off. The final bookshelf ended up smooth and beautiful. But I never forgot that initial rough feeling.
When is Sanding After Staining Most Important?
There are times when this step is almost non-negotiable. It’s especially critical if you’re using water-based stains. These types of stains are notorious for raising the grain significantly. If you skip sanding, you’ll definitely feel and see the difference.
Also, consider the type of wood you are using. Pine, poplar, and other softwoods will swell and raise their grain much more than hardwoods like maple or walnut. If you’re working with a softwood, plan on doing a light sanding after staining.
The type of finish you plan to use also matters. Some finishes might be more forgiving. But polyurethane, especially oil-based or water-based varieties, really benefits from a smooth surface to adhere to.
Understanding Different Stains
Oil-based stains use mineral spirits or naphtha as a solvent. They penetrate the wood and add color. They generally raise the grain less than water-based stains.
Water-based stains use water as the solvent. This means the wood fibers swell more readily. They often offer brighter colors and faster drying times. But that grain raising is a common side effect.
Gel stains are another option. They sit more on the surface rather than soaking in deeply. They usually cause less grain raising.
Wood Types Matter
Pine: Very soft, absorbs stain readily, and its grain raises a lot.
Poplar: Also a softwood, similar issues to pine.
Oak: A hardwood with an open grain structure. It can raise but is generally less prone than softwoods.
Maple: A hardwood with a dense, closed grain. It typically raises the least.
Cherry: A beautiful hardwood that can be prone to grain raising, especially in humid conditions.
Quick Stain & Grain Raising Guide
Water-Based Stains: Higher chance of significant grain raising. Sanding is strongly recommended.
Oil-Based Stains: Moderate grain raising. Light sanding is often beneficial.
Gel Stains: Low grain raising. Sanding may not be necessary but can still help with smoothness.
Softwoods (Pine, Poplar): Expect more grain raising. Always consider sanding.
Hardwoods (Oak, Maple): Less grain raising. Sanding is helpful but might be less critical.
How to Properly Sand After Staining
The key here is “lightly.” You’re not trying to remove the stain or smooth out major imperfections in the wood itself. You’re just knocking down the raised fibers.
You’ll want to use a fine-grit sandpaper. Something like 220-grit or even 320-grit is perfect. You can use sandpaper by hand or with a sanding block. A sanding block helps ensure you apply even pressure.
Always sand in the direction of the wood grain. This is super important to avoid scratching the surface. Apply gentle pressure. You should be able to feel the difference. The surface will go from slightly rough to smooth.
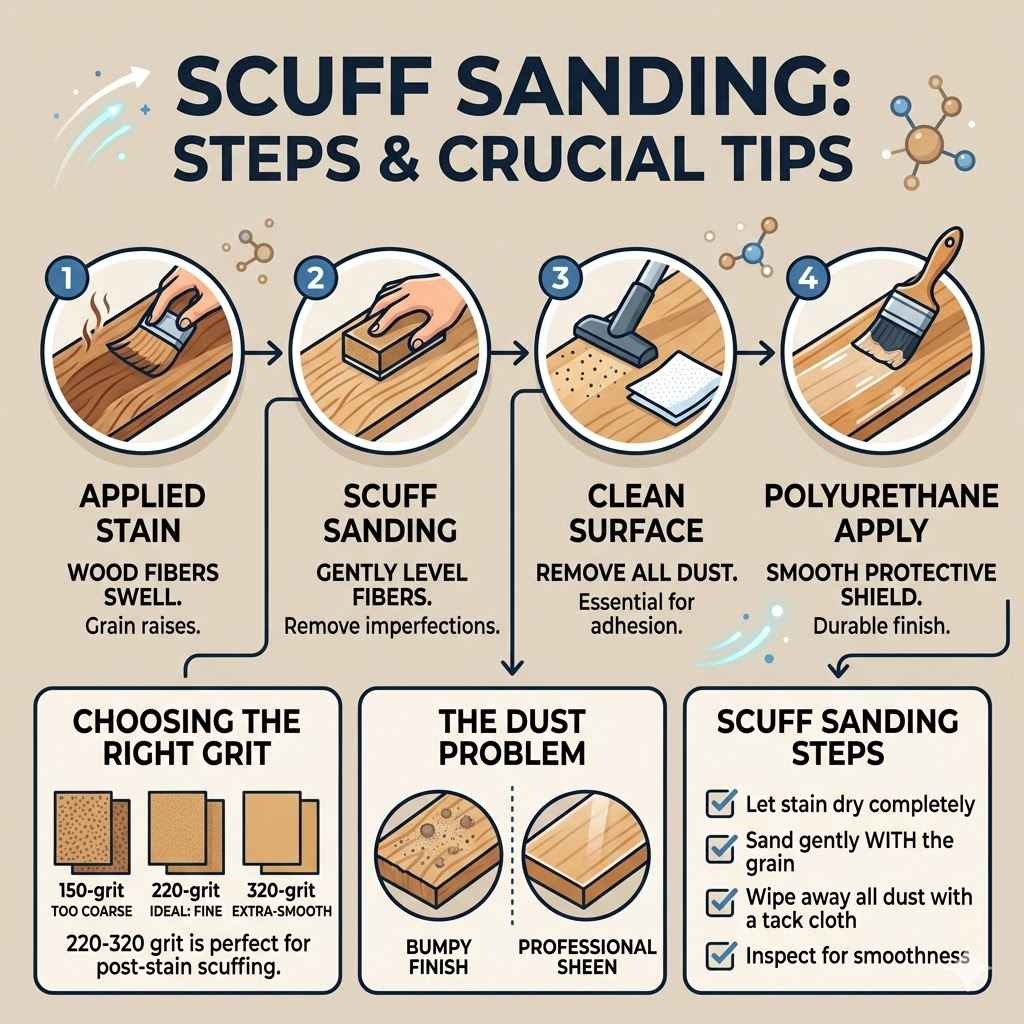
After sanding, you must clean up the dust. Use a tack cloth or a vacuum with a brush attachment. Any dust left behind will get trapped in your poly finish. This will make it look bumpy and unprofessional.
Choosing the Right Grit
220-grit: A good starting point for most projects. It’s fine enough to remove the raised grain without being too aggressive.
320-grit: Even finer. Use this if you want an extra-smooth surface or if the 220-grit seems a little too much for your wood.
Avoid coarser grits: Anything below 180-grit is too rough. It can scratch the stain and even the wood.
The Dust Problem
Dust is the enemy of a smooth finish. Tiny particles can settle into your wet poly. This creates little bumps or “nibs.”
Tack Cloth: These sticky cloths are designed to pick up fine dust. Wipe the surface gently.
Vacuum Brush: Use a soft brush attachment on your shop vac. Get into corners and along edges.
Compressed Air: If you have it, a blast of compressed air can clear the surface. Follow up with a tack cloth.
Scuff Sanding Steps
- Let stain dry completely.
- Choose fine-grit sandpaper (220-320 grit).
- Sand gently, always with the wood grain.
- Wipe away all dust with a tack cloth.
- Inspect for smoothness.
Alternatives and When to Skip Sanding
Sometimes, you might be able to skip this specific sanding step. If you pre-condition your wood before staining, it can help reduce grain raising. A pre-conditioner helps the stain soak in more evenly. This can minimize the swelling effect.
Also, if you’re using a stain that you know doesn’t raise grain much (like some oil-based or gel stains), and you’ve used a very dry application method, you might get away without sanding.
Another approach is to “wet-sand” the stain. This is done by applying the stain, letting it sit for a short time, then wiping it off with a rag soaked in mineral spirits (for oil-based stains) or water (for water-based stains). This can help remove some of the raised fibers as you wipe.
However, even in these cases, a very light scuff sand after the stain is fully dry can still improve adhesion for the poly. It’s about making sure that first coat of poly has the best possible surface to bond with.
Pre-Conditioning Your Wood
A wood conditioner is a liquid that you apply before staining. It seals some of the wood’s pores. This helps the stain penetrate more uniformly. It means less chance of blotchiness. It also helps reduce how much the grain raises.
“Wipe-Off” Stain Technique
Instead of letting stain soak in deeply, you apply it and then wipe most of it off after a few minutes. This leaves color in the pores but less on the surface fibers, which can reduce swelling.
When You Might Skip Sanding (Use Caution!)
- Using a gel stain on hardwood.
- Wood has been thoroughly pre-conditioned.
- Using an oil-based stain and wiping off almost all excess.
- The wood surface feels perfectly smooth after the stain is dry.
Always test first!
What Happens If You Don’t Sand?
If you skip this step, the most common issue is a rough, uneven feel to your finished surface. The polyurethane will be bonding to those raised wood fibers. This can make the finish feel slightly gritty.
It can also affect the durability of your finish. The poly might not adhere as well to the uneven surface. Over time, this can lead to the finish chipping or peeling in areas. This is especially true in high-traffic areas or places that get a lot of moisture.
You might also notice a duller appearance. The light can catch those raised fibers differently. This can make the finish look less lustrous than it would on a perfectly smooth surface.
In some cases, you might see the raised grain more prominently after the first coat of poly. It can look a bit like a fine sandpaper texture. This is disappointing when you’re aiming for a glassy-smooth finish.
Visualizing the Problem
Imagine a tiny forest of wood fibers sticking up. When you put a layer of liquid over it, some of those fibers might get bent over. Others might stay upright. The top layer of poly is then sitting on a bumpy landscape. It’s not a flat, solid surface for the next coat to build upon.
Potential Outcomes of Skipping Sanding
- Rough or gritty feel.
- Reduced adhesion of the topcoat.
- Finish may wear out faster.
- Less attractive, less lustrous appearance.
- Visible raised grain after finishing.
Preparing for Polyurethane Application
Once you’ve sanded after staining and cleaned up all the dust, you’re ready for the next step: applying polyurethane. It’s essential to ensure your surface is perfectly clean. Any remaining dust or debris will ruin your finish.
When applying polyurethane, use a good quality brush or foam applicator. Work in thin, even coats. Avoid over-brushing. Apply in the direction of the wood grain. Allow each coat to dry thoroughly according to the manufacturer’s instructions.
Between coats of polyurethane, you will likely want to do another light sanding. This time, you’ll use an even finer grit, like 320 or 400-grit sandpaper. This is called “scuff sanding” between coats. It knocks down any dust nibs that may have appeared. It also provides a slightly rougher surface for the next coat to adhere to, building a stronger, smoother finish. Again, clean all dust thoroughly after this sanding step.
Applying Polyurethane
Thin Coats: Multiple thin coats are better than one thick coat.
Even Application: Avoid drips or pooling.
Direction: Always brush with the wood grain.
Ventilation: Work in a well-ventilated area.
Sanding Between Poly Coats
This is a different type of sanding. It’s about smoothing the poly itself.
Grit: 320-400 grit is ideal.
Purpose: Removes dust nibs, slight imperfections.
Adhesion: Creates a better bond for the next coat.
Dust Removal: Crucial after this sanding too.
Real-World Scenarios and Considerations
Let’s think about where this matters most. If you’re refinishing an old, solid wood dining table, you want it to be durable and smooth. The surface will see a lot of use. Skipping the sand after stain could lead to a finish that feels rough under your elbows or is prone to damage.
In contrast, if you’re staining a small craft project, like a wooden jewelry box, and you’re not overly concerned about a perfectly glass-like finish, you might be able to get away with skipping it, especially if you used a hardwood and an oil-based stain.
Consider the environment where the finished piece will live. A piece in a high-humidity bathroom might need an extra robust finish. A piece in a dry bedroom might be more forgiving.
Project Type Matters
High-Use Items (Tables, Chairs, Floors): Extra care is needed. Sanding after stain is crucial for durability.
Decorative Items (Picture Frames, Small Boxes): Might allow for a bit more flexibility, but smoothness is still desirable.
Outdoor Furniture: Requires specialized finishes, but the principle of a good surface still applies.
Environmental Factors
Humidity: High humidity can cause wood to swell more. This means more grain raising.
Temperature: Extreme temperatures can affect how stains and finishes cure.
Airflow: Good airflow helps finishes dry properly.
What This Means for Your Project
So, what’s the takeaway? For most wood finishing projects where you want a smooth, professional-looking, and durable result, it is highly recommended to do a light sanding after staining and before applying your first coat of polyurethane.
Think of it as a small investment of time for a significant improvement in the final outcome. It prevents potential headaches down the line. It ensures your hard work on staining doesn’t get marred by a rough or uneven protective layer.
When in doubt, test on a scrap piece of the same wood. Stain it, let it dry, then try applying poly with and without sanding. You’ll see and feel the difference. This will give you confidence in your approach for your actual project.
When to Be Extra Careful
When using water-based stains.
When working with softwoods.
When aiming for a high-gloss finish.
For any project where durability is paramount.
When You Might Be Okay Skipping (with caution!)
Using a gel stain on dense hardwoods.
The wood has been pre-conditioned and stained with minimal excess.
You are okay with a slightly less polished feel.
Quick Tips for a Smooth Finish
Always Test First: Use scrap wood to practice your staining and sanding technique.
Let Stain Dry: Give the stain ample time to dry completely before sanding. Rushing this can cause issues.
Gentle Pressure: You’re not trying to remove stain. Just smooth the fibers.
Cleanliness is Key: Dust is your biggest enemy. Clean thoroughly after every sanding step.
Quality Materials: Use good quality stains, sandpaper, and finishes. They make a difference.
Smooth Finish Checklist
Stain Dry? Yes
Grain Raised? Likely
Sanding After Stain? Recommended (220-320 grit)
Dust Cleaned? Absolutely
Poly Applied Thin? Yes
Sanding Between Poly Coats? Recommended (320-400 grit)
Dust Cleaned Again? Yes
Frequently Asked Questions
Do I need to sand after staining if I used an oil-based stain?
It’s still a good idea to lightly sand after using an oil-based stain. While they tend to raise the grain less than water-based stains, some swelling can still occur. A quick scuff with 220-grit sandpaper will help ensure a smooth surface for your polyurethane to adhere to, leading to a better final finish.
Can I use the same sandpaper for sanding after staining and sanding between poly coats?
No, you should use different grits. For sanding after staining, a 220-grit or 320-grit sandpaper is usually appropriate. For sanding between coats of polyurethane, you want to use a finer grit, such as 320-grit or 400-grit, to smooth the finish itself without removing too much material.
How long should I wait for the stain to dry before sanding?
You should wait until the stain is completely dry to the touch. This usually takes at least 24 hours, but it can depend on the type of stain, humidity, and temperature. Check the manufacturer’s instructions for their specific drying time recommendations.
Sanding too early can lift the stain or create a gummy mess.
What if I see dust after wiping with a tack cloth?
If you still see dust, try wiping again with the tack cloth. Ensure you are using a clean part of the cloth. Sometimes, using a vacuum with a soft brush attachment first can help remove more stubborn dust particles before the final tack cloth wipe.
Good lighting is also important to spot any missed dust.
Will sanding after staining remove the color I just applied?
No, if you sand lightly with a fine-grit sandpaper (like 220 or 320), you are only removing the raised wood fibers. The stain is absorbed into the wood. You are not sanding deeply enough to remove the color.
You are just leveling the surface.
Is it okay to use a power sander after staining?
For sanding after staining, it’s best to use hand sanding or a sanding block. Power sanders can be too aggressive and may remove too much stain or create an uneven surface. They are generally used for initial wood preparation before staining, not for light scuff sanding after the stain is applied.
Conclusion
So, to wrap it all up, the question of whether to sand after staining before applying polyurethane isn’t always a simple yes or no. However, for the best results – a smooth, durable, and beautiful finish – the answer leans heavily towards yes. This light sanding, or scuff sanding, addresses the raised grain that moisture from the stain causes.
It prepares the surface for better adhesion of your protective topcoat. While there are rare exceptions, making this small extra step part of your process will likely save you frustration and elevate your woodworking projects. Always test on scrap wood to see what works best for your specific materials and desired outcome.