How Long Wood Glue Dry: The Critical, Proven Answer
Most common wood glues, like yellow PVA glue, require 20-30 minutes of clamp time and are safe for light handling after 1-2 hours. For the strongest possible bond, you must wait a full 24 hours for the glue to completely cure. Always check the bottle, as temperature and humidity can change these times.
Welcome to the workshop! I’m Md Meraj, and if you’ve ever found yourself staring at a freshly glued project, tapping your fingers and wondering, “Is it ready yet?”—you’re in the right place. It’s one of the most common questions in woodworking. Guessing can lead to weak joints that fall apart, and nobody wants that.
Waiting for glue to dry can feel like watching paint dry, but it’s one of the most important steps for creating something strong and lasting. Don’t worry, it’s not as complicated as it seems. In this guide, I’ll walk you through everything you need to know, from the different stages of drying to the factors that can speed it up or slow it down. Let’s make sure your next project is built to last.
Drying vs. Curing: The Simple Difference Every Woodworker Should Know
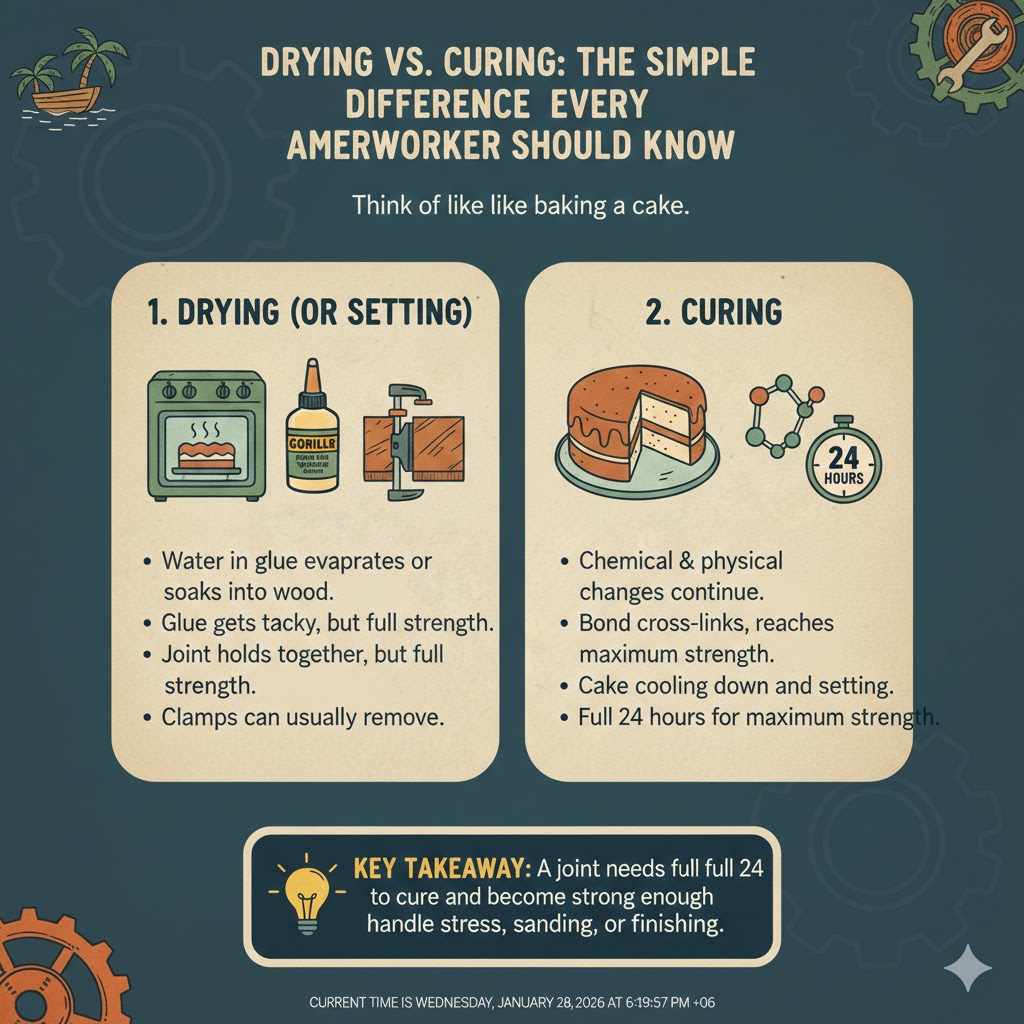
You’ll hear two words a lot: “drying” and “curing.” They sound similar, but they mean very different things for your project’s strength. Think of it like baking a cake.
- Drying (or Setting): This is when the water in the glue evaporates or soaks into the wood fibers. The glue gets tacky and then hard. It’s like your cake batter solidifying in the oven. The joint can hold itself together, but it’s not at full strength yet. You can usually remove the clamps at this stage.
- Curing: This is the magic part. After the glue is dry, chemical and physical changes continue to happen inside the glue line. The bond cross-links and hardens, reaching its maximum possible strength. This is like your cake cooling down and setting completely, so you can slice it without it crumbling.
The key takeaway? A joint might feel dry to the touch in an hour, but it needs a full 24 hours to cure and become strong enough to handle stress, sanding, or finishing.
The Three Main Stages of Wood Glue Drying
To really understand how glue works, it helps to know about its three distinct stages. Knowing these helps you work more efficiently and avoid mistakes.
- Open Time: This is your working window. It’s the period right after you apply the glue when it’s still wet and slippery. You can still move your wood pieces around to get the perfect alignment. For most yellow wood glues, this is about 5-10 minutes. Work fast but don’t rush!
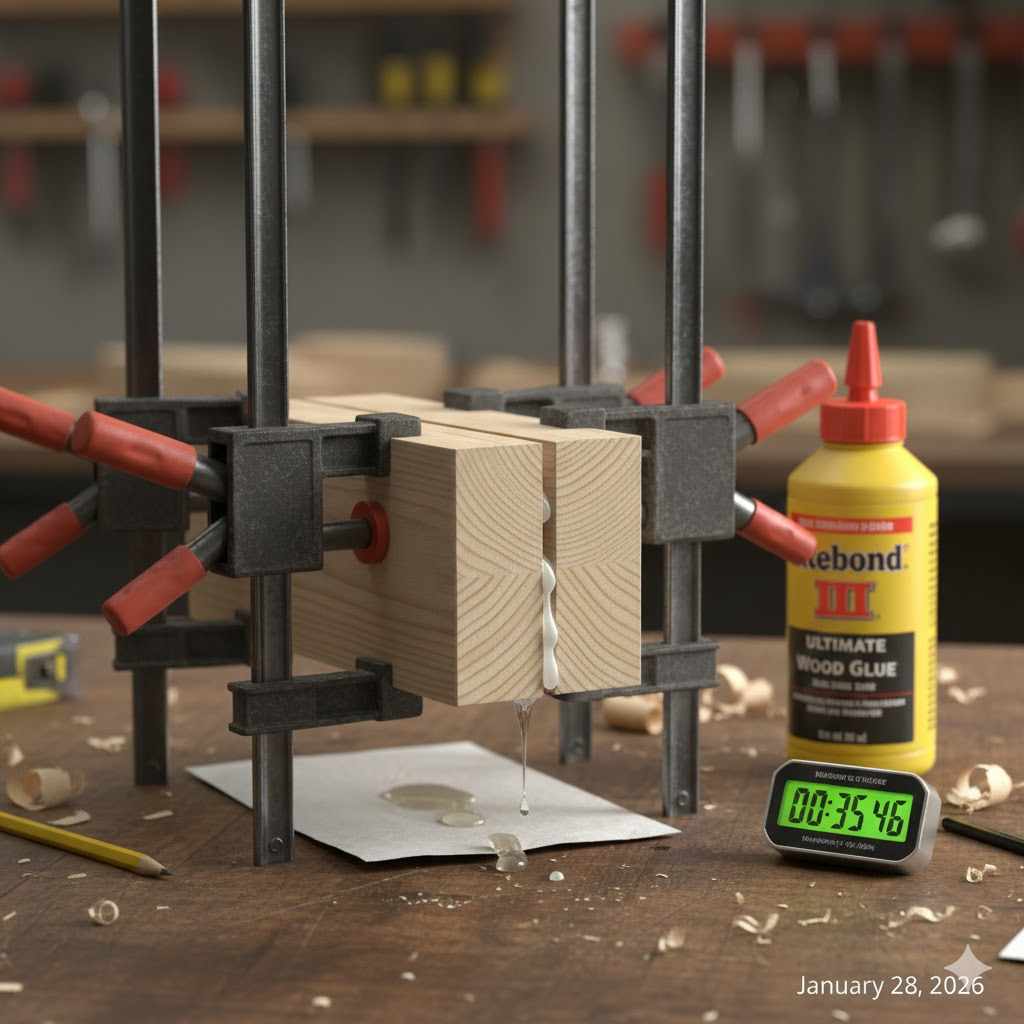
- Clamping Time (or Set Time): Once you press your pieces together and apply clamps, the “set time” begins. The glue starts to grab hold and create an initial bond. It’s crucial to keep the project clamped and completely still during this phase. This usually takes 20-60 minutes.
- Cure Time: This is the final and longest stage. After you remove the clamps, the glue continues to harden and strengthen over the next 24 hours. The joint is vulnerable during this time, so avoid putting any major stress on it, like heavy sanding, routing, or dropping it!
How Long Does Wood Glue Take to Dry? A Quick Reference Chart
Not all glues are created equal. The type of glue you use is the biggest factor in determining dry and cure times. Here is a simple chart for the most common glues you’ll find in your workshop.
| Type of Wood Glue | Common Brands | Clamping Time | Light Handling | Full Cure Time |
|---|---|---|---|---|
| PVA Glue (Yellow/White) | Titebond Original, Gorilla Wood Glue | 20–30 minutes | 1–2 hours | 24 hours |
| Cross-Linking PVA (Water-Resistant) | Titebond II, Titebond III | 30–60 minutes | 2–4 hours | 24 hours |
| Polyurethane Glue | Gorilla Glue (Original), Titebond Polyurethane | 1–2 hours | 4–6 hours | 24 hours |
| Epoxy | West System, Gorilla Epoxy | Varies (30 mins to 8 hrs) | Varies (Check package) | 24–72 hours |
| Cyanoacrylate (CA or Super Glue) | Starbond, Krazy Glue | Seconds (No clamps needed) | 5–10 minutes | 8–24 hours |
Always remember: The times listed on the bottle are your best guide! These are general estimates based on ideal conditions.
The 5 Big Factors That Change Wood Glue Drying Time
Ever notice your glue dries faster on a sunny day than a dreary one? You’re not imagining it. Several environmental and application factors can drastically change how long it takes for wood glue to dry. Let’s break them down.
1. Temperature and Humidity
This is the most important factor. Wood glue is happiest in the same conditions you are: warm and dry.
- Temperature: Most wood glues are designed to work best at around 70°F (21°C). In a colder shop (below 55°F or 13°C), the chemical reactions slow down, and drying time increases significantly. In a warmer shop, it will dry faster.
- Humidity: Standard PVA glues dry as their water content evaporates. In a humid room, the air is already full of moisture, so that evaporation process slows way down. According to the U.S. Forest Products Laboratory, wood itself changes dimensions based on humidity, which can also affect the final joint strength. A dry environment is your best friend for a fast-curing glue joint.
2. The Type of Wood You Are Using
Wood is a natural material, and every species behaves a little differently with glue.
- Porous Woods (like Pine, Poplar): These woods act like a sponge. They have large pores that quickly soak up the water from PVA glue, causing it to set much faster.
- Dense, Oily Woods (like Oak, Maple, Teak): These woods have tighter grain and natural oils. They don’t absorb water as quickly, which means the glue takes longer to dry. For oily woods like teak, it’s often a good idea to wipe the surface with acetone right before gluing to remove surface oils and help the glue stick better.
3. How Much Glue You Apply
More is not always better when it comes to wood glue. Your goal should be a thin, consistent layer across the entire surface.
- Too Much Glue: A thick, goopy layer of glue means there is a lot more water that needs to evaporate. This extends drying time and can create a weaker joint that is more “gummy” than solid. It also leads to more squeeze-out you have to clean up.
- Too Little Glue: If you starve the joint of glue, there won’t be enough to create a strong bond between the wood fibers. You’ll see dry spots and the joint will likely fail.
A perfect amount of glue will result in a tiny, even bead of squeeze-out along the joint line when you apply clamp pressure.
4. Airflow in Your Workspace
A little bit of moving air can make a big difference, especially for PVA glues that rely on evaporation. A gentle, indirect breeze from a fan can help wick moisture away from the glue line, speeding up the drying process. However, avoid pointing a powerful fan directly at your project, as this can cause the glue to “skin over” on the surface while remaining wet underneath, leading to a weak bond.
5. Clamping Pressure
Clamps aren’t meant to squeeze all the glue out of a joint. Their job is to bring the two pieces of wood into tight, even contact so the glue can do its work.
- Correct Pressure: Evenly applied pressure ensures a thin, strong glue line and closes any small gaps between the wood pieces.
- Too Much Pressure: If you crank down the clamps with all your might, you can squeeze out too much glue. This “starves” the joint and leaves you with a weak, glue-less bond. Aim for firm pressure, not crushing pressure.
How to Tell If Your Wood Glue is Actually Dry
So, the clamp time has passed. How do you know if it’s safe to move on? The 24-hour full cure rule is always the safest bet, but here are a few simple checks you can do to see if the glue has set properly.
Check the Squeeze-Out
The little bead of glue that squeezes out of the joint is your best indicator.
- If it’s still wet or gummy: Leave the clamps on. It needs more time.
- If it’s rubbery: It’s in the process of setting. It’s getting there, but don’t remove clamps yet.
- If it’s hard and crusty: The glue has set. You can likely remove the clamps. Try scraping a piece of the squeeze-out with a fingernail or a chisel. If it flakes off cleanly or feels brittle, you’re good to go.
The “Listen” Test
This is an old-timer’s trick. If you tap gently near the joint with your knuckle, a well-set joint will sound solid and firm. A joint that is still wet might have a slightly duller, less resonant sound. This takes a bit of practice but can be a useful indicator.
When in Doubt, Wait It Out
Here’s the honest truth: no project has ever been ruined by waiting too long for the glue to dry. But many projects have been ruined by taking the clamps off too soon. If you are unsure, just give it another hour or two. Patience is a woodworker’s greatest tool.
Pro Tips for a Faster (and Stronger) Glue-Up
While you can’t rush the curing process, you can set yourself up for success and ensure the glue dries as efficiently as possible.
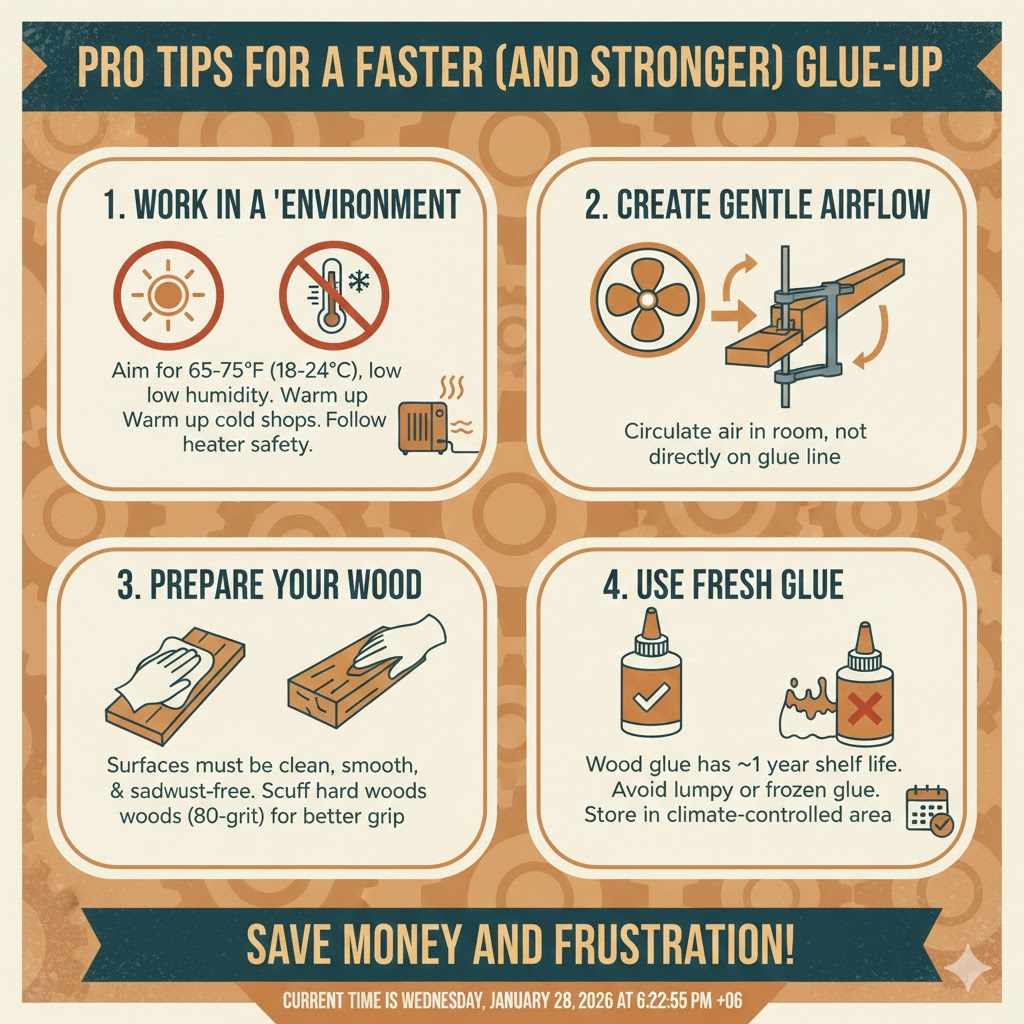
- Work in a “Happy” Environment: Aim for a room temperature between 65-75°F (18-24°C) with low humidity. If your shop is cold, use a small space heater to warm it up before you start your glue-up. Just be sure to follow all safety precautions with heaters in a workshop!
- Create Gentle Airflow: Place a fan in the room, but have it pointing away from your project. You want to circulate the air in the room, not create a wind tunnel on your glue line.
- Prepare Your Wood: Make sure the surfaces to be joined are clean, smooth, and free of sawdust or oils. A good glue bond needs a clean surface. For very hard, dense woods, scuffing the surface with 80-grit sandpaper can give the glue more to grab onto.
- Use Fresh Glue: Wood glue has a shelf life, typically around one year. If your glue is old, lumpy, or has been frozen, it won’t create a strong bond. Always store your glue in a climate-controlled area, not in a cold garage or shed.
Frequently Asked Questions
Can I use a hair dryer to speed up wood glue drying?
It’s generally not a good idea. A hair dryer provides intense, direct heat, which can cause the surface of the glue to dry too quickly and form a skin. This traps moisture underneath, preventing the joint from setting properly and resulting in a much weaker bond.
What happens if I don’t clamp the wood pieces?
Clamping is critical. Without clamps, the wood pieces won’t have tight, even contact. This creates gaps and a thick, weak glue line. The joint will almost certainly be very fragile and can easily be pulled apart. Even for a few minutes, clamping makes all the difference.
My glue squeezed out. When is the best time to clean it up?
You have two great options. You can wipe it away immediately with a damp cloth, but be careful not to smear it and thin the glue at the joint line. A better method for many is to wait about 20-30 minutes for the squeeze-out to become rubbery. At this point, it will peel off cleanly with a chisel or scraper without smearing.
How long does a popular glue like Titebond III take to dry?
Titebond III, a popular water-resistant glue, requires a slightly longer clamp time than other PVA glues. The manufacturer recommends clamping for a minimum of 30-60 minutes. Like other glues, it can be lightly handled after a few hours but needs the full 24 hours to achieve its maximum, waterproof strength.
Is it safe to sand my project after just an hour or two?
It’s best to wait. While the joint may hold together, sanding (especially with a power sander) creates heat and vibration, which can stress and weaken a joint that hasn’t fully cured. Waiting the full 24 hours ensures the bond is rock solid and won’t fail while you’re working on it.
Does wood glue dry clear?
Most yellow wood glues (PVA) dry to a yellowish or translucent tan color. White PVA glue dries mostly clear. Some glues, like polyurethane, can dry to an amber or brownish color. It’s always best to clean up any squeeze-out, as the dried glue line will be visible and won’t accept wood stain the same way wood does.
Will wood glue stick to painted or finished surfaces?
No, wood glue is designed to bond with raw wood fibers. It will not form a strong bond on paint, varnish, or other sealers. For a strong joint, you must always sand or scrape away any finish to expose the bare wood before applying glue.
Conclusion: Patience is Your Strongest Bond
So, how long does wood glue need to dry? The simple answer is that while it sets up quickly, the real strength comes from waiting for the full 24-hour cure. It can be tempting to rush, but patience is what separates a good project from a great one.
By understanding the difference between drying and curing, paying attention to your workshop environment, and using the right amount of clamping pressure, you’re no longer guessing. You’re in control. You have the knowledge to create strong, durable, and reliable joints every single time you pick up that glue bottle. Now you can get back to your project with confidence, knowing you’re building something that will stand the test of time.
Happy building!