
How to Build a Wood Fence on a Slope: A Step-By-Step Guide
Building a wood fence on a slope is similar to installing a fence on level ground. Begin from the top of the slope and plot out your fence posts.
Dig a hole for each post, install the posts, and gravel boards. Finally, slot in your fence panels and close any gaps. A stepped wooden fence could also be a great solution for a sloping yard, creating a series of levels or steps that follow the natural contour of the land.
Avoid building fences that are not level as they can be weaker and more likely to fall over, causing serious injury to anyone nearby. Racked fences, without spaces between the rail and ground, are great for families with dogs and can work well with gently sloped yards.
Planning And Layout
Building a wood fence on a slope requires proper planning and layout. Begin at the top of the slope, plot out fence posts, and dig holes for each post. Install gravel boards, slot in fence panels, and close any gaps to ensure a strong and secure fence.
Before starting the construction process for your wood fence on a slope, proper planning and layout are crucial to ensure the longevity and stability of your fence. Here are the key steps to follow in the planning and layout phase
Marking the Next Section of Fence:
To proceed with the marking process, you must start from the top of the slope where you want your fence to begin. First, measure the length of the fence line and divide it into equal sections to avoid any unbalanced gaps between the posts. Mark each post with chalk at the center to make way for digging the hole. This process will ensure that each fence panel is the same size and that the fence is installed straight.
Layout for Back of Property:
When marking your fence line, it’s crucial to consider the layout for the back part of your property. The back of the property may have different elevations or angles, making it more challenging to install fence panels. To avoid any issues, use stakes and string to visualize the fence line and ensure that the panels remain straight. It’s a good idea to use a level to determine the angles of the slope and adjust the height of the panels accordingly.
Drilling on a Slope:
The drilling process on a slope requires extra attention to prevent post installation errors. To get the best results, use a post hole digger to remove the grass and soil in the marked areas. After removing enough soil, insert the post into the hole while holding a level to ensure that it’s upright. Then add concrete or gravel to stabilize the post in place.
By following the above steps in the planning and layout phase, you can guarantee that your wood fence on a slope is installed correctly and will last for years to come.
Preparing The Ground
When building a wood fence on a slope, it is important to start at the top and work your way down. Plot out the fence posts, dig a hole for each one, and install the posts. Then, install the gravel boards and fence panels, and close any gaps to ensure the fence is sturdy and secure.
Preparing the Ground
Before you can install a wood fence on a slope, you need to ensure that the ground is prepared properly. This includes digging the holes for the posts and drilling them appropriately on the sloped ground. Here is a step-by-step guide to preparing the ground for building a wood fence on a slope.
Digging Holes for Posts
The first step is to plot out your fence posts, taking into account the slope of the ground. This involves measuring the distance between each post and ensuring that they are positioned at equal intervals. Then, dig a hole for each post, ensuring that the depth is appropriate for the height of the post and that the width is suitable for the type of wood you are using.
Drilling on a Slope
Drilling the posts is an important step in building a wood fence on a slope. It helps to provide extra support and stability for the fence. You need to drill the posts at an angle that matches the slope of the ground, ensuring that each post is securely anchored in the ground. This requires careful measuring and precise drilling, so it’s essential to use the right tools for the job.
Installing the Posts
Once you have drilled the posts, it’s time to install them in the holes you have dug. Make sure each post is positioned securely in the hole, and fill the hole with concrete or gravel to provide extra support. Ensure that the posts are level and plumb, using a spirit level to check each post as you go.
Installing Gravel Boards
Gravel boards provide additional support for the fence panels and help to prevent moisture damage to the wood. They should be installed to sit horizontally along the base of each fence panel. Ensure that the gravel boards are cut to match the slope of the ground, so they sit level.
Slotting in Fence Panels
Once the posts and gravel boards are in place, you can begin to slot in your fence panels. Ensure that each panel matches the slope of the ground, and that the top of the panel is level. Use screws or nails to secure the fence panels to the posts and gravel boards, ensuring that they are firmly anchored in place.
Closing Any Gaps
Finally, check for any gaps or inconsistencies in the fence panels and fill these in. This helps to ensure that your fence is secure and provides adequate privacy for your property. Once you have ensured that everything is in place, your wood fence on a slope is ready to use.
Setting Posts And Stringers
When building a wood fence on a slope, it’s important to properly set the posts and stringers. Start at the top of the slope, plot out your fence posts, dig a hole for each post, install the posts, then attach the stringers to the posts, and finally slot in your fence panels and close any gaps.
Remember that a sloping fence should still follow the natural contour of the land to avoid an uneven or weak fence.
Now that you have plotted the fence posts, it’s time to start the actual installation of your wood fence on a slope. Installing posts and stringers on uneven ground can be tricky, but it’s not impossible. This section will guide you on how to set posts and attach stringers to build your fence on a slope.
Installing Posts
To install posts on a slope, you need to first dig a hole at the bottom of the slope. The depth of the hole will depend on the length of the post and the terrain. The hole should be deep enough to provide a solid foundation for the post. Once you have dug a hole, insert the post, ensuring it is straight and plumb.
Setting Line Posts
Setting line posts on a slope requires a different approach than on level ground. To ensure the line posts are level, you need to stretch a string between the first and last post. Use a level to ensure the string is level, then use stakes to hold the string in place. This will guide you on where to set the line posts.
Attaching Stringers To Posts
After setting the posts and the line posts, the next step is to attach the stringers to the posts. Begin by measuring the distance between the line posts and cut the stringers to the required length. Hold the stringers in place and attach them to the posts using nails or screws. Ensure the stringers are level to prevent the fence from being uneven.
In conclusion, setting posts and stringers for building a wood fence on a slope requires proper planning and execution. Follow the steps outlined above to ensure that your fence is level and sturdy on uneven ground.
Attaching Fence Panels
Building a wood fence on a slope requires careful planning. Begin by working at the top of the slope and plot out your fence posts. Dig a hole for each post and install them, then attach gravel boards and slot in your fence panels.
Close any gaps to ensure a secure and level fence.
Attaching Fence Panels
After you have installed the fence posts and the gravel boards, it’s finally time to attach the fence panels. This step, although seemingly straightforward, requires some finesse, especially if you are building on a slope. In this section, we will discuss how to properly slot in the fence panels and close any gaps that might exist.
Installing Gravel Boards
Before we move on to attaching the fence panels, let’s quickly discuss the importance of the gravel boards. When building on a slope, gravel boards are a great way to ensure that your fence remains level.
They are essentially treated wooden planks that are installed horizontally at the bottom of the fence, above the ground. To install them, simply screw them into the posts using wood screws. By doing this, you can create a solid foundation for your fence panels to sit on.
Slotting in Fence Panels
After installing the gravel boards, you can now slot in the fence panels. It’s important to note that you may need to cut some panels to fit into the slope, depending on the angle. To do this, measure the panel and mark where you need to cut. Then, use a saw to make the cut. Once the panels are cut to size, hold them in place and use wood screws to attach them to the posts and the gravel boards.
Closing Any Gaps
Finally, it’s time to close any gaps that may exist in the fence. One effective method for this is to use wedge-shaped shims. To use shims, simply insert them between the panels and the posts until the gap is closed. Once closed, use wood screws to fasten the panel to the post and the gravel boards.
In conclusion, attaching fence panels is a critical step in building a wood fence on a slope. By installing gravel boards and properly slotting in the panels, you can create a strong foundation for your fence. And, by using shims, you can close any gaps to ensure that your fence is secure and visually appealing.
Dealing With Slopes
Building a wood fence on a slope requires careful planning and attention to detail. Starting from the top of the slope, the fence posts must be carefully plotted out, dug and installed, followed by gravel boards and fence panels to complete the installation.
Proper construction of the fence on a slope is important to ensure its stability and longevity.
Choosing Between A Straight Top Line Or Following The Trench
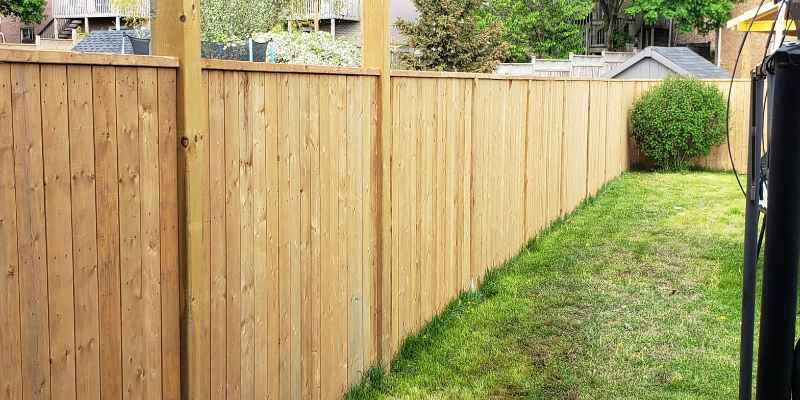
When building a wooden fence on a slope, you may have to make a decision between a straight top line or following the natural contour of the slope. Following the trench has its advantages as it results in a seamless and natural-looking fence that blends in with the existing landscape.
On the other hand, a straight top line may be more aesthetically pleasing to some homeowners. Whichever option you choose, ensure that the fence posts are installed plumb (that is, perpendicular to the ground), to guarantee the stability of the fence.
Stair Stepping
Another common method used to build a fence on a slope is the stair-stepping technique. In this method, the fence panels are installed at different heights, so they follow the slope of the land. This results in a stepped fence that looks intentional and attractive.
However, it is essential to note that stair-stepping can result in an uneven look, especially if the panels are not installed correctly. To ensure that the fence looks professional and visually appealing, measure and mark your fence line before installation, and use a level to ensure consistent spacing.
Racking Fences
If you are looking for the easiest fence to install on a slope, a racked fence may be your best bet. This technique involves installing a fence that follows the contour of the ground by angling the rails instead of using a stepped effect. Racking fences are a popular option because they require minimal tools and experience.
They also provide an excellent option for pet owners who want to contain their pets as there is less risk of gaps between the fence and the ground. Regardless of the option you choose, it is essential to ensure that your fence is sturdy, level, and able to withstand the natural forces that may affect it over time.
Tips And Tricks
Building a wood fence on a slope can be tricky, but with the right tips and tricks, it can be done. Start by plotting out your fence posts and digging holes for each post. Then, install the posts, followed by adding gravel boards and fence panels.
Close any gaps to finish off the project.
Building a wood fence on a slope can present a few unique challenges, but with the right tools and techniques, it can be done successfully. Here are some tips and tricks to help you build a wood fence on a slope.
Using a String to Maintain a Straight Line
When building a wood fence on a slope, using a string can help you maintain a straight line. Begin by stretching a string tight at the top of the slope where you want your fence to start. Then measure the distance between each post along the string line to ensure they are evenly spaced.
Leveling Upright Posts
Leveling the upright posts is crucial when building a fence on a slope. A level will help ensure each post is straight and plumb. To level each post, place the level on the side of the post and adjust it until it is level in both directions.
Securing Posts
When securing posts on a slope, it’s important to ensure they are stable and won’t shift over time. Use a heavy-duty anchor to secure each post to the ground. Make sure the anchor is positioned in the hole and line up the holes in the anchor with the holes in the post.
Installing Fence Boards
Installing fence boards can be challenging when building a fence on a slope, but with a little effort, it can be done. Start at the top of the fence and work your way down, using a level to ensure each board is straight. Make sure to overlap each board by at least 1 inch to ensure there are no gaps between boards.
In conclusion, building a wood fence on a slope requires a bit more effort, but it’s entirely possible with the right tools and techniques. Use a string to maintain a straight line, level each post, use a heavy-duty anchor to secure each post to the ground, and install fence boards from the top down, overlapping each board by at least 1 inch. By following these tips and tricks, you can successfully build a wood fence on a slope.
Final Touches
Building a wood fence on a slope can present some unique challenges, but it is still possible to create a sturdy, attractive fence. Begin by working at the top of the slope and carefully plotting out the location of each fence post.
Install each post securely, making sure to adjust for any slope. Attach stringers to the posts and slot in your fence panels, making any necessary adjustments to ensure a tight fit.
Cutting The Frame
Once all the fence panels have been properly set, you will need to cut the frame to match the slope of the ground. Cut the posts and rails as needed to ensure they match the slope of the ground while still maintaining the desired height of the fence. This can be done using a circular saw or an adjustable miter saw.
Future Plans
It is important to think about any future plans you may have for your property that could impact your fence. For example, if you plan to add a patio or deck, you may need to move or adjust your fence. Make sure to plan for these potential changes now to save yourself time and money down the road. Additionally, consider any future landscaping plans that may impact the height or stability of the fence.
In conclusion, with a little extra effort and preparation, you can successfully build a wood fence on a slope. Make sure to properly layout and mark your fence line, use the right materials and tools, and take the necessary steps for final touches to ensure your fence looks great and functions properly for years to come.
Frequently Asked Questions For How To Build A Wood Fence On A Slope
How Do You Build A Wooden Fence On A Slight Slope?
To build a wooden fence on a slight slope, begin at the top of the slope, plot out your fence posts, dig a hole for each post, install the posts, install gravel boards, slot in your fence panels, and close any gaps.
Remember to make sure that your fence is level and sturdy. A stepped wooden fence could also be a good solution for following the natural contour of the land. Consider using racked fences for gently sloped yards and wooden fences for a stronger structure.
Should A Fence Be Level Or Follow The Ground?
A fence should be level, not following the ground. An uneven fence is more likely to fall over, causing injury or damage. Installing a fence on a slope is similar to installing on level ground but requires careful plotting of fence posts, digging holes, and installing gravel boards to keep the fence steady.
Different fence options, such as a stepped wooden fence or racked fences, are also available for those with sloped yards.
What Is The Easiest Fence To Install On A Slope?
The easiest fence to install on a slope is a racked fence. This type of fence adapts to gentle slopes and has no spaces between the rail and ground, making it a good option for families with dogs. Stepped wooden fences are also a good solution for sloping yards.
Install the fence starting from the top of the slope and follow the natural contour of the land.
What To Do With A Fence On A Slope?
For a fence on a slope, start from the top and plot out your fence posts. Dig a hole for each post and install them. Install gravel boards and slot in your fence panels. Close any gaps. Consider a stepped wooden fence that follows the natural contour of the land for a solution that enhances your property and works well with the slope.
Conclusion
Building a wood fence on a slope requires careful planning and preparation, but it is certainly doable. By following the right steps, you can create a beautiful and functional fence that enhances your property’s appearance while providing the privacy and security you need.
Whether you choose to install a racked fence, a stepped fence, or use another method, remember to take your time, use the right tools and materials, and seek advice from professionals if needed. With these tips in mind, you can build a sturdy and attractive fence that will last for years to come.