Change a Drill Bit Fast on a Black and Decker Drill
Changing a Black and Decker drill bit involves unlocking the chuck, removing the old bit, inserting the new one, and then tightening the chuck. Most models use a keyless chuck that you simply twist. Always ensure the drill is unplugged or the battery is removed before starting.
Understanding Your Black and Decker Drill Chuck
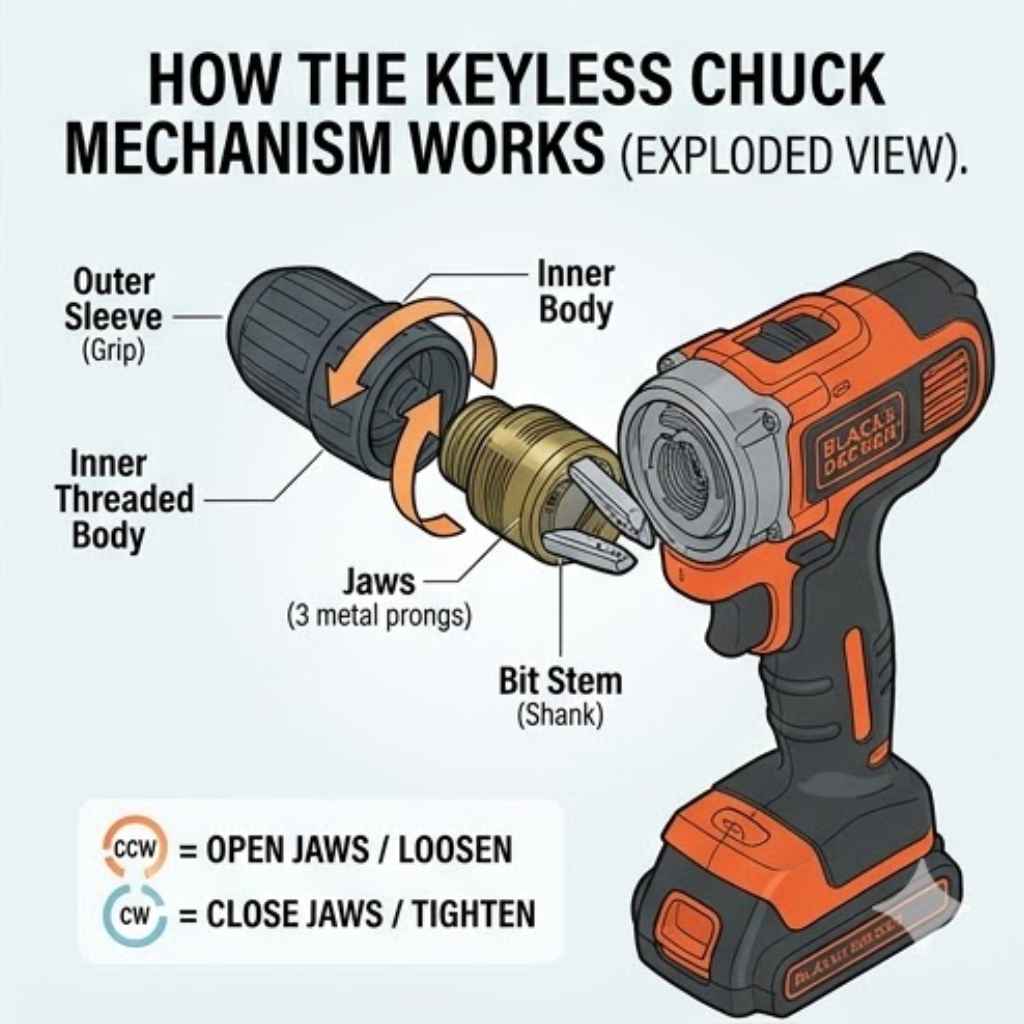
Your drill has a special part called a chuck. This is the part that holds the drill bit. Black and Decker drills usually come with a keyless chuck.
This means you don’t need a separate key to tighten or loosen it. You just use your hands!
The chuck has jaws. These are like little fingers that grip the bit. When you want to change a bit, you need to open these jaws.
When you want to hold the new bit tight, you close them.
Most keyless chucks on Black and Decker drills work by twisting. You’ll twist one part of the chuck to open it and twist another part to close it. It’s designed to be easy and quick.
You can usually tell which way to twist by looking at markings on the chuck itself.
Some older or different models might have a chuck that needs a small wrench, called a chuck key. If your drill came with a little square-shaped key, you’ll need that. But most modern Black and Decker drills are keyless.
We’ll focus on those, as they are the most common now.
Knowing your chuck is the first step. It’s the main part you’ll interact with when changing bits. It’s important to understand how it works so you can use it correctly and safely.
My Own Drill Bit Change Mishap
I remember one time I was trying to hang a heavy mirror in my living room. I had drilled the first hole perfectly with a wood bit. But then, I realized I needed a larger pilot hole for the wall anchor.
I looked at my drill, a Black and Decker I’d had for years. I knew I had to change the bit, but I’d never done it before.
I fiddled with the chuck. I tried turning it one way, then the other. Nothing seemed to happen.
I was getting a little panicked because I didn’t want to ruin the wall or the drill. It felt like the bit was stuck in there forever. I even tried to pull it out with my pliers, which was a terrible idea!
It just scratched up the chuck and didn’t budge the bit.
Finally, I stopped. I took a deep breath and looked closely at the chuck. I saw some little arrows and words.
I realized I was turning it the wrong way. The moment I turned it the correct way, the jaws opened right up. The old bit just dropped out.
I felt so silly, but also relieved! It taught me to really look at the tool before I start forcing things.
This experience showed me how important it is to understand the basic function of your tools. A little bit of knowledge goes a long way, and it can save you a lot of frustration and potential damage. Changing a drill bit is a basic skill, but knowing the steps makes it a breeze.
How to Safely Change a Drill Bit
Safety first is always the best approach. Before you even touch the drill bit or the chuck, you need to make sure the drill is powered off. For a corded drill, this means unplugging it from the wall.
For a cordless drill, you must remove the battery pack.
This step is super important. If you accidentally squeeze the trigger while changing a bit, the drill could suddenly spin. This could cause injury to your hand or damage to the drill.
Always double-check that the drill cannot turn on by itself. Think of it like securing your workspace before you begin any task.
Once the drill is safely de-powered, you can then focus on the chuck. Look at the front of your Black and Decker drill. You’ll see the chuck.
It’s usually a cylindrical part that surrounds the drill bit.
There are two main types of keyless chucks you might find on a Black and Decker drill. The most common type is a sleeve that you twist. Sometimes, you twist the whole front part of the chuck.
Other times, there’s a front sleeve and a back collar that you hold still while twisting the sleeve. Some drills have a lock button or trigger that you might need to engage.
Look closely at the chuck. You might see arrows indicating which direction to turn to open (loosen) and which direction to turn to close (tighten). Usually, turning counter-clockwise loosens the chuck, and turning clockwise tightens it.
This is the opposite of how screws often work!
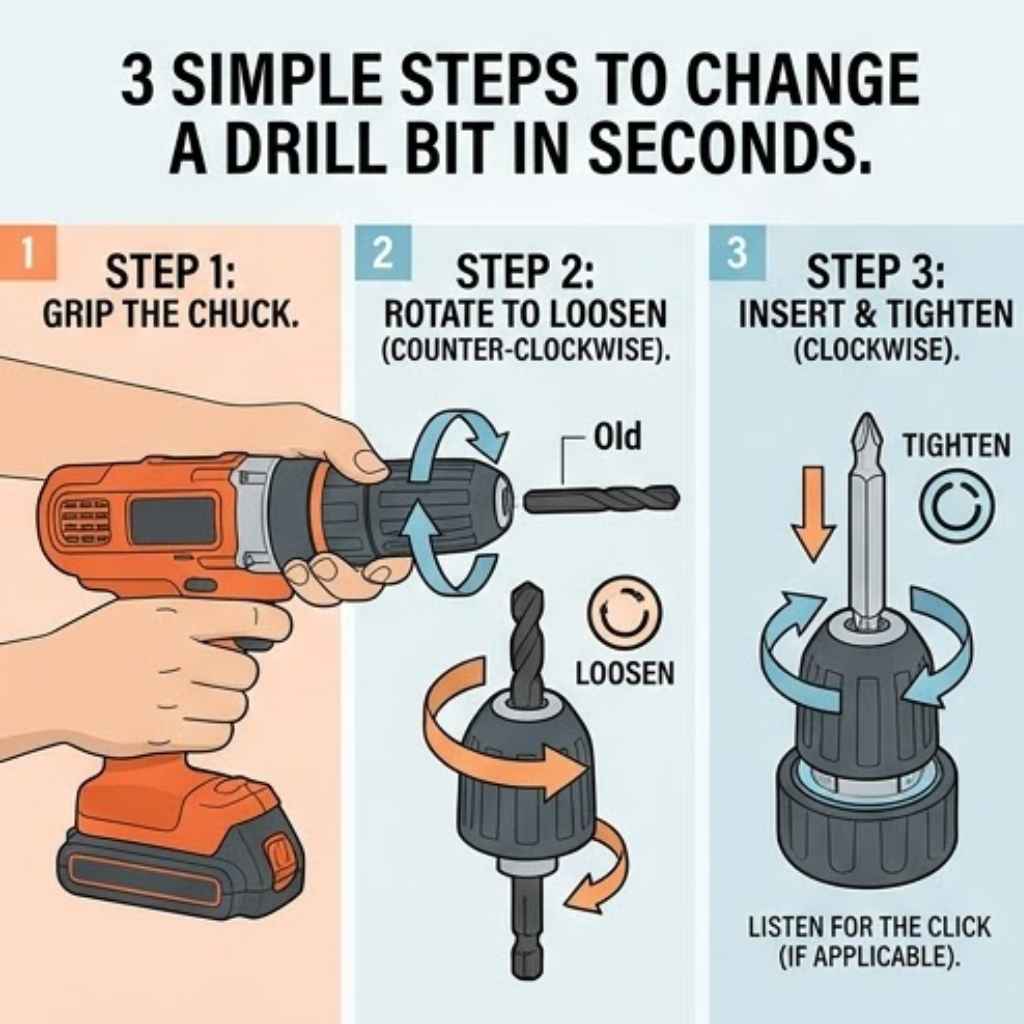
Grip the chuck firmly with one hand. With your other hand, twist the correct part of the chuck in the loosening direction (usually counter-clockwise). You might need to apply a bit of pressure.
You’ll feel it loosen up. Keep twisting until the jaws open wide enough to release the old drill bit.
As the jaws open, the bit will become loose. You can then simply pull the old bit straight out of the chuck. Be careful not to drop it.
Now your drill is ready for a new bit.
To insert the new bit, simply slide its shank (the part that goes into the drill) into the open jaws of the chuck. Push it in as far as it will comfortably go. Make sure it’s centered within the jaws.
Once the new bit is in place, you need to tighten the chuck. Grip the chuck again and twist the correct part in the tightening direction (usually clockwise). Continue twisting until the chuck jaws close tightly around the bit.
You want it to feel secure and snug. It shouldn’t wobble or feel loose at all. Over-tightening isn’t usually a problem with keyless chucks, but you want a firm grip.
After the new bit is securely in place, you can re-insert the battery or plug the drill back in. Test the drill briefly at a low speed to make sure the bit is running true and isn’t wobbly. If it seems okay, you’re ready to get back to your project!
Common Black and Decker Drill Chuck Types
Keyless Sleeve Chuck: The most popular type. You twist a sleeve to open or close the jaws.
Two-Part Keyless Chuck: Some have a front sleeve and a rear collar. You hold one still while twisting the other.
Older Chucks (with Key): If your drill has holes on the chuck, you might need a chuck key to tighten and loosen it.
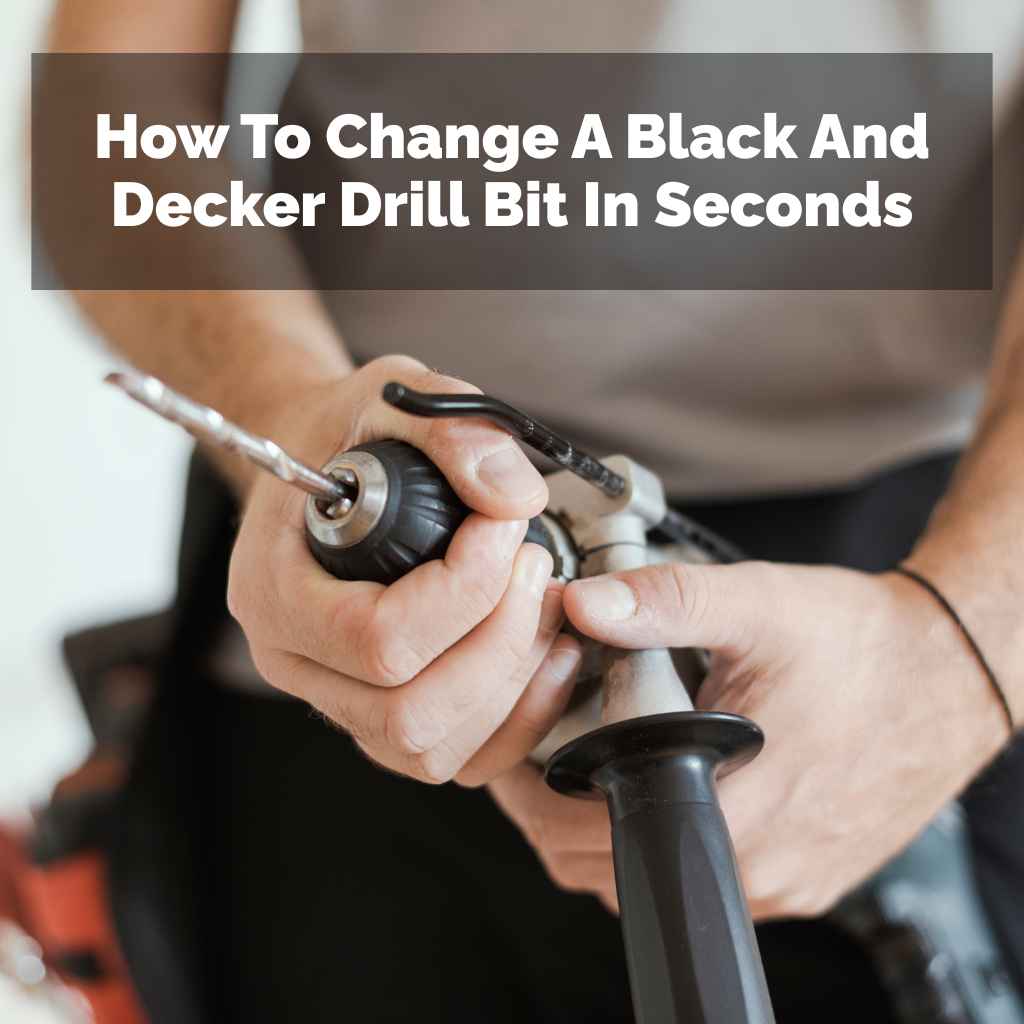
Step-by-Step Guide: The Actual Process
Let’s walk through the exact steps again, clearly. This is for most Black and Decker drills with a keyless chuck.
Step 1: Power Down! Make sure the drill is unplugged or the battery is removed. Seriously, do this first. It’s non-negotiable for safety.
Step 2: Identify the Chuck. This is the part at the very front of the drill where the bit goes. It looks like a metal cylinder.
Step 3: Locate the Turning Part. Look for the part of the chuck that moves. On most, it’s a sleeve or collar you can twist with your fingers.
Step 4: Loosen the Chuck. Grip the chuck firmly. Twist the movable part counter-clockwise. Keep twisting until the jaws open wide.
You should see the space between the jaws get bigger.
Step 5: Remove the Old Bit. Once the jaws are open, simply pull the old drill bit straight out. It should slide out easily.
Step 6: Insert the New Bit. Take your new drill bit. Slide the shank (the smooth, unsharpened end) into the opening of the chuck jaws. Push it in so it sits straight.
Step 7: Tighten the Chuck. Grip the chuck again. Twist the movable part clockwise. Turn it until the jaws grip the new bit firmly.
You want it to feel very secure. Give it a good tighten.
Step 8: Test Briefly. Put the battery back in or plug the drill in. Squeeze the trigger very gently for just a second or two. Watch the bit.
Does it spin straight? Does it feel loose? If it’s solid, you’re good to go.
This process usually takes less than a minute once you get the hang of it. It’s a fundamental skill for anyone who uses a drill.
What If My Black and Decker Drill Has a Chuck Key?
While less common on newer models, some Black and Decker drills might still come with a chuck key. These are usually older drills or specific professional-grade models. If your drill has small holes around the chuck, it likely uses a chuck key.
The chuck key is a small metal tool, often L-shaped, with a square or hexagonal end. This end fits into one of the holes on the chuck. There are usually three holes on the chuck for this purpose.
To loosen the chuck with a key: First, ensure the drill is powered off (unplugged or battery removed). Insert the chuck key into one of the holes. Turn the key counter-clockwise.
You’ll need to apply some force, and you might need to move the key to different holes to loosen it evenly.
Keep turning until the jaws of the chuck open up enough to remove the old bit. Then, remove the old bit.
To insert the new bit: Slide the new bit into the open jaws. Then, insert the chuck key into one of the holes and turn it clockwise. This tightens the chuck around the bit.
Make sure it’s very snug. You may need to use multiple holes to tighten it evenly.
A keyless chuck is generally easier and faster, but if you have a chuck key model, the process is just as effective. Just remember to use the correct tool!
Keyless vs. Chuck Key: Which Is Better?
Keyless Chucks:
- Pros: Faster bit changes, no extra tool to lose, generally easier to use.
- Cons: Can sometimes be harder to get a super-tight grip on very large bits compared to a key.
Chuck Key Chucks:
- Pros: Can provide a very strong, secure grip on the bit.
- Cons: Slower bit changes, easy to misplace the key, requires an extra tool.
Troubleshooting Common Issues
Sometimes, things don’t go as smoothly as you hope. Here are a few things that might happen and how to fix them.
Problem: The chuck won’t loosen.
This is the most common issue. First, double-check that you are turning it the right way (usually counter-clockwise). If it’s still stuck, there might be some debris or grit caught in the chuck mechanism.
Try firmly tapping the chuck against a soft surface like a block of wood (while it’s still de-powered!). This can sometimes dislodge whatever is stuck.
Another trick is to try gripping the chuck sleeve with a rubber glove or a piece of cloth. This can give you a better grip. If it’s a two-part chuck, make sure you’re holding the correct part stationary while twisting the other.
Sometimes, a bit of penetrating oil (used sparingly!) can help, but this is rare for drill chucks.
Problem: The bit is spinning inside the chuck.
This means the chuck jaws aren’t gripping the bit tightly enough. You probably didn’t tighten it enough in Step 7. Power down the drill again.
Remove the bit, re-insert it, and tighten the chuck with extra force. Make sure the bit is straight and centered.
Problem: The chuck is making grinding noises.
This can happen if there’s dirt or debris inside the chuck. Power down the drill. You can try blowing compressed air into the chuck to clear it out.
If that doesn’t work, you might need to let a tiny drop of lubricant designed for tools into the chuck mechanism. Use it very sparingly. You might also need to take it to a repair shop if it’s persistent.
Problem: The chuck won’t tighten.
This could mean the chuck jaws are worn out or damaged. If you’ve tried tightening firmly and the bit still feels loose, the chuck itself might need to be
Remember, always power down the drill before attempting any fixes. If you’re unsure or uncomfortable, it’s better to take it to a professional or consult your drill’s manual.
Quick Fix Checklist
Chuck Stuck?
- Turn the right way?
- Tap gently?
- Better grip (glove/cloth)?
Bit Slipping?
- Did you tighten enough?
- Is the bit centered?
Grinding Noises?
- Is there dirt? (Use air)
- Need a tiny drop of oil?
When to Call It Quits (and Get Help)
While changing a drill bit is usually straightforward, there are times when you might encounter a problem that’s beyond a simple fix. If you’ve tried all the troubleshooting steps and your chuck is still not working correctly, it might be time to seek professional help.
This could mean taking your drill to a local tool repair shop. They have the expertise and tools to diagnose and fix more complex issues. Sometimes, it’s more cost-effective to get a repair than to buy a brand-new drill, especially if it’s a good quality tool.
Another option is to check your drill’s warranty. If your Black and Decker drill is still under warranty, you might be able to get it repaired or replaced for free. Always check the manufacturer’s website or your purchase receipt for warranty information.
If the drill is very old and has had a lot of use, it might just be worn out. In that case, investing in a new drill might be the best option. You can often find great deals on Black and Decker drills, making them an affordable replacement.
But for most users, the standard bit change process is simple and effective. Don’t let a stubborn chuck stop you from completing your DIY tasks! A little patience and the right technique will get you through it.
Types of Drill Bits and Why They Matter
Knowing how to change a drill bit is great, but what about the bits themselves? Different tasks need different bits. Using the wrong bit can not only be ineffective but can also damage your material or the bit.
Wood Bits: These are typically sharp and have a pointed tip. This helps them center easily and cut cleanly into wood. Some have a screw-like point to help pull the bit into the wood.
Metal Bits: These are usually made of hardened steel, often with a black oxide coating. They are designed to drill through tough materials like metal and some plastics. They are generally straighter and less pointed than wood bits.
Masonry Bits: These are used for drilling into brick, concrete, and stone. They have a special carbide tip that is very hard and designed to withstand the abrasive nature of these materials. They often have flutes that help clear dust.
Screwdriver Bits: These aren’t technically “drill bits” but are used in drills to drive screws. They come in various shapes like Phillips (cross-shaped), flathead, Torx (star-shaped), and more. They have a shank that fits into the drill chuck.
Spade Bits (Paddle Bits): These are wide, flat bits with a sharp point. They are used for drilling large holes in wood, usually for running wires or pipes.
Forstner Bits: These create clean, flat-bottomed holes in wood. They are often used for making precise holes for hinges or for decorative purposes.
When you’re changing your drill bit, think about what material you’re working with and what kind of hole you need. This will guide you to the correct bit. For instance, trying to drill a large hole in concrete with a wood bit will just create dust and frustration.
Drill Bit Basics
Material: What are you drilling into? Wood, metal, or masonry require different bits.
Size: Does the bit match the required hole diameter? Look for the size etched on the bit or its packaging.
Type: Is it for drilling holes, driving screws, or making specialized cuts?
Shank: The part that fits into the chuck. Most standard bits have a round shank.
Tips for Maximizing Your Drill’s Life
Taking good care of your Black and Decker drill will ensure it works well for a long time. Changing bits is just one part of this.
Keep it Clean: After using your drill, wipe off any dust or debris. Dirt can get into the chuck and motor, causing problems.
Store it Properly: Keep your drill in its case or in a dry, safe place. Avoid extreme temperatures or humidity.
Use the Right Bit: As we discussed, using the correct bit for the job prevents strain on the drill and ensures better results.
Don’t Force It: If the drill is struggling, don’t force it. You might be using the wrong bit, the wrong speed, or the material might be too tough. Let the drill do the work.
Battery Care (Cordless): Follow the manufacturer’s instructions for charging and storing your drill’s battery. Avoid leaving it fully discharged for long periods.
Regular Maintenance: For keyless chucks, occasionally blowing out debris with compressed air can help keep them functioning smoothly. For chuck key models, ensure the key is stored where you can find it.
These simple tips can prevent common issues and keep your Black and Decker drill performing at its best for many projects to come.
Frequently Asked Questions About Changing Drill Bits
How do I know which way to turn the chuck on my Black and Decker drill?
Most Black and Decker drills have arrows or markings on the chuck indicating the direction to turn for tightening (usually clockwise, marked with a lock symbol) and loosening (usually counter-clockwise, marked with an unlock symbol). If you don’t see markings, the standard is counter-clockwise to loosen and clockwise to tighten.
Can I change a drill bit while the drill is still plugged in?
No, you should never change a drill bit while the drill is plugged in or the battery is inserted. Always unplug corded drills or remove the battery from cordless drills before changing bits to prevent accidental startup and injury.
My Black and Decker drill bit keeps slipping even after tightening. What should I do?
If the bit slips after tightening, it usually means the chuck is not gripping it firmly enough. Make sure you are tightening it as much as you can by hand. If it continues to slip, the chuck jaws might be worn out or there could be debris preventing a good grip.
Power down the drill, remove the bit, and check the chuck interior for any dirt. Try re-inserting and tightening again with more force.
What if my drill has a reverse setting? Does that affect changing bits?
The reverse setting on your drill is for controlling the direction of rotation when you are drilling or driving screws. It does not affect how you change the drill bit itself. The process of loosening and tightening the chuck remains the same regardless of the drill’s forward or reverse settings.
How tight should I make the drill bit in the chuck?
You should tighten the drill bit until it feels very secure and there is no wobble. For keyless chucks, tighten it firmly by hand. You don’t need extreme force, but it should feel solid.
If you have a chuck key, tighten it until it is snug and the bit is held firmly. Over-tightening is rarely an issue with keyless chucks, but a loose bit is a safety hazard.
Can I use a wrench on the chuck to tighten it if it feels loose?
For keyless chucks, you are generally not supposed to use a wrench. They are designed to be tightened by hand. Using a wrench could damage the chuck mechanism.
If your drill has a chuck key, then yes, you would use the key to tighten it. Always refer to your drill’s manual if you are unsure about your specific model.
Conclusion
Changing a drill bit on your Black and Decker drill is a fundamental skill that makes DIY projects much smoother. By following the simple steps of powering down, loosening the chuck, swapping the bit, and tightening securely, you can switch bits in seconds. Remember to always prioritize safety and to use the right bit for the job.
With a little practice, you’ll be a pro at this in no time!