How to Clean a Painted Deck Before Repainting It Right
Getting ready to paint your deck can be exciting, but it also brings up questions. Many people wonder about the best way to prepare their old painted deck. It might seem like a tricky step, especially if you’re new to deck projects.
But don’t worry, it’s simpler than you think! We’ll walk you through exactly how to clean a painted deck before repainting it right. This guide will make your deck look amazing.
Let’s get started on making that old deck fresh again.
Prepare Your Painted Deck for a Great Finish
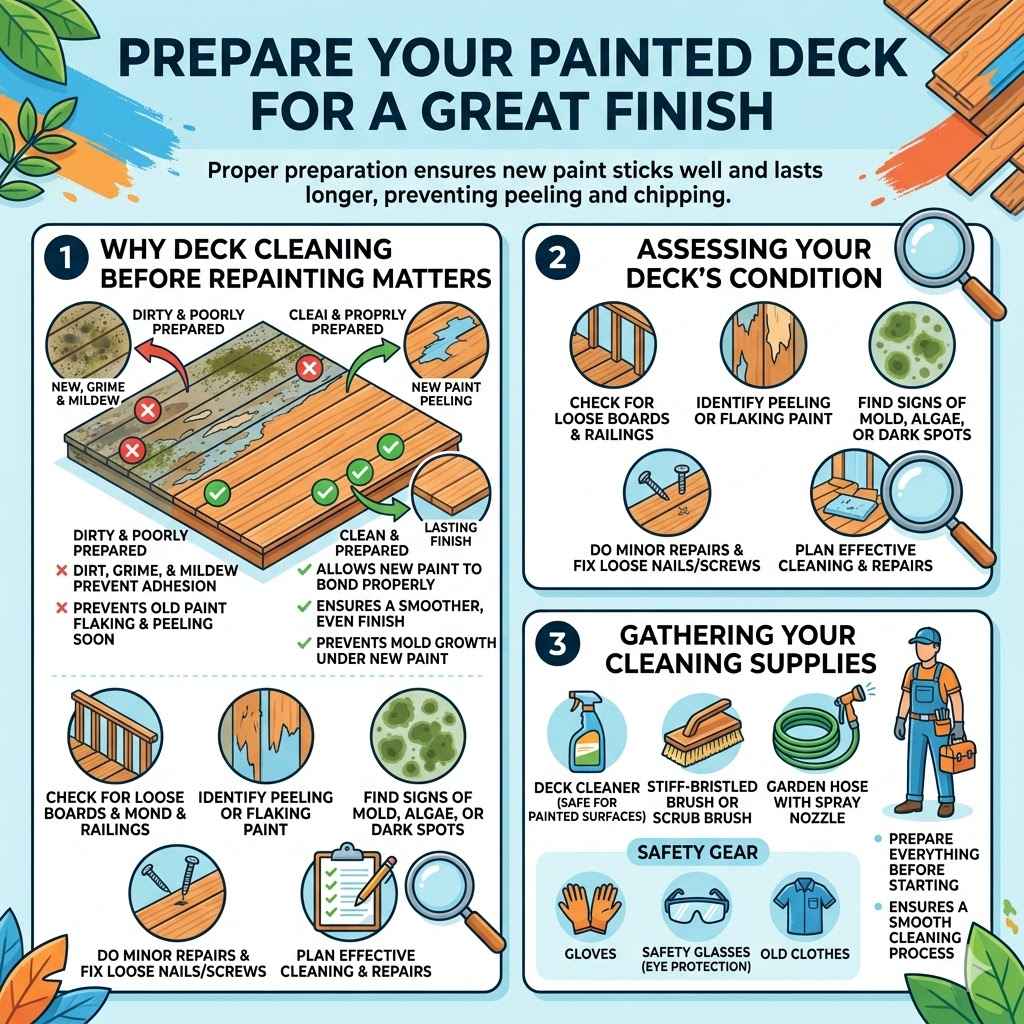
Getting your painted deck ready for a new coat of paint is super important. It’s not just about making it look pretty; it’s about making sure the new paint sticks well and lasts a long time. Skipping this part can lead to peeling and chipping paint very soon.
This section will cover why this prep work matters and what you need to think about before you even touch a paintbrush. We’ll also touch on safety.
Why Deck Cleaning Before Repainting Matters
Cleaning your painted deck before you repaint it is a key step for a lasting finish. Over time, decks collect dirt, grime, mildew, and even old, loose paint. If you paint over these things, the new paint won’t have a good surface to stick to.
This means your new paint job might start to peel or flake off much sooner than you’d like. It’s like trying to build a house on shaky ground. The surface needs to be clean and sound.
Think about it like washing your hands before you eat. You wouldn’t want to eat with dirty hands, right? Your deck paint needs a clean start too.
A clean surface allows the new paint to bond properly with the wood. This results in a smoother, more even finish. It also helps prevent problems like mold and mildew from growing under the new paint.
This preparation step is the foundation for a beautiful and durable deck.
Assessing Your Deck’s Condition
Before you start scrubbing, take a good look at your painted deck. See if there are any loose boards or railings. Check for areas where the old paint is peeling or flaking badly.
These spots will need extra attention. You might need to do some minor repairs before you clean. Fixing loose nails or screws is also a good idea.
A quick inspection helps you know what you’re dealing with.
Also, look for any signs of mold or algae growth. These usually show up as green, black, or dark spots on the wood. They are common in shady or damp areas of the deck.
You’ll need special cleaners to get rid of them. Identifying these issues now means you can plan your cleaning and repair steps effectively. This proactive approach saves you time and effort later on.
Gathering Your Cleaning Supplies
To properly clean your painted deck, you’ll need a few things. Start with a good quality deck cleaner. Choose one that’s safe for painted surfaces.
You might also need a stiff-bristled brush or a scrub brush. A garden hose with a spray nozzle is essential for rinsing. If you plan to use a pressure washer, make sure it’s set to a low setting to avoid damaging the wood.
Safety gear is also important. Wear gloves to protect your hands from cleaning chemicals. Eye protection, like safety glasses, is a must.
Old clothes are a good idea because cleaning can be messy. Having everything ready before you begin makes the process go much smoother. You won’t have to stop and search for things in the middle of your work.
The Step-by-Step Guide to Cleaning Your Painted Deck
Now that you know why cleaning is important and have your supplies ready, let’s get to the actual steps. This guide breaks down the process into simple actions. We will cover preparing the area, applying the cleaner, scrubbing, and rinsing.
Following these steps will help you achieve a surface that’s perfect for new paint.
Step 1 Sweep and Clear the Deck
The very first thing you should do is clear everything off your deck. This means moving all furniture, planters, grills, and any other items. Make sure you get into all the corners.
A clean slate makes the cleaning job much easier.
Once the deck is clear, grab a broom and sweep away all loose debris. This includes leaves, dirt, cobwebs, and any loose paint chips. Pay special attention to areas between deck boards and along the edges.
Getting rid of this loose stuff prevents it from becoming mud when you add water. A thorough sweep ensures you’re starting with the cleanest possible surface.
Step 2 Protect Surrounding Areas
Before you apply any cleaning solutions, protect plants, shrubs, and your house siding. You can cover them with plastic sheeting or old drop cloths. This prevents the cleaning solutions from damaging them.
Some deck cleaners can harm plant life or stain siding.
Also, consider taping off any areas where you don’t want the cleaner to go. This might include painted trim, windows, or doors. Using painter’s tape designed for outdoor use is best.
This simple step helps avoid potential damage and extra cleanup later. It shows you’re thinking ahead.
Step 3 Apply Deck Cleaner
Now it’s time to apply your deck cleaner. Most cleaners come as a concentrate that you mix with water. Follow the instructions on the product label carefully.
You can use a garden sprayer, a bucket and brush, or a mop to apply the cleaner.
Start applying the cleaner from one end of the deck and work your way towards the other. Overlap each section slightly to ensure even coverage. Don’t let the cleaner dry on the deck surface.
If it starts to dry, mist it with a little water. This keeps the cleaner active and working.
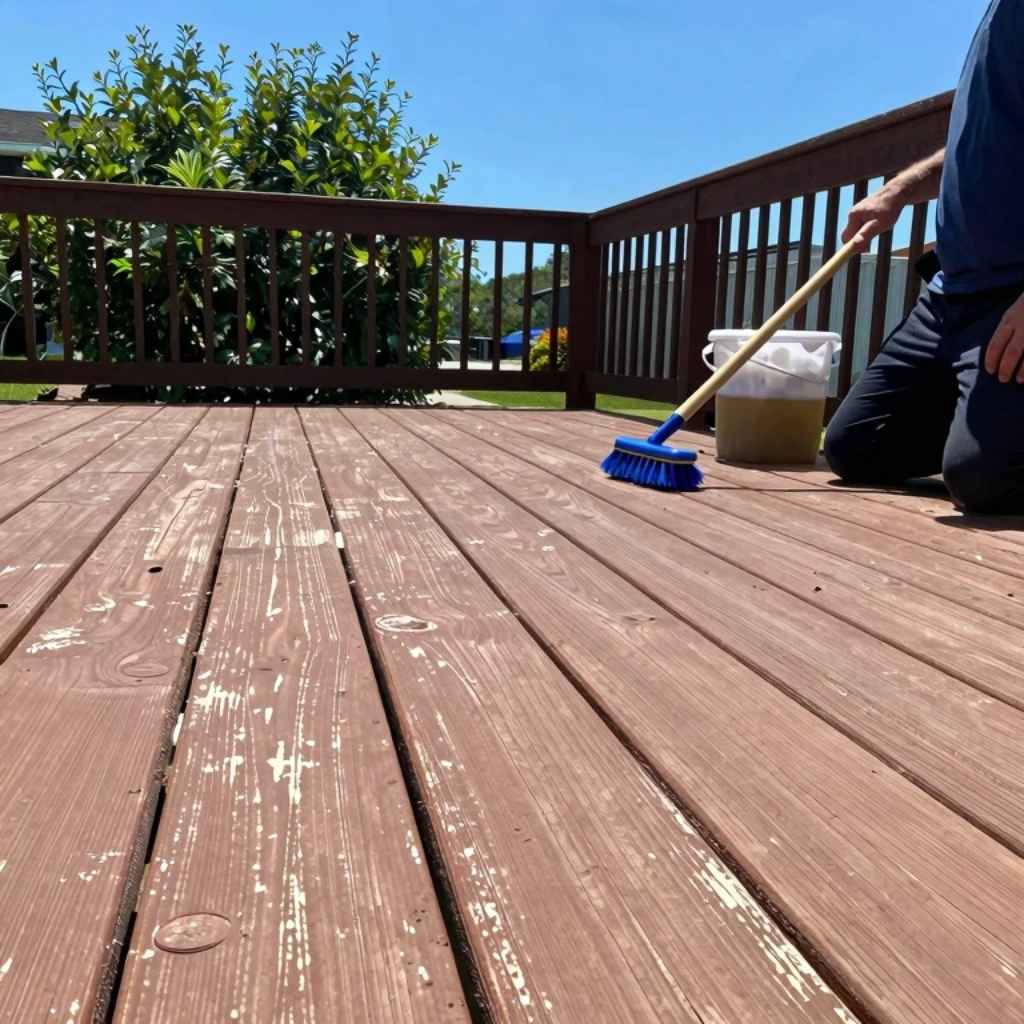
Step 4 Scrub the Deck
After you’ve applied the cleaner to a section of the deck, let it sit for the time recommended on the product label. This usually ranges from 10 to 20 minutes. During this time, the cleaner works to break down dirt, mildew, and grime.
Then, use your stiff-bristled brush to scrub the deck. Work in the direction of the wood grain. This helps lift embedded dirt and grime.
For tougher spots, you might need to apply a little more pressure. If you’re using a pressure washer, set it to a low PSI (pounds per square inch) and keep the wand moving constantly. Hold it too close or in one spot for too long can damage the wood.
For example, Sarah had a deck that looked dull and gray. She used a deck cleaner and scrubbed it well. After rinsing, she was amazed at how much cleaner it looked.
The old paint was still there, but it looked much brighter. This step really makes a visible difference.
Step 5 Rinse Thoroughly
Rinsing is a very important step. Use your garden hose with a spray nozzle to rinse the deck. Start at the highest point of the deck and work your way down.
Make sure to rinse away all the cleaner and loosened dirt. You don’t want any cleaner residue left behind, as it can affect how the new paint adheres.
Rinse each section thoroughly before moving to the next. Rinse the surrounding areas too, especially if you covered plants. This removes any cleaner that might have splashed or dripped onto them.
A good rinse ensures a clean surface for your next steps.
Step 6 Inspect and Repeat if Necessary
Once the deck is rinsed, let it dry for a bit. Then, inspect it closely. Are there still any stubborn stains or areas with mildew?
If so, you might need to repeat the cleaning and scrubbing process on those specific spots. Don’t rush this inspection. A truly clean surface is vital for the best paint job.
Sometimes, particularly with older decks or stubborn stains, a single cleaning might not be enough. It’s better to do an extra scrub now than to have paint fail later. You’re aiming for a surface that is not only clean but also smooth and free of any contaminants.
How to Clean a Painted Deck Before Repainting It Right With Specific Cleaners
Choosing the right cleaner is key to a successful deck cleaning. There are different types of cleaners available, each designed for specific problems. Understanding these options will help you pick the best one for your painted deck.
This section explores common cleaner types.
Oxygen Bleach Cleaners
Oxygen bleach cleaners are a popular choice for decks. They use sodium percarbonate, which breaks down into hydrogen peroxide and soda ash when mixed with water. This makes them effective at lifting dirt, mildew, and stains without being as harsh as chlorine bleach.
They are generally safer for plants and surrounding areas when used correctly.
These cleaners work by releasing oxygen bubbles that help to loosen grime and brighten the wood. They are a good option if you’re concerned about damaging your plants. They are also effective at removing general dirt and mildew.
Always follow the product instructions for mixing and application.
Chlorine Bleach Solutions (Use with Caution)
Chlorine bleach solutions can be very effective at killing mold, mildew, and algae. However, they are also strong chemicals that can damage wood fibers if not used properly. They can also harm plants and may discolor some siding materials.
If you choose to use chlorine bleach, it’s essential to dilute it correctly and rinse the deck very thoroughly.
A common mixture is 1 part bleach to 3 parts water. Always wear protective gear when working with chlorine bleach. After cleaning, rinse the deck multiple times to remove all traces of bleach.
This type of cleaner is best reserved for very stubborn mold and mildew problems after trying less harsh options.
Commercial Deck Washers
There are many specialized commercial deck washers on the market. Some are designed specifically for painted decks. They often contain a mix of detergents, mild acids or bases, and other cleaning agents to tackle specific problems like dirt, grime, mildew, and old stains.
When choosing a commercial cleaner, read the label carefully to ensure it’s suitable for painted wood. Some cleaners are too strong and can strip paint. Look for products that are biodegradable and environmentally friendly if possible.
These often provide a good balance of cleaning power and safety.
DIY Cleaning Solutions
You can also create your own deck cleaning solutions. A simple and effective DIY cleaner is a mixture of warm water and dish soap. This can help remove general dirt and grime.
For mildew, a solution of vinegar and water (equal parts) can be effective, though it may require more scrubbing and repeated applications.
Another DIY option for mildew is a borax solution. Mix about half a cup of borax with a gallon of warm water. This can help kill mold and mildew.
While DIY solutions are often more eco-friendly and cheaper, they might not be as powerful as commercial cleaners for very tough jobs.
Essential Post-Cleaning Steps Before Painting
After you’ve cleaned your deck, there are still a few crucial steps to take. These ensure that your deck is perfectly ready for primer and paint. Skipping these can undo all your hard cleaning work.
Allow the Deck to Dry Completely
This is one of the most important steps. Your deck must be completely dry before you apply any primer or paint. Moisture trapped in the wood can cause paint to blister, peel, and bubble.
It can also lead to mold and mildew growth under the new paint.
Drying time can vary depending on the weather. On a warm, sunny, and breezy day, your deck might dry in 24 hours. On a cool, humid, or cloudy day, it could take 48 hours or even longer.
To check if it’s dry, you can place a small piece of plastic wrap secured with tape onto the deck surface. Leave it overnight. If you find moisture underneath the plastic in the morning, the deck is still too wet.
Address Mildew and Stains Again
Once the deck is dry, take another close look. If you missed any spots during cleaning, now is the time to re-treat them. Use a mildew cleaner or a stronger solution if needed.
Stubborn stains might require a specific stain remover.
Getting rid of all mildew and tough stains is critical. Mold and mildew can continue to grow if not fully eradicated. This growth can compromise the integrity of your paint job and the wood itself.
A thorough final check ensures a solid base for your new paint.
Light Sanding for Better Adhesion
Even after cleaning, the painted surface might be a bit too smooth for the new paint to grip well. A light sanding can create a slightly rougher texture, known as “tooth,” which helps the new paint adhere better. This is especially important if the old paint was glossy.
Use a medium-grit sandpaper (around 80 to 120 grit) for this task. You can do this by hand or with a pole sander. Focus on any areas that feel slick or look uneven.
After sanding, make sure to sweep or vacuum away all the dust thoroughly. Sanding and then cleaning off the dust ensures the surface is ready for primer.
Consider a Deck Primer
While not always mandatory, applying a primer is highly recommended when repainting a deck. A good primer seals the wood and creates an even surface for your topcoat. It helps the new paint stick better, improves its durability, and can prevent issues like tannins from bleeding through the paint.
Choose a primer specifically designed for exterior wood surfaces. Make sure it is compatible with the type of paint you plan to use. Applying a coat of primer is an extra step, but it significantly improves the quality and longevity of your finished deck.
It ensures the best possible outcome for your effort.
Troubleshooting Common Painted Deck Cleaning Issues
Sometimes, even with the best intentions, you might run into problems when cleaning your painted deck. Knowing how to handle these common issues can save your project. This section offers solutions for those unexpected challenges.
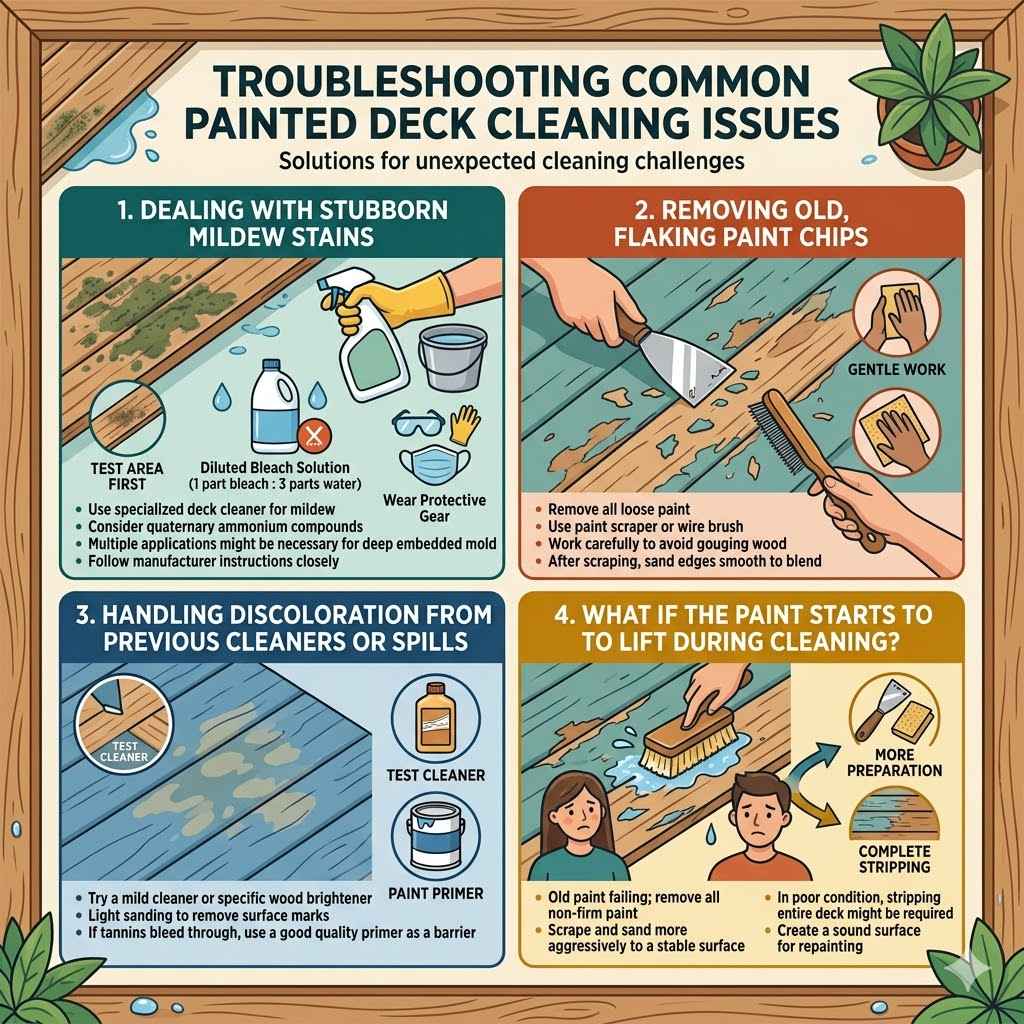
Dealing with Stubborn Mildew Stains
If mildew stains are particularly tough and don’t come off with regular cleaning, you might need a stronger approach. Consider using a specialized deck cleaner for mildew. Some people use a diluted bleach solution (about 1 part bleach to 3 parts water), but always test it on an inconspicuous area first.
Remember to wear protective gear and rinse extremely well. Another option is a product containing quaternary ammonium compounds, which are effective mildewcides. Always follow manufacturer instructions closely.
If the mildew is deeply embedded, multiple applications might be necessary.
Removing Old, Flaking Paint Chips
If there are large areas of flaking paint, simply cleaning won’t be enough. You’ll need to remove as much of the loose paint as possible. Use a paint scraper or a wire brush to lift off peeling sections.
Work carefully to avoid gouging the wood.
After scraping, sand the edges of the remaining paint smooth to blend them with the bare wood. This will prevent the new paint from looking uneven or having visible lines where the old paint chipped away. A thorough scraping and sanding is essential for a smooth finish.
Handling Discoloration from Previous Cleaners
Sometimes, previous cleaning attempts or spills can leave unusual discolorations on your painted deck. If you notice these, try a mild cleaner or a specific wood brightener designed to even out wood tones. A light sanding can also help to remove surface discoloration.
If the discoloration is due to tannins from the wood bleeding through, a good quality primer is your best defense. The primer will act as a barrier, preventing the tannins from showing through your new paint. Test any new cleaning or brightening solutions in a small, hidden spot first.
What If the Paint Starts to Lift During Cleaning?
If you notice the paint lifting or peeling more than expected during the cleaning process, it indicates the old paint is failing. You may need to scrape and sand more aggressively to remove the loose paint. This means more preparation work, but it’s better than painting over paint that’s about to come off.
In some cases, if the old paint is in very poor condition, it might be better to strip the deck completely. However, for most situations, careful scraping, sanding, and then using a good primer can help create a stable surface for repainting. The goal is to remove any paint that isn’t firmly attached.
Frequently Asked Questions
Question: How long should I let my deck dry before painting?
Answer: You should let your deck dry completely, which usually takes at least 24 to 48 hours, depending on the weather. Moisture trapped under the paint will cause problems.
Question: Can I use a pressure washer on a painted deck?
Answer: Yes, but with caution. Use a low pressure setting and keep the wand moving constantly to avoid damaging the wood or the paint.
Question: What is the best type of cleaner for a painted deck with mold?
Answer: Oxygen bleach cleaners are a good starting point. For stubborn mold, a specialized deck cleaner or a very diluted bleach solution might be needed, used carefully.
Question: Do I need to scrape off all the old paint?
Answer: You need to scrape off any paint that is peeling, flaking, or loose. The goal is to create a smooth surface, not necessarily to remove every last speck of old paint.
Question: Will cleaning my deck remove the old paint color?
Answer: It might lighten it or remove some of the very top layer of dirt and grime, making the old color look a bit fresher. It won’t typically strip the entire paint job on its own.
Summary
Cleaning your painted deck before repainting is a vital step. You must clear, sweep, and protect surrounding areas. Apply a suitable cleaner, scrub gently in wood grain direction, and rinse thoroughly.
Allow the deck to dry fully, address any remaining stains, and consider a light sanding. Proper preparation ensures your new paint looks great and lasts.