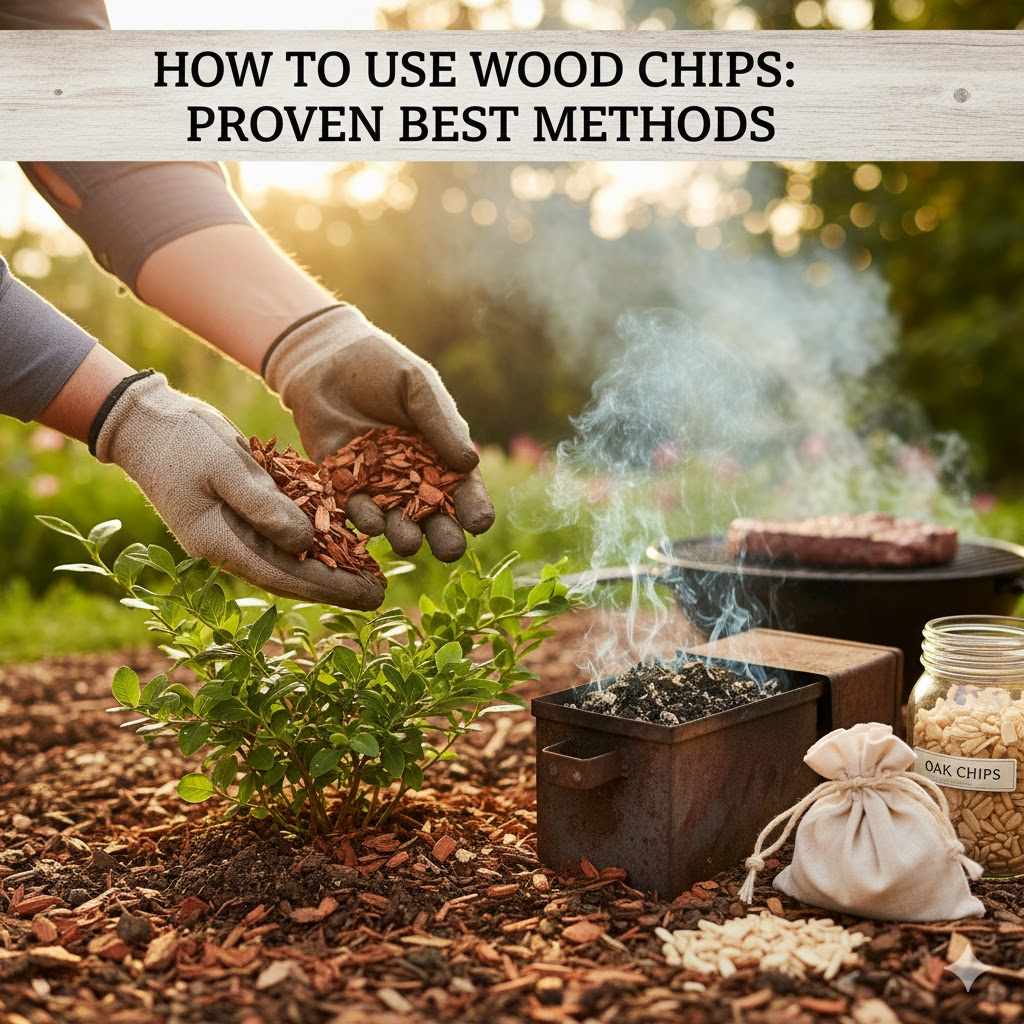
How to Use Wood Chips: Proven Best Methods
Using wood chips is simple! The best methods involve spreading a 3-6 inch layer as mulch in gardens to retain moisture and suppress weeds, creating natural pathways, adding them to compost piles for carbon, or using specific types like hickory or apple chips for smoking food. Always use untreated, natural wood for safety.
Hello, fellow makers and homeowners! It’s Md Meraj, your guide in the workshop. Have you ever found yourself with a big pile of wood chips after a project or a tree trimming? It can feel like you’ve just created a mountain of waste. Many people wonder if they should just haul them away. But I’m here to tell you that those wood chips are like gold for your home and garden.
You’re not alone in feeling a bit unsure about the best way to use them. The good news is, it’s incredibly easy to turn this simple byproduct into a valuable resource. I’m going to walk you through the very best ways to use wood chips, step-by-step. Let’s unlock their amazing potential together!
What Are Wood Chips and Why Should You Use Them?
Before we dive into the “how-to,” let’s quickly cover the “what” and “why.” Wood chips are simply small pieces of wood, usually created by a machine called a wood chipper. They can come from tree branches, stumps, or unused lumber. They are much chunkier and more irregular than sawdust or shavings.
So, why bother using them? The benefits are huge, especially for anyone who loves an efficient, healthy, and beautiful home environment. Think of them as a multi-tool for your yard.
Key Benefits of Using Wood Chips
- Improves Soil Health: As they decompose, wood chips add rich organic matter to your soil. This feeds the worms and beneficial microbes that keep your soil alive and healthy.
- Saves Water: A good layer of wood chip mulch acts like a sponge, soaking up rain and then slowly releasing it to your plants. This means you’ll need to water less often.
- Prevents Weeds: A thick layer of wood chips blocks sunlight, which keeps most weed seeds from sprouting. This means less back-breaking work for you!
- Regulates Soil Temperature: Mulch insulates the soil, keeping it cooler in the summer and warmer in the winter. This protects plant roots from extreme temperature swings.
- Reduces Waste: Using wood chips from your own or a neighbor’s tree trimming keeps valuable organic material out of landfills. It’s a fantastic way to recycle.
- Saves Money: Wood chips are often available for free or very cheap, making them a budget-friendly alternative to expensive store-bought mulches or path materials.
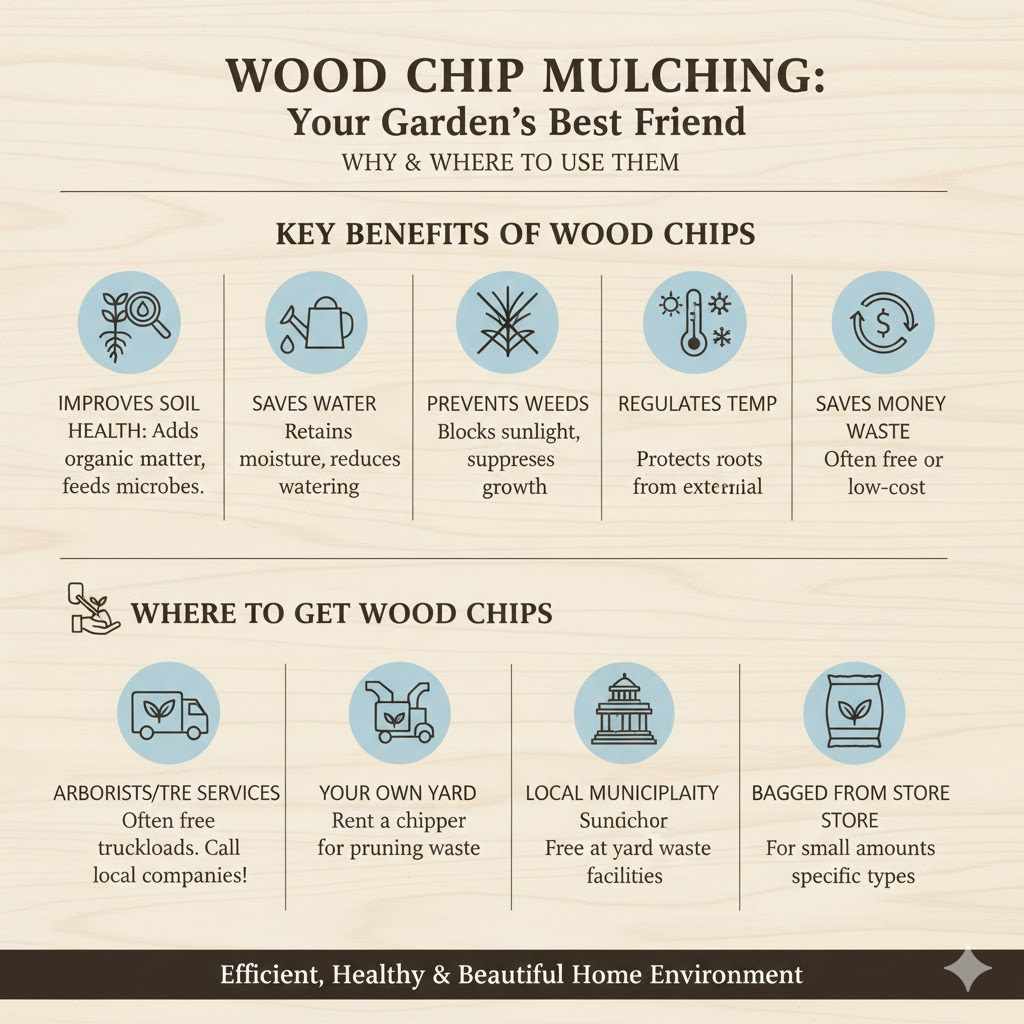
Where to Get Wood Chips
You don’t always need to own a wood chipper to get your hands on this fantastic resource. There are several ways to source them.
- Arborists and Tree Services: This is one of the best sources. Tree trimming companies often have to pay to dispose of the chips they create. Many are thrilled to drop off a truckload at your home for free. Look up local services and give them a call!
- Your Own Yard: If you do a lot of pruning or have had a tree removed, renting a wood chipper for a day can turn that brush pile into a useful resource right on-site.
- Local Municipality: Some cities or counties offer free wood chips to residents at their yard waste or compost facilities. Check your local government’s website.
- Bagged from a Store: You can always buy bagged wood chips from garden centers or home improvement stores. This is a good option if you only need a small amount or want a specific type of wood (like for smoking).
Method 1: Using Wood Chips as a Garden and Landscape Mulch
This is by far the most popular and beneficial way to use wood chips. They make an outstanding mulch for trees, shrubs, and perennial garden beds. The goal is to mimic the natural floor of a forest.
Step-by-Step Guide to Applying Wood Chip Mulch
- Prepare the Area: First, remove any existing weeds from the area you want to mulch. For really tough, grassy areas, you can lay down a layer of plain cardboard first. This will smother the weeds and eventually decompose into the soil.
- Don’t Dig Them In: Remember, wood chips are a mulch. They should sit on top of the soil, not be mixed into it. Mixing fresh wood chips directly into your planting soil can temporarily “rob” the soil of nitrogen as microbes work hard to break down the wood.
- Apply a Thick Layer: The magic is in the thickness. Spread the wood chips to a depth of 3 to 6 inches. A thinner layer won’t be as effective at suppressing weeds or retaining moisture. Use a pitchfork or a sturdy rake to spread them evenly.
- Keep a “Donut” Around Plants: This is very important! Do not pile the wood chips directly against the trunks of trees or the stems of your plants. This can trap moisture and lead to rot and disease. Leave a small, mulch-free circle (a “donut,” not a “volcano”) of about 3-4 inches around the base of each plant.
- Water the Mulch: After applying, give the area a good watering. This helps the chips settle into place and begins the process of moisture retention.
What Kind of Wood Chips Are Best for Mulch?
For general landscape mulching, a mix of different types and sizes of wood chips, often called “arborist wood chips,” is ideal. These contain a mix of wood, bark, and even some leaves, which provides a wider range of nutrients as they break down. Avoid using dyed mulches, as the dyes can sometimes contain unwanted chemicals.
Method 2: Creating Natural and Inexpensive Pathways
Tired of muddy trails in your garden or yard? Wood chips are a perfect solution for creating beautiful, soft, and low-cost pathways.
How to Build a Wood Chip Path
- Mark Your Path: Use a garden hose or rope to lay out the shape of your desired path. You can make it straight or gently curved.
- Define the Edges: While not strictly necessary, defining the edges will keep your path looking neat and prevent the chips from scattering. You can use stones, bricks, flexible landscape edging, or even larger logs.
- Clear the Ground: Remove any large rocks, roots, or weeds from the pathway area. For a more durable path, you can scrape away the top layer of sod.
- Lay a Weed Barrier (Optional): If you’re concerned about persistent weeds, lay down a layer of cardboard or several layers of newspaper. This acts as a natural, biodegradable weed blocker. Avoid using plastic sheeting, as it prevents water and air from reaching the soil below.
- Add the Wood Chips: Fill the pathway with a generous layer of wood chips, at least 4-6 inches deep. A deep layer helps with weed control and feels springy underfoot.
- Compact the Chips: Rake the chips smooth and then walk up and down the path a few times to help compact them. You can also lightly tamp them down with the back of a shovel.
Over time, the bottom layer will decompose and the path will need to be topped up with fresh chips every year or two. This is a small task for a path that’s easy on your feet and blends perfectly with a natural landscape.
Method 3: Supercharging Your Compost Pile
Every good compost pile needs a balance of “greens” (nitrogen-rich materials like grass clippings and kitchen scraps) and “browns” (carbon-rich materials). Wood chips are one of the best “browns” you can find!
Using Wood Chips in Compost
- Provide Carbon: Wood chips are packed with carbon. Balancing them with nitrogen-rich greens is the key to fast, odor-free composting. A good rule of thumb is to aim for a ratio of about 2 to 3 parts brown material for every 1 part green material.
- Improve Aeration: The coarse texture of wood chips creates air pockets within your compost pile. This allows oxygen to flow through, which is essential for the aerobic bacteria that do the hard work of decomposition. Without enough air, your pile can become a slimy, smelly mess.
- How to Add Them: When you add a bucket of kitchen scraps or a layer of grass clippings to your pile, follow it up with a layer of wood chips. Try to keep the chips from forming a thick, matted layer on their own. Mix them in as you build your pile.
Because they are dense, wood chips take longer to break down than leaves or paper. This isn’t a bad thing! It means they provide a slow and steady source of carbon and structure for your pile. You might find some partially decomposed chips in your finished compost; you can either sift them out and add them back to the active pile or just use them in your garden where they will continue to break down. For more detailed information on home composting, the U.S. Environmental Protection Agency provides an excellent guide.
Method 4: Smoking Food for Incredible Flavor
If you love to grill or barbecue, wood chips are your ticket to adding authentic, smoky flavor to meats, fish, and vegetables. Not just any wood chip will do for this job, though!
Choosing and Using Wood Chips for Smoking
The type of wood you choose has a huge impact on the flavor. It’s important to only use wood chips from hardwoods and fruitwoods that are meant for cooking.
| Wood Type | Flavor Profile | Best For |
|---|---|---|
| Apple | Mild, sweet, fruity | Pork, poultry, fish |
| Cherry | Mild, sweet, slightly fruity | Beef, pork, poultry (gives a reddish color) |
| Hickory | Strong, smoky, bacon-like | Pork, ribs, beef, large cuts |
| Mesquite | Very strong, earthy | Beef, especially brisket and steak (use sparingly) |
| Oak | Medium smoke, classic BBQ flavor | A great all-purpose wood for beef, ribs, lamb |
How to Smoke with Wood Chips
- Soak Your Chips: For most grills, you should soak your wood chips in water for at least 30 minutes before using them. This prevents them from catching fire immediately and helps them smolder and produce smoke instead.
- Drain the Chips: After soaking, drain the excess water from the chips. They should be damp, not dripping wet.
- Contain the Chips: You don’t want to throw the chips directly onto the hot coals. Instead, use a smoker box or create a foil packet. To make a packet, simply place a handful of chips on a piece of heavy-duty aluminum foil, fold it into a sealed pouch, and poke a few holes in the top to let the smoke escape.
- Position for Heat: Place your smoker box or foil packet directly over the heat source on your grill. For a charcoal grill, place it on top of the hot coals. For a gas grill, place it under the cooking grate, on top of one of the burners.
- Wait for Smoke: Close the lid of your grill. It will take a few minutes for the chips to get hot enough to start smoking. Once you see a steady stream of smoke, you’re ready to add your food and start cooking!
Method 5: Other Practical Uses Around the Home
Wood chips are incredibly versatile. Here are a few more proven ways you can put them to good use.
Animal Bedding
Kiln-dried pine or aspen shavings and chips make excellent, absorbent bedding for animals like chickens, rabbits, and guinea pigs. They help control odor and are easy to clean out.
Crucially, you must avoid certain woods:
- Cedar and treated woods are toxic to small animals and should never be used for bedding.
- Black Walnut is toxic to horses and other animals.
Always be certain of your wood source when using it for animal bedding.
Natural Playground Surfacing
Engineered Wood Fiber (EWF) is a specific type of processed wood chip that is a common and approved safety surfacing for playgrounds. It provides excellent cushioning to help protect against injuries from falls. If you are building a play area at home, ensure you use EWF that meets safety standards. According to the U.S. Consumer Product Safety Commission, a depth of at least 9 inches of wood chips can be effective for shock absorption.
Erosion Control
On sloped areas of your property that are prone to soil erosion from heavy rain, a thick layer of wood chips can be a lifesaver. The chips absorb the impact of raindrops and slow the flow of water, allowing it to soak into the ground instead of washing your valuable topsoil away.
Common Mistakes to Avoid
Using wood chips is easy, but a few common mistakes can cause problems. Let’s make sure you get it right from the start!
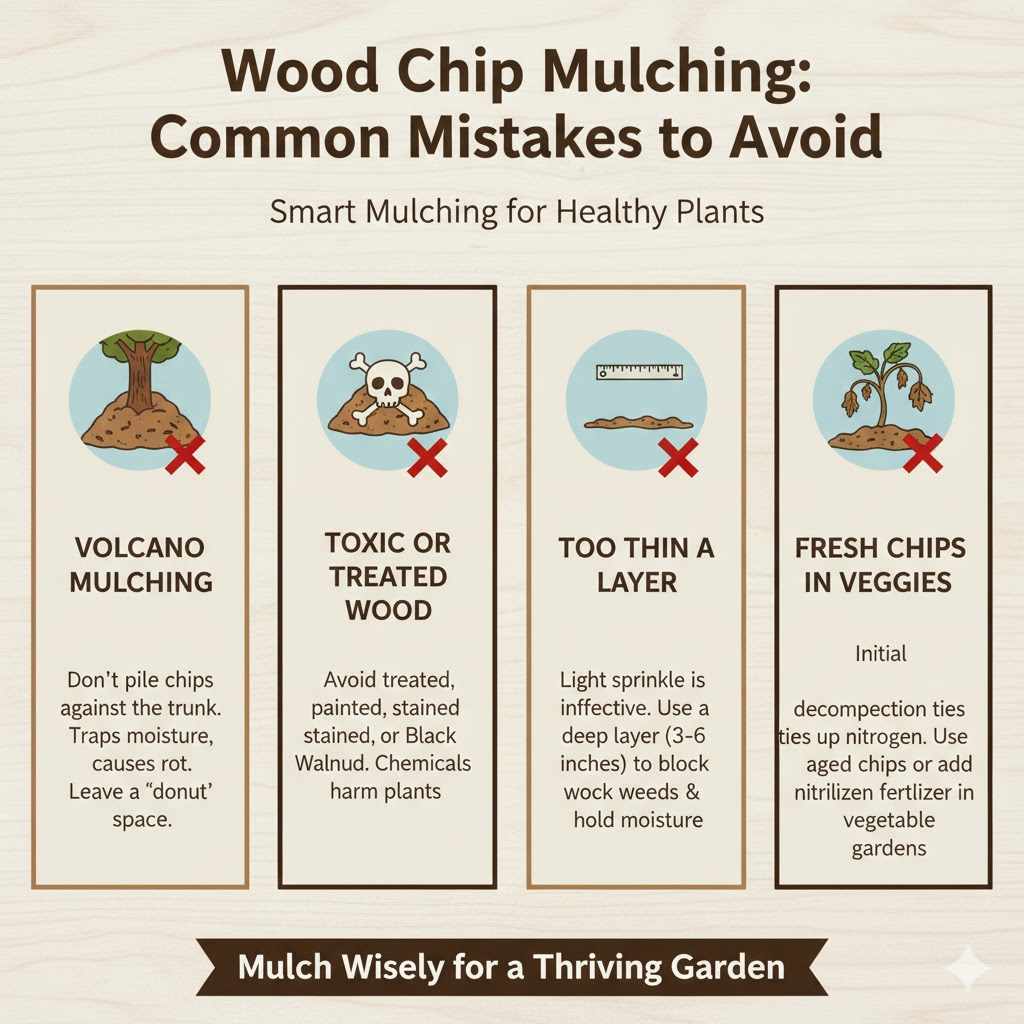
- Volcano Mulching: Piling mulch high up against the trunk of a tree looks like a volcano and is very bad for the tree. It traps moisture against the bark, inviting rot, disease, and pests. Always leave that “donut” space.
- Using Toxic or Treated Wood: Never use wood chips from treated lumber (like CCA or pressure-treated wood), particleboard, or wood that has been painted or stained. These contain chemicals that can leach into your soil and harm your plants. Black Walnut wood also contains a substance called juglone, which is toxic to many plants like tomatoes and peppers.
- Applying Too Thin a Layer: A light sprinkle of chips won’t do much. You need a deep layer (3-6 inches) to effectively block weeds and hold in moisture.
- Using Fresh Chips in Vegetable Gardens: While great around trees and shrubs, be cautious with fresh wood chips in your annual vegetable or flower garden. The initial decomposition process can tie up nitrogen. It’s better to use aged or partially composted chips in these areas. If you must use fresh chips, consider adding a light sprinkle of a nitrogen-rich fertilizer first.
Frequently Asked Questions (FAQ)
1. Will wood chips attract termites to my house?
This is a very common concern, but research shows it’s largely unfounded. Termites are attracted to moisture and food (wood), but a wood chip mulch doesn’t create a more favorable environment than any other type of organic mulch. The key is to avoid piling any type of mulch, including wood chips, directly against your home’s foundation. Keep a clear, bare space of at least 6-12 inches between the mulch and your house.
2. How thick should my layer of wood chip mulch be?
For best results in weed suppression and moisture retention, aim for a depth of 3 to 6 inches. For pathways, 4 to 6 inches is a good target. Anything less than 3 inches will likely be too thin to provide the full benefits.
3. Can I make my own wood chips?
Absolutely! If you frequently prune trees and large shrubs, renting or buying a small electric or gas-powered wood chipper can be a great investment. It allows you to recycle your own yard waste directly into a valuable resource. Always follow the chipper’s safety instructions carefully.
4. How long do wood chips last as mulch?
Wood chips break down slowly over time. A good, thick layer of mulch will typically last for several years. You’ll likely need to top it up with a fresh layer of an inch or two every 1 to 3 years to maintain its depth and effectiveness.
5. What’s the difference between wood chips and bark mulch?
Bark mulch is made only from the bark of trees (like pine or cedar) and is often more uniform in appearance. Wood chips, especially arborist chips, are made from the entire branch—wood, bark, and sometimes leaves. Many soil scientists believe that wood chips provide a broader range of nutrients to the soil as they decompose, making them a superior choice for soil health.
6. What kind of wood chips should I never use in my garden?
Avoid chips from Black Walnut trees, as they release a chemical that is toxic to many common garden plants. You should also never use wood chips from treated, painted, stained wood, or composite wood products like MDF or particleboard, as these can release harmful chemicals into your soil.
Conclusion: Your New Secret Weapon
So there you have it! That pile of wood chips is no longer a problem to be solved, but a wonderful opportunity waiting to happen. Whether you want a healthier garden, beautiful pathways, flavorful barbecue, or a richer compost pile, wood chips are an amazing, eco-friendly, and often free resource.
By following these proven methods, you can confidently put them to work around your home. You’re not just getting rid of waste; you’re actively improving your soil, saving water, and making your outdoor spaces more beautiful and functional. Give it a try—I promise you’ll be amazed at what these simple pieces of wood can do. Happy making!