Best Way To Install Wood Fence Posts: Expert Tips
Quick Summary: The best way to install wood fence posts involves digging holes of the correct depth and width, using gravel for drainage, setting posts plumb with concrete or tamped soil, and allowing adequate curing time. This ensures a strong, long-lasting fence foundation.
Hey there, DIYers and aspiring fence builders! Md Meraj here, your woodworking mentor. Ever looked at a wobbly fence and thought, “There has to be a better way?” You’re not alone! Getting those fence posts perfectly straight and sturdy can feel like a big hurdle. It’s the foundation of your whole fence, and if it’s not right, you’ll be battling leaning posts and loose panels sooner than you think. But don’t worry, even if you’re new to this, we can tackle it together. I’m going to walk you through the best way to install wood fence posts, step-by-step, using simple techniques that give professional results. Get ready to build a fence you’ll be proud of!
Why Proper Fence Post Installation Matters
A fence is more than just a boundary; it’s an investment in your property’s security, privacy, and curb appeal. The longevity and stability of your entire fence system hinge directly on how well the posts are installed. If you cut corners here, you’re inviting trouble down the line. We’re talking about:
- Leaning posts: These make your fence look sloppy and can compromise its structural integrity.
- Rotting posts: Improper drainage or contact with soil can lead to premature decay, especially at the ground level.
- Fence failure: Strong winds, heavy snow, or even just years of stress can cause a poorly installed post to give way, potentially damaging the rest of the fence.
- Wasted effort and money: Re-doing fence work is frustrating and costly. Getting it right the first time saves you headaches and resources.
My goal with this guide is to equip you with the knowledge and confidence to install fence posts that will stand tall and strong for years to come. We’ll cover everything from choosing the right materials to ensuring your posts are perfectly plumb (that’s straight up and down in woodworking terms!).
Essential Tools and Materials
Before we dig in, let’s gather our supplies. Having the right tools makes any job easier and safer. Think of this as setting yourself up for success:
Tools You’ll Need:
- Post Hole Digger: This is the specialized shovel for digging deep, narrow holes. An auger attachment for a drill can also be a real time-saver for larger projects.
- Shovel: For moving dirt and debris.
- Measuring Tape: For accurate post spacing and depth.
- Level (4-foot recommended): Crucial for ensuring your posts are perfectly plumb.
- String Line and Stakes: To mark your fence line accurately.
- Hammer or Mallet: For driving stakes and, occasionally, tapping posts.
- Wheelbarrow: Handy for mixing concrete and moving materials.
- Safety Glasses: Always protect your eyes!
- Work Gloves: To protect your hands.
- Post Brace (optional but helpful): Keeps the post stable while concrete cures.
Materials You’ll Need:
- Fence Posts: Typically pressure-treated lumber (like cedar or redwood for natural resistance, or pine/fir treated for ground contact) cut to the appropriate height. For a typical 6-foot fence, you’ll need 8-foot posts (2 feet for below ground).
- Gravel: About 4-6 inches of coarse gravel for drainage at the bottom of each hole.
- Concrete Mix: Bags of dry concrete mix, typically “fast-setting” for quicker results.
- Water: For mixing the concrete.
- String Line: To guide your fence line.
- Paint Stirrers or Small Wood Scraps: To create a slight slope away from the post for water runoff if not using concrete.
Step-by-Step: The Best Way to Install Wood Fence Posts
Alright, let’s get our hands dirty! Follow these steps carefully for a solid fence post installation.
Step 1: Plan Your Fence Line
Before you dig, map it out. Use stakes and a string line to create a straight, clean path for your fence. Measure carefully, ensuring consistent spacing between posts. Typical spacing is 6 to 8 feet apart, depending on the type of fence panels you’ll be using. Check local building codes and property lines to avoid any surprises. Resources from the International Code Council (ICC) can be invaluable for understanding regulations.
Step 2: Mark and Dig Your Post Holes
Now, mark the exact spots for each post along your string line. For the hole depth, a good rule of thumb is to go one-third of the post’s total height into the ground. For a 6-foot fence, a 6-foot post needs about 2 feet underground, so you’ll use an 8-foot post. This depth provides stability against wind and ground movement.
The hole diameter should be about three times the width of your post. For a standard 4×4 post, aim for a 12-inch diameter hole. This gives you enough room to position the post and add concrete or soil around it.
Use your post hole digger or auger to excavate the holes. Try to keep the sides as straight as possible. As you dig, place the removed soil nearby – you might need it later.
Step 3: Add Drainage to the Bottom of the Hole
This is a crucial step often overlooked! At the bottom of each hole, add about 4-6 inches of coarse gravel. This layer acts as a drainage system, preventing water from pooling around the base of your post. Standing water is a fast track to rot, even for treated lumber. Compact the gravel with your shovel or a piece of scrap wood.
Step 4: Position the First Post and Brace It
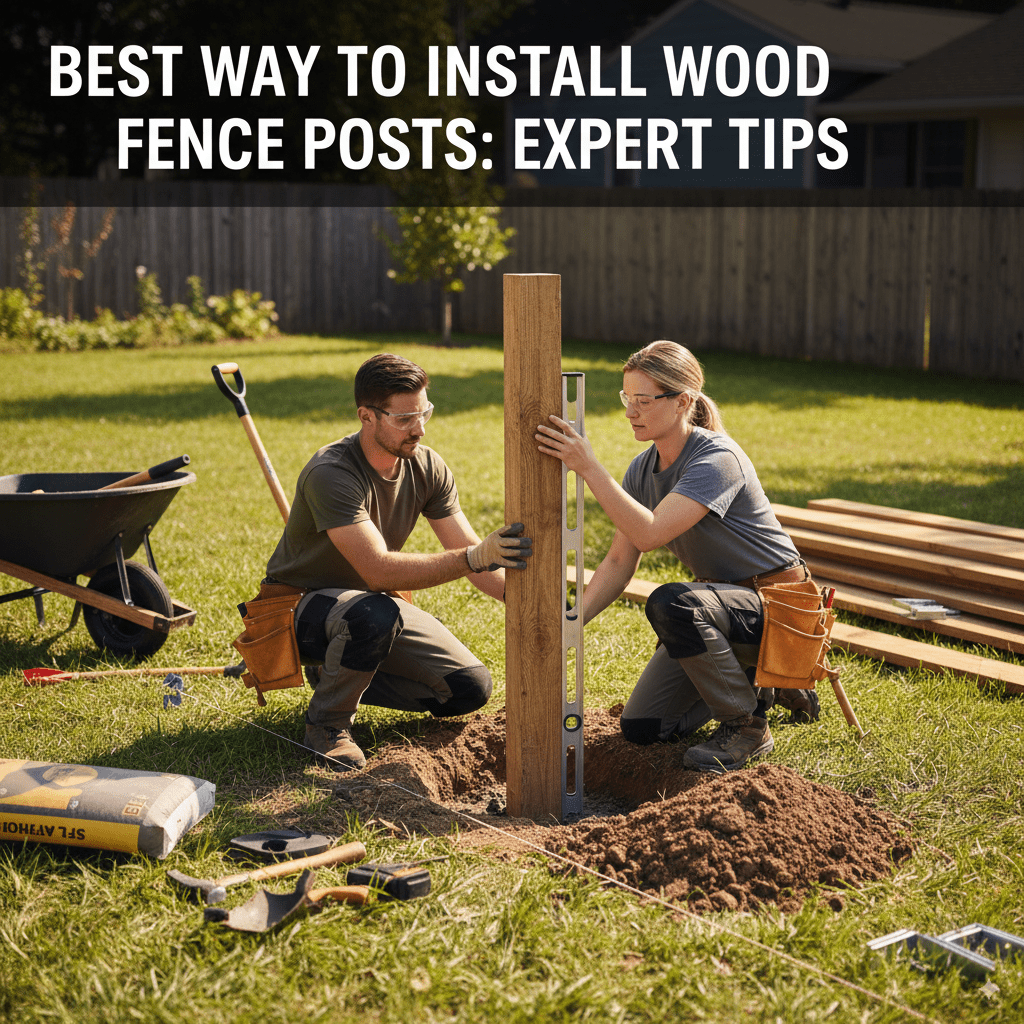
Carefully place your first fence post into the hole, resting it on the gravel base. Now, use your level on two adjacent sides of the post. Adjust the post until it is perfectly plumb (straight up and down in both directions). This first post is critical as it often sets the level for the entire fence line.
Once plumb, use temporary braces to hold it in place. These can be made from scrap wood. Nail or screw one end of a diagonal brace to the post, a few feet off the ground, and stake the other end firmly into the ground away from the hole. Two braces, positioned at roughly 90 degrees to each other, offer the best stability. For more precise alignment, line up the post with your string line.
Pro Tip: If you’re installing a series of posts, use your string line to ensure each post is in the correct position relative to the others, not just plumb in its hole.
Step 5: Fill the Hole – Choose Your Method!
You have two main options for securing your posts: concrete or tamped soil/gravel. Concrete offers the strongest, most permanent solution, especially in windy areas or for heavier fences.
Option A: Setting Posts in Concrete
This is generally considered the best way to install wood fence posts for maximum durability.
- Mix the Concrete: In your wheelbarrow, mix the concrete according to the manufacturer’s instructions. You’re aiming for a consistency like thick oatmeal – not too soupy, not too dry.
- Pour the Concrete: Carefully pour the mixed concrete into the hole, around the post. Fill the hole to about 2-3 inches from the top.
- Settle the Concrete: As you pour, periodically use a shovel or a piece of wood to tamp down the concrete. This helps eliminate air pockets, which can weaken the setting. Ensure the post remains plumb as you do this, and re-check with your level frequently. You can also use a paint stirrer or scrap wood to poke into the concrete and release air bubbles.
- Slope the Top: Once filled, dome the top of the concrete slightly, sloping it away from the post. This detail is vital for directing rainwater away from the wood, preventing rot.
- Cure Time: Allow the concrete to cure fully before attaching fence panels. Fast-setting concrete can often be ready for light load-bearing in a few hours, but it’s best to check the bag’s instructions and wait at least 24-48 hours for optimal strength.
Option B: Setting Posts with Tamped Soil or Gravel
This method is more eco-friendly and can be suitable for lighter fences in less demanding conditions. It relies on tightly packing material around the post.
- Add and Tamp: Begin adding soil or gravel back into the hole, in layers of about 6 inches.
- Compact Each Layer: After adding each layer, use a heavy tamper (or the end of a 4×4 scrap) to compact the material firmly. You want to eliminate as much air space as possible.
- Maintain Plumbness: Constantly check that your post remains plumb with your level as you add and tamp material. Use your string line to ensure it’s correctly aligned with the fence.
- Slight Slope: If using soil, consider adding a few inches of gravel at the very top, sloped away from the post, to improve drainage where it matters most.
- Watering: Watering each layer moderately as you tamp can help the soil settle and compact more effectively, but avoid over-saturating.
Comparing Concrete vs. Tamped Soil/Gravel:
| Feature | Concrete Setting | Tamped Soil/Gravel Setting |
|---|---|---|
| Strength & Stability | Highest. Excellent resistance to wind and movement. | Moderate. Can shift over time, especially in soft soil or high winds. |
| Durability & Longevity | Very good, especially with proper drainage. | Can be good, but more susceptible to post rot if water penetrates. |
| Ease of Installation | Requires mixing and handling heavy materials. | Physically demanding to tamp effectively, but no mixing. |
| Cost | Slightly higher due to concrete mix cost. | Lower material cost. |
| Best For | Heavy fences, windy areas, long-term stability needs. | Light fences (e.g., garden borders), areas with minimal wind, budget projects. |
Step 6: Install Remaining Posts
Repeat steps 4 and 5 for all remaining posts. Remember these key points:
- Use your string line to ensure consistent spacing and alignment between posts.
- Keep your level handy for every post.
- If using concrete, ensure the top surface is sloped away from the post.
- Double-check the setting of each post before moving on.
For very long fence runs, you might need to install corner posts and end posts first, then run a string line between them to guide the placement of the interior posts. This ensures a consistent straight line.
Step 7: Let It Cure (If Using Concrete)
Patience is a virtue here! Resist the temptation to attach fence panels too soon if you used concrete. Follow the manufacturer’s recommended curing time. This allows the concrete to reach its full strength, providing a rock-solid foundation.
Considerations for Different Soil Types
The ground beneath your fence posts plays a big role in how stable they’ll be. Understanding your soil type can help you adapt your installation technique:
- Clay Soil: This soil expands when wet and shrinks when dry. This freeze-thaw cycle can push posts upwards over time. For clay, ensuring a wide hole (at least 3x the post width) and thorough compaction, or using concrete, is highly recommended. The gravel drainage layer is also extra important.
- Sandy Soil: If your soil drains very quickly, you might worry about stability. A concrete setting is almost always best for sandy soil to provide a solid anchor.
- Rocky Soil: Digging holes in rocky soil can be challenging. If you encounter very large rocks, you may need to hand-dig around them or consider using a gas-powered auger. Ensure no large voids are left around the post if using soil/gravel.
For more information on soil properties and their impact on construction, resources from university extensions, like the Purdue Extension, often provide detailed insights.
Tips for Extra Durability and Longevity
Want your fence to last even longer and look great doing it? Here are a few expert tips:
- Use Quality Materials: Opt for pressure-treated lumber rated for ground contact. Cedar and redwood are naturally resistant to decay and insects.
- Post Caps: Install post caps on top of your fence posts. These prevent water from soaking into the end grain of the wood, a common entry point for rot.
- Hardware Cloth (for small animals): If you’re concerned about critters digging under your fence, bury a length of hardware cloth around the base of the posts and fence line.
- Regular Maintenance: Periodically check your fence posts for any signs of leaning or rot. Clean them and reapply sealant or stain as needed to protect the wood.
- Adequate Spacing: Don’t space your posts too far apart. Stick to the recommended 6-8 foot intervals for optimal support.
Frequently Asked Questions (FAQ)
Q1: How deep should I dig my fence post holes?
A: A good rule of thumb is to dig the hole to one-third the total length of your post. For a 6-foot tall fence, this means using an 8-foot post and digging 2 feet deep.
Q2: Should I put gravel in the bottom of my fence post holes?
A: Yes, absolutely! A layer of 4-6 inches of gravel at the bottom provides essential drainage, preventing water from pooling around the base of the post and causing rot.
Q3: Concrete or tamped soil/gravel for setting posts? Which is better?
A: Concrete provides Superior strength and longevity, especially in windy areas or for heavy fences. Tamped soil/gravel is a more budget-friendly option for lighter fences in calmer conditions.
Q4: How do I make sure my fence posts are straight?
A: Use a 4-foot level on at least two adjacent sides of the post as you set it. Adjust the post until it is perfectly plumb (straight up and down) in both directions before securing it with concrete or soil.
Q5: How long does concrete need to cure before I can attach fence panels?
A: For fast-setting concrete, you might be able to attach panels after a few hours, but it’s best to wait at least 24-48 hours for concrete to cure properly and reach its full strength.
Q6: How wide should my fence post holes be?
A: The hole diameter should be about three times the width of your fence post. For a standard 4×4 post, aim for a 12-inch diameter hole.
Q7: Can I reuse old fence posts?
A: Sometimes, but only if they are in excellent condition. Inspect old posts thoroughly for rot, insect damage, or structural weakness. If there’s any doubt, it’s safer and more cost-effective in the long run to use new, properly treated posts.
Conclusion
There you have it! Installing wood fence posts doesn’t have to be a daunting task. By understanding the importance of proper depth, drainage, and plumbness, and by following these straightforward steps, you’re well on your way to building a beautiful, sturdy fence that will enhance your property for years to come.
Remember, taking the time to do it right at the foundation level – with your posts – is the secret to a long-lasting, great-looking fence. So grab your tools, gather your materials, and get ready to build something you’ll be proud of. Happy building!