Can I Install Hardwood Floors Myself A DIY Guide
Thinking about new hardwood floors? Many people wonder, “Can I Install Hardwood Floors Myself? DIY Guide.” It can seem like a big project, especially if you’ve never done it before.
There are many steps and choices involved. But don’t worry! This guide breaks it all down into simple, easy-to-follow steps.
We’ll help you get those beautiful new floors you’ve been dreaming of without the stress.
Getting Started With Your DIY Hardwood Floor Project
Taking on a DIY hardwood flooring project can feel like a significant undertaking, and it’s natural to question, “Can I Install Hardwood Floors Myself? DIY Guide.” Beginners often find the sheer number of tools, materials, and techniques overwhelming. Decisions about wood types, installation methods, and room preparation can seem like complex puzzles.
However, with the right knowledge and a clear plan, it becomes much more manageable. This section will guide you through the essential preliminary steps, ensuring you have a solid foundation for success. We’ll cover everything from assessing your readiness to choosing the right materials, setting you up for a rewarding experience.
Is DIY Hardwood Flooring Right For You
Before you even think about buying wood, ask yourself if a DIY approach truly fits your skills and lifestyle. Installing hardwood floors requires patience, physical effort, and a good eye for detail. It’s not a weekend project that can be rushed.
Consider your previous DIY experience. Have you tackled projects like tiling, framing, or trim work before? These can be good indicators of your aptitude for flooring.
Also, think about your available time. Do you have uninterrupted blocks of time to dedicate to the project, or will you be squeezing it in between work and other commitments? Rushing the installation can lead to costly mistakes.
It’s also important to assess your physical condition. You’ll be on your knees for extended periods, lifting heavy boxes of flooring, and using power tools. If you have back problems or other physical limitations, it might be wiser to hire professionals.
However, if you’re determined and willing to learn, many challenges can be overcome with research and the right approach. The satisfaction of completing a beautiful hardwood floor yourself can be immense.
Understanding Different Hardwood Flooring Types
The type of hardwood flooring you choose significantly impacts the installation process. The two main categories are solid hardwood and engineered hardwood. Solid hardwood is exactly what it sounds like—a plank made from a single piece of solid wood.
It’s classic, can be sanded and refinished many times, and adds significant value to a home. However, it’s more susceptible to moisture and temperature changes, making it less ideal for basements or areas with high humidity.
Engineered hardwood, on the other hand, is constructed with multiple layers. The top layer is real hardwood veneer, backed by layers of plywood or high-density fiberboard (HDF). This construction makes it more stable and resistant to moisture and temperature fluctuations.
It’s often a more forgiving option for DIYers, especially for installation methods like floating or gluing. Understanding these differences will help you select the best flooring for your specific room and installation method.
Solid Hardwood
Solid hardwood planks are milled from a single piece of timber. This means each board is uniform in thickness and composition throughout. The beauty of solid hardwood lies in its natural character, which can include unique grain patterns and occasional knots, adding warmth and authenticity to any room.
Because it’s solid wood, it can be sanded down and refinished multiple times over its lifespan. This offers incredible longevity and allows you to change the floor’s appearance over the years, perhaps by staining it a different color or applying a new protective finish.
However, solid hardwood is more sensitive to environmental changes. Extreme humidity or drastic temperature swings can cause the wood to expand and contract, potentially leading to cupping, gapping, or warping. For this reason, it’s generally recommended for installation on or above ground level in areas with stable humidity and temperature, such as living rooms, bedrooms, and hallways.
Proper acclimation before installation is absolutely critical for solid hardwood to minimize these issues.
Engineered Hardwood
Engineered hardwood flooring offers a blend of durability and versatility. It’s constructed using a core of stabilized materials, such as plywood or HDF, topped with a real wood veneer. This layered design provides superior dimensional stability compared to solid hardwood.
The cross-grain construction of the core layers significantly reduces the impact of humidity and temperature changes, making it less prone to expansion, contraction, and warping. This makes engineered hardwood a more suitable choice for challenging environments like basements, kitchens, and even areas prone to moisture.
The installation methods for engineered hardwood are also often more varied and sometimes simpler for DIYers. Many engineered planks come with a click-lock system, allowing for a floating installation without nails or glue. Others can be glued down or even stapled.
The top veneer layer is genuine hardwood, so it looks and feels like solid hardwood. However, the number of times it can be sanded and refinished is limited by the thickness of the veneer layer.
Essential Tools and Materials
To answer the question, “Can I Install Hardwood Floors Myself? DIY Guide,” effectively, you need to know what tools and materials are required. Gathering everything before you start is crucial for a smooth process.
You’ll need basic carpentry tools, plus some specialized flooring tools. Don’t underestimate the importance of safety equipment—gloves, safety glasses, and knee pads are essential.
Beyond the flooring itself, you’ll need underlayment to provide a moisture barrier and cushion. You’ll also need a chalk line and measuring tape for layout, and potentially a miter saw or a jigsaw for cutting planks. For nailing down solid hardwood, a flooring nailer and compressor are highly recommended.
For glued-down or floating floors, you’ll need specialized adhesives or the click-lock system itself. Having the right gear makes the job manageable.
- Measuring Tape: A reliable measuring tape is fundamental for accurately measuring your room dimensions and the flooring planks. This ensures you order the correct amount of material and plan your layout efficiently. Without precise measurements, you risk under or over-ordering, leading to wasted material or frustrating shortages mid-project.
- Chalk Line and Pencil: These are used for marking straight lines on your subfloor. This is particularly important for establishing your starting line and ensuring your rows of flooring are perfectly parallel to your walls. A consistent line is key to a professional-looking finished floor.
- Miter Saw or Jigsaw: You’ll need a saw to cut planks to length, especially at the end of rows or around obstacles like doorways and cabinets. A miter saw is ideal for making straight, clean crosscuts, while a jigsaw is useful for making curved cuts or notches.
- Flooring Nailer (for solid hardwood): This specialized tool drives nails at an angle through the tongue of the plank, securing it to the subfloor. It significantly speeds up the installation of solid hardwood compared to manual nailing. You’ll also need an air compressor to power it.
- Underlayment: This is a layer installed between the subfloor and the hardwood planks. It provides a moisture barrier, helps with sound dampening, and offers a slight cushion underfoot. The type of underlayment needed depends on your flooring and subfloor type.
- Safety Gear: This includes safety glasses to protect your eyes from debris, sturdy gloves to protect your hands, and knee pads to cushion your knees during prolonged periods of kneeling.
The Installation Process Step-by-Step
Now that you’re equipped and have chosen your materials, let’s get into the heart of the question, “Can I Install Hardwood Floors Myself? DIY Guide.” This section will walk you through the actual installation. We’ll cover preparing your subfloor, laying the first row, and working your way across the room.
Following these steps carefully will ensure a strong, beautiful, and long-lasting floor.
Subfloor Preparation is Key
The success of your hardwood floor installation hinges entirely on the condition of your subfloor. A clean, level, and dry subfloor is non-negotiable. Any imperfections in the subfloor will translate directly to your new hardwood floor, leading to creaks, gaps, and premature wear.
If you’re installing over an existing floor, you’ll typically need to remove it. However, if it’s a concrete subfloor, you may need to install a layer of plywood over it first, depending on the engineered flooring manufacturer’s recommendations.
Start by inspecting the subfloor for any loose boards or nails. If it’s wood, secure any squeaky spots with screws. Uneven areas need to be leveled.
For minor dips, you can use a leveling compound. Major unevenness might require sanding down high spots or adding shims. Ensure the subfloor is completely dry.
Moisture is the enemy of hardwood, so test for moisture levels, especially on concrete slabs. Any moisture issues must be addressed before proceeding.
Checking Subfloor Levelness
A common standard for acceptable subfloor levelness is that it should not deviate by more than 1/8 inch over a 6-foot span. To check this, use a long, straight edge (like a metal screed or a long level) and place it across the subfloor in various directions. If you can see a gap of more than 1/8 inch between the straight edge and the subfloor, that area needs attention.
Use a quality floor leveling compound specifically designed for your subfloor type (wood or concrete) to fill low spots. For high spots, you might need to carefully sand them down, but be cautious not to create new low spots in the process.
For concrete subfloors, it’s essential to ensure they are properly cured and dry. The moisture content should be within the manufacturer’s recommended limits, usually checked with a moisture meter. If there is excessive moisture, you might need to use a moisture barrier primer or consider a different flooring product.
Addressing these subfloor issues upfront prevents much larger and more expensive problems down the line.
Acclimation of Hardwood Flooring
Acclimation is a critical step that many DIYers overlook, yet it’s vital for the longevity of your new hardwood floor. Hardwood is a natural material that reacts to its environment. Before installation, the flooring needs to adjust to the temperature and humidity levels of the room where it will be installed.
This process prevents excessive expansion or contraction after installation, which can cause gaps, buckling, or cupping.
Generally, solid hardwood needs to acclimate for at least 72 hours, while engineered hardwood might need less time, typically 24-48 hours. However, always follow the manufacturer’s specific recommendations. Store the unopened boxes of flooring flat in the room where they will be installed.
Ensure the room is at its intended living temperature and humidity. Do not acclimate flooring in basements or garages unless that is where it will be installed and the conditions are stable.
Laying the First Row
The first row of planks is arguably the most important. It sets the tone and alignment for the entire floor. You’ll typically start along the longest, straightest wall in the room.
This is often the wall opposite the main entrance or the primary focal point. Measure the room’s width and divide by the width of your flooring planks to determine if your last row will be too narrow or too wide. If it’s less than half the width of a plank, you’ll need to rip (cut lengthwise) your first row to make the last row a more consistent width.
When laying the first row, ensure you remove the tongue side of the planks that will face the wall. This is usually done with a hand saw or a table saw. You’ll then place the planks with the grooved side facing the wall.
Use spacers between the planks and the wall to create an expansion gap. This gap is crucial to allow for natural wood movement. The size of this gap is usually specified by the flooring manufacturer, typically ranging from 1/4 inch to 1/2 inch.
Starting Wall Selection
Choosing the correct starting wall is more than just picking a wall; it’s a strategic decision that affects the visual appeal and ease of installation. Ideally, you want to start along the longest, straightest wall in your room. This minimizes the risk of the first row looking crooked, which would then throw off subsequent rows.
Many installers prefer to start along the wall that’s furthest from the main entry point of the room. This way, the most visible part of the floor will have full, uninterrupted planks, creating a more polished look.
Before committing to a wall, do a dry layout of a few rows to visualize the outcome. Measure the room’s dimensions and the width of your flooring planks. Calculate how wide your final row of planks will be.
If the last row is exceptionally narrow (less than half the width of a plank), it will look unbalanced and can be prone to damage. In such cases, you’ll need to rip your first row lengthwise to make the last row a more aesthetically pleasing and structurally sound width.
Expansion Gaps Explained
Hardwood flooring is a natural product that expands and contracts with changes in temperature and humidity. This movement is a normal characteristic of wood. To prevent your beautiful new floor from buckling, cracking, or gapping apart, it’s essential to leave an expansion gap around the perimeter of the room.
This gap acts as a buffer, giving the wood room to move without stressing the installation. The size of this gap is critical and is always specified by the flooring manufacturer. It typically ranges from 1/4 inch to 1/2 inch.
During installation, you will place small spacers between the edge of each plank and the adjacent wall or any fixed object like cabinets or doorways. Once the entire floor is installed, these spacers are removed, and the gap is covered by baseboards or quarter-round molding. It’s crucial that the flooring doesn’t touch any fixed vertical surfaces.
Even door casings or built-in cabinets need a small gap. If you’re unsure how to create these gaps around doorways or other features, consult your flooring manual or seek professional advice.
Installing Subsequent Rows
Once your first row is perfectly laid and secured, the process of laying subsequent rows becomes more straightforward. The key is to stagger the end joints of the planks. This means that no two adjacent rows should have their end seams line up.
This staggered pattern creates a more visually appealing and structurally sound floor. A common recommendation is to stagger the end joints by at least 6 to 8 inches.
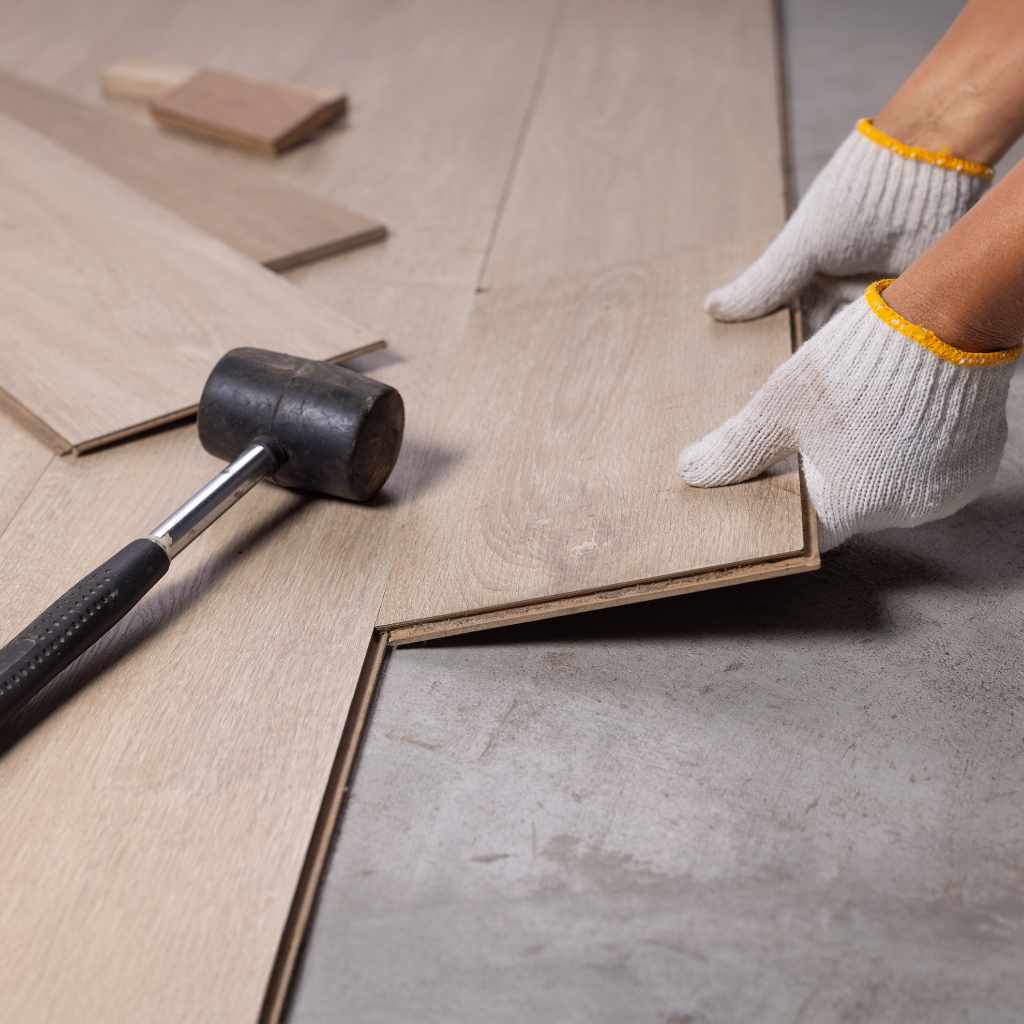
For nail-down installations, you’ll use your flooring nailer to secure each plank. For glued-down installations, apply the adhesive according to the manufacturer’s instructions before laying each plank. For click-lock systems, simply engage the tongue of one plank into the groove of the previous one and tap it securely into place.
Continue this process, row by row, ensuring each plank is firmly connected and properly aligned. You’ll likely need to cut planks to fit at the end of rows, so measure carefully.
Staggering Plank Joints
The arrangement of plank end joints, often referred to as staggering, is a fundamental aspect of installing hardwood floors that contributes significantly to both the aesthetic appeal and structural integrity of the finished product. Unlike a straight pattern where all end joints align across rows, a staggered pattern creates a more natural and visually interesting appearance, mimicking the look of traditional random-length plank flooring. A well-staggered floor looks more organic and less like a manufactured installation.
To achieve a good stagger, you’ll want to ensure that the end joints in one row are offset from the end joints in the adjacent rows by a significant distance. A common rule of thumb is to aim for an offset of at least 6 to 8 inches. This means that if you cut a plank to end a row, you should use the offcut from that plank to start the next row, provided it’s long enough, or cut a new plank to the desired length, ensuring it doesn’t align with the previous row’s joints.
Some people even use a random length approach to create a more varied look, but consistent staggering is key for a professional finish.
Working Around Obstacles
Rooms are rarely perfect rectangles. You’ll inevitably encounter obstacles like doorways, heating vents, cabinets, and staircases. Careful planning and precise cutting are necessary to work around these features.
For doorways and openings, you’ll need to cut planks to fit snugly against the door jambs and any trim. Often, the flooring will be installed under the door jambs, requiring you to undercut the jambs with a hand saw to slide the plank underneath.
Heating vents might require cutting out sections of planks to fit around them. This is where a jigsaw can be invaluable. For cabinets, you’ll usually install the flooring right up to the cabinet base, leaving the necessary expansion gap.
If you have a staircase, you’ll need specialized stair nosing or transition pieces to create a clean and safe edge where the floor meets the first step. Taking your time and measuring twice before cutting once is paramount when dealing with these tricky areas.
Finishing Touches and Protection
After the last plank is installed and secured, your hardwood floor is nearly complete. However, a few finishing touches are essential for both aesthetics and protection. This includes installing baseboards and quarter-round molding to cover the expansion gaps around the perimeter.
If your floor meets another flooring type or a different level, you’ll need transition strips. Finally, applying a protective finish or ensuring your pre-finished floor is clean and ready for use is the last step.
Cleaning is vital. Remove any adhesive residue, sawdust, or scuff marks. For pre-finished floors, a light cleaning with a recommended hardwood floor cleaner is usually sufficient.
If you’ve installed unfinished hardwood and plan to finish it yourself, this is the stage for sanding and applying stain and sealant. Remember that the finish will protect your floor from spills and wear, so ensure it’s applied evenly and thoroughly. A final walk-through to check for any loose boards or imperfections is also a good idea.
Installing Baseboards and Trim
Baseboards and quarter-round molding are the finishing touches that conceal the expansion gaps around the room’s perimeter, providing a clean and professional look. Baseboards cover the joint between the wall and the floor, while quarter-round molding, which is a quarter-circle shaped trim, can be added at the base of the baseboard to further hide any slight imperfections or larger gaps. When installing these, you’ll want to ensure they are securely fastened to the wall, not the floor.
This is important because the floor moves independently of the walls.
You can use a nail gun designed for trim work to install these pieces. Measure the lengths needed and cut them to fit precisely, using a miter saw for clean, angled cuts at corners. If you have existing baseboards that are in good condition, you might be able to reuse them, but often it’s best to remove and replace them to get a clean edge for the new flooring.
Take care not to damage the walls or the new hardwood during this process.
Transition Strips
Transition strips are essential pieces of molding that bridge the gap between your new hardwood floor and other flooring materials or level changes in adjacent rooms. They are not just for looks; they serve a critical functional purpose. If your hardwood floor meets a carpeted area, a carpet reducer strip will be used.
For areas where the hardwood meets tile or another hard surface at the same height, a T-molding is often used. When there’s a significant height difference, such as at a doorway leading to a lower level or a different type of flooring, a stair nosing or a ramp-style reducer will be necessary.
These transition pieces are typically secured to the subfloor or the existing flooring beneath them, depending on the type. Some are nailed down, while others might be glued. It’s important to choose a transition strip that is not only functional but also complements the style and color of your hardwood floors for a cohesive and attractive look.
Proper installation ensures a safe and smooth transition between different areas of your home.
Common Pitfalls and How to Avoid Them
Even with the best intentions, DIY projects can hit snags. Knowing the common mistakes people make when installing hardwood floors can save you time, money, and frustration. This section addresses those potential issues and offers practical solutions, reinforcing that “Can I Install Hardwood Floors Myself?
DIY Guide” is achievable with awareness.
Ignoring Manufacturer Instructions
This is perhaps the most common and costly mistake DIYers make. Flooring manufacturers invest a lot of time and research into developing their products and providing clear installation guidelines. These instructions are not just suggestions; they are specific to the materials and methods that will ensure your warranty remains valid and your floor performs as intended.
Ignoring them can lead to a host of problems, from improper acclimation to incorrect adhesive application or inadequate expansion gaps.
Always read the manufacturer’s installation manual thoroughly before you begin. Keep it handy throughout the project and refer to it whenever you have a question. Pay close attention to details regarding acclimation times, recommended adhesives or fasteners, required expansion gap sizes, and subfloor preparation.
If the instructions seem unclear, contact the manufacturer’s technical support for clarification rather than guessing. Adhering to these guidelines is a significant step towards a successful and durable installation.
The Importance of the Warranty
Your hardwood flooring likely came with a manufacturer’s warranty, which is a promise of quality and durability. However, this warranty is contingent upon following specific installation and maintenance guidelines. If you deviate from these instructions, you risk voiding the warranty entirely.
For example, many warranties require specific subfloor preparation or prohibit installation in certain high-moisture areas. Failing to meet these requirements means that if a problem arises with your floor, the manufacturer may deny your claim, leaving you responsible for all repair or replacement costs.
Keeping your proof of purchase and any receipts for installation materials is also important. Documenting your installation process with photos can sometimes be helpful if a dispute arises. Understanding the terms of your warranty before you start can help you avoid actions that could invalidate it.
This proactive approach ensures that you are covered should any unforeseen issues occur with your flooring.
Improper Subfloor Preparation
As mentioned earlier, the subfloor is the foundation of your new floor. If it’s not properly prepared, your hardwood floor will be compromised. This includes not only issues with levelness and dryness but also structural integrity.
A subfloor that is too flexible or has too much bounce can cause the hardwood planks to flex and potentially break their locking mechanisms or loosen their adhesive bond over time. This leads to creaking, squeaking, and premature wear.
For wood subfloors, ensure all boards are securely fastened to the joists. Check for any damage or rot and repair as needed. For concrete subfloors, the moisture content is critical.
Even a small amount of residual moisture can cause significant damage to hardwood. Testing for moisture and applying appropriate moisture barriers or primers are essential steps that cannot be skipped. If you are unsure about the condition of your subfloor or how to properly prepare it, consulting with a flooring professional is a wise investment.
Moisture Issues
Moisture is the arch-nemesis of hardwood flooring. Both excess moisture in the subfloor and high humidity in the room can cause irreparable damage. On concrete subfloors, moisture can wick up from the ground or be present from the curing process.
This moisture can cause solid hardwood to swell and warp, while engineered hardwood, though more resistant, can still be affected, leading to delamination of the layers or a weakened adhesive bond. This is why moisture testing is non-negotiable, especially for concrete slabs.
Even after installation, maintaining a consistent humidity level in your home is crucial for the longevity of your hardwood floors. Extreme swings from very dry to very humid conditions will cause the wood to expand and contract excessively. Using a humidifier in dry winter months and a dehumidifier in humid summer months can help regulate the environment.
Always ensure that any plumbing leaks or spills are addressed immediately, and dry affected areas thoroughly.
Incorrect Expansion Gaps
The expansion gap is a small but vital space left around the perimeter of your hardwood floor. Its purpose is to allow the wood to expand and contract naturally with changes in temperature and humidity. If this gap is too small or non-existent, the planks will have nowhere to go when they expand, leading to immense pressure that can cause the flooring to buckle upwards or crack.
Conversely, if the gap is too large, it can be difficult to conceal properly with molding and might create an unsightly appearance.
The required size of the expansion gap is always specified by the flooring manufacturer and depends on the type of wood and the size of the room. For larger rooms, a wider gap may be necessary. It’s also important to remember that expansion gaps are needed not only along the walls but also around any fixed vertical objects, such as pipes, columns, or built-in cabinets.
Ignoring this detail is a frequent cause of flooring failure.
Calculating the Gap Size
The calculation for the expansion gap size is usually straightforward and directly stated in the manufacturer’s installation guide. It’s often expressed as a measurement per linear foot of flooring. For instance, a common recommendation might be 1/4 inch for every 12 feet of flooring width.
So, in a room that is 20 feet wide, you would need an expansion gap of approximately 1/4 inch plus an additional 1/8 inch (for the extra 8 feet), totaling around 3/8 inch around the entire perimeter. Always refer to the specific instructions for your product.
To ensure the gap is consistent, use spacers of the correct thickness during installation. These are small, often wedge-shaped pieces that you place between the flooring plank and the wall. Once all the planks are laid and the floor is secured, you remove these spacers.
The baseboards or quarter-round molding are then installed to cover this gap, making it virtually invisible. Never fasten baseboards or quarter-round directly into the hardwood flooring itself, as this will restrict movement.
Poor Acclimation Practices
Acclimation is the process of allowing your hardwood flooring to adjust to the moisture and temperature conditions of the room where it will be installed. Hardwood is hygroscopic, meaning it absorbs and releases moisture from the surrounding air. If you install flooring that is too dry in a humid environment, it will absorb moisture and swell.
If you install flooring that is too wet in a dry environment, it will release moisture and shrink.
Both scenarios can lead to significant problems. Swelling can cause planks to buckle or cup upwards. Shrinking can create unsightly gaps between planks.
The required acclimation time varies depending on the type of wood (solid vs. engineered) and the manufacturer’s specifications, but it typically ranges from 48 to 72 hours. The flooring should be stored in its unopened cartons, laid flat, in the room where it will be installed, at the intended living temperature and humidity levels.
Temperature and Humidity Considerations
The environmental conditions of the installation room are paramount for successful acclimation. Before the flooring even arrives, ensure your HVAC system is operational and set to a temperature that mimics your typical living conditions. For most hardwood, this means maintaining a temperature between 60-80 degrees Fahrenheit (15-27 degrees Celsius).
Similarly, relative humidity should ideally be kept between 30-50%, though this can vary by product and climate.
If your home experiences extreme seasonal humidity fluctuations, consider using a whole-house humidifier or dehumidifier to maintain a more stable environment. This is not just about acclimation; it’s about ongoing care for your hardwood floors. By providing a consistent environment, you minimize the wood’s natural tendency to expand and contract, thereby preserving the integrity and appearance of your floor for years to come.
Advanced Tips for a Professional Finish
If you’ve made it this far, you’re ready to tackle the question, “Can I Install Hardwood Floors Myself? DIY Guide” with confidence. These advanced tips will help you achieve a result that looks like it was done by a seasoned professional.
Using a Flooring Nailer Correctly
For solid hardwood installations, a flooring nailer is an indispensable tool that significantly speeds up the process and ensures consistent fastening. These tools drive nails at an angle through the tongue of the plank, securing it firmly to the subfloor without damaging the visible surface. However, using one requires a bit of practice.
It’s crucial to maintain the correct angle and pressure. Too much pressure can sink the nail too deep, potentially damaging the plank, while too little pressure might leave the nailhead proud, creating a hazard. Always follow the nailer manufacturer’s instructions regarding air pressure for your compressor.
Practice on scrap pieces of flooring before you start on the actual installation. Ensure each nail is driven flush or slightly countersunk into the tongue of the plank for a secure fit.
Nail Placement and Spacing
Proper nail placement and spacing are critical for the long-term stability of your hardwood floor. Generally, nails should be driven through the tongue of the plank every 6 to 8 inches. The first and last few rows often require face-nailing (driving nails directly through the face of the plank) because there isn’t enough room to use the flooring nailer’s angled magazine.
In these instances, nails should be placed about 1 to 2 inches from the edge of the plank.
After face-nailing the first and last rows, these nail heads can be carefully countersunk and then filled with wood putty that matches the color of your flooring. This ensures a smooth finish that doesn’t snag or become a tripping hazard. Proper fastening prevents planks from lifting, gapping, or developing squeaks over time.
It’s the unseen element that makes a floor last.
Working with Pre-Finished vs. Unfinished Flooring
The choice between pre-finished and unfinished hardwood flooring impacts the installation process significantly. Pre-finished flooring comes with the stain and protective coating already applied at the factory. This means no sanding or finishing is required on-site, dramatically reducing installation time and mess.
It’s often the preferred choice for DIYers due to its convenience and immediate usability after installation.
Unfinished flooring, on the other hand, requires sanding, staining, and sealing after installation. While this is more labor-intensive and messy, it allows for complete customization of the color and finish. It can also result in a smoother, more seamless floor, as the sanding process can level out minor imperfections.
If you choose unfinished flooring, be prepared for a multi-stage process that includes multiple sanding steps and finishing coats, each requiring drying time.
Sanding and Finishing Unfinished Floors
Installing unfinished hardwood opens up a world of design possibilities but demands more effort. Once the planks are installed, the first step is a thorough sanding. This is typically done in stages, starting with a coarser grit sandpaper to remove milling marks and level the surface, then moving to progressively finer grits.
Drum sanders and edge sanders are commonly used for this. The goal is to create a perfectly smooth and level surface ready for finishing.
After sanding, the floor is cleaned meticulously to remove all dust. Then comes the staining process, where you apply your chosen wood stain to achieve the desired color. Multiple coats might be needed.
Finally, protective finishes like polyurethane or a hardwax oil are applied. These finishes protect the wood from wear, spills, and UV damage. Usually, two to three coats of finish are applied, with light sanding between coats for optimal adhesion and smoothness.
This entire process requires ventilation and careful application to avoid streaks or imperfections.
Dealing with Difficult Room Shapes
Rooms with angled walls, bay windows, or irregular nooks present a greater challenge. The key is to approach these areas methodically. For angled walls, you’ll need to use your miter saw to cut the ends of your planks at the corresponding angle.
This requires accurate angle measurements and careful cutting. It’s often helpful to create a template out of cardboard or paper to get the precise angle before cutting the wood.
For bay windows or curved areas, you might need to cut individual planks into smaller segments or even use a jigsaw to cut custom shapes that fit the contour of the wall or window sill. Patience is key here. Take your time, measure precisely, and dry-fit pieces before applying adhesive or nails.
Don’t be afraid to make multiple small cuts rather than one large, potentially incorrect cut.
Frequently Asked Questions
Question: Can I install hardwood floors over existing tile?
Answer: Generally, yes, but with important caveats. The existing tile must be flat, well-adhered to the subfloor, and free of cracks or damage. You may need to remove any existing grout lines that are significantly uneven.
Some manufacturers recommend a layer of cement board over the tile for a more stable subfloor. Always check your specific hardwood flooring manufacturer’s guidelines for installation over existing tile.
Question: How much hardwood flooring should I buy?
Answer: It’s standard practice to purchase 5-10% extra flooring for cuts and potential mistakes. Measure your room’s square footage and add the percentage for waste. For rooms with many angles or complicated layouts, err on the side of buying closer to 10% extra.
Question: Can I install hardwood floors in a bathroom?
Answer: It is generally not recommended to install solid hardwood floors in bathrooms due to the high moisture levels. Engineered hardwood is more resistant to moisture fluctuations but still not ideal for areas with direct water exposure. If you want wood-look flooring in a bathroom, consider luxury vinyl plank (LVP) or porcelain tile.
Question: How do I clean my new hardwood floors?
Answer: For pre-finished hardwood, use a manufacturer-recommended hardwood floor cleaner and a microfiber mop. Avoid excessive water, as it can damage the wood. For unfinished floors that have been sealed, the cleaning method will depend on the type of finish applied.
Question: What is the difference between a floating and a glued-down installation?
Answer: A floating floor is installed by interlocking the planks together and allowing them to lie loosely on top of the subfloor, often over an underlayment, without being directly attached to it. A glued-down installation involves adhering each plank directly to the subfloor using a specialized adhesive.
Final Thoughts
Contemplating whether “Can I Install Hardwood Floors Myself? DIY Guide” is within reach is a common starting point for many homeowners dreaming of beautiful new floors. The process, from understanding the different wood types and preparing your subfloor to carefully laying each plank and adding the finishing touches, requires attention to detail and patience.
Mistakes can happen, but by learning about common pitfalls like improper acclimation or ignoring manufacturer instructions, you can significantly increase your chances of success. Choosing the right tools, understanding the importance of expansion gaps, and working methodically around obstacles are all key components of achieving a professional-looking outcome.
The effort involved in a DIY hardwood floor installation is considerable, but the rewards—both financial savings and personal satisfaction—can be immense. Equip yourself with knowledge, gather the necessary tools, and approach each step with care. Even if you encounter challenges, remember that resources and advice are readily available.
Don’t be afraid to start small or consult with professionals if a particular aspect feels overwhelming. With diligent preparation and execution, you can absolutely transform your living space with gorgeous, self-installed hardwood floors.