How To Change A Drill Bit On A Dewalt Drill Step-By-Step
Got a DeWalt drill and a bit that’s just not cutting it anymore? Or maybe you need to switch tasks fast? Changing a drill bit might seem simple, but it can be a little tricky.
You want to make sure it’s secure. And you don’t want to hurt yourself. We’ve all been there, fumbling with the chuck.
Let’s walk through how to get that bit out and a new one in. You’ll be drilling again in no time. We’ll cover what you need and how to do it right.
Changing a drill bit on a DeWalt drill involves releasing the chuck, removing the old bit, inserting the new bit, and tightening the chuck securely. Always ensure the drill is unplugged or the battery is removed before starting this process to prevent accidental starts.
Understanding Your DeWalt Drill Chuck
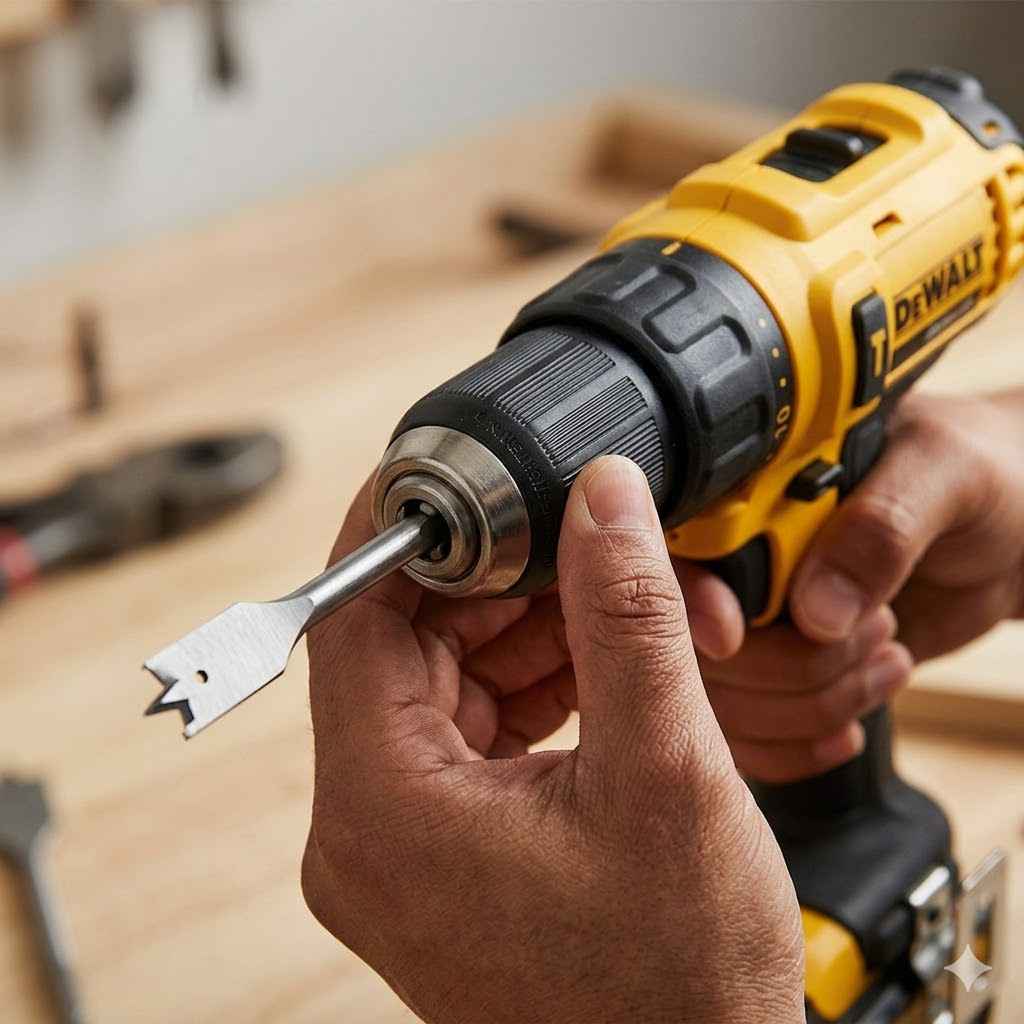
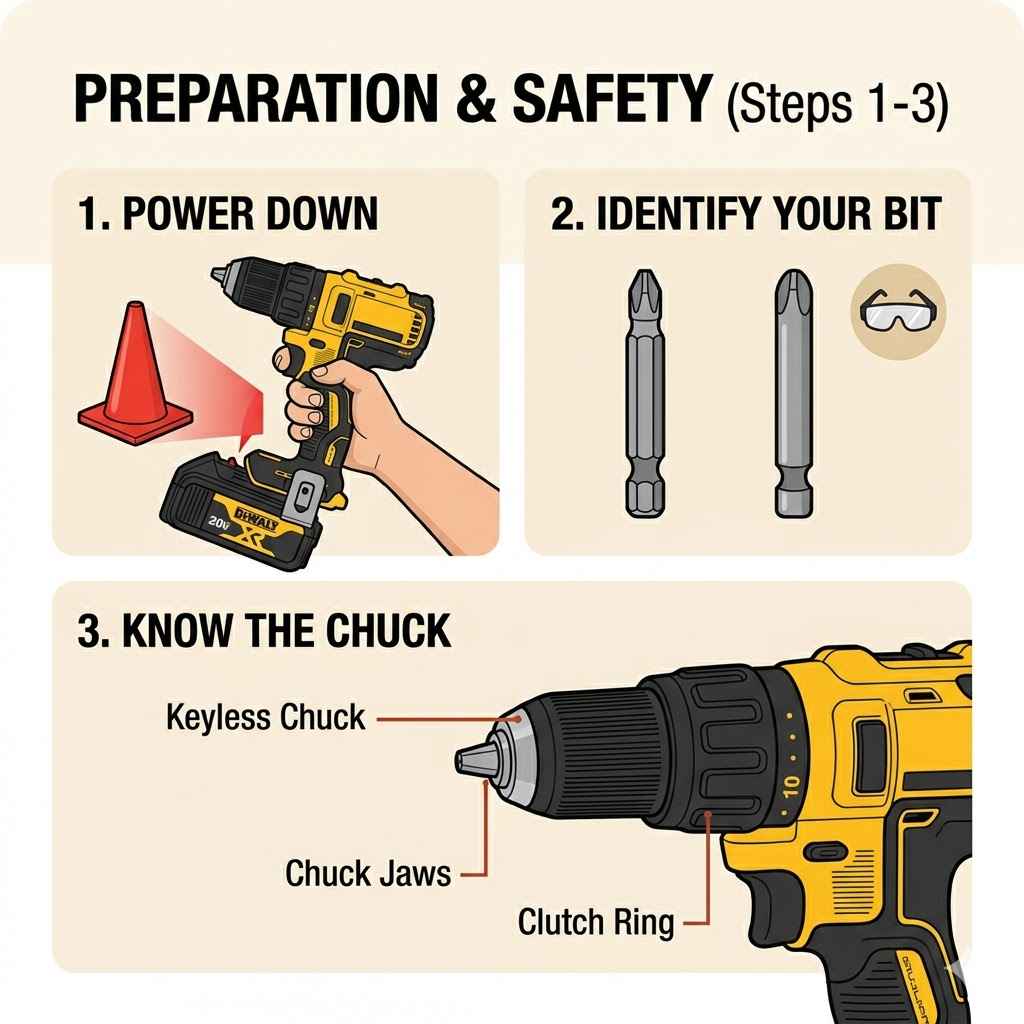
Your DeWalt drill’s chuck is the part that holds the drill bit. Think of it like a hand or a collet. It has jaws that grip the bit.
Most DeWalt drills use a keyless chuck. This means you can tighten or loosen it with your hand. Some older or more basic models might use a chuck key.
This is a small, crank-like tool. Knowing which type you have is the first step.
The keyless chuck usually has two parts you can grip. You twist them in opposite directions to open and close the jaws. When you twist one way, the jaws open up.
This lets you slide the bit out. When you twist the other way, the jaws close. This grips the new bit tightly.
It’s important to feel that it’s really secure before you drill. A loose bit can slip or even fly out.
On a keyless chuck, you might see some ribbed texture. This helps your grip. Sometimes there’s a collar you turn.
Other times, the entire front part of the chuck spins. The goal is always the same: expand the jaws to remove the bit, then contract them to hold the new one.
Getting Ready for the Bit Change
Safety first is a big deal. Before you do anything, make sure your drill is powered off. If it’s a corded drill, unplug it from the wall.
If it’s a cordless DeWalt drill, take out the battery pack. This simple step prevents the drill from accidentally starting while your fingers are near the chuck. It sounds obvious, but it’s easy to forget when you’re in a hurry.
Next, clear your workspace. You don’t want anything to get in the way. Make sure you have the new drill bit handy.
Check that it’s the right size and type for the job you’re about to do. A wood bit for metal won’t work well. Having the right bit ready saves you time.
It also stops you from trying to force the wrong bit into the chuck.
You might want to wear gloves. Some drill bits have sharp edges. The chuck itself can sometimes be a bit rough.
Gloves give you a better grip. They also offer a bit of protection. A pair of safety glasses is always a good idea when you’re working with power tools.
You never know when a tiny metal shaving might fly off.
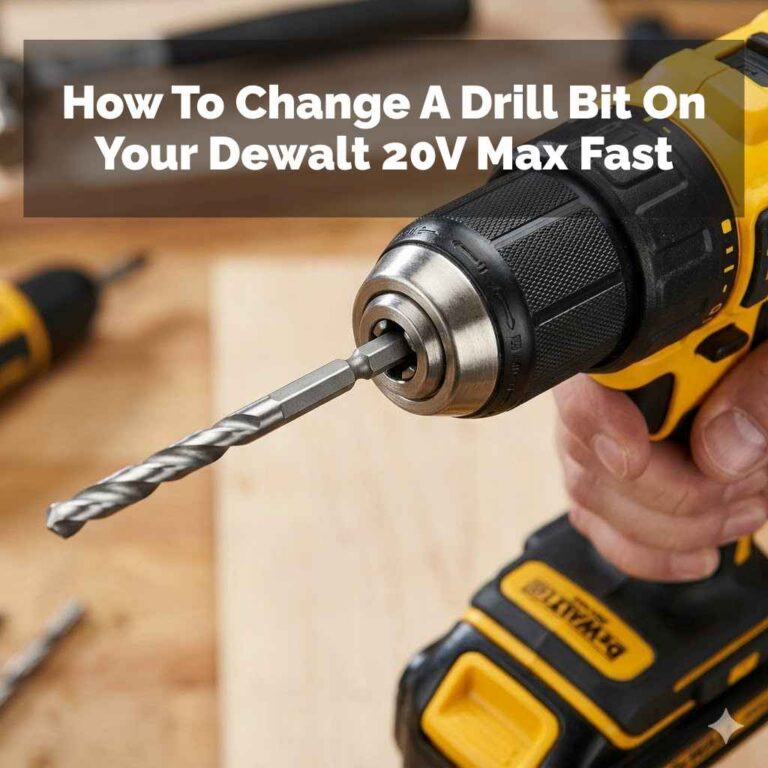
Step-by-Step: Changing a Bit on a Keyless Chuck
Okay, let’s get to it. You’ve unplugged your drill or removed the battery. You have your new bit ready.
Now, look at the chuck on your DeWalt drill. You’ll see the part that holds the bit. This is usually a sleeve or a cone shape.
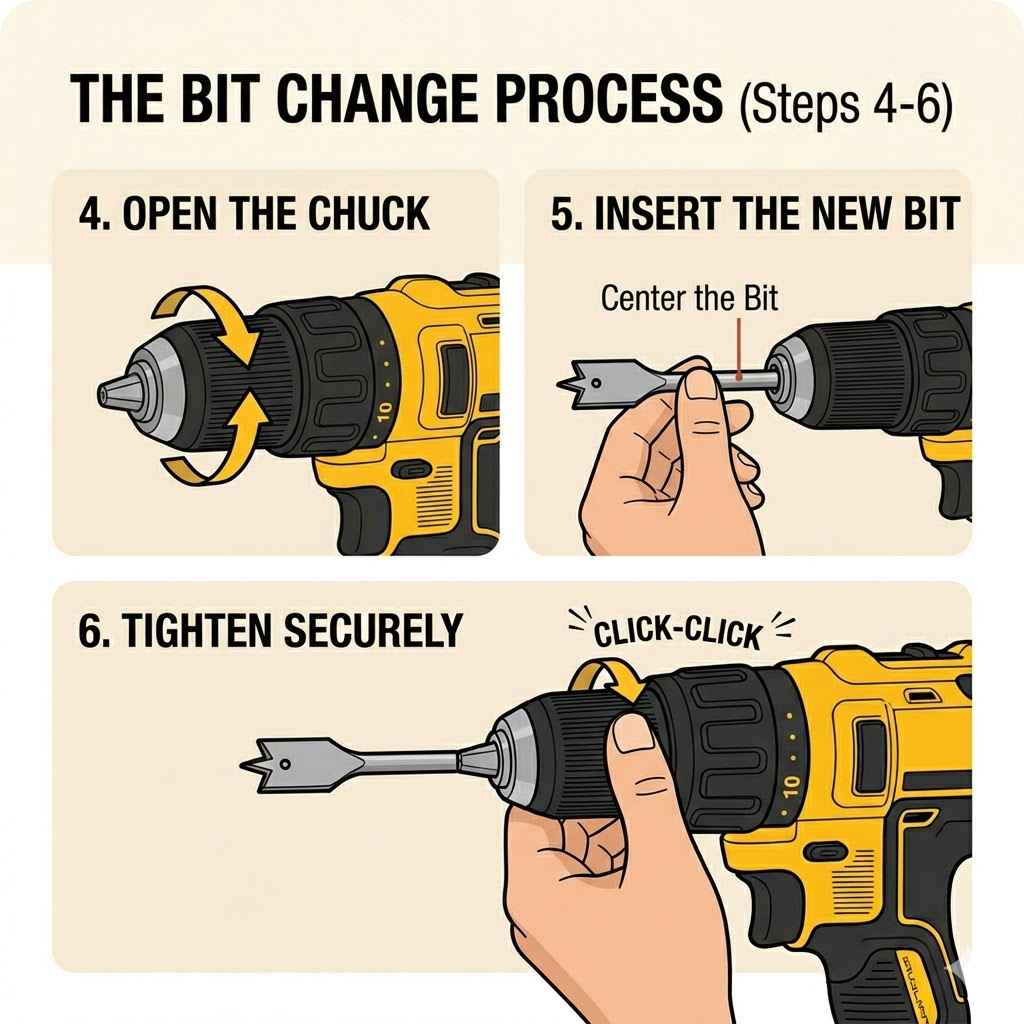
You need to open up the jaws inside.
Grab the chuck firmly with one hand. Some DeWalt drills have a rotating collar. You might need to twist this collar.
Other models have a front section you grip. Find the direction to loosen it. Most of the time, it’s by twisting the chuck counter-clockwise.
You should feel and hear it loosen. The jaws will start to open wider.
As the jaws open, you can pull the old drill bit straight out. Don’t force it. If it’s stuck, try wiggling it a little.
Make sure the chuck is fully open. Once the old bit is out, you can insert the new one. Push the new bit into the open jaws as far as it will comfortably go.
Make sure the shank of the bit is seated properly.
Now, you need to tighten the chuck. Grip the front part of the chuck again. Turn it clockwise.
You’ll feel the jaws close around the bit. Keep turning until it feels snug. For extra security, many DeWalt keyless chucks have a ratcheting feature.
You can often give it a final firm twist. You might hear a clicking sound. This means it’s locked tight.
It’s important to tighten it well. A loose bit is dangerous.
To test if it’s secure, try to wiggle the bit. It shouldn’t move at all. If it does, you need to tighten the chuck more.
Then, reinsert the battery or plug in your drill. You’re ready to go!
DeWalt Keyless Chuck – Quick Check
Action: Loosen chuck.
How: Twist chuck counter-clockwise.
Result: Jaws open.
Action: Insert new bit.
How: Push bit into open jaws.
Action: Tighten chuck.
How: Twist chuck clockwise.
Result: Jaws grip bit firmly.
What About DeWalt Drills with a Chuck Key?
Some DeWalt drills, especially older or more heavy-duty models, might come with a chuck key. This key fits into a small hole on the side of the chuck. You’ll usually see three holes on the chuck body.
Pick one of these holes to insert your key.
To loosen the chuck, insert the key and turn it counter-clockwise. You’ll need to turn it several times. As you turn, you’ll feel the chuck jaws open.
Keep turning until the jaws are open wide enough to remove the old bit. Once it’s loose, pull the old bit straight out.
Take your new drill bit and insert its shank into the now-open jaws. Make sure it goes in straight and is seated well. Now, it’s time to tighten.
Insert the chuck key into one of the holes again. This time, turn it clockwise. Keep turning and applying firm pressure.
You want to make sure the jaws grip the bit very tightly.
It’s good practice to use all three holes for tightening. Insert the key into one hole and turn as far as you can. Then, move the key to the next hole and repeat.
Do this for the third hole. This ensures the chuck is tightened evenly and securely. A properly tightened bit is crucial for effective and safe drilling.
Once it feels really solid, remove the key. You can now plug in your drill or reinsert the battery.
Keyed Chuck vs. Keyless Chuck
Keyed Chuck:
- Uses a separate tool (chuck key).
- Often found on older or heavier-duty drills.
- Requires manual turning in three holes for best grip.
- Can offer very strong, precise tightening.
Keyless Chuck:
- Operated by hand.
- Most common on modern drills.
- Twists to open and close jaws.
- Often has a ratcheting feature for extra security.
Troubleshooting Common Bit Changing Problems
Sometimes, things don’t go as smoothly as planned. One common issue is a bit that’s stuck in the chuck. If your bit won’t come out of a keyless chuck, make sure you’ve loosened it all the way.
Try wiggling the bit gently while the chuck is fully open. Sometimes, a bit of a tap on the chuck body with a rubber mallet can help. Just don’t hit it too hard.
If you’re using a keyed chuck and the key won’t turn, it might be jammed. Make sure the key is fully inserted into the hole. Try to move the drill bit slightly.
Sometimes, the internal mechanism gets misaligned. A little pressure on the bit while turning the key can help. Ensure you’re turning in the correct direction (counter-clockwise to loosen).
Another problem is a new bit not being held tightly. If your DeWalt drill chuck won’t grip a bit, it could mean the jaws are worn out. This is more common on older drills.
If it’s a keyless chuck, make sure you’re tightening it with enough force. Give it that final ratcheting turn if it has one. For keyed chucks, ensure you’re using all three holes for tightening.
If you’re changing bits often, you might notice wear and tear on the chuck itself. Look for any damage or rust. Sometimes, a bit of lubrication on the chuck mechanism can help it move more freely.
Use a light machine oil, but don’t overdo it. Too much oil can attract dirt and make the problem worse.
Bit Won’t Come Out? Try This:
Problem: Bit is stuck in keyless chuck.
Solution: 1. Ensure chuck is fully loosened (counter-clockwise). 2.
Wiggle the bit gently. 3. Tap chuck lightly with a rubber mallet.
4. Check if the bit is bent.
Problem: Chuck key won’t turn.
Solution: 1. Make sure key is fully inserted. 2.
Try slightly moving the drill bit. 3. Confirm you are turning the correct way (counter-clockwise to loosen).
4. Apply steady pressure.
When to Replace Your DeWalt Drill Bit
Knowing when to change a drill bit is as important as knowing how to change it. A dull bit makes drilling harder. It can also damage your material.
You’ll notice several signs that tell you it’s time for a new bit.
The first sign is increased effort. If you find yourself pushing much harder than usual to get the drill to cut, the bit is likely dull. It might also make a grinding noise instead of a clean cutting sound.
The drill motor might seem to be working harder, too.
Another sign is heat. A dull bit creates more friction. The bit and the material you’re drilling can get surprisingly hot.
If you touch the bit after drilling (carefully!), and it’s very hot, it’s a good indicator it needs replacing. Overheating can also damage the material.
You might also see poor hole quality. Instead of clean edges, you might get ragged holes. For wood, you might get splintering.
For metal, you might get burrs. If the bit starts to wander or skate across the surface when you start drilling, it’s probably dull and needs changing. Always use the right bit for the job.
A bit designed for wood will get dull quickly if used on metal.
Signs Your Drill Bit Needs Replacing
Increased Force Needed: You have to push much harder to drill.
Excessive Heat: The bit or material gets too hot.
Poor Hole Quality: Edges are rough, splintered, or have burrs.
Skating/Wandering: Bit doesn’t start cleanly and moves around.
Grinding Noise: Drill sounds like it’s struggling or grinding.
Tips for Using Different Types of Drill Bits
DeWalt makes drills for all sorts of jobs. And there are many types of drill bits. Let’s quickly touch on a few common ones and how they fit.
Twist drill bits are the most common. They have spiral flutes. They work for wood, plastic, and metal.
The shank (the part that goes into the chuck) is usually round. Some larger twist bits might have a partially flattened shank for better grip.
Spade bits or paddle bits are flat and wide. They’re mainly for drilling larger holes in wood. The shank is usually round and sturdy.
They fit easily into standard chucks.
Hole saws are for cutting very large holes. They look like a cylinder with teeth. They have a central pilot bit to guide them.
The shank is usually a thick rod that fits into the hole saw adapter. You attach the adapter to the chuck, not the hole saw directly.
Masonry bits are for drilling into brick, concrete, and stone. They have a special carbide tip. They are designed to hammer and cut.
The shank is often round, but can sometimes be SDS style for hammer drills. Ensure your DeWalt drill is suitable for the bit type.
When you insert any bit, make sure it’s straight. A crooked bit can wobble. This makes drilling inaccurate.
It can also put stress on the drill. For twist bits, ensure the shank is fully seated in the jaws. For spade bits and hole saws, make sure the adapter is securely tightened to the chuck.
Drill Bit Shanks Explained
Round Shank: The most common type. Fits most standard chucks easily. Found on twist bits, spade bits, and some masonry bits.
Hex Shank: Has a hexagonal shape. Offers a more secure grip, especially for impact drivers. Common on driver bits and some drill bits.
SDS Shank: Found on hammer drills and rotary hammers. Designed for quick-release and robust hammer action. Requires a special SDS chuck.
Shank with Flat: A round shank with a flattened side. Improves grip in the chuck, preventing slippage.
Maintaining Your DeWalt Drill Chuck
A little care goes a long way for your DeWalt drill’s chuck. Keeping it clean and well-maintained will make bit changes smoother and extend its life. After you finish using your drill, take a moment to clean the chuck.
Use a soft cloth or a brush to wipe away any dust, wood chips, or metal shavings. Pay attention to the jaw areas and the part where the bit enters. If you notice any rust, you can try a rust remover.
For persistent stiffness, a tiny drop of light machine oil applied to the moving parts of the chuck can help. Don’t spray lubricants directly into the chuck. Use a small applicator or cloth.
Inspect the jaws regularly. If they look rounded, chipped, or worn, they won’t grip bits as well. This is a sign that the chuck might need replacement.
On keyless chucks, listen for any grinding noises when you tighten or loosen them. This could indicate dirt or wear inside.
When you’re not using your DeWalt drill, store it properly. A dry place away from moisture is best. If your drill came with a case, use it.
This protects the chuck from damage and keeps dust out. Proper storage also helps prevent rust on the metal parts of the chuck and the drill body.
Chuck Care Checklist
- Wipe clean after each use.
- Brush away dust and debris.
- Inspect jaws for wear or damage.
- Lubricate sparingly if stiff (use light oil).
- Store drill in a dry, protected place.
- Avoid dropping the drill.
Real-World Scenario: Quick Task Switch
I remember a time when I was helping a friend paint their garage. We were putting up some shelves. I had started with a pilot bit to mark the stud locations.
Once we found them, I needed to switch to a larger drill bit to make the holes for the shelf brackets.
My DeWalt drill has a keyless chuck. I’d just finished marking the holes. I unplugged the drill.
Then, I grabbed the chuck. I twisted it counter-clockwise. The jaws opened up easily.
I pulled out the small pilot bit. It felt smooth. Then I grabbed the larger bit.
I slid it into the chuck until it felt fully seated.
Next, I gripped the chuck again and twisted it clockwise. I felt it get snug. I gave it that final ratcheting twist.
I wiggled the bit to make sure it was solid. It didn’t budge. I popped the battery back in and drilled the first hole.
It went in clean and straight. Switching bits took less than a minute. It was so much faster than if I had to find a tool.
What This Means for Your Drilling Projects
Understanding how to change your drill bits correctly means your work will be safer and more efficient. A securely held bit prevents damage to your workpiece and your tool. It also stops you from getting injured.
If your DeWalt drill has a keyless chuck, practice opening and closing it when the drill is off.
If you have a keyed chuck, keep the key somewhere easy to find. Maybe hang it on the drill’s belt clip or keep it in a tool bag. Losing the key makes changing bits a real pain.
Knowing when a bit is dull is important too. Don’t keep using a worn-out bit. It’s better to replace it.
This saves you frustration and helps you do a better job.
For different tasks, you’ll need different bits. A simple twist bit won’t cut it for a thick piece of wood. Using the wrong bit can damage the bit, the drill, and the material.
Always match the bit to the material and the hole size. This basic knowledge makes your DIY projects much smoother.
When to Call a Professional
Most of the time, changing a drill bit is a DIY task. However, there are times when it’s better to call someone who knows their way around tools. If your drill chuck is damaged, rusted shut, or severely worn, it might be time for a professional to look at it.
They can repair or replace the chuck.
If you are drilling into very hard materials like reinforced concrete or steel, and you’re not experienced, it’s safer to hire someone. These jobs require specialized tools and knowledge. Also, if you’re unsure about the best type of bit for a specific material or task, a professional can advise you.
They can ensure the job is done correctly and safely.
Sometimes, the problem isn’t the bit or the chuck, but the drill itself. If your drill motor is making strange noises, overheating, or not powering up correctly, don’t try to force it. A faulty drill can be dangerous.
Taking it to a tool repair shop or contacting DeWalt support is the best option.
Quick Fixes and Tips for Bit Changes
Here are some simple tips to make changing your DeWalt drill bits even easier:
- Always unplug or remove the battery. This is the most important safety step.
- Keep your chuck clean. Dust and debris make it harder to grip.
- Use the right bit for the job. Wood, metal, masonry – they all need different bits.
- Don’t overtighten a keyless chuck. Tighten until snug, then give it one final firm turn. Overtightening can strain the mechanism.
- If using a keyed chuck, use all three holes. This ensures an even, strong grip.
- Store your drill bits properly. Keep them organized in a bit case. This prevents damage and makes them easy to find.
- Check bit condition regularly. Replace dull or damaged bits.
- For stubborn bits, try a little penetrating oil. Let it soak in for a bit before trying to remove the bit again.
Frequently Asked Questions About Changing Drill Bits
How do I know if my DeWalt drill has a keyless chuck?
Most modern DeWalt drills have keyless chucks. You can usually tell because you can grip and twist the front of the chuck with your hand to open and close the jaws. There won’t be any small holes on the chuck for a key.
If you don’t see holes for a chuck key, it’s likely keyless.
Can I use a bit from another brand in my DeWalt drill?
Yes, absolutely. DeWalt drills use standard drill bit shanks. As long as the shank of the bit fits the size capacity of your drill’s chuck (e.g., 1/4 inch, 3/8 inch, 1/2 inch), you can use bits from other reputable brands.
The chuck grips the shank, not the brand of the bit.
How tight should I make the drill bit?
You want the bit to be very secure, but not so tight that you damage the chuck or the bit. For keyless chucks, tighten it until it feels snug, then give it one firm ratcheting turn. For keyed chucks, tighten firmly using all three holes.
A good test is to try to wiggle the bit; it should not move.
What if the drill bit is too small for the chuck?
If the drill bit shank is too small, the chuck jaws won’t be able to grip it effectively. You might need a smaller drill bit or a bit adapter. Some very small bits might require a special chuck or a collet system, but for most common tasks, ensure the bit shank size matches your chuck’s capacity range.
How do I clean a DeWalt drill chuck?
After unplugging the drill or removing the battery, use a soft brush or a dry cloth to wipe away dust and debris from the chuck body and jaws. If there’s any rust, you can use a rust remover. For stiff mechanisms, a tiny amount of light machine oil on a cloth can be applied to the moving parts of the chuck.
My DeWalt drill has a hammer function. Does that affect how I change bits?
No, the hammer function itself does not change how you change the drill bit. The hammer function is activated separately from the chuck. You still loosen and tighten the chuck the same way, whether you’re using the drill in regular drill mode or hammer drill mode.
Just ensure the drill is powered off before changing bits.
Conclusion
Changing a drill bit on your DeWalt drill is a fundamental skill. By understanding your chuck type, prioritizing safety, and following these steps, you can swap bits quickly and confidently. Remember to keep your chuck clean and your bits sharp.
This will make all your drilling tasks much easier and more successful.