How to Repaint MDF Furniture: Proven Effortless Guide
Repainting MDF furniture is surprisingly simple! With proper prep, primer, and paint, you can give your old MDF pieces a fresh, durable, and beautiful new look. This guide provides step-by-step instructions to achieve professional-quality results that will last, even for beginners.
Got an MDF cabinet, table, or shelf that’s seen better days? You might be thinking it’s impossible to give it a facelift. Well, I’m here to tell you it’s not! Repainting Medium-Density Fiberboard (MDF) furniture can seem tricky, but it’s quite achievable with the right approach. Many DIYers shy away from MDF because it can be a bit thirsty and prone to issues if not prepped correctly.
But don’t worry, as your woodworking mentor, I’m going to walk you through this step-by-step, making it feel effortless. We’ll cover everything from cleaning and sanding to priming and painting, ensuring a smooth, lasting finish that will have you admiring your work. Ready to transform that piece?
This guide will equip you with the knowledge to tackle your MDF furniture project with confidence. You’ll learn about the best materials to use, common pitfalls to avoid, and techniques that yield professional-looking results. Let’s get started!
Why You Might Want to Repaint Your MDF Furniture
MDF furniture is a popular choice for many homes because it’s budget-friendly and versatile. However, over time, the original finish can get scratched, faded, or simply go out of style. Repainting is a fantastic way to:
- Revitalize old, tired-looking furniture.
- Update your home decor without buying new pieces.
- Repair minor damage and wear.
- Achieve a custom color or finish not available in stores.
- Extend the life of your furniture, promoting sustainability.
It’s a rewarding DIY project that can make a huge difference in your living space, and with MDF, the results can be stunning when done right.

Materials You’ll Need for a Perfect MDF Paint Job
Gathering the right supplies is the first step to a successful project. Here’s what you’ll need:
- Cleaning Supplies: Mild soap or degreaser, clean cloths or sponges.
- Sandpaper: Medium-grit (120-150) and fine-grit (180-220). A sanding block or an orbital sander can speed things up. For more information on types of sandpaper, check out this guide from Popular Mechanics.
- Wood Filler: For filling any gouges or screw holes.
- Primer: A high-quality MDF primer or a good stain-blocking primer is essential.
- Paint: Your choice of paint. For MDF, latex (water-based) or oil-based paints work well. Acrylic paints are also a good option.
- Applicators: High-density foam rollers for smooth surfaces and a good quality paintbrush (angled sash brush) for details and edges.
- Drop cloths or old sheets: To protect your work area.
- Screwdriver or drill: To remove hardware.
- Tack cloth: To remove fine dust after sanding.
- Safety gear: Safety glasses and a dust mask are a must.
Step-by-Step Guide: How to Repaint MDF Furniture
Follow these straightforward steps for a flawless finish on your MDF furniture.
Step 1: Prepare Your Workspace and Furniture
Start by clearing your workspace. Lay down drop cloths to protect the floor from dust and paint. If possible, work in a well-ventilated area, especially when sanding and painting.
Next, assess your MDF furniture. Remove any hardware like knobs, hinges, or drawer pulls. This will ensure a cleaner paint job and make the process easier. If your furniture has any loose parts, secure them.
Step 2: Clean the Furniture Thoroughly
MDF can absorb dust and grime, so a good cleaning is crucial. Use a soft cloth dampened with a mild soap and water solution or a degreaser. Gently wipe down the entire piece. Pay attention to any sticky spots or stains. Rinse the furniture with a clean, damp cloth and allow it to dry completely before moving on. This step ensures the primer and paint will adhere properly.
Step 3: Repair Any Imperfections
Examine the furniture for any dents, scratches, or holes.
- For minor scratches: Light sanding might be enough.
- For deeper dents or holes: Use wood filler. Apply it with a putty knife, slightly overfilling the area, as it will shrink slightly when drying. Let the filler dry completely according to the product instructions.
Once dry, lightly sand the filled areas smooth, flush with the surrounding surface.
Step 4: Sand the MDF Surface
Sanding is critical for paint adhesion. Use medium-grit sandpaper (120-150) to scuff up the entire surface. You don’t need to remove the old finish unless it’s peeling or damaged. The goal is to create a slightly rough surface for the primer to grip onto. If you’re using an orbital sander, be gentle to avoid damaging the MDF. After the initial sanding, switch to fine-grit sandpaper (180-220) to smooth out any rough spots and create a velvety finish.
Safety first! Always wear a dust mask and safety glasses when sanding. MDF dust can be irritating to your lungs and eyes. For more safety tips when working with wood, you can refer to resources from the Occupational Safety and Health Administration (OSHA).
After sanding, use a tack cloth to wipe away all the dust. This is a really important step for a smooth finish.
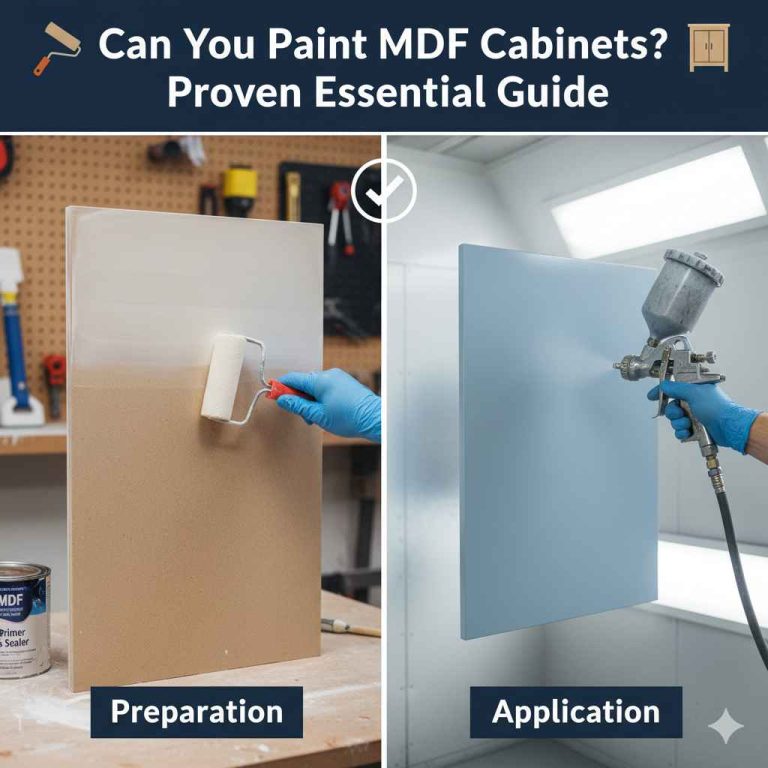
Step 5: Apply the Primer
Primer is your best friend when painting MDF. It seals the porous surface of the MDF, prevents swirling or blotchiness, and helps your topcoat of paint adhere better. MDF is known to absorb a lot of paint, and primer helps with this significantly.
Choose a good quality primer specifically designed for MDF or a reliable stain-blocking primer. Apply a thin, even coat using a foam roller for flat surfaces and a paintbrush for edges and details. Avoid applying too much primer at once, as this can lead to drips and an uneven finish.
Let the first coat of primer dry completely. Once dry, lightly sand the primed surface with fine-grit sandpaper (220-grit). This will create an even smoother surface for your paint. Wipe away the dust with a tack cloth.
Depending on the color you’re painting over and the color you’re painting with, you might need a second coat of primer. Apply thin coats and sand lightly between each coat if needed. Two thin coats of primer are almost always better than one thick one.
Step 6: Apply the Paint
Now for the fun part – applying your chosen paint color! Stir the paint well before you start. Avoid shaking the can, as this can create air bubbles.
Start with thin, even coats. Use your high-density foam roller for large, flat areas and your angled sash paintbrush for corners, edges, and any intricate details. Work in the same direction for a consistent finish.
Allow each coat of paint to dry thoroughly before applying the next. This is typically a few hours, but check your paint can instructions and the humidity in your area. Rushing this step is a common mistake that leads to poor adhesion and a less durable finish.
You’ll likely need at least two coats of paint, and sometimes three, especially if you are going from a dark color to a light one, or if the MDF is still showing through. Remember to lightly sand with fine-grit sandpaper (220-grit) between coats if you notice any imperfections or rough spots, and always wipe away dust with a tack cloth.
Step 7: Applying a Protective Topcoat (Optional but Recommended)
For added durability and a smoother finish, especially for high-traffic pieces like tabletops or kitchen cabinets, consider a topcoat or sealer. Polyurethane (water-based or oil-based) or a clear acrylic sealer are excellent choices.
Apply the topcoat in thin, even layers, following the same technique as painting (rolling for flat areas, brushing for details). Let each coat dry completely and sand very lightly with ultra-fine sandpaper (320-grit or higher) between coats if desired for an extra-smooth feel. Two to three thin coats of topcoat will significantly enhance the longevity and appearance of your painted MDF furniture.
Step 8: Reattach Hardware and Admire Your Work
Once the final coat of paint or topcoat is completely dry and cured (this can take several days to a week depending on the product), it’s time to reattach any hardware you removed. Carefully screw back in the knobs, handles, and hinges.
Step back and admire your beautifully transformed piece of MDF furniture! You’ve successfully given it a new lease on life through your own hands.
Tips for Different Types of MDF Finishes
MDF furniture comes in various finishes, and some might require slightly different approaches:
Laminate/Veneer MDF
If your MDF furniture has a laminate or veneer finish (like a faux wood grain or a smooth laminate), start by thoroughly cleaning it. Lightly scuff sanding is usually enough to create adhesion. For very slick laminate surfaces, consider using a bonding primer specifically designed for slick surfaces.
Painted MDF (Factory Painted)
If the furniture is already painted but you want a new color, proper sanding is key to removing any sheen and creating a surface for the new primer to grip. Follow the steps above, ensuring you get good adhesion with your primer.
Raw MDF
Raw MDF is the most porous and will absorb the most primer and paint. Be prepared for multiple thin coats of primer and paint. Ensure you fill any imperfections very well, as raw MDF can show them easily.
Choosing the Right Paint for MDF
The type of paint you choose can greatly impact the final look and durability. Here’s a quick rundown:
| Paint Type | Pros | Cons | Best For |
|---|---|---|---|
| Latex (Water-Based) | Easy cleanup with water, low odor, fast drying, flexible finish. | Can be less durable than oil-based without a good topcoat. | Most furniture projects, cabinets, walls. |
| Acrylic (Water-Based) | Very durable, good adhesion, more water-resistant than latex once cured. | Can be more expensive, cleanup with water. | High-wear surfaces like tabletops, furniture that needs to withstand moisture. |
| Oil-Based (Alkyd) | Extremely durable, smooth, hard finish, good for high-traffic areas. | Strong fumes, requires mineral spirits for cleanup, longer drying times, can yellow over time. | Doors, trim, furniture expected to take a lot of abuse. |
| Enamel Paints | Durable, often provide a hard, glossy finish. Can be water or oil-based. | Durability varies; water-based enamels are often less durable than oil-based. | When a very tough, often shiny finish is desired. |
For most beginner DIY projects on MDF, a good quality water-based acrylic or latex paint with a durable finish is an excellent choice due to ease of use and cleanup. Always opt for paints labeled as “furniture paint” or “cabinet paint” for better performance.
Common Mistakes to Avoid When Painting MDF
Even with the best intentions, a few common slip-ups can affect your MDF painting project. Knowing these can help you avoid them:
- Skipping the Primer: MDF is very porous. Without primer, paint can soak in unevenly, leading to a blotchy, uneven finish.
- Not Sanding Properly: Insufficient sanding means the primer and paint won’t have a surface to adhere to, risking chipping and peeling.
- Applying Paint Too Thickly: Thick coats lead to drips, uneven texture, and longer drying times. Thin, multiple coats are always better.
- Not Letting Coats Dry Fully: Painting over wet coats traps moisture and prevents proper adhesion, leading to a weak finish.
- Not Using a Tack Cloth: Tiny dust particles from sanding can get trapped in the paint, creating a gritty texture.
- Not Sealing Edges: MDF edges are particularly absorbent. Ensuring they are well-primed and painted is crucial for a uniform look.

Frequently Asked Questions About Repainting MDF Furniture
Q1: Can I paint over the existing finish on MDF furniture without sanding?
It’s not recommended. Sanding creates a surface profile that allows primer and paint to adhere properly. Painting over a slick, un-sanded surface will likely result in the paint peeling or chipping over time.
Q2: How many coats of primer do I need for MDF furniture?
Most MFD pieces require at least two thin coats of primer. High-quality MDF primers are designed to seal the material effectively, but a second coat ensures an even, non-porous base for your paint.
Q3: What is the best type of paint roller for MDF?
A high-density foam roller is ideal for MDF. It applies paint smoothly without leaving heavy roller marks, which is crucial for achieving a factory-like finish on flat surfaces.
Q4: How long does it take for painted MDF furniture to cure?
While MDF paint might feel dry to the touch within a few hours, it can take anywhere from 24 hours to a full week (or even longer, depending on the specific product and environmental conditions) for it to fully cure and reach its maximum hardness and durability.
Q5: Can I use spray paint on MDF furniture?
Yes, you can use spray paint on MDF. It can provide a very smooth finish if applied correctly. Ensure proper ventilation, use multiple light coats, and consider using a spray primer designed for MDF first. Test on a scrap piece if possible.
Q6: My MDF furniture looks “fuzzy” after I sand it. What should I do?
This is normal with raw MDF. After you sand it the first time, wipe it down with a damp cloth and let it dry. This will raise the grain. Then, sand it again with fine-grit sandpaper. This “pre-raising” of the grain helps create a much smoother surface for priming and painting.
Conclusion
Repainting MDF furniture is a fantastic way to refresh your home decor and give well-loved pieces a new lease on life. By following these detailed, step-by-step instructions, you’ve learned the importance of proper preparation, the critical role of primer, and the best techniques for applying paint for a smooth, durable finish. Don’t be intimidated by MDF; with a little patience and the right approach, you can achieve professional-looking results.
Remember, the key lies in thorough cleaning, adequate sanding, good quality primer, and applying paint in thin, even coats. Don’t skip the drying times between coats, and always prioritize safety by using a dust mask and safety glasses. You’re now equipped with the proven, effortless guide to transform your MDF furniture. So, gather your supplies, clear your workspace, and get ready to enjoy your beautifully updated furniture!