Can Wax Be Written On? Everything You Should Know
The World of Writing on Wax
Think about it. Candles are everywhere. They’re part of celebrations, moments of calm, and expressions of love.
Sometimes, a plain candle just isn’t enough. You want it to tell a story, to be unique. That’s where adding writing comes in.
It turns a simple object into something meaningful.
For many years, people thought wax was a surface you just couldn’t mark. It’s smooth, often waxy, and some materials just slide right off. But that’s not the whole story.
With a little know-how, you can achieve beautiful results. This isn’t about magic; it’s about understanding the materials you’re working with.
We’ll dive into the different ways you can get words onto wax. You’ll learn about tools, techniques, and what to avoid. This way, your next wax project can have that special handwritten detail you’re dreaming of.
No more guessing games when you’re ready to get creative.
What Does It Mean to “Write on Wax”?
When we talk about writing on wax, we mean making a visible mark on its surface. This mark can be letters, symbols, or even small drawings. The goal is for this mark to last and be clear to see.
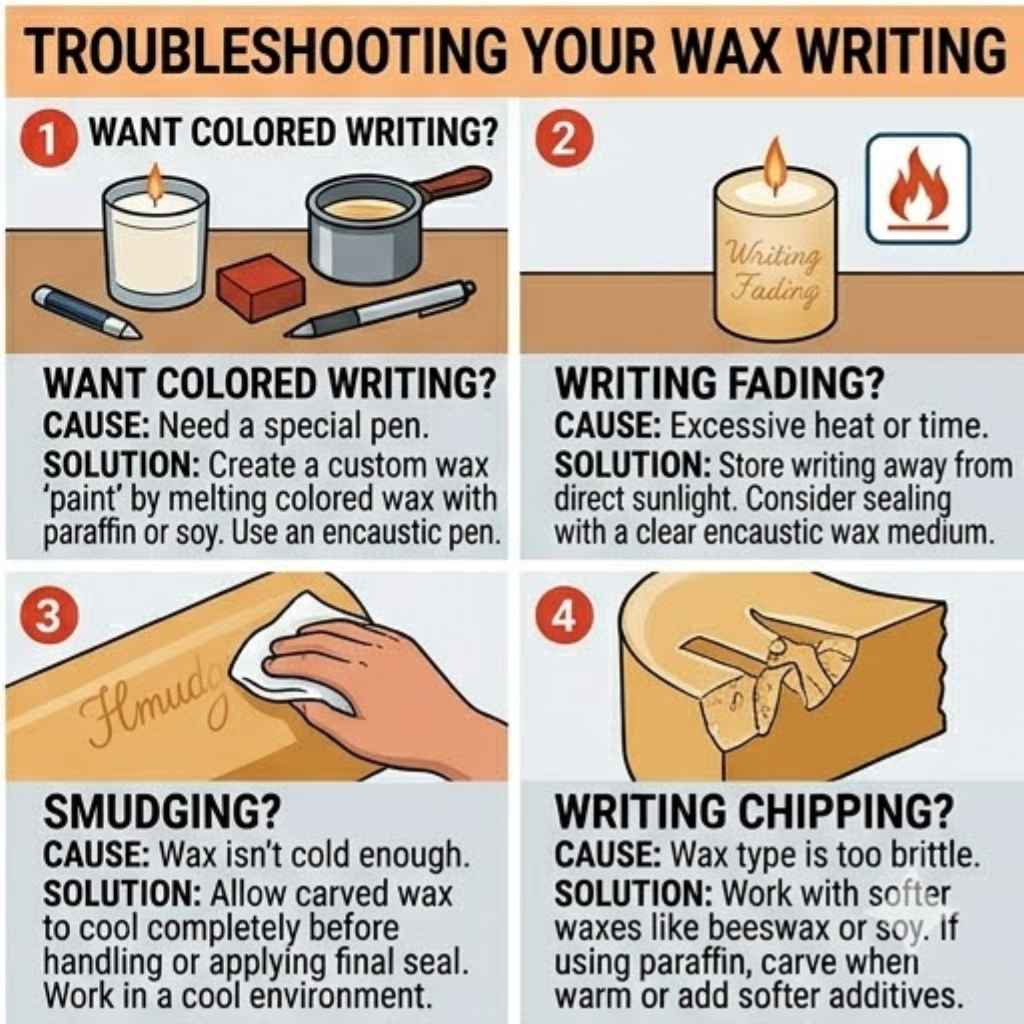
It’s not just about making a dent; it’s about adding color or texture that stays put.
Wax itself is a type of fat. It can be made from plants, animals, or minerals. Because it’s often smooth and non-porous, many standard pens and markers won’t work well.
They might bead up, fade away, or simply not adhere.
So, we need special methods. These methods consider the nature of wax. They aim to create a bond or an impression that is durable.
Think of it like writing on glass versus writing on paper. Each surface needs a different tool and technique. Wax is somewhere in the middle, needing a bit of care.
My Own Waxy Writing Adventure
I remember the first time I truly wanted to write on a candle. It was for my best friend’s birthday. She loved a specific scent, and I wanted to write “Happy Birthday, Sarah!” on it.
I grabbed a Sharpie, feeling confident. Big mistake.
The ink just sat on top, a thick, blobby line. As it dried, it started to flake off. It looked messy, not celebratory at all.
I felt a rush of disappointment. I had envisioned this beautiful, personal touch, and instead, I had a smudged disaster. I almost gave up.
That’s when I realized I needed to learn more. I spent hours researching, and what I found opened up a whole new world of possibilities for decorating wax.
Choosing Your Wax Type
Soy Wax: This is a popular natural wax. It’s often softer. Writing on it is usually easier with the right tools.
It’s great for beginners.
Paraffin Wax: This is a common petroleum-based wax. It can be harder. Some methods work better on harder wax.
Beeswax: This natural wax has a unique scent and color. It can be quite hard, which is good for some writing techniques.
How Do People Actually Write on Wax?
There are several ways to get your message onto wax. Each has its own look and requires different supplies. The best method for you depends on the kind of wax you have and the final look you want.
Some methods involve adding something to the surface. Others involve carving into it. Let’s look at the most common and effective ways to do this.
Method 1: Using Special Pens and Markers
This is often the simplest approach. You need pens designed for non-porous surfaces or specifically for wax. These pens use special ink that can bond with the wax surface.
What to look for:
- Paint Pens: Brands like Posca or oil-based Sharpie paint markers are excellent. They have opaque ink that covers well.
- Permanent Markers: While regular Sharpies can struggle, some permanent markers designed for crafts might work. Always test first.
- Wax Pens: Some companies make pens specifically for decorating candles.
How to do it:
- Make sure your wax surface is clean and dry. Wipe away any dust.
- Shake the pen well. Prime it if the instructions say to.
- Draw your design or write your text. Go slowly and steadily.
- Let the ink dry completely. This is important to prevent smudging.
Pro Tip: Always test your pen on a hidden spot or a scrap piece of wax first. This shows you how the ink will look and behave.
Quick Scan: Best Pens for Wax
| Pen Type | Pros | Cons |
| Oil-Based Paint Pens | Vibrant colors, opaque, good adhesion | Can be thicker lines, require shaking |
| Permanent Markers (Craft Specific) | Fine tips available, quick drying | May not stick to all wax types, less opaque |
| Wax/Candle Pens | Designed for wax, consistent results | Limited color options sometimes |
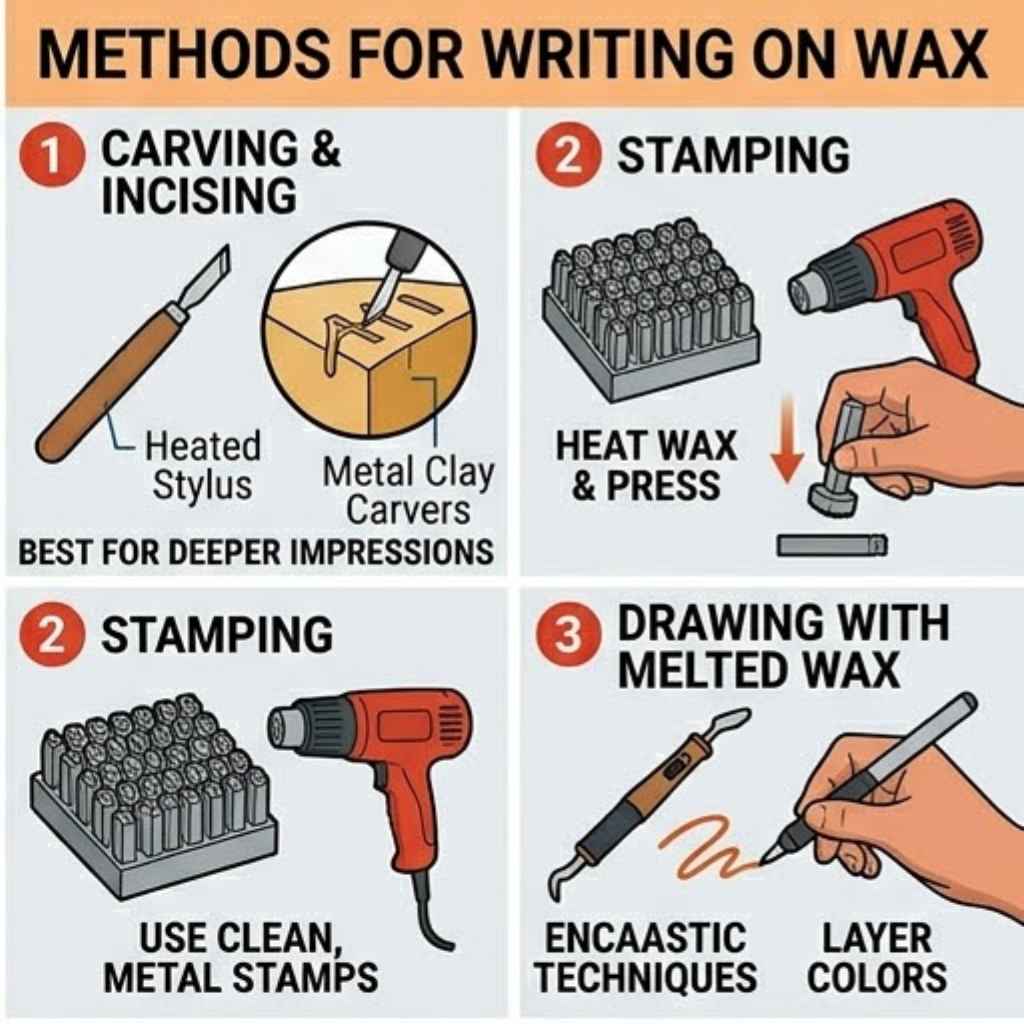
Method 2: Stamping Designs on Wax
Stamping is another fun and effective way to add patterns or words. You use a stamp and an ink pad, but with a twist.
What you’ll need:
- Rubber stamps (choose designs that fit your wax item).
- Ink pads.
- A way to make the ink stick better.
How to do it:
- Option A (Heat Transfer): Ink your stamp. Press it onto a piece of parchment paper. Place the parchment paper ink-side down onto the wax. Gently press with a warm iron (low setting) over the parchment. The heat transfers the ink to the wax. This works best on smoother wax surfaces.
- Option B (Special Ink): Use a specialized ink pad designed for non-porous surfaces. These inks often have additives that help them adhere. Stamp directly onto the wax. Let it dry fully.
Experience Check: I tried the heat transfer method on a set of pillar candles. It was a bit tricky to get the pressure even. Some of the finer details of the stamp didn’t transfer perfectly, but the overall effect was lovely.
The ink held up well, even when the candle burned.
Method 3: Engraving or Carving into Wax
This method doesn’t add ink. Instead, it creates a mark by removing a thin layer of wax. This gives a more subtle, etched look.
Tools you can use:
- Craft knives: Like X-Acto knives or clay sculpting tools.
- Wood burning tools (with caution): Some have fine tips that can melt wax.
- Sharp pointed objects: A sturdy toothpick or a sharp nail file can work for simple marks.
How to do it:
- Sketch your design lightly on the wax with a pencil, or plan it out in your head.
- Gently start to carve or engrave. Use shallow, controlled strokes.
- It’s easier to remove wax than to add it back. So, take your time.
- You can fill the carved lines with a paint pen afterwards for a colored effect.
Important Note: This method can weaken the candle structure if you carve too deeply. Be extra careful with candles that are thin or meant to be burned.
Contrast: Engraving vs. Ink
Engraving:
- Look: Subtle, etched, textured.
- Durability: Very durable, part of the wax itself.
- When to use: For a more understated, elegant look.
- Risk: Can weaken the wax structure.
Ink:
- Look: Bold, colorful, can be detailed.
- Durability: Depends on ink and wax type, can smudge if not dry.
- When to use: For clear messages, bright designs.
- Risk: Ink may fade or chip over time.
Method 4: Using Decals or Rub-Ons
Decals and rub-on transfers are another way to get detailed images or text onto wax. These are like stickers but often adhere more smoothly.
What you’ll need:
- Water-slide decals.
- Rub-on transfers (like those found in craft stores for scrapbooking).
- A clear sealant (optional, but recommended for longevity).
How to do it with Water-Slide Decals:
- Print your design onto special water-slide decal paper, or buy pre-made ones.
- Cut out your design.
- Submerge the decal in water for about 30 seconds.
- Carefully slide the decal off the backing paper and onto the wax surface.
- Gently smooth out any air bubbles.
- Let it dry completely.
- If you want extra protection, lightly spray with a clear acrylic sealant designed for crafts.
How to do it with Rub-Ons:
- Peel the clear protective sheet off the rub-on transfer.
- Position the design on the wax where you want it.
- Use a craft stick or a burnishing tool to rub firmly over the design.
- Gently peel back the clear sheet. The design should have transferred.
- Again, let it dry and consider a light sealant.
Personal Insight: Rub-ons are fantastic for small details. I used them on some votive candles to add tiny floral patterns. They gave a really professional finish, and no one could tell they weren’t printed directly on.
It was a much easier process than I expected.
Method 5: Stencils and Paint
Stenciling offers a way to create repeated patterns or text with a consistent look. It’s a great option when you want something clear and uniform.
What you’ll need:
- Stencils (pre-made or cut your own).
- Acrylic paints or chalk paints.
- A stencil brush or a small sponge.
- Clear sealant (optional).
How to do it:
- Place the stencil firmly on the wax surface. You can use a little bit of temporary spray adhesive to help it stick, but be cautious as it can melt some waxes.
- Load your brush or sponge with a small amount of paint. Offload excess paint onto a paper towel. This prevents bleed-through.
- Dab or lightly brush the paint over the stencil openings. Use a dry-brushing technique.
- Carefully lift the stencil while the paint is still slightly wet to avoid sticking.
- Let the paint dry completely.
- A light coat of clear sealant can help protect the paint.
Tip: For tricky stencils, you can try using a very fine mist of water-based hairspray as a temporary adhesive. It usually dries clear and holds well enough.
What Kind of Wax Are You Working With?
The type of wax matters a lot. Different waxes have different melting points and textures. This affects how well writing or decorations will stick.
Soy Wax: This is a softer wax. It’s usually easy to write on with paint pens or markers. It can be prone to scratching, so be gentle.
Paraffin Wax: This is often harder. It can be a good surface for engraving. Paint pens and markers usually work well too, as the surface is less yielding.
Beeswax: Beeswax is naturally a bit sticky and can have a rougher surface. It’s great for engraving. For ink, you might need a more specialized product or a good primer.
Blended Waxes: Many modern candles use blends. These can have properties of both soy and paraffin. Always test your chosen method on a hidden area or a sample.
Understanding Wax Surfaces
Smooth Surface: Easier for inks and decals. Think of a polished pillar candle.
Textured Surface: Might hide minor imperfections. Good for some stamping or engraving.
Matte Finish: Paint pens often adhere well to matte finishes.
Glossy Finish: Can be trickier; inks might bead up. May require specialized adhesion promoters.
When Is It Normal to Write on Wax?
It’s completely normal to want to personalize wax items! This is common for:
- Candles: For birthdays, weddings, holidays, or just to make a decorative piece special.
- Wax Melts: Adding a scent name or a small logo.
- Wax Seals: While not “writing on wax” in the same sense, wax is the medium.
- Craft Projects: Any art or decor item made with wax.
The desire to add a personal touch is human. It’s what makes handmade items so valuable. So, if you’re thinking about it, you’re not alone.
It’s a very common and creative impulse.
When Should You Be Concerned About Writing on Wax?
There are a few times when you should pause or be extra careful:
- Burning Safety: If you are writing on a candle that you intend to burn, ensure the materials you use are safe. Some inks or paints can produce toxic fumes when burned. Always check product labels. Avoid writing on areas that will melt close to the flame if the material is not heat-resistant.
- Structural Integrity: As mentioned, deep engraving can weaken a candle. Be mindful of how much wax you are removing.
- Material Compatibility: If you use something that doesn’t adhere well, it might flake off later. This is more of an aesthetic concern, but it’s worth avoiding.
In general, for decorative purposes, there’s little to worry about. The safety concerns primarily arise when the wax item is intended for use (like burning). Always prioritize safety when working with candles.
Quick Fixes and Tips for Writing on Wax
Here are some simple things to keep in mind:
- Clean Surface: Always start with a clean, dust-free wax surface.
- Test First: This is the golden rule. Test your pens, inks, or techniques on a hidden spot.
- Go Slow: Rushing leads to mistakes. Take your time, especially with fine details.
- Layering: For opaque coverage, a second coat of paint pen might be needed. Let the first layer dry.
- Sealing: A clear sealant adds protection, especially for decorative items that will be handled.
- Ventilation: If using spray sealants or certain markers, work in a well-ventilated area.
These small tips can make a big difference in your results. They help ensure your writing stays put and looks just how you want it.
Frequently Asked Questions About Writing on Wax
Can I write on a regular candle with a normal marker?
Usually, a regular marker like a standard Sharpie won’t work well on wax. The ink tends to bead up or smudge because wax is a non-porous surface. For best results, use specialized paint pens or permanent markers designed for crafts.
Will the writing burn off if I light the candle?
It depends on what you use. Some inks and paints are designed to be safe when burned. Others can release fumes or melt away.
Always check product labels for safety information regarding burning candles. For safety, avoid writing too close to the wick or in areas that will melt quickly.
What’s the easiest way to write on wax?
The easiest way for most people is using an oil-based paint pen or a specific candle decorating pen. These pens offer good coverage and are relatively simple to use. Just shake, prime, and draw!
Can I use nail polish to write on wax?
Yes, nail polish can work on wax. It dries hard and comes in many colors. Make sure the wax surface is clean and dry.
Apply thin coats, and let each coat dry completely. Like other inks, test it first to see how it adheres to your specific wax type.
How do I get a clean line when writing on a candle?
To get a clean line, use a pen with a fine tip. Go slowly and draw with steady pressure. If you’re using a stencil, ensure it’s firmly in place and use minimal paint on your brush or sponge to prevent bleed-through.
Practicing on scrap wax or paper can help you get the feel for it.
Is it safe to write on wax melts?
Yes, it is generally safe to write on wax melts, especially if they are for decorative purposes or if you are using inks safe for contact. If you are using the wax melts for their intended purpose (melting), it’s best to use materials that are non-toxic and won’t produce harmful fumes when heated. Water-based paints or specialized wax pens are usually good choices.
How can I make my writing last longer on wax?
For writing that needs to be very durable, consider engraving the wax first and then filling the lines with a paint pen. For painted or inked designs, applying a thin layer of a clear, non-yellowing acrylic sealant designed for crafts can help protect the writing from smudges and wear, especially on decorative items.
Conclusion: Your Wax, Your Words
So, can wax be written on? Absolutely! It just takes knowing the right tools and techniques.
Whether you’re adding a heartfelt message to a birthday candle or a custom design to a wax melt, you now have options. From special pens to subtle engraving, your creativity is the limit. Enjoy making your wax creations truly unique and personal.