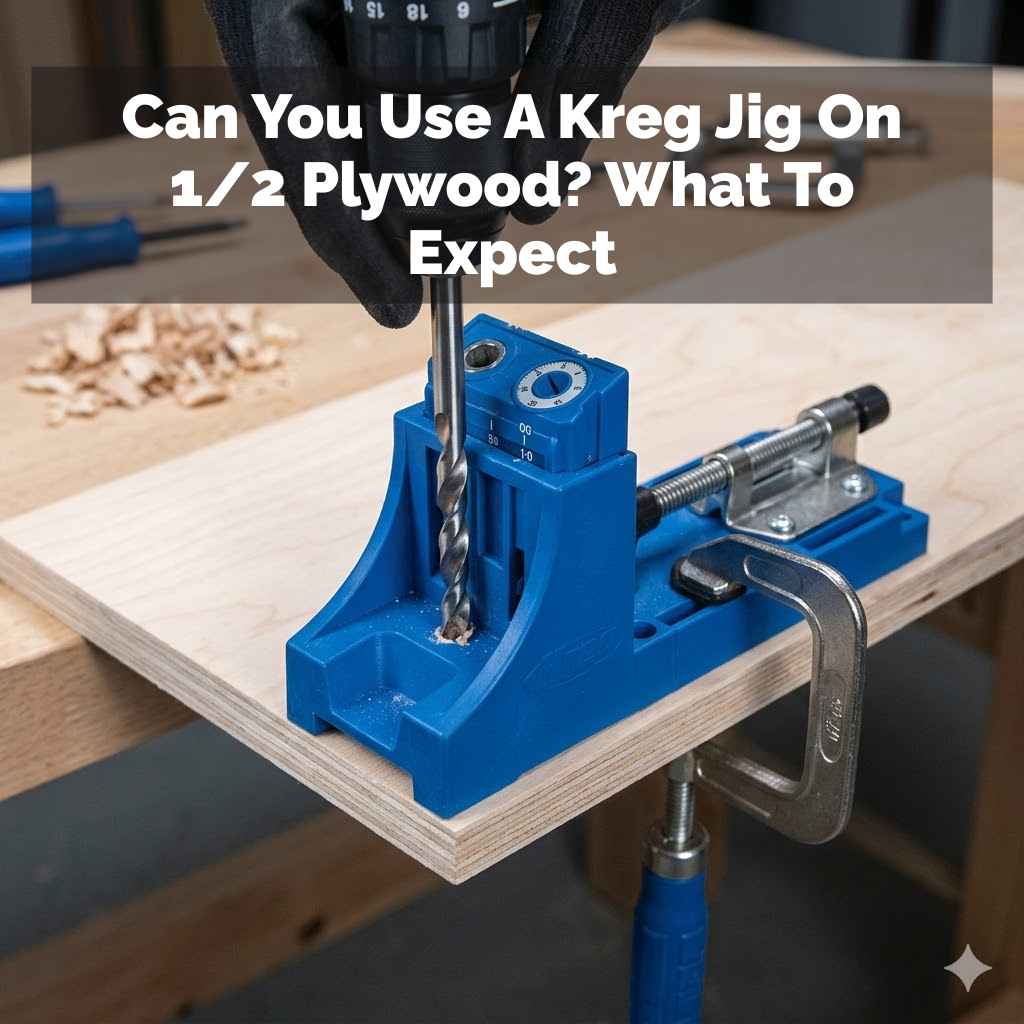
Can You Use A Kreg Jig On 1/2 Plywood? What To Expect
So, you’ve got a project in mind, maybe a small cabinet or some shelving, and you’re looking at using 1/2 inch plywood. It’s a common material, and you’re probably wondering if your trusty Kreg Jig can handle it. It’s a valid question, and one that many DIYers grapple with.
Plywood thickness can sometimes be a bit tricky with pocket hole jigs, and you want to make sure you get strong, clean joints without any fuss. Let’s dive into whether your Kreg Jig is up to the task for 1/2 inch plywood and what you should keep an eye on.
Yes, you can use a Kreg Jig on 1/2 inch plywood. However, it requires using the correct screws and potentially adjusting your jig settings. Results can be great with proper technique, but there are limitations to watch out for with thinner materials.
Understanding the Kreg Jig and Plywood Thickness
A Kreg Jig is a fantastic tool for creating strong, hidden joints. It works by drilling angled holes, called pocket holes, in one piece of wood. Then, you use a special self-tapping screw to drive through that hole into another piece of wood.
This pulls the two pieces tightly together.
The trick with any pocket hole jig, including a Kreg Jig, is matching the screw length and the jig’s settings to the thickness of the wood you’re using. If the screws are too long, they’ll poke through the other side of your workpiece. If they’re too short, the joint won’t be strong enough.
Plywood can be a bit of a wildcard. While it’s often listed by a nominal thickness, like 1/2 inch, its actual thickness can sometimes vary slightly. This is due to the way plywood is made, with multiple thin layers of wood veneer glued together.
These layers might not always be perfectly uniform, leading to small differences in thickness.
Why 1/2 Inch Plywood Can Be Tricky
The most common Kreg Jig models are designed with standard lumber thicknesses in mind, like 3/4 inch. When you step down to 1/2 inch plywood, you’re working with less material for the screw threads to bite into and less thickness for the pocket hole itself.
The pocket hole needs to be deep enough to create a good angle for the screw. But it also can’t be so deep that it weakens the wood too much or, worse, goes all the way through. With 1/2 inch plywood, this margin for error gets smaller.
Another factor is the layered nature of plywood. The glue lines between the veneers can sometimes affect how cleanly the drill bit cuts. You might find that the bit can grab or splinter the wood if you’re not careful.
This is especially true if the plywood is of lower quality.
Can You Actually Use a Kreg Jig on 1/2 Inch Plywood?
The short answer is yes, you absolutely can. Kreg Tool, the maker of the popular Kreg Jigs, offers screws specifically for thinner materials, including 1/2 inch plywood. This is the key to making it work successfully.
The most common Kreg Jig models, like the K4, K5, or the newer Kreg Jig 720 Pro, can all be set up for 1/2 inch material. You just need to make sure you’re using the right accessories and following the correct steps. It’s not as straightforward as using it with standard 3/4 inch pine, but it’s definitely achievable.
Think of it like using a tool for a slightly different job than it was primarily designed for. It can do it, but you need to be a bit more mindful of the details. In this case, the details are the screws and the jig settings.
The Right Screws Are Crucial
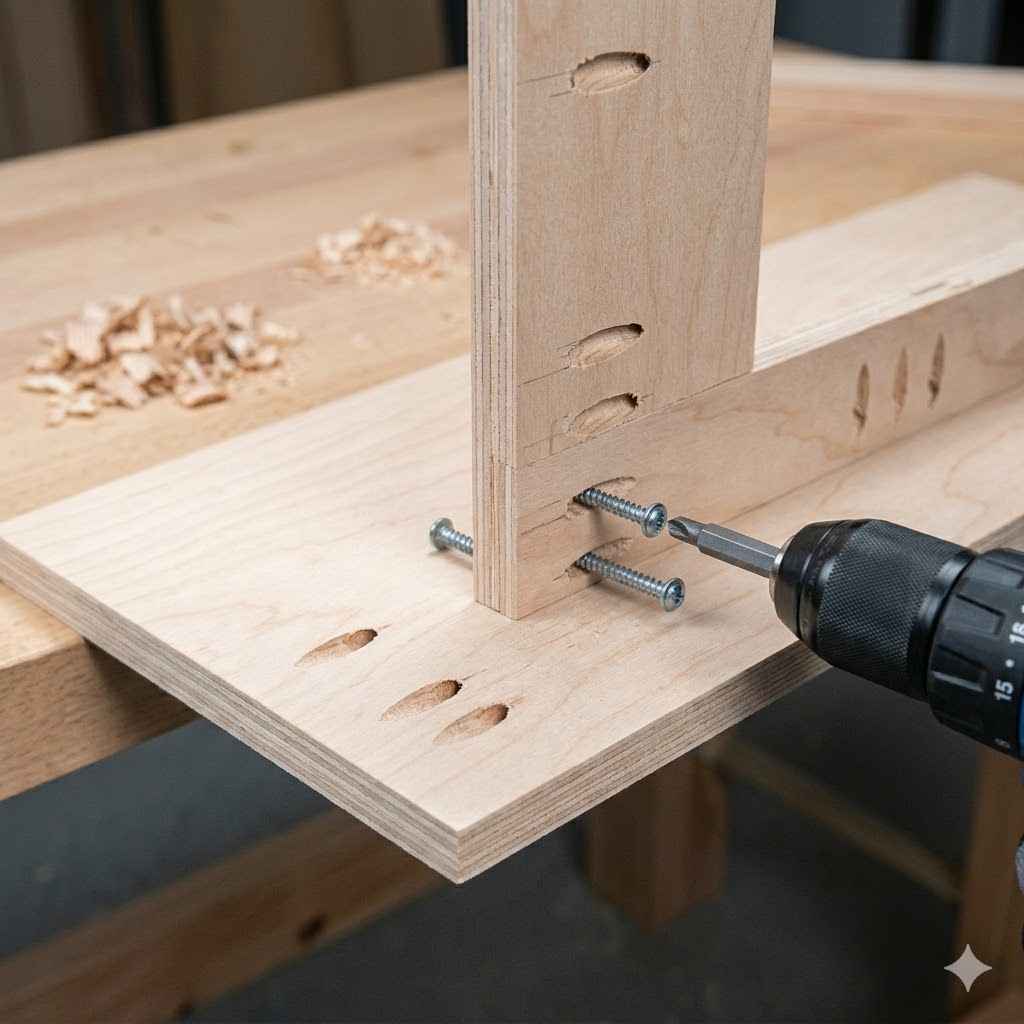
This is where most people run into trouble. Using the standard 1-1/4 inch coarse thread screws that come with many Kreg Jig kits on 1/2 inch plywood is a recipe for disaster. They are simply too long.
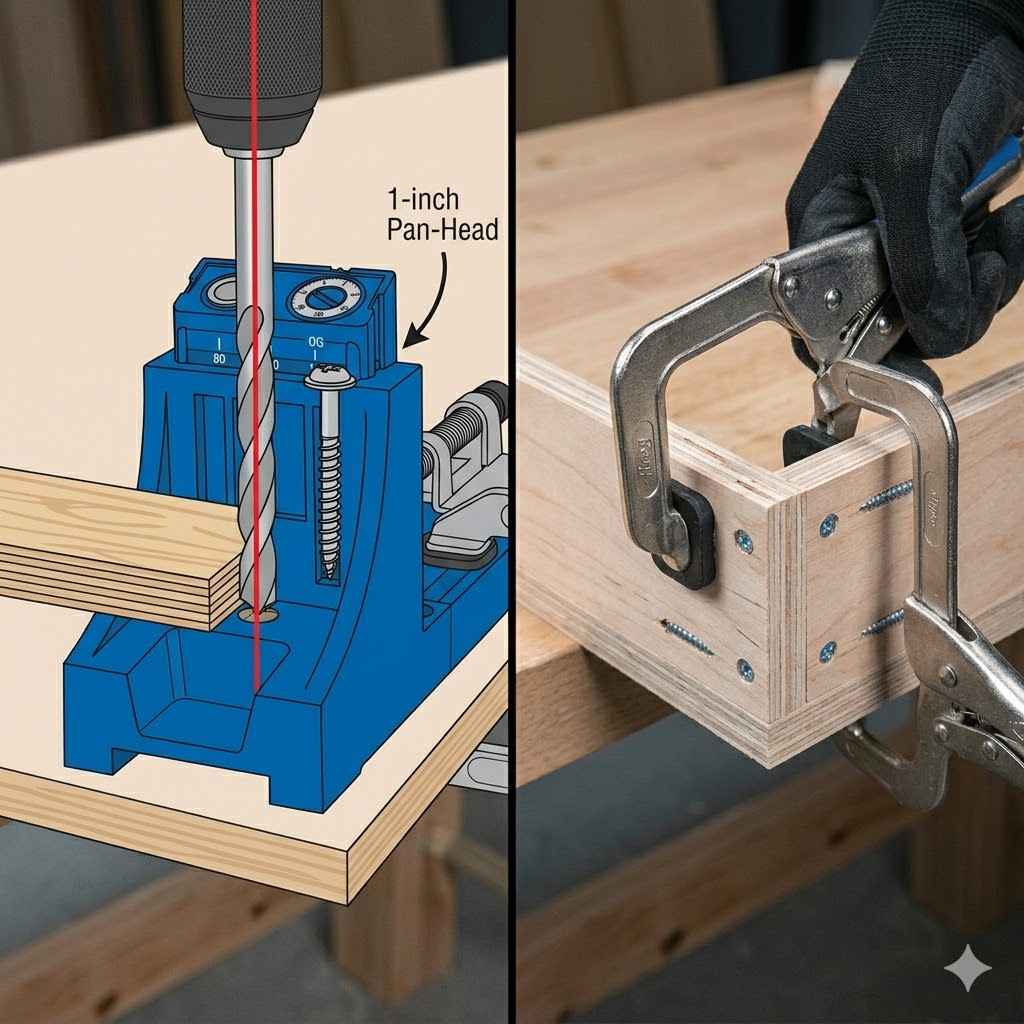
Kreg Tool offers specialized screws for thinner materials. For 1/2 inch plywood, you’ll want to look for their 1 inch coarse thread pocket hole screws. These screws have a shorter shank and are designed to sink into the thinner material without pushing through the other side.
It’s also important to use the right type of screw. For hardwoods and plywoods, coarse thread screws are generally recommended because they grip better. For softer woods like pine, fine thread screws are often used.
Since plywood has multiple layers and glue, the coarse thread is usually the best bet.
Pocket Hole Screw Length Guide for Plywood
Material Thickness | Recommended Screw Length
1/2 inch Plywood | 1 inch
5/8 inch Plywood | 1 inch
3/4 inch Plywood | 1-1/4 inch
Always double-check the Kreg Jig recommendations or the screw packaging. They are usually very clear about which screw length to use for which material thickness. Getting this wrong is the most common mistake.
Setting Up Your Kreg Jig for 1/2 Inch Plywood
Most Kreg Jigs have a built-in thickness setting or a guide that helps you set the drill bit depth. When you’re using 1/2 inch plywood, you need to adjust these settings.
For Kreg Jig Models with Thickness Stops (like the K4, K5, or 720 Pro):
There’s usually a setting for 1/2 inch or a way to adjust the drill bit collar. Refer to your jig’s manual. You’ll want to set the drill bit stop collar so that it drills a pocket hole that’s just the right depth.
The goal is for the drill bit to stop just short of breaking through the backside of the plywood. A common guideline is that the shoulder of the drill bit (where the twisty part ends and the smooth shank begins) should stop about 1/8 inch from the backside surface.
For Kreg Jig Pocket-Hole Jigs with Adjustable Stops:
Many jigs have a way to adjust how far the drill bit goes. You’ll want to set this stop to the correct depth for 1/2 inch material. If your jig has specific markings for 1/2 inch, use those.
If not, you might need to do a test drill.
Test Drills Are Your Friend:
Before you start drilling into your project pieces, always do a test. Grab a scrap piece of the same 1/2 inch plywood you’re using. Set up your jig and drill a pocket hole.
Then, place the scrap piece on a flat surface with the pocket hole facing down. You should be able to see if the drill bit has come too close to the back. A tiny bit of the pilot hole might be visible, but you absolutely do not want the threaded part of the screw to poke through.
I remember the first time I tried using my Kreg Jig on some thinner plywood. I just assumed the standard settings would work. I drilled a hole, drove in a screw, and then I saw it – the tip of the screw was sticking out on the other side.
Panic set in! That’s when I learned how critical those screw lengths and jig settings really are.
Checking the depth of the drilled hole against the backside of the plywood is a simple step that saves a lot of headaches. You want the pocket hole to be deep enough for the screw head to sit flush, but not so deep it compromises the integrity of the joint.
Drilling Techniques for Plywood
Plywood can sometimes be prone to tear-out, especially when drilling pocket holes. Tear-out happens when the wood fibers splinter and break away as the drill bit exits the material.
To minimize tear-out on 1/2 inch plywood:
- Use a Sharp Drill Bit: A sharp bit cuts cleanly and reduces the chance of splintering.
- Slow and Steady: Don’t rush the drilling process. Let the drill bit do the work.
- Support the Backside: If possible, place a scrap piece of wood or a sacrificial board behind where the drill bit will exit. This gives the wood fibers something to break against instead of just tearing away.
- Clamp Securely: Make sure your workpiece is firmly clamped to the jig. Any movement during drilling can lead to sloppy holes or increased tear-out.
Quick Tips for Drilling Plywood
Use a sharp bit.
Drill at a steady pace.
Back it up with scrap wood.
Clamp it down tight.
When I’m drilling into plywood, especially thinner grades, I always feel a little extra tension. You know that moment when the drill bit is about to break through the other side? I hold my breath just a little bit, hoping for a clean exit.
Using a backing board has made a huge difference for me. It’s a simple thing, but it’s made those pocket holes look so much cleaner.
What to Expect with 1/2 Inch Plywood Joints
When done correctly with the right screws and settings, pocket hole joints in 1/2 inch plywood can be surprisingly strong. They are excellent for many applications where extreme structural load isn’t the main concern.
Good for:
- Cabinet boxes
- Shelving units
- Small furniture pieces
- Drawer boxes
- Face frames (when reinforced or for lighter applications)
Limitations:
You might find that the joint isn’t quite as robust as a comparable joint made with 3/4 inch plywood or solid wood. The screws have less material to grip, and the pocket hole itself is shallower relative to the screw length. This means the joint might be more susceptible to racking or shear forces.
For projects that will bear a lot of weight or be subject to significant stress, you might want to consider adding extra support. This could include:
- Corner braces
- Additional screws or fasteners
- Deeper pocket holes (if your jig allows and you’ve tested carefully)
- Reinforcing the joint with glue
I once built a set of storage shelves for my garage using 1/2 inch plywood and pocket holes. I used the 1-inch screws and made sure my settings were right. They’ve held up great for storing tools and supplies.
However, I did notice that if I pushed really hard on one of the shelves, there was a tiny bit of flex that I wouldn’t get with 3/4 inch material. It’s not a deal-breaker, but it’s something to be aware of.
Common Problems and How to Avoid Them
Here are some issues you might encounter and how to get past them:
Common Pocket Hole Problems (and Solutions)
Problem: Screws poke through the backside.
Solution: Use shorter screws (1-inch for 1/2-inch plywood). Verify jig settings and drill bit collar depth. Do test drills.
Problem: Joint is not tight.
Solution: Ensure you are using the correct screw length. Check that the clamp is holding the pieces tightly together before driving the screw. Make sure the pocket hole is drilled correctly.
Problem: Wood splits near the pocket hole.
Solution: Use coarse thread screws for plywood. Ensure the drill bit doesn’t go too deep. Avoid overtightening screws.
If the wood is very thin or brittle, consider adding glue.
Problem: Tear-out when drilling pocket holes.
Solution: Use a sharp drill bit. Use a backing board. Drill at a moderate speed.
Clamp the workpiece securely.
One of the biggest temptations is to just grab whatever screws you have. But honestly, for pocket hole joinery, using the specific screws designed for the material thickness is non-negotiable. It’s like trying to build a strong fence with nails that are too short – it just won’t hold.
I’ve also learned the hard way that if the wood is really splintery, even with the right screws, you might need to add a bit of wood glue in the joint for extra strength. Pocket holes are great for alignment and holding, but glue provides the real long-term bond.
When to Consider Alternatives
While Kreg Jigs are versatile, there are times when 1/2 inch plywood might be better joined with a different method.
If your project needs to withstand heavy loads, extreme moisture, or high shear forces, you might want to look at:
- Dovetail joints: For very high-end furniture and drawers.
- Mortise and tenon joints: Strong traditional woodworking joints.
- Biscuit joiners: Good for alignment and some strength.
- Dadoes or rabbets: Especially useful for shelf support in cabinets.
- Traditional screwing and gluing with corner braces: A simple but effective method.
For example, if you were building the main frame of a heavy-duty workbench that would have significant weight and lateral forces applied, I’d probably steer clear of pocket holes on 1/2 inch plywood for the main structural elements. I’d opt for thicker material, like 3/4 inch plywood, or a different joinery method that offers more inherent strength.
Alternatives to Pocket Holes on Thin Plywood
Use thicker material (3/4 inch or more).
Employ traditional joinery (dovetails, mortise & tenon).
Utilize dadoes and rabbets for shelves and panels.
Reinforce with glue and fasteners.
It’s all about matching the joinery method to the demands of the project. Kreg Jigs are fantastic for speed and ease, especially for projects where aesthetics and moderate strength are key. But understanding their limits with thinner materials is part of being a smart woodworker.
Maintaining and Cleaning Your Kreg Jig
To ensure your Kreg Jig continues to perform well, especially when dealing with potentially dusty materials like plywood, regular maintenance is a good idea.
After each project, or at least periodically, clean out any sawdust that might have accumulated in the jig’s mechanisms or drill guides. A brush or compressed air works well for this.
Check the drill bit for any buildup or damage. A clean, sharp bit drills better. If the bit shows signs of wear or is dull, it’s time to replace it.
This is especially important for cleaner cuts in plywood.
Make sure all the parts of your jig are functioning smoothly. If any parts feel stiff or difficult to adjust, a quick clean and a touch of lubricant might be all they need.
I know it’s tempting to just put the jig back in the box after a project. But taking a few minutes to clean it makes a world of difference for the next time. I’ve found that sawdust can really gum up the works, especially in the drill guide.
A quick brush-out and making sure everything moves freely helps me feel confident when I set it up again.
Is 1/2 Inch Plywood Always the Same?
This is a great question because, as I mentioned earlier, plywood thickness can vary. What’s labeled as 1/2 inch might actually be 7/16 inch, or sometimes a little thicker.
This is another reason why doing test pieces is so important. You can’t always rely on the label alone. Take a piece of the actual plywood you plan to use for your project, and set your Kreg Jig up based on its measured thickness.
You can measure the thickness of your plywood with a ruler or, even better, a measuring tape. Once you have the actual measurement, you can adjust your jig settings accordingly. Kreg Tool often has guides or tables that help you dial in the settings based on precise measurements.
For instance, if your 1/2 inch plywood is actually closer to 7/16 inch, you might need to adjust your drill bit depth slightly to compensate. It’s a small adjustment, but it can prevent screws from poking through.
In my workshop, I’ve noticed that even sheets of plywood from the same manufacturer can have slight variations. It’s a good reminder that woodworking often involves adapting to the materials you have, rather than expecting them to be perfectly uniform every single time. Measuring your material is key.
Your Projects and the Kreg Jig: Making it Work
So, can you use a Kreg Jig on 1/2 inch plywood? Absolutely. The key lies in being precise.
Remember these main points:
- Use 1-inch coarse thread Kreg screws. This is the most critical step.
- Set your jig correctly. Do test drills to verify the drill bit depth and screw length.
- Clamp securely.
- Drill cleanly. Use a sharp bit and consider a backing board.
- Understand the limitations. For very heavy-duty applications, you might need stronger joinery.
When you nail these details, you’ll find that 1/2 inch plywood can be a very workable and economical material for many of your DIY projects. The speed and ease of pocket hole joinery are hard to beat, and with a little care, you can achieve great results. It’s all about knowing your tools, your materials, and how they work together.
Frequently Asked Questions
Can I use regular screws with a Kreg Jig on 1/2 inch plywood?
No, it is strongly recommended to use Kreg Screws for Pocket Holes?” href=”https://woodworkingadvisor.com/do-you-have-to-use-kreg-screws-for-pocket-holes/” target=”_blank” rel=”noopener” data-wpil-monitor-id=”20446″>Kreg’s specialized 1-inch coarse thread pocket hole screws designed for 1/2-inch thick material. Regular screws are usually too long and will poke through the other side of the plywood, ruining the joint and the workpiece.
How deep should the pocket hole be in 1/2 inch plywood?
The pocket hole depth should be set so that the drill bit stops just before breaking through the backside of the 1/2 inch plywood. The shoulder of the drill bit should be about 1/8 inch from the back surface. Always perform a test drill on a scrap piece to confirm the correct depth.
Will pocket holes on 1/2 inch plywood be strong enough for shelves?
Yes, for most common shelving applications where the weight isn’t excessive, pocket holes on 1/2 inch plywood are strong enough, especially when combined with wood glue. For very heavy loads, you might consider adding additional support like corner braces or using thicker material.
What if my 1/2 inch plywood is not exactly 1/2 inch thick?
Plywood thickness can vary. It’s crucial to measure the actual thickness of your plywood with a ruler or caliper. Then, adjust your Kreg Jig settings or drill bit stop collar accordingly to ensure the screws don’t poke through and the joint is secure.
Can I use a Kreg Jig for outdoor projects with 1/2 inch plywood?
For outdoor projects, it’s best to use exterior-grade plywood and exterior-rated pocket hole screws. You’ll also want to ensure all exposed wood surfaces are properly sealed and finished to protect them from moisture and the elements. Standard pocket hole joints might not be sufficient for outdoor durability without these precautions.
What is the difference between coarse and fine thread pocket hole screws for plywood?
Coarse thread screws are generally recommended for softwoods and plywoods because their wider threads provide a better grip in the layered material. Fine thread screws are typically used for hardwoods. For 1/2 inch plywood, always opt for coarse thread screws.
Conclusion
Tackling projects with 1/2 inch plywood and your Kreg Jig is absolutely achievable. The key is to respect the material’s thickness and use the right tools for the job. By selecting the correct screws and carefully setting up your jig, you can create sturdy and attractive joints.
Remember that practice makes perfect, and a few test pieces will set you up for success. Happy building!