Hand Saw Painting Ideas: Genius & Essential
Transform your old hand saw into a stunning piece of art with these genius and essential painting ideas. Perfect for beginners, these techniques will add a unique, decorative touch to your workshop, home décor, or even as a thoughtful gift.
Ever looked at an old hand saw gathering dust and thought, “that could be so much more”? You’re not alone! Many of us have these classic tools, beautifully crafted but often overlooked as decorative items. The challenge is knowing where to start with turning them into something special. It can feel a bit daunting, especially if you’re new to woodworking or DIY crafts. But don’t worry, I’m here to guide you through it! We’ll break down simple, fun ways to paint your hand saw, making it a true conversation starter. Get ready to see your old saw in a whole new light!
Why Paint a Hand Saw?
Painting an old hand saw is a fantastic way to repurpose a functional tool into a beautiful decorative item. It’s a project that blends the charm of vintage tools with personal artistic expression. Whether you’re looking to add a unique touch to your workshop, create eye-catching home décor, or craft a memorable gift, a painted hand saw is a versatile option. It’s also an incredibly accessible DIY project, requiring minimal specialized skills and readily available materials. You don’t need to be a master painter; the goal is to have fun and create something that reflects your style.
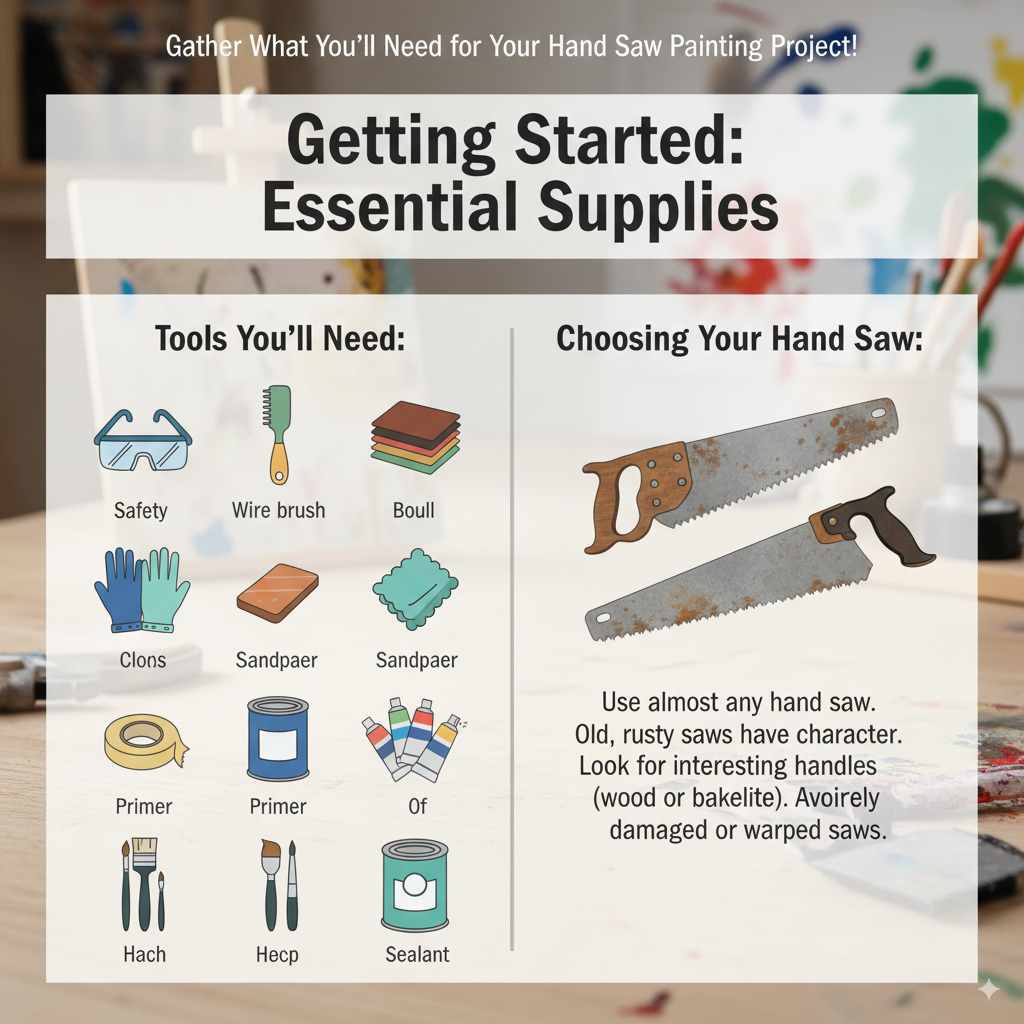
Getting Started: Essential Supplies
Before we dive into the creative part, let’s gather what you’ll need. The beauty of this project is that you likely have some of these items already, or they are inexpensive and easy to find. Safety first, always!
Tools You’ll Need:
- Safety Glasses: Protect your eyes from dust and paint chips.
- Gloves: Keep your hands clean and protected.
- Wire Brush: For cleaning off rust and debris from the saw blade.
- Sandpaper (various grits, e.g., 100-220): To smooth the handle and prepare the blade for paint.
- Cleaning Cloths or Rags: For wiping down the saw.
- Painter’s Tape: To mask off areas you don’t want to paint.
- Primer: To ensure paint adheres well and for a better finish.
- Paints: Acrylic paints are versatile and easy to use. Spray paint is also a great option for even coverage.
- Brushes: A variety of sizes for different effects.
- Sealant/Clear Coat: To protect your finished design.
Choosing Your Hand Saw:
You can use almost any hand saw for this project. Old, rusty saws often have the most character. Look for saws with interesting handles made of wood or bakelite. Avoid saws that are severely damaged or warped, as they might be harder to work with and less safe. A good-quality vintage saw will often have a blade with a nice patina that can be enhanced with paint, or you can choose to cover it completely.
Step-by-Step Guide to Painting Your Hand Saw
Step 1: Cleaning and Preparation
This is the most crucial step for a lasting finish. A clean surface is key!
- Safety First: Put on your safety glasses and gloves.
- Rust Removal: Use a stiff wire brush to scrub away any rust and loose debris from the saw blade. For stubborn rust, you might need a rust remover chemical, but work in a well-ventilated area and follow product instructions carefully. You can also try a rust removal paste like Evapo-Rust, which is often less harsh.
- Surface Cleaning: Wipe down the entire saw with a damp cloth to remove dust. Once dry, use a degreaser or rubbing alcohol on the blade to remove any final traces of oil or grime.
- Handle Prep: If the handle is wood, inspect it for loose splinters or rough patches. Lightly sand it smooth with sandpaper (start with a coarser grit like 100 if needed, then move to a finer grit like 220). Wipe away dust with a tack cloth or a slightly damp rag. If the handle is made of plastic or bakelite, a gentle wipe with a damp cloth is usually sufficient.
Step 2: Priming for Success
Primer acts as a base coat, helping your paint stick better and providing a more uniform color. It’s especially important on metal surfaces.
- Masking: If you want to keep certain parts of the handle unpainted or if there are any metal parts you don’t want to paint (like a tang peeking through the handle), use painter’s tape to cover them precisely.
- Apply Primer: Apply a thin, even coat of primer. Spray primers are excellent for this, providing smooth coverage. If using a brush-on primer, ensure you get good coverage without drips.
- Drying: Let the primer dry completely according to the manufacturer’s instructions. This usually takes at least 30 minutes to an hour. You might need a second coat for better coverage, especially on a heavily rusted blade.
Step 3: Bringing Your Vision to Life: Painting Techniques
This is where the fun really begins! You can go as simple or as elaborate as you like.
Option A: Solid Color & Handle Accent
A classic and elegant choice. You can paint the blade a single bold color and focus on detailing the handle, or vice versa.
- Paint the Blade: Once the primer is dry, apply your chosen color to the saw blade. Spray paint offers a smooth, professional finish. Hold the can about 8-12 inches away and apply in light, sweeping motions. Allow each coat to dry before applying the next. Two to three thin coats are usually better than one thick one.
- Paint the Handle: For the handle, you might opt for a complementary color or a natural wood finish (if you sanded it well and decided not to paint it). If painting, use acrylic paints for more control or spray paint designed for wood or plastic. You can paint the entire handle or just sections.
Option B: Patterned or Themed Saw
This is where you can get really creative! Think floral designs, geometric patterns, or even a rustic, distressed look.
- Stenciling: Use pre-made stencils or cut your own from cardstock or thin plastic. Place the stencil on the blade or handle and carefully apply paint using a sponge or a small brush with dabbing motions.
- Hand-Painting Designs: If you’re comfortable with freehand painting, you can add intricate designs like vines, stars, or even small illustrations. Thin acrylic paints work best for detail work.
- Distressed Look: For a vintage or rustic feel, paint the saw in your chosen colors, let it dry, and then lightly sand some areas to reveal the primer or the original metal/wood underneath. This creates a charming aged appearance. You can also dry-brush paint over a base coat for a textured, worn effect.
Option C: Wood Grain Enhancement (Handle Focus)
If you have a beautiful wooden handle, you might want to enhance its natural grain.
- Stain or Paint Wash: After sanding, apply a wood stain in your desired color. Alternatively, you can create a paint wash by mixing a small amount of acrylic paint with water (or a milky consistency). Apply the wash with a brush, and then wipe off the excess before it dries to highlight the wood grain.
- Sealing: Once dry, seal the handle with a clear polyurethane or varnish for protection.
Step 4: Drying and Curing
Patience is a virtue here! Allow your painted saw to dry thoroughly. Most paints will feel dry to the touch within a few hours, but they need much longer to fully cure and harden. This can take 24-72 hours or even longer depending on the type of paint and humidity. Refer to the paint manufacturer’s guidelines.
Step 5: Sealing Your Masterpiece
To protect your hard work from chips, scratches, and the elements, apply a clear protective coat.
- Choose Your Sealer: A clear acrylic spray sealant is usually the easiest and provides an even finish. You can choose between a matte, satin, or glossy finish.
- Apply Sealer: In a well-ventilated area, apply one to two thin coats of the sealant, following the manufacturer’s instructions for drying times between coats.
- Final Cure: Allow the sealant to cure completely before handling the saw extensively or hanging it up.
Hand Saw Painting Ideas for Inspiration
Still pondering what to paint? Here are some popular and effective ideas to spark your creativity:
1. Rustic Charm
Focus on enhancing the vintage feel. Think distressed finishes, muted colors like barn red, antique white, or deep charcoal. You could even add subtle wood grain effects to the handle. This style complements farmhouse and rustic décor beautifully.
- Paint the blade a matte black or deep burgundy.
- Use a dry-brushing technique with lighter colors (cream, light grey) over the base coat on the blade and handle for a weathered look.
- If the saw has a wooden handle, consider a dark walnut stain.
2. Folk Art Flourish
Embrace traditional folk art motifs. This often involves intricate patterns, bold colors, and stylized imagery like flowers, birds, or hearts.
- Paint the blade a bright, solid color like cobalt blue or emerald green.
- Adorn the blade with hand-painted scrolling vines, small flowers, or simple geometric borders in contrasting colors.
- The handle could be painted a complementary solid color.
3. Nautical & Coastal Themes
Perfect for beach houses or anyone who loves the sea. Blues, whites, sandy beiges, and rope accents work wonderfully.
- Paint the blade in varying shades of blue and white using a wave-like motion.
- Add details like anchors, seagulls, or lighthouses.
- Wrap the handle in jute twine or paint it to resemble weathered driftwood.
4. Industrial Chic
This style embraces the raw, mechanical nature of the tool. Think metallic finishes, bold typography, or geometric patterns.
- Use metallic spray paints like copper, bronze, or gunmetal grey for the blade.
- Paint the handle a high-contrast color like black or deep red.
- Consider stenciling numbers or letters in a bold, sans-serif font onto the blade, perhaps a year or a meaningful word. You can learn more about font pairing at Font Squirrel’s font combination tool for inspiration.
5. Floral & Botanical Designs
Bring the outdoors in with elegant floral patterns. This works well on the blade or as accents.
- Paint the blade a soft, muted green or cream.
- Hand-paint delicate flowers, leaves, or sprigs along the length of the blade.
- The handle could be painted a coordinating pastel color.
6. Whimsical & Fun
Don’t be afraid to be playful! Bright colors, fun characters, or abstract designs can make your saw a real statement piece.
- Paint the blade in a rainbow gradient.
- Add cartoon-like characters or bold abstract shapes.
- Use neon paints for a vibrant pop.
Safety Considerations for Hand Saw Painting
While painting is a creative and generally safe activity, it’s important to remember some key safety points, especially when working with tools and paints:
- Ventilation: Always work in a well-ventilated area, especially when using spray paints, primers, or sealants. Open windows or work outdoors.
- Protective Gear: Your safety glasses and gloves are non-negotiable. Consider a dust mask when sanding.
- Sharp Edges: Be cautious of the saw’s teeth. While you’re painting, they can still be sharp and pose a risk of cuts.
- Paint Disposal: Dispose of paints and solvents responsibly according to local regulations. Never pour them down the drain. You can find guidance from the U.S. Environmental Protection Agency (EPA) on hazardous waste.
- Tool Condition: If you are painting a saw that you intend to use for actual woodworking, ensure the paint does not interfere with the blade’s function or safety features. For purely decorative saws, this is less of a concern.
Table: Paint Types and Their Pros/Cons
Choosing the right paint can make a big difference in your project’s appearance and durability.
| Paint Type | Pros | Cons |
|---|---|---|
| Acrylic Paints | Water-based, easy cleanup, low odor, versatile for detail work, good color selection. | Can be less durable than oil-based paints if not sealed properly. Might require multiple coats for opaque coverage. |
| Spray Paint (Enamel/Acrylic) | Fast application, smooth and even finish, good for metal and wood. | Requires good ventilation, can be messy if not careful, fumes can be strong, harder for intricate details. |
| Oil-Based Enamel Paints | Very durable, hard-wearing finish, excellent for metal. | Strong fumes, requires mineral spirits for cleanup, longer drying times. |
| Chalk Paint / Milk Paint | Creates a matte, distressed, or vintage look with minimal prep. | Requires sealing for durability, can be more expensive, not ideal for high-gloss finishes. |
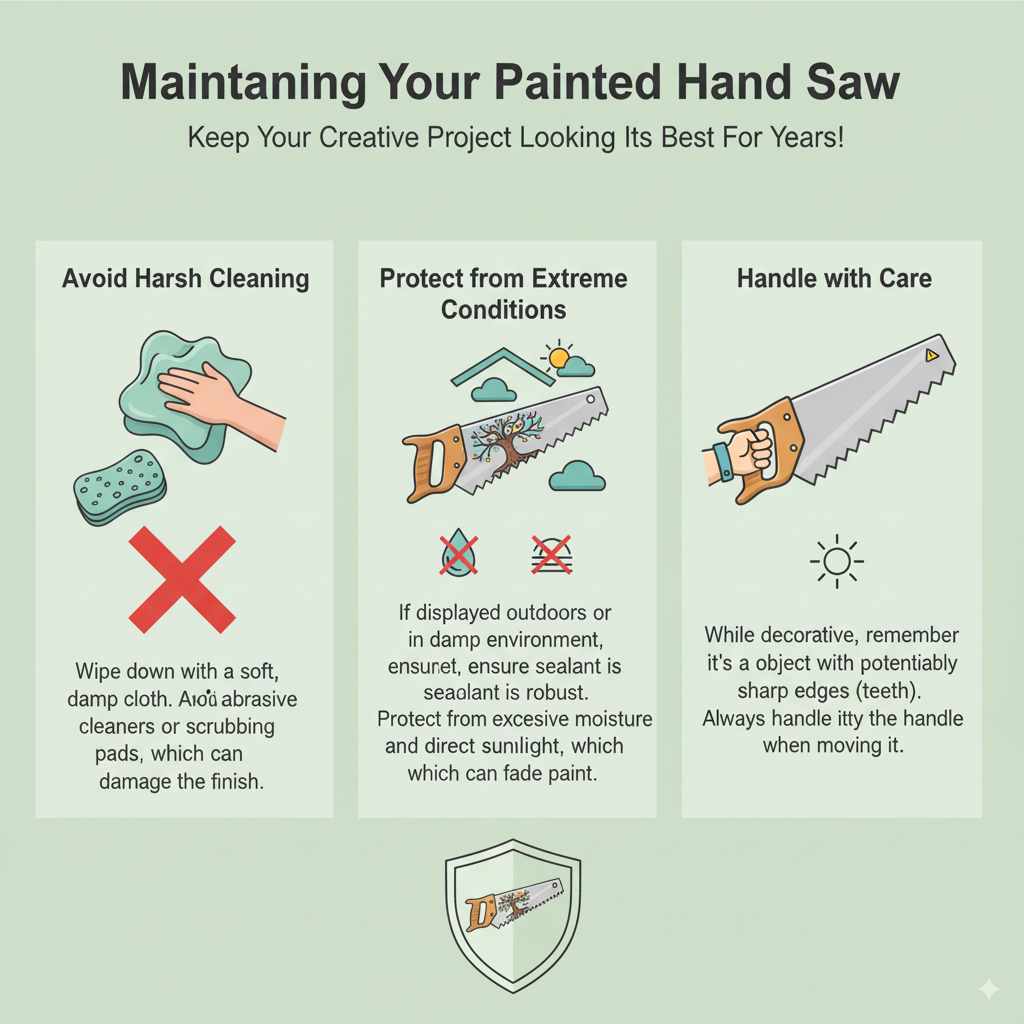
Maintaining Your Painted Hand Saw
Once your hand saw is painted and sealed, it should be quite durable. However, a little care will make it last for years:
- Avoid Harsh Cleaning: Wipe down with a soft, damp cloth. Avoid abrasive cleaners or scrubbing pads, which can damage the finish.
- Protect from Extreme Conditions: If displayed outdoors or in a damp environment, ensure the sealant is robust and the saw is protected from excessive moisture and direct sunlight, which can fade paint over time.
- Handle with Care: While decorative, remember it’s an object with potentially sharp edges (teeth). Handle it by the handle when moving it.
FAQ: Hand Saw Painting
Q1: Do I need to remove all the rust before painting?
For the best adhesion and a smooth finish, yes, you should remove as much rust as possible. Heavy rust can cause paint to flake off later. A wire brush is your best friend here.
Q2: Can I paint directly onto the metal blade?
It’s highly recommended to use a primer on the metal blade first. Primer helps the paint adhere better, prevents rust from bleeding through, and provides a more even surface for your color coat.
Q3: What kind of paint is best for the wooden handle?
Acrylic paints are a great choice for wooden handles. They offer a wide range of colors, are easy to clean up, and can be detailed. If the handle is going to see a lot of handling, a stronger enamel paint or a good varnish over acrylics will add durability.
Q4: How do I get a smooth finish with spray paint?
The key is multiple thin coats. Hold the can about 8-12 inches away and spray in steady, sweeping motions. Don’t try to cover everything in one go. Allow each coat to dry for a few minutes before applying the next. Good lighting and a steady hand also help!
Q5: Can I use my painted hand saw for actual woodworking?
If you intend to use the saw for cutting, it’s best to paint only the handle. The paint on the blade could interfere with its cutting ability, create friction, or wear off quickly. For decorative purposes only, you can paint the entire saw.
Q6: How long should I wait before using the saw for projects?
If you are painting only the handle and intend to use the saw, wait at least 24-48 hours for the paint and sealant to cure properly before putting it to work. For decorative saws, allow the sealant to cure for the time recommended by the manufacturer (often up to 72 hours) before handling heavily.
Conclusion
Turning an old hand saw into a work of art is a rewarding and accessible project for anyone. By following these steps—from thorough cleaning and preparation to creative painting and sealing—you can transform a dusty tool into a stunning decorative piece or a unique gift. Remember to prioritize safety by wearing protective gear and working in a well-ventilated space.