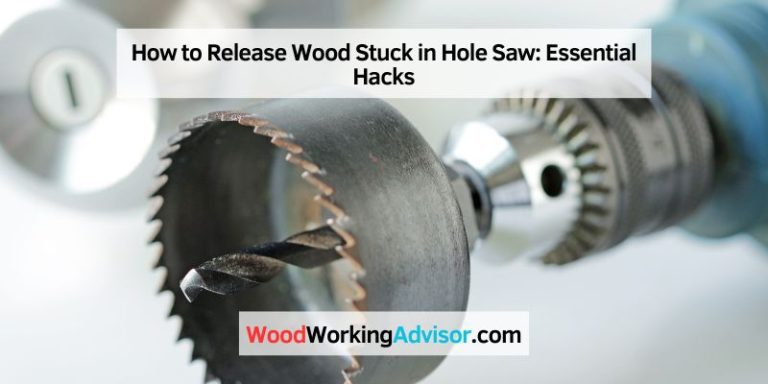
How To Change A Drill Bit On Your Ryobi 18V The Right Way
Changing a drill bit on a Ryobi 18V drill is simple. Most models use a keyless chuck. You just need to twist the front part of the chuck counter-clockwise until it opens enough to remove the old bit.
Then, insert the new bit and twist the chuck clockwise until it’s snug. Make sure it’s secure before you start drilling.
Understanding Your Ryobi 18V Drill’s Chuck
Your Ryobi 18V drill likely has what’s called a keyless chuck. This is the part at the very front of the drill that holds the drill bit. It’s designed for quick changes without needing a special tool, like an old-fashioned chuck key.
This makes switching between different bits super fast.
The chuck usually has two main parts that you can grip and turn. The outer sleeve is what you’ll use to open and close the chuck. The inner part stays still when you’re just changing bits.
It’s all about making it easy for you to get your work done without fuss.
When you look at the chuck, you’ll see jaws inside. These jaws grip the drill bit tightly. They can move closer together or farther apart.
This movement is what lets you put in bits of different sizes. A properly functioning chuck is key to safe and effective drilling.
A Personal Story: The Day My Drill Bit Got Stuck
I remember one afternoon vividly. I was building a rather ambitious birdhouse for my backyard. It was a sunny Saturday, and I was feeling pretty good about my DIY skills.
I’d drilled all the pilot holes perfectly with a nice, thin bit. Now it was time to switch to a slightly thicker bit to make the actual holes for the screws.
I grabbed my trusty Ryobi 18V drill, the one I’d had for years. I reached for the front of the chuck, expecting the usual smooth twist. But this time, it felt… stuck.
I tried turning it counter-clockwise, like I always did. Nothing. I twisted harder.
Still nothing. A little bit of panic started to creep in. The sun was beating down, and my carefully planned birdhouse project was on hold because of a stubborn drill bit.
I started to worry. Was I going to break it? Was there a trick I was missing?
I felt a little silly, like I should know this simple thing. I tried wiggling the bit while I turned the chuck, hoping that might help loosen it. It didn’t.
I could feel a bead of sweat trickle down my temple, not just from the heat, but from the frustration. This was supposed to be the easy part!
Quick Chuck Check: Keyless Styles
Standard Keyless Chuck: Most Ryobi 18V drills have this. You just twist the front collar.
Auto-locking: Some models might have this feature. It means the chuck locks automatically when you stop twisting.
Double-Sleeve: You might see two rings you can turn. Usually, one locks the spindle and the other opens/closes the jaws.
Single-Sleeve: This is the most common. One part moves to open and close.
How to Safely Remove Your Current Drill Bit
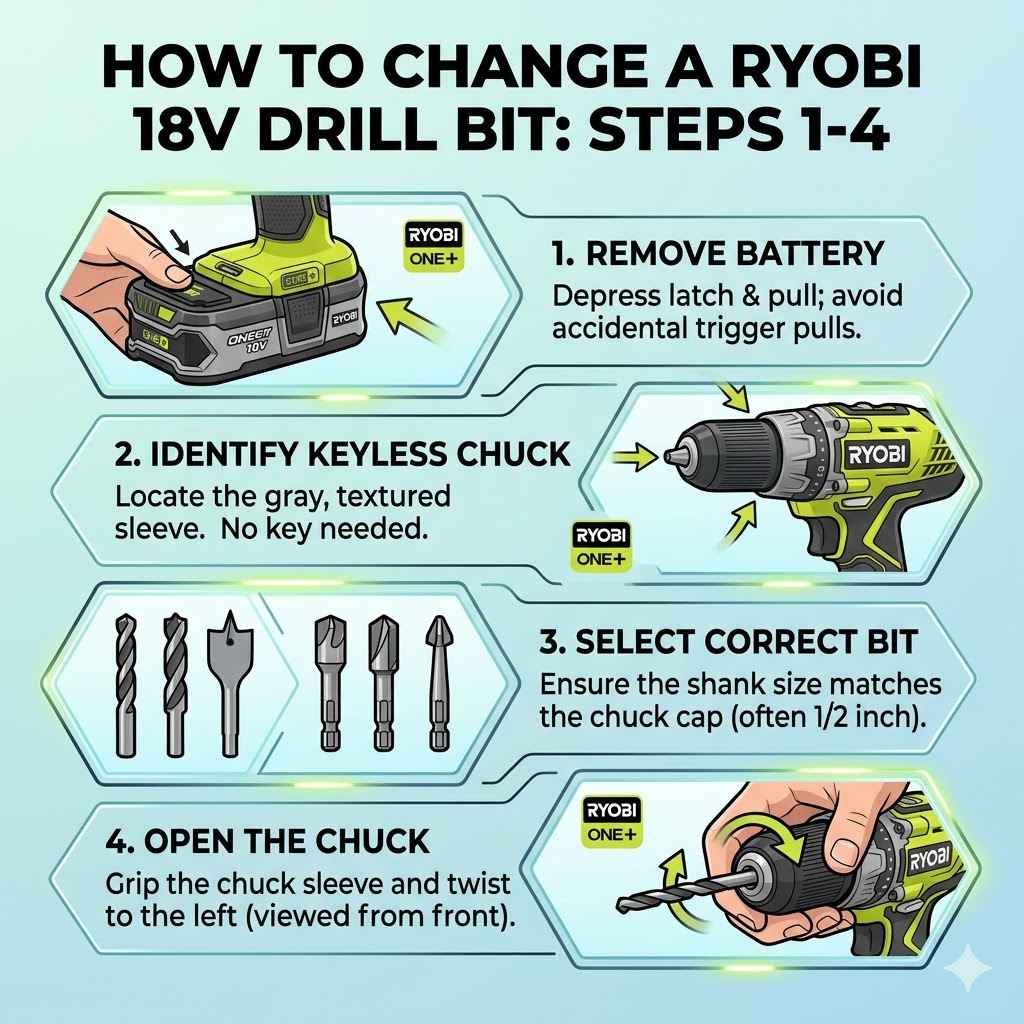
The first thing to do when you need to change a bit is to make sure your drill is safe to handle. This means you need to disconnect the power source. For your Ryobi 18V, this is super important.
You need to remove the battery pack.
This is crucial. If the battery is in, there’s always a chance the drill could accidentally turn on. That’s the last thing you want when your fingers are near the chuck or the bit.
So, battery out. Always.
Now, look at the chuck. It’s the metal or plastic part at the front. You’ll usually see two parts that you can grip and turn.
You need to find the part that spins to open the jaws. On most Ryobi drills, this is the front sleeve or collar.
Grip the main body of the drill firmly with one hand. With your other hand, grab the front sleeve of the chuck. You need to turn this sleeve counter-clockwise.
That’s the direction opposite to how you’d tighten a screw. Keep turning it.
You’ll feel the jaws inside the chuck opening up. They move inward, away from the drill bit. Keep turning until the jaws have opened wide enough.
You should then be able to pull the old drill bit straight out. If it feels a little stuck, give it a gentle wiggle while you continue to turn the chuck. Don’t force it too hard, though.
Sometimes, a bit can get really jammed in there. This is often because it wasn’t tightened properly last time, or it got hot and expanded. If it’s really stuck, try gripping the bit itself with a pair of pliers and gently pulling while you turn the chuck.
But always remember to remove the battery first!
Bit Removal Steps: The Quick List
1. Battery Out: Remove the Ryobi 18V battery pack.
2. Grip Drill: Hold the drill body steady.
3. Turn Chuck: Twist the front collar counter-clockwise.
4. Open Jaws: Turn until the bit can slide out.
5. Remove Bit: Pull the old bit straight out.
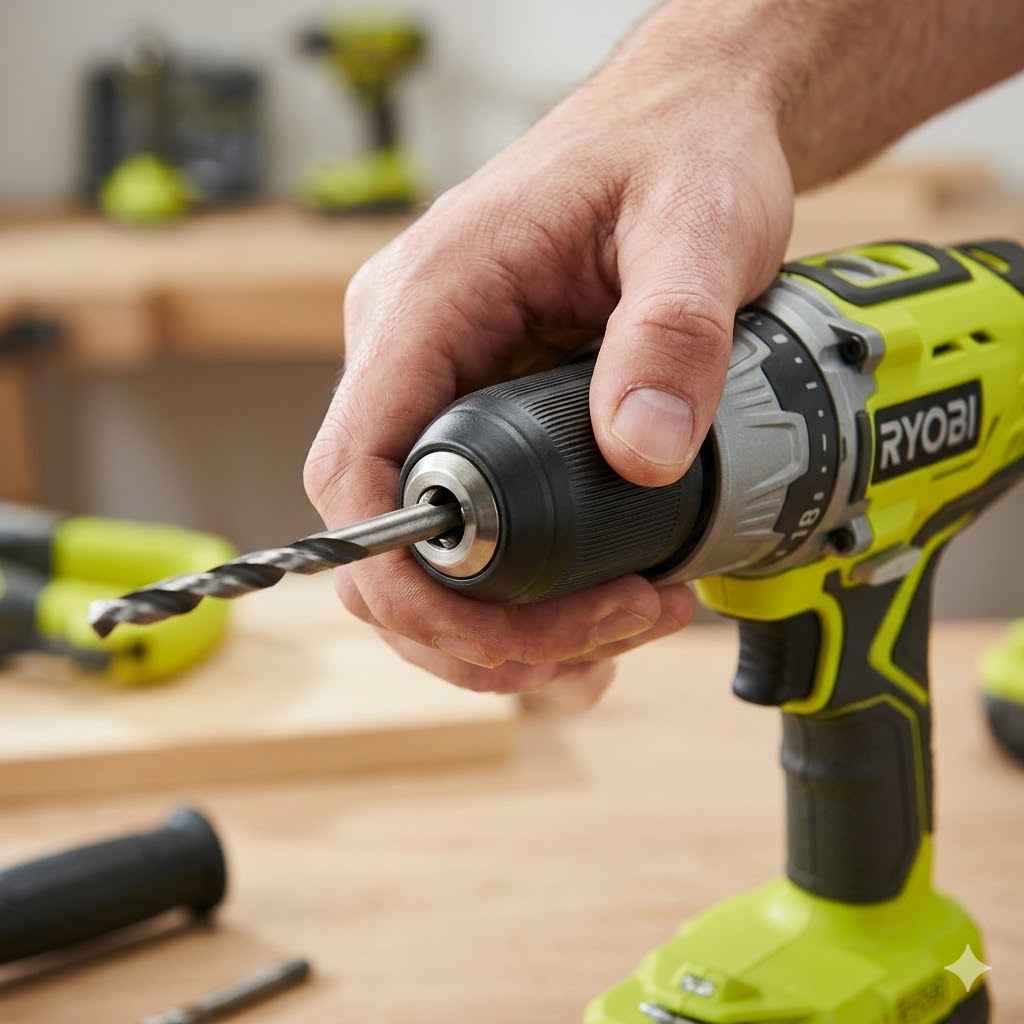
Choosing and Inserting the New Drill Bit
Now that the old bit is out, it’s time for the new one. What kind of bit do you need? That depends on your project.
Are you drilling into wood, metal, or drywall? Each material often needs a specific type of drill bit. Make sure your new bit is the right one for the job.
Also, check the shank of the bit. This is the part that goes into the chuck. Most bits have a round shank.
Some might have a hex shank, which is more common for screw driving bits. Your Ryobi chuck should accept most standard shank types.
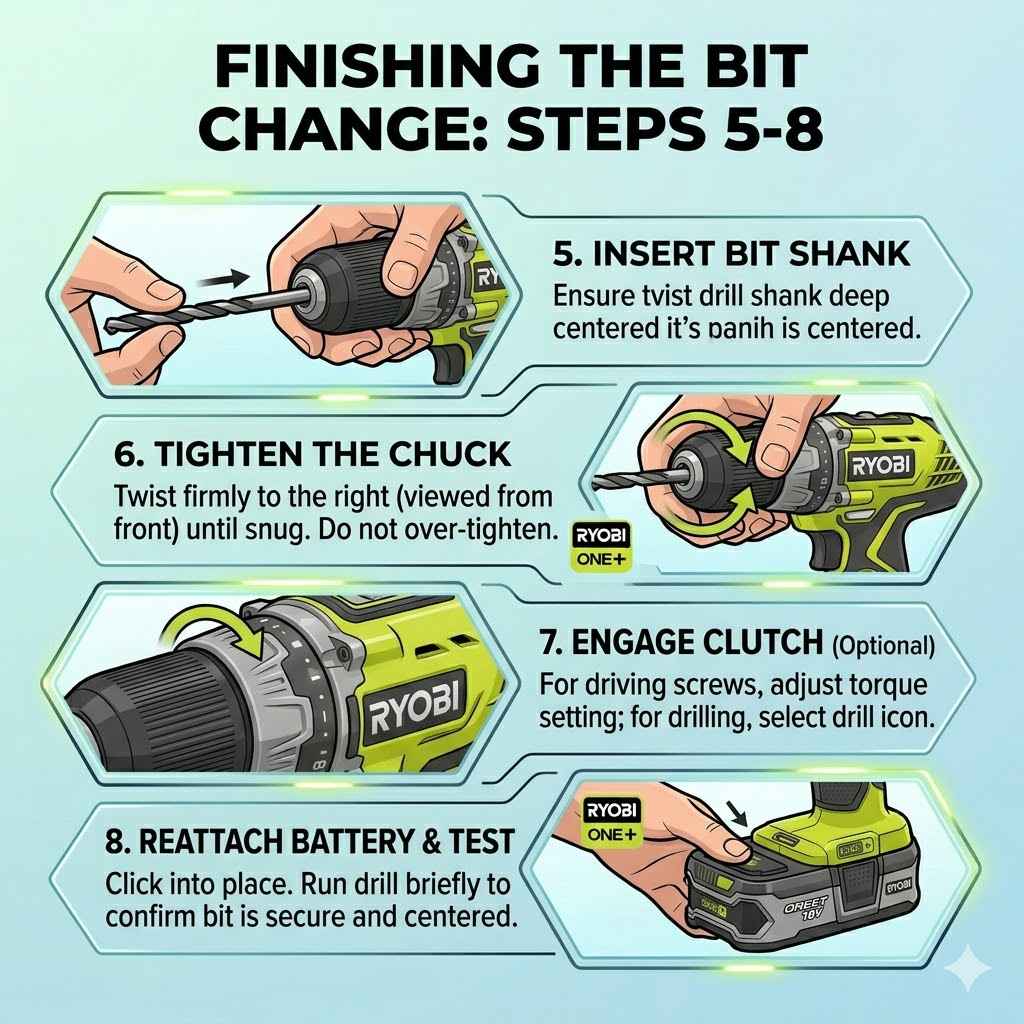
Hold the new drill bit by its shank, not the sharp end. Put the shank into the open jaws of the chuck. You want to push it in as far as it will comfortably go.
Make sure it’s sitting straight and centered within the jaws.
Once the bit is in place, you need to tighten the chuck. Grip the front collar of the chuck again. You’re going to turn it clockwise this time.
That’s the same direction you’d tighten a screw. As you turn, you’ll feel the jaws close in. They will grip the shank of the drill bit tightly.
Keep turning until the chuck feels snug. You want it to be tight enough so the bit won’t slip when you start drilling. But you don’t need to overtighten it with all your might.
Overtightening can damage the chuck or the bit. A firm, secure grip is what you’re after.
Many modern Ryobi drills have a mechanism that helps ensure the chuck is tight. Some might even click when they reach a good level of tightness. If yours does, listen for that click.
If not, just turn until it feels solid and the bit doesn’t move when you try to twist it by hand.
Insert and Tighten: Step-by-Step
1. Get New Bit: Choose the correct bit for your task.
2. Insert Shank: Place the bit’s shank into the open chuck jaws.
3. Center Bit: Make sure it’s straight and well-seated.
4. Grip Collar: Grab the chuck’s front collar again.
5. Twist Clockwise: Turn the collar to tighten the jaws around the bit.
6. Feel Snug: Tighten until the bit is secure and won’t slip.
When the Chuck Won’t Open or Close Properly
So, what if you’re trying to change a bit, and the chuck just won’t cooperate? This is where frustration really kicks in. You’ve removed the battery, you’re gripping it right, but the sleeve is either stuck fast or feels loose and floppy.
If the sleeve is stuck, it’s often due to grit, rust, or dried lubricant. Sometimes, a bit of gentle tapping with the handle of a screwdriver can help free it up. Don’t go banging it hard, though.
You don’t want to damage the internal gears of the chuck.
Another thing to try is using both hands to grip the chuck. One hand on the main chuck body and the other on the sleeve. Then, try to twist.
Sometimes, a stronger grip is all it needs. If it’s still stuck, you might need to look for some penetrating oil. Apply a small amount to the seam where the sleeve meets the body.
Let it sit for a few minutes, then try again.
On the flip side, if the chuck sleeve feels loose and the jaws don’t seem to grip the bit tightly, there might be an issue inside. The internal mechanism could be worn out, or something might have broken. If the bit slips during use, it’s not only annoying but also dangerous.
A slipping bit can ruin your work or even cause injury.
In cases where the chuck is significantly damaged or worn, it might need to be replaced. For many Ryobi 18V drills, the chuck is a replaceable part. You might be able to order a new one and install it yourself, or take it to a repair shop.
This is usually a more advanced task, so assess your comfort level.
Chuck Troubleshooting Tips
Stuck Sleeve:
- Gentle tapping with a soft hammer or screwdriver handle.
- Using penetrating oil on the seams.
- Applying more even pressure with both hands.
Loose Jaws / Bit Slipping:
- Ensure the bit is fully inserted and centered.
- Try a different drill bit to see if the problem persists.
- Check for obvious damage to the chuck jaws or sleeve.
- Consider chuck replacement if damage is apparent or it won’t grip securely.
Common Mistakes to Avoid
When you’re in the flow of a project, it’s easy to overlook small steps. But some common mistakes can make changing drill bits harder, or even cause damage. One of the biggest is forgetting to remove the battery.
I’ve already stressed this, but it’s worth repeating. Always disconnect power first.
Another mistake is not opening the chuck wide enough. If you try to jam a new bit into a partly open chuck, you’ll struggle. This can bend the bit or damage the chuck jaws.
Always open it up fully until the jaws are well out of the way.
Forgetting to tighten the chuck properly is also a biggie. If the bit isn’t gripped securely, it can wobble around. This makes drilling inaccurate.
Worse, it can cause the bit to fly out of the chuck mid-operation. That’s a serious safety hazard.
On the other hand, overtightening can strip the threads inside the chuck. This means it won’t be able to grip bits properly anymore. It’s about finding that sweet spot where the bit is held firmly but not excessively.
You don’t need superhuman strength to tighten it.
Finally, trying to force a bit that’s stuck can lead to broken parts. If a bit won’t come out easily, take a moment. Figure out why it might be stuck.
There’s usually a gentle way to get it free without breaking anything. Patience is key here.
Real-World Scenarios for Bit Changes
Think about different situations where you’ll be changing drill bits. For example, when you’re framing a deck, you might start with a long pilot bit to mark your holes. Then you’ll switch to a driver bit to put in lag screws.
You’ll do this many times, so efficiency matters.
In a workshop, you might be drilling a series of holes in a piece of furniture. You’ll start with a small bit, then maybe move to a spade bit for a larger hole, and then perhaps a countersink bit to prepare the surface for screw heads. Each change needs to be quick and secure.
Even simple home repairs often involve multiple bit changes. Installing new hinges might require drilling pilot holes with one bit, then switching to a driver bit for the screws, and possibly even a slightly larger bit if the screw holes are a bit too tight.
The design of modern drills, like your Ryobi 18V, is all about making these transitions as smooth as possible. The keyless chuck is a testament to that. It’s meant to be used frequently.
So, getting comfortable with it is part of being a confident DIYer.
Common Bit Change Tasks
Task: Hanging a picture
Bits Needed: Small pilot bit, screwdriver bit (Phillips or flathead)
Task: Assembling flat-pack furniture
Bits Needed: Various screwdriver bits (often Allen or Torx), possibly small pilot bit
Task: Building a fence post
Bits Needed: Long pilot bit, driver bit for lag screws, possibly a large auger bit
Task: Electrical work (e.g., installing an outlet)
Bits Needed: Various wood or metal bits for pilot holes, sometimes specialized bits
What This Means for You: When is it Normal?
Changing a drill bit on your Ryobi 18V should feel pretty straightforward. If the chuck opens and closes smoothly, and the bit stays put once tightened, that’s perfectly normal. You should be able to do this in just a few seconds.
When it’s normal, the chuck sleeve turns without much resistance. The jaws retract fully to allow the bit to slide out easily. When you tighten it, the jaws firmly grip the bit’s shank.
The bit will then spin true with the drill, without wobble.
It’s also normal for there to be a slight sound when you tighten the chuck, like a quiet grinding or clicking, as the jaws engage. What’s not normal is excessive noise, a feeling of grinding gears that won’t stop, or the chuck sleeve being completely immobile.
A bit of dust or debris can sometimes get into the chuck. This is normal. A quick blast of compressed air or a brush can usually clear it.
But if the chuck starts to feel gritty and rough all the time, it might need cleaning or maintenance.
Quick Tips for Smooth Bit Changes
Here are a few simple things you can do to make changing bits on your Ryobi 18V drill a breeze:
Keep it Clean: After each use, especially if you’ve been working in a dusty environment, give your chuck a quick brush or a puff of air. This prevents grit from building up.
Battery Safety: Seriously, always remove the battery pack before you touch the chuck. It’s the single most important safety step.
Right Bit for the Job: Using the correct drill bit for your material and task means less strain on the bit and the chuck. Don’t try to force a wood bit into metal, for instance.
Gentle Tightening: Tighten the chuck until it’s snug and the bit doesn’t move. You don’t need to crank it as hard as you can. A firm grip is enough.
Listen and Feel: Pay attention to how the chuck feels and sounds. If it starts making odd noises or feels rough, investigate it. It’s better to catch a small problem before it becomes a big one.
Store Bits Properly: Keep your drill bits organized in a case. This protects them from damage and makes it easier to find the one you need. It also means less chance of dirt getting on the shanks.
Smooth Bit Change Checklist
- Safety First: Battery removed.
- Open Wide: Chuck jaws opened fully counter-clockwise.
- Insert Straight: New bit shank centered and pushed in.
- Tighten Securely: Chuck collar turned clockwise until snug.
- Test Grip: Wiggle bit by hand to ensure it’s secure.
- Power On: Re-insert battery and proceed with drilling.
Frequently Asked Questions
How do I know if my Ryobi 18V drill has a keyless chuck?
Most modern Ryobi 18V drills come with a keyless chuck. You’ll be able to see a collar or sleeve at the front of the drill that you can twist by hand to open and close the jaws that hold the bit. You won’t see a place to insert a separate chuck key.
What happens if I overtighten the drill bit in the chuck?
Overtightening can strip the internal threads of the chuck. This means the chuck may no longer be able to grip drill bits securely. It can also damage the drill bit itself or the chuck jaws, leading to a need for repair or replacement.
Can I use a drill bit with a different shank type in my Ryobi chuck?
Your Ryobi 18V drill’s chuck is designed to accept standard drill bit shanks. Most common bits have round shanks, which fit perfectly. Some bits have hex shanks, which also usually fit securely in a keyless chuck.
As long as the shank fits within the jaws and can be gripped, it should work.
My drill bit is stuck, and I can’t get it out. What should I do?
First, ensure the battery is removed. Then, try gripping the chuck sleeve firmly and turning it counter-clockwise. If it’s still stuck, try gently wiggling the drill bit while you turn the chuck.
If that doesn’t work, you might need to use pliers to grip the bit’s shank and gently pull while turning the chuck. Avoid excessive force.
How often should I clean my drill chuck?
It’s a good practice to clean your drill chuck periodically, especially if you work in dusty environments. After each significant project, or if you notice grit building up, give it a quick brush or blow with compressed air. This helps maintain smooth operation and prevents premature wear.
Is it normal for the chuck to make noise when tightening a bit?
Yes, it’s normal for the chuck to make some noise, like a slight grinding or clicking sound, as the jaws engage and tighten onto the drill bit shank. This is the sound of the mechanism working. However, if the noise is very loud, harsh, or feels like gears are grinding excessively, it might indicate a problem.
Conclusion: Back to Your Projects
Changing a drill bit on your Ryobi 18V drill is a fundamental skill. By following these simple steps, you can do it safely and effectively every time. Remember to always disconnect the power, open the chuck wide, insert the new bit securely, and then tighten it firmly.
Getting this right means your projects will run smoother and you’ll stay safe. Now you’re ready to tackle whatever comes next!