Can You Use Self Leveler On Plywood? The Complete Answer
It’s a question many folks ask when fixing up floors. You’ve got a plywood subfloor, and it’s not quite flat. Maybe there are bumps or dips.
You’ve heard about self-leveling underlayment. It sounds like magic for making floors smooth. But can you actually use it on plywood?
Let’s find out. This stuff can really help, but it needs the right setup.
Self-leveling underlayment can be used on plywood subfloors if the plywood is properly prepared and meets certain requirements. Key steps include ensuring structural integrity, cleaning thoroughly, and using a suitable primer. It’s crucial to address any flexing or movement in the plywood first.
What is Self-Leveling Underlayment?
Self-leveling underlayment is a special cement-based mix. You add water to it. Then, you pour it onto your floor.
It’s designed to flow and spread out. It finds its own level. This creates a very flat and smooth surface.
It’s great for hiding small imperfections. It also makes a perfect base for things like tile, vinyl, or wood flooring.
Why is this so helpful? Because many subfloors aren’t perfectly flat. Wood subfloors, especially, can warp or sag over time.
Plywood is common in homes. It’s strong, but it can have issues. Small bumps, screw heads, or cupping can happen.
These make it hard to lay new flooring evenly. Uneven floors can lead to problems later. Your new flooring might creak.
It could even crack or wear out faster.
Self-leveling underlayment is like a liquid smoothing agent. It’s a powdered product. You mix it with water.
The consistency is important. It should be pourable but not too thin. It flows into low spots.
It also smooths over high spots. It hardens into a strong, level surface. This process makes your old subfloor new again.
It gives you a solid foundation for your next flooring layer.
My Own Plywood Floor Fiasco
I remember one project vividly. I was helping a friend update her kitchen. She had old, but sturdy, plywood subflooring.
It had seen better days. There were some noticeable low spots near the sink. Also, some old tile adhesive had been scraped off unevenly.
It looked like a miniature mountain range. She wanted to install beautiful new luxury vinyl plank (LVP) flooring. LVP looks amazing, but it needs a super flat base.
I looked at the plywood and thought, “This won’t work.” The dips were too deep for the LVP alone. My initial thought was to fill them with wood filler. But that would take forever.
And it might not be strong enough. Then I remembered self-leveling underlayment. I had used it before on concrete.
It worked like a charm. But on plywood? I wasn’t totally sure about the prep.
We decided to try it. The first step was critical. We had to make sure the plywood was solid.
No squeaks or bounces. We screwed down any loose spots. Then came the cleaning.
Dust is the enemy of self-leveler. We vacuumed and swept until our arms ached. The big worry was if the plywood would flex.
If it flexed, the self-leveler might crack later. That’s when I learned about the importance of a good primer.
When Can You Use Self-Leveler on Plywood?
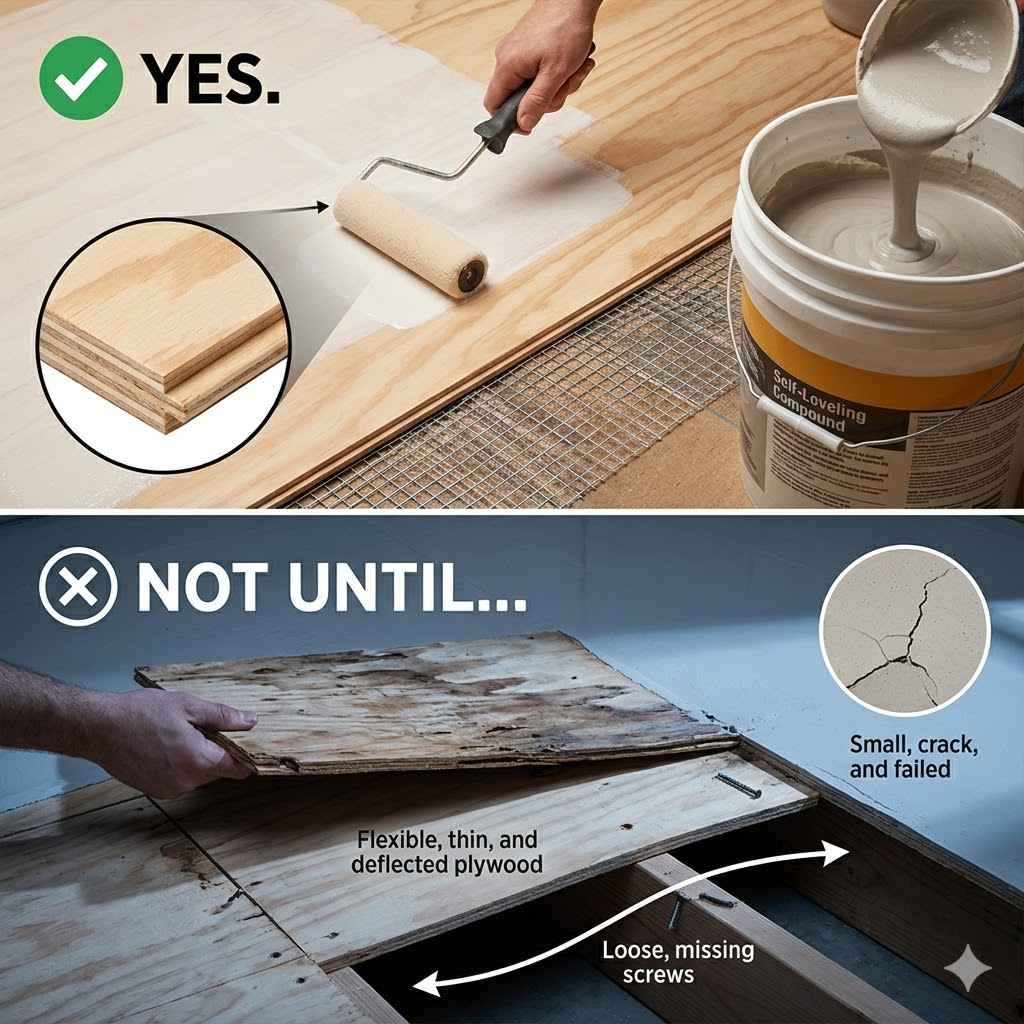
Using self-leveling underlayment on plywood is totally possible. But there are rules. You can’t just pour it over any old plywood.
First, the plywood itself must be sound. It needs to be a stable subfloor. This means it should be well-attached to the joists.
There should be no major damage, like rot or delamination. If the plywood is loose, you must fix it. Screw it down securely.
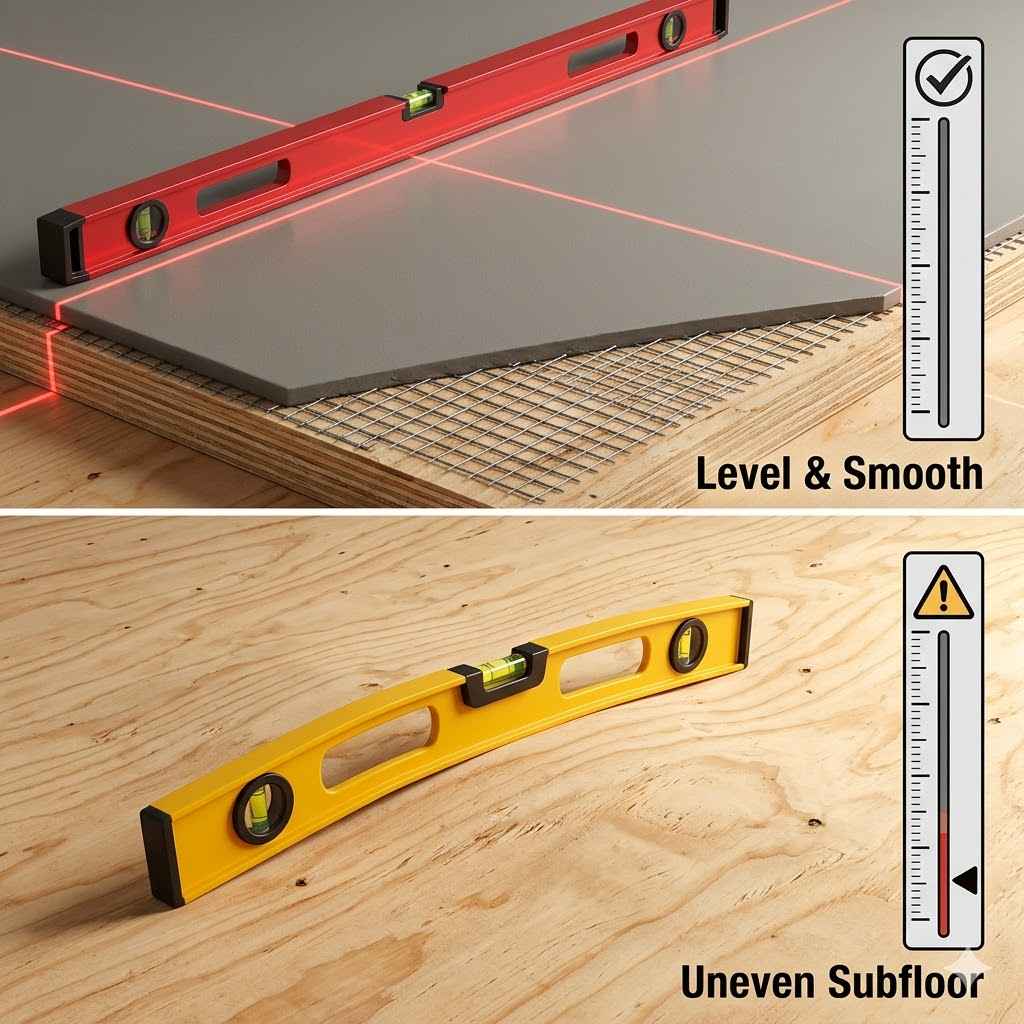
Plywood subfloors can sometimes flex. This is a big problem for self-leveler. The underlayment needs a rigid base.
If the plywood bends too much when you walk on it, the self-leveler can crack. Most manufacturers say the subfloor shouldn’t deflect more than a certain amount. This is often related to the joist spacing and the thickness of the plywood.
You might need to add more support underneath. Or use a thicker plywood. Some newer types of self-leveler are more flexible.
Check the product specs.
Another crucial point is moisture. Plywood can be affected by water. If there’s a moisture issue, you need to fix it first.
Self-leveling underlayment doesn’t stop water. It’s a cementitious product. It can be damaged by prolonged dampness.
Make sure the area is dry. And will stay dry. In bathrooms or basements, extra care is needed.
Preparing the Plywood Subfloor
This is where most people make mistakes. Proper prep is the key to success. If you skip these steps, your new level floor might fail.
It can crack. It might not stick well. Or it could just not be flat enough.
The very first thing to do is clean. And I mean really clean. Dust, dirt, grease, old glue – it all has to go.
Use a stiff brush and a shop vacuum. Get into every corner. If there are old adhesives or coatings, you might need to scrape them off.
Or even grind them down a bit. The surface needs to be bare and clean for the primer to work.
Next, check for any high spots. Nail heads sticking up? Screw heads not flush?
Gouges or bumps? You need to deal with these. You can often hammer down nails or drive screws a bit deeper.
For higher spots, you might need to sand them down. Or use a concrete patch. You want a generally smooth surface before you add the self-leveler.
Now, for the dreaded gaps. Plywood subfloors often have small gaps between sheets. Or at the edges.
These gaps can let the self-leveler leak through. Especially if they are large. You need to seal these.
Use a good quality caulk or gap filler. Make sure it’s flexible. This stops the self-leveler from draining away.
It also gives the material something solid to bond to.
Before you mix anything, you need to know if you need a primer. Most self-leveling underlayments require a special primer. This primer does a few things.
It helps the underlayment stick to the plywood. It also seals the wood. This stops the wood from sucking the water out of the mix too fast.
This is super important for the self-leveling action. Without it, the water drains away too quickly. The mix hardens before it can level.
Use the primer recommended by the underlayment manufacturer.
Apply the primer evenly. Follow the product’s instructions. You might need one coat or two.
Let it dry completely. Some primers are clear. Others are colored.
Make sure there are no puddles. Just a thin, even coat. This whole prep stage might seem like a lot of work.
But it’s the most important part. Don’t rush it.
Plywood Prep Checklist
Structural Soundness:
- Check for loose or squeaky boards.
- Secure all boards to joists with screws.
- Ensure no signs of rot or water damage.
Surface Preparation:
- Remove all debris, dust, and dirt.
- Scrape off old adhesives or coatings.
- Level high spots (nails, screws, patches).
Gap Filling:
- Seal all gaps between plywood sheets.
- Seal edges where plywood meets walls.
- Use a flexible caulk or filler.
Priming:
- Apply the manufacturer-recommended primer.
- Ensure even coverage without puddles.
- Allow primer to dry completely.
Choosing the Right Self-Leveling Underlayment
Not all self-leveling products are the same. You need to pick one that works for plywood. Some are made for concrete only.
Others are good for wood. Read the product label carefully. It will tell you what surfaces it can be used on.
For plywood, you want a product that bonds well to wood. It also needs to be strong enough. And able to handle a little bit of movement if it can’t be totally eliminated.
Some underlayments are designed for specific types of flooring. For example, if you’re putting down thin vinyl, you need a very smooth surface. If you’re tiling, you need a strong, durable base.
Check the compatibility with your final flooring.
Consider the thickness. Some underlayments are thin. They are good for minor leveling.
Others can be poured much thicker. They can fill deeper low spots. You need to know how deep your dips are.
Then choose a product that can handle that depth. Some products require a mesh reinforcement for thicker pours. Make sure you understand these requirements.
Another factor is the drying time. Some self-levelers dry very fast. This means you have a short window to work.
Others take longer. This can be helpful if you’re new to the process. It gives you more time to spread it.
Always check the manufacturer’s instructions. They will give you a clear timeline for mixing, pouring, setting, and when you can walk on it or install flooring.
Quick-Scan: Underlayment Choice Factors
| Factor | What to Look For |
| Substrate Compatibility | Must state suitability for plywood. |
| Bonding Strength | Good adhesion to wood is vital. |
| Flexibility | Slight flexibility helps with minor wood movement. |
| Pour Depth | Matches the depth of your floor’s low spots. |
| Drying Time | Choose based on your comfort level and schedule. |
| Final Flooring Compatibility | Works with your chosen tile, vinyl, wood, etc. |
The Application Process: Step-by-Step
Okay, you’ve prepped. You’ve got your underlayment and primer. It’s time to mix and pour.
This part goes fast. You need to be organized. Have everything ready before you open the bag.
First, seal off the room. Use painter’s tape around the base of the walls. This prevents the self-leveler from running where you don’t want it.
Some people use a foam dam or tape around doorways. You want to contain the material. Make sure doors are closed or blocked from opening inwards into the wet mix.
Next, calculate how much you need. Read the bag. It will tell you the coverage rate per bag for a certain thickness.
Measure your room. Figure out the square footage. Then estimate the average depth you need to fill.
It’s always better to have a little extra than to run out mid-pour. Running out means you’ll have a seam. And that’s not good.
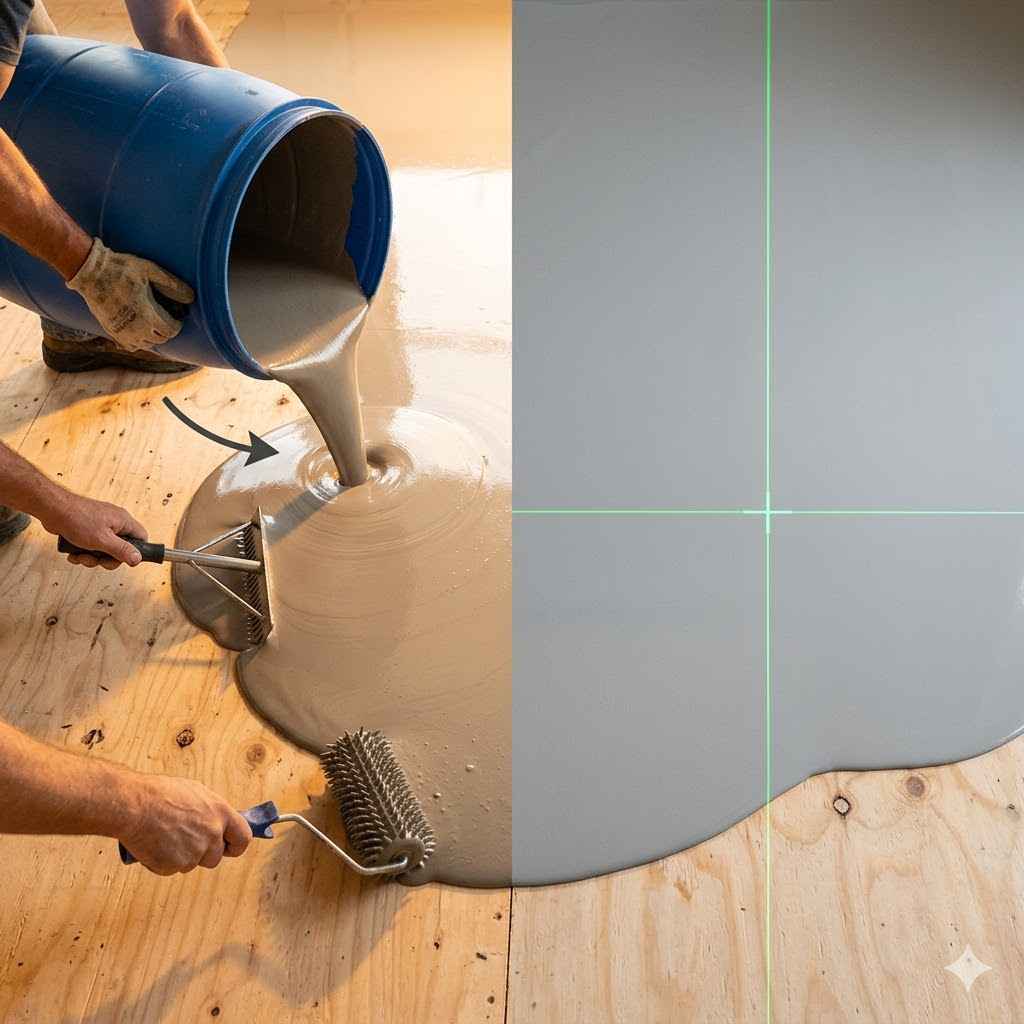
Now, mixing. This is crucial. Use a large mixing bucket.
A 5-gallon bucket is standard. Get a good mixing paddle that attaches to a drill. Follow the water ratio exactly.
Too much water makes it weak. Too little water makes it hard to flow. Add the powder to the water, not the other way around.
Mix for the time specified on the bag. Usually about 2-3 minutes. Don’t overmix.
That can introduce too much air.
You need to work quickly. Once mixed, the material starts to set. You’ll likely need a helper.
One person mixes while the other pours and spreads. Pour the mixed material onto the floor. Start in the lowest area or corner.
Don’t pour it all in one spot. Spread it out. You can use a squeegee or a smoother to help guide it.
The material itself will do most of the leveling.
As you pour more batches, work them together. Overlap the edges slightly. This helps create a seamless surface.
Keep an eye on the flow. If it’s not spreading well, you might have used too little water, or the primer isn’t effective. If it’s spreading too thin, you might have used too much water.
Try to maintain a consistent pour.
After pouring and spreading, let it set. Do not touch it. Do not walk on it.
Follow the drying times on the bag. This can range from a few hours to a full day. The surface will be hard.
You can then remove the tape. You might need to do some light sanding on any rough edges or tiny imperfections. But ideally, it should be very smooth.
Application Time-Savers
- Team Up: Have at least one helper.
- Pre-Measure Water: Have all water ready for each batch.
- Organize Tools: Buckets, drill, mixer, squeegee, tape all within reach.
- Work from Back to Front: Pouring towards your exit.
- Consistent Mixing: Follow water ratios and mix times exactly.
When is Plywood NOT a Good Base?
While you can use self-leveler on plywood, it’s not always the best solution. Sometimes, the plywood subfloor has issues that self-leveling can’t fix. Or it might be more trouble than it’s worth.
One big red flag is structural weakness. If your plywood subfloor is old and has started to rot, self-leveling won’t make it strong. It needs to be replaced.
The same goes for severely warped or cupped plywood. You might be able to sand down minor cupping. But severe cases need replacement.
Excessive movement is another problem. If the subfloor bounces or flexes a lot when you walk on it, the self-leveling compound will likely crack. This is common with older homes or when joists are spaced too far apart for the plywood thickness.
Adding extra bracing or thicker plywood might be needed. But if that’s too much work, it’s a sign to reconsider the self-leveler.
Moisture is a deal-breaker. If you have persistent dampness or leaks, self-leveler won’t fix it. Water can damage the underlayment.
It can also make the plywood itself unstable. You need to address the source of moisture first. This might mean fixing plumbing, improving drainage, or adding a vapor barrier.
Very large dips or very uneven surfaces can also be an issue. While some self-levelers can fill deep voids, there are limits. For extremely uneven floors, pouring enough self-leveler to fix it might become very expensive.
It might also be a structural concern. In these cases, other solutions might be better. Like adding new underlayment boards or replacing sections of the subfloor.
Finally, consider the cost and effort. If the subfloor requires extensive repair before you can even apply the self-leveler, it might be cheaper and faster to just replace the plywood. It’s a judgment call based on the condition of your specific floor.
Red Flags for Plywood Subfloors
Structural Issues:
- Rot or water damage.
- Severe warping or cupping.
- Loose or squeaky boards that can’t be secured.
Excessive Movement:
- Floor flexes significantly when walked on.
- Joist spacing is too wide for plywood thickness.
Moisture Problems:
- Persistent dampness.
- Active leaks.
- No proper moisture barrier.
Extreme Unevenness:
- Very deep, widespread low spots.
- Large, irregular high spots.
What Happens If You Don’t Prepare Correctly?
Let me tell you, I’ve seen what happens. It’s not pretty. And it’s a lot more work to fix later.
The most common problem is cracking. If the plywood flexes too much, or if the self-leveler didn’t bond properly, you’ll get cracks. These can be hairline cracks.
Or they can be big, ugly fissures.
Another issue is peeling or delamination. If the primer wasn’t used, or if the surface was dusty, the self-leveler might just lift off. It won’t stick to the plywood.
You’ll find loose pieces. This is a total failure. You have to scrape it all up and start over.
Which is a huge pain.
You might also end up with an uneven surface, ironically. If you didn’t seal the gaps properly, the self-leveler could drain through. This leaves holes or uneven patches.
Or if the mix was wrong, it might not have flowed correctly. It could set with waves or ridges. Not the smooth finish you wanted.
Sometimes, the new flooring laid on top will show the problems. Even with self-leveler, if there are underlying issues, they can show through. For example, if the subfloor flexes, your vinyl planks might start to separate at the seams.
Or tile grout might crack.
The biggest lesson here is that self-leveling underlayment is not a fix-all for a bad subfloor. It’s a smoothing agent. It needs a good, solid base to work on.
Trying to cut corners on prep is like building a beautiful house on a shaky foundation. It’s bound to collapse eventually.
What This Means for Your Project
So, can you use self-leveler on plywood? Yes, but only under the right conditions. It’s a great tool when your plywood subfloor is structurally sound.
And when it’s clean and stable enough to provide a firm base.
When it’s normal to use it: You have a solid plywood subfloor with minor imperfections. There are small dips, some unevenness from old flooring, or minor trowel marks. You want a perfectly smooth surface for LVP, tile, or engineered wood.
You are willing to do the thorough prep work: cleaning, sealing, and priming.
When you should worry: Your plywood subfloor is soft, feels bouncy, or has visible damage like rot. There are large gaps between the plywood sheets. You suspect significant moisture issues.
The subfloor flexes noticeably when you walk on it. In these cases, self-leveling might not be the best or only solution. You may need to repair or replace the plywood first.
Simple checks you can do: Walk all over the floor. Listen for squeaks. Push down on boards to feel for flex.
Look for any signs of water damage. Check if seams between plywood sheets are tight. If you have any doubts, it’s always better to consult with a flooring professional.
Remember, self-leveling underlayment is designed to make a good subfloor perfect. It’s not a magical solution to fix a fundamentally bad one. Invest the time in proper preparation.
It will save you headaches and money down the road. Your final floor will thank you for it.
Quick Fixes and Tips for Plywood
While this article focuses on the process, here are a few quick tips for using self-leveler on plywood:
Use the Right Primer: Always use the primer recommended by the self-leveler manufacturer. It’s designed to bond the underlayment to the specific surface. Don’t skip this step.
Don’t Skimp on Mixing: Accurate water measurement is critical. Use a good mixing paddle and drill. Mix for the recommended time.
Poor mixing leads to poor results.
Work Fast: Self-leveler has a limited working time. Have all your tools and materials ready. Work with a partner if possible.
Seal Edges and Gaps: Ensure all potential leaks are sealed. This prevents material loss and ensures a solid, level pour.
Thicker Plywood is Better: If you are building a new subfloor or replacing old plywood, opt for thicker sheets (e.g., 3/4 inch) and ensure joists are spaced appropriately (typically 16 inches on center). This reduces flex.
Consider Reinforcement: For thicker pours, some manufacturers require or recommend reinforcing mesh. Check the product data sheet.
Ventilation is Key: Ensure good ventilation while working and during the drying period. This helps the underlayment cure properly and dissipates fumes.
Frequently Asked Questions
Can I pour self-leveling underlayment directly over old vinyl flooring glued to plywood?
Generally, no. You must remove the old vinyl flooring. Any old adhesive must also be removed or properly treated.
The self-leveling underlayment needs to bond directly to the plywood subfloor. Check the underlayment manufacturer’s specific guidelines, as some might allow certain types of stable, well-adhered vinyl if properly prepared and primed, but removal is the safest bet.
How thick can I pour self-leveling underlayment on plywood?
The maximum pour thickness depends on the specific product. Many standard self-leveling underlayments can be poured from a feather-edge up to 1 inch. Thicker pours might require reinforcement like a fiberglass mesh.
Always check the product’s technical data sheet for its specific limitations and recommendations regarding pour depth on wood subfloors.
What happens if the plywood subfloor is not perfectly flat to begin with?
Self-leveling underlayment is designed to fix minor imperfections and create a smooth, level surface. If the plywood is significantly out of level or has large dips and humps, the underlayment will try to fill them. However, extremely uneven surfaces might require multiple pours or a thicker underlayment.
It’s crucial to address any structural issues or excessive cupping in the plywood first.
Do I need a special primer for self-leveling underlayment on plywood?
Yes, almost always. Plywood is porous and can absorb moisture from the self-leveling mix, causing it to cure too quickly and not flow properly. A primer seals the wood, improves adhesion, and helps achieve a smooth, level finish.
Always use the primer recommended by the self-leveling underlayment manufacturer for best results.
How long does self-leveling underlayment take to dry on plywood before I can install flooring?
Drying time varies by product and conditions like temperature and humidity. Most self-leveling underlayments are ready for flooring installation within 16 to 24 hours. Some faster-setting products might be ready in as little as 4 hours.
Always refer to the manufacturer’s instructions for the specific drying and curing times. Avoid walking on it until it’s sufficiently hardened.
Can I use self-leveling compound if my plywood subfloor has slight squeaks?
Ideally, all squeaks should be addressed before applying self-leveling underlayment. Squeaks indicate movement between the plywood and the joists. This movement can cause the self-leveling compound to crack over time.
Secure the plywood by adding screws to eliminate any squeaking sounds. Self-leveler is best applied to a completely stable subfloor.
Conclusion
Using self-leveling underlayment on plywood subfloors is a viable and often excellent way to achieve a perfectly flat surface. The key to success lies in meticulous preparation. Ensure your plywood is structurally sound, clean, and properly primed.
When done right, it transforms your subfloor into a premium base for any type of flooring you choose. It’s a process that demands attention to detail, but the rewarding, smooth finish is well worth the effort.